目录
第六步,配置Tomcat插件或者使用本地Tomcat进行测试
总结一下Spring与Mybatis的结合6.19(第二次)
要实现Mybatis首先我们先生成一个与数据库对应的pojo类(不要忘记序列化)
第二步生成对应的Mapper接口,来定义一个操作数据库的方法
Spring整合mybatis的入门案例也完成了,感谢大家的观看
一、三层框架和MVC
model1模式介绍
这种模式比较简单,页面显示,控制分发,业务逻辑,数据访问全部通过Jsp去实现
model2模式介绍
这种模式通过两部分去实现,即Jsp与servlet。Jsp负责页面显示,servlet负责控制分发, 业务逻辑以及数据访问。
MVC模式的介绍
MVC模式分为三大块,即视图(View),控制器(Control),模型(Model),视图是Jsp负责的页面显示,控制器是servlet负责的控制分发,
模型包括service和dao两部分分别负责业务逻辑和数据访问。
三种模型的对比
Model1 模式的优缺点:
优点:架构简单,比较适合小型项目开发
缺点:JSP 职责不单一,职责过重,不便于维护
Model2 模式的优缺点:
优点:职责清晰,较适合于大型项目架构
缺点:不适合小型项目开发
MVC模式的优缺点:
优点:分工明确,各司其职,互不干涉。适用于大型项目架构,有利于组件的重构
缺点:增加了系统开发的复杂度
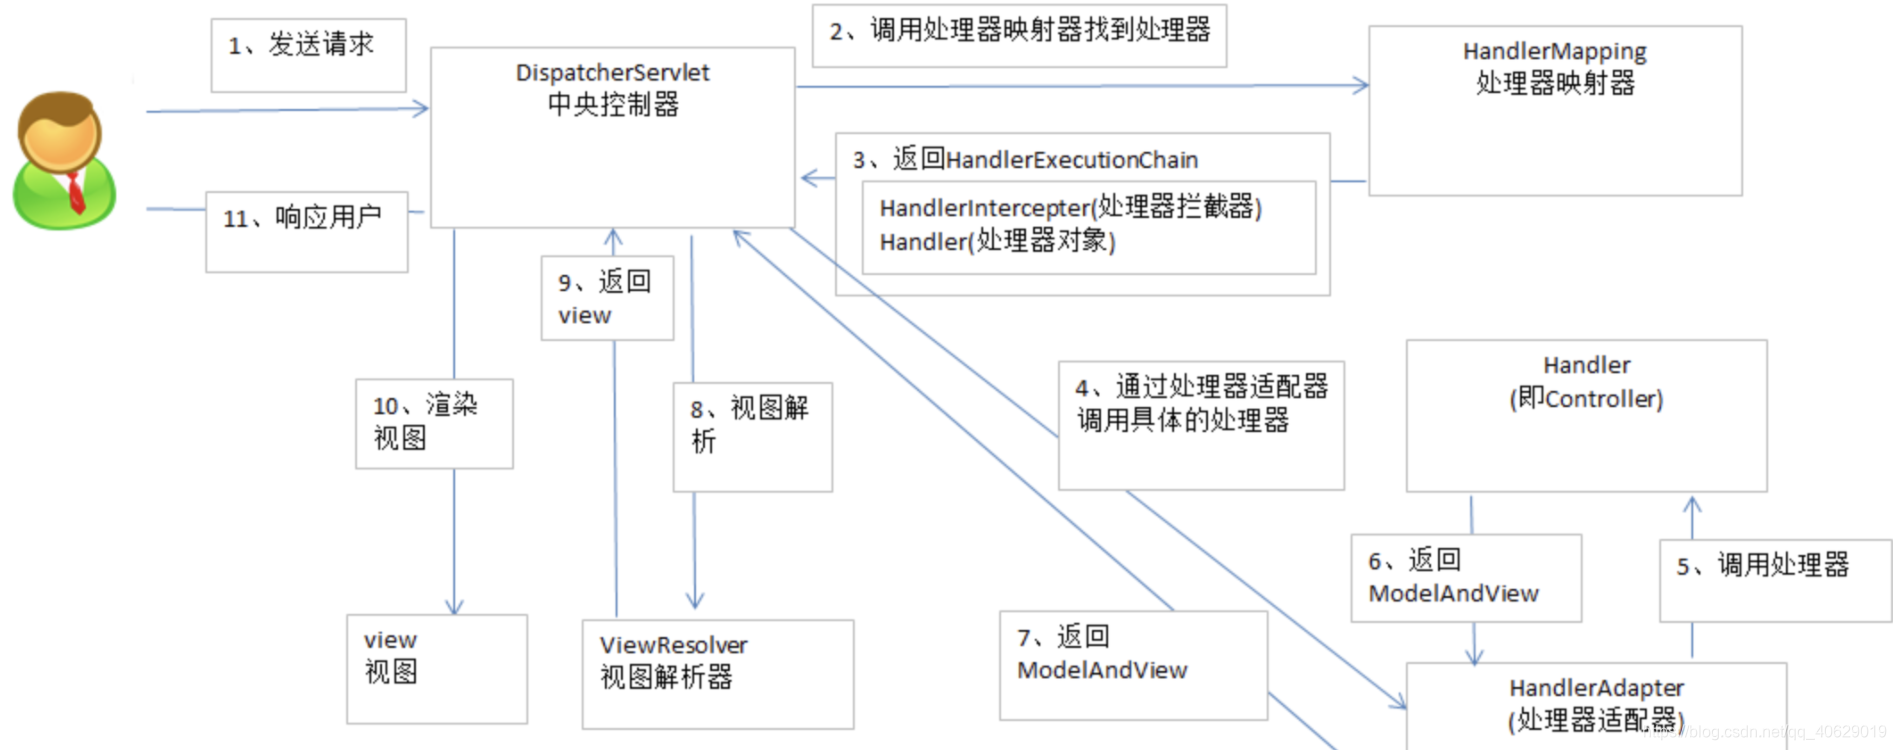
SpringMVC的图解

二、SpringMVC的概述
SpringMVC是什么
springmvc是基于java实现了MVC设计模式的轻量级web框架,通过把Model,View,Controller分离,将web层职责解耦,把复杂的web划分清晰简化了程序员的开发,减少出错,方便各部门分工合作
MVC思想的实现: Struts1(apache), webwork(webwork), webwork--->apache(struts2)--->SpringMVC
SpringMVC在三层架构中位于表现层,用来接收请求响应的数据,响应的数据通过视图、模版展示给用户。
SpringMVC的优势(面试题)
1.对角色的划分非常清晰
  前端控制器DispatcherServlet
  请求器处理器映射RequestMappingHandlerMapping
  处理器适配器RequstMappingHandlerAdapter
  视图解析器InternalResourceViewResolver
  处理器或页面控制器(Controller)
  验证器(Validator)
  命令对象(Command 请求参数绑定到的对象就叫命令对象)
  表单对象(Form Object 提供给表单展示和提交到的对象就叫表单对象)
2.分工明确,有很好的扩展性
3.由于命令对象就是一个pojo,无需继承特定的框架API可以使用命令对象直接作为业务处理的对象。
4.和Spring的其他框架可以无缝结合,是其他的web框架所不具备的
5.可适配,通过HandlerAdapter,可以支持任意的类作为处理器
6.可定制性,HandlerMapper,ViewResolver能够非常简单的定制
7.功能强大的数据验证、格式化、绑定机制
8.利用 Spring 提供的 Mock 对象能够非常简单的进行 Web 层单元测试。
9.本地化、主题的解析的支持,使我们更容易进行国际化和主题的切换。
10.强大的 JSP 标签库,使 JSP 编写更容易。
………………还有比如RESTful风格的支持、简单的文件上传、约定大于配置的契约式编程支持、基于注解的零配
置支持等等。
自己总结Spring的书写步骤
第一步先导入相关的依赖
需要的依赖有Spring-webmvc、Spring-web、Spring-context
<dependency>
            <groupId>org.springframework</groupId>
            <artifactId>spring-webmvc</artifactId>
            <version>5.1.7.RELEASE</version>
        </dependency>
        <dependency>
            <groupId>org.springframework</groupId>
            <artifactId>spring-web</artifactId>
            <version>5.1.7.RELEASE</version>
        </dependency>
        <dependency>
            <groupId>org.springframework</groupId>
            <artifactId>spring-context</artifactId>
            <version>5.1.7.RELEASE</version>
        </dependency>
第二步将工程转换为web工程,配置web.xml
web.xml文件中配置自己的核心控制器DispatcherServlet(起到分配任务的作用,枢纽)
  <servlet>
    <servlet-name>springmvc</servlet-name>
    <!--  第一步:配置核心控制器DispatcherServlet-->
    <servlet-class>org.springframework.web.servlet.DispatcherServlet</servlet-class>
     <!-- init初始化,导入全局配置文件的位置-->
    <init-param>
      <param-name>contextConfigLocation</param-name>
      <param-value>classpath:spring/springmvc-people.xml</param-value>
    </init-param>
  </servlet>
    <!--设置DispatcherServlet的拦截路径,在这里需要注意一个问题-->
    <servlet-mapping>
    <servlet-name>springmvc</servlet-name>
    <url-pattern>*.do</url-pattern>
  </servlet-mapping>
        <!--  首先加载的,首页-->
  <welcome-file-list>
    <welcome-file>index.jsp</welcome-file>
  </welcome-file-list>
在设置DispatcherServlet的拦截路径的时候需要注意一个问题
我们自己写的DispatcherServlet的拦截路径如果为"/"则会覆盖servlet默认的defaultServlet的拦截路径,导致默认的处理失效,但是自己写的DispatcherServlet并不能处理html文件等,所以会报404错误,因为jsp文件servlet单独写了一个配置,所以jsp文件默认的servlet能够拦截处理到,为了解决这个问题我们需要将拦截路径设置的与defaultServlet不一致,strut1和strut2一般用".do"和".action"作为拦截路径,所以我们选用".do"作为拦截路径,只拦截".do"的路径交给我们自己写的DispatcherServlet处理,其他的页面什么的交给默认的defaultServlet处理,就可以解决这个问题
第三步我们配置Springmvc的配置文件
第一步别忘了加注释的扫描,使用context标签之前别忘了在头上加入context约束
<context:component-scan base-package="com.ujiuye"/>这配置文件中需要配置的第一个为处理器映射器RequestMappingHandlerMapping
<bean class="org.springframework.web.servlet.mvc.method.annotation.RequestMappingHandlerMapping"></bean>第二个配置处理器适配器RequestMappingHandlerAdapter
<bean class="org.springframework.web.servlet.mvc.method.annotation.RequestMappingHandlerAdapter"></bean>第三个配置视图器解析器InternalResourceViewResolver,拼接路径
   <bean class="org.springframework.web.servlet.view.InternalResourceViewResolver"
          id="internalView">
        <!-- 路径前缀 -->
        <property name="prefix" value="/" />
        <!-- 路径后缀 -->
        <property name="suffix" value=".jsp" />
    </bean>
为了简化书写,省略书写处理器映射器和处理器适配器我们可以书写
<mvc:annotation-driven />第四步生成Controller类
//一级地址
//@RequestMapping("/people")
//@Controller这个注解是将视图层类放入SpringIOC容器中
@Controller
public class PeopleController {
//二级地址
@RequestMapping("/showInfo1.do")
//一旦controller处理完成客户请求,返回一个ModelAndView给DispatcherServlet前端控制器,ModelAndView中包含了Model和View
public ModelAndView showInfo(){
System.out.println("我是一个控制器方法成功执行了=======");
ModelAndView modelAndView = new ModelAndView();
//方法执行成功后将要跳转到的页面
modelAndView.setViewName("success");
return modelAndView;
}
}第五步,配置执行成功后跳转的jsp页面和首页
<a href="showInfo1.do">点我</a>第六步,配置Tomcat插件或者使用本地Tomcat进行测试
配置Tomcat的插件需要导入的依赖
<plugins>
            <!-- tomcat插件控制 -->
            <plugin>
                <groupId>org.apache.tomcat.maven</groupId>
                <artifactId>tomcat7-maven-plugin</artifactId>
                <version>2.2</version>
                <configuration>
                    <!--端口控制-->
                    <port>8080</port>
                    <!--项目路径控制意味着http://localhost:8080/abc-->
                    <path>/abc</path>
                    <!--编码-->
                    <uriEncoding>UTF-8</uriEncoding>
                </configuration>
            </plugin>
        </plugins>
使用maven工程,先clean,然后Install,最后使用Tomcat插件的Run
到此SpringMVC的入门案例就完成了,so简单
总结一下Spring与Mybatis的结合6.19(第二次)
Spring和Mybatis结合后就是Mybatis将插件交给Spring来控制,从而可以简化了Mybatis的核心配置文件ApplicationContext.xml
要实现Mybatis首先我们先生成一个与数据库对应的pojo类(不要忘记序列化)
package com.ujiuye.pojo;
import java.io.Serializable;
public class People implements Serializable {
private Integer id ;
private String name;
private Double money;
public People(Integer id, String name, Double money) {
this.id = id;
this.name = name;
this.money = money;
}
public People() {
}
public Integer getId() {
return id;
}
public void setId(Integer id) {
this.id = id;
}
public String getName() {
return name;
}
public void setName(String name) {
this.name = name;
}
public Double getMoney() {
return money;
}
public void setMoney(Double money) {
this.money = money;
}
@Override
public String toString() {
return "People{" +
"id=" + id +
", name='" + name + '\'' +
", money=" + money +
'}';
}
}第二步生成对应的Mapper接口,来定义一个操作数据库的方法
package com.ujiuye.mapper;
import com.ujiuye.pojo.People;
import java.util.List;
public interface PeopleMapper {
public int updateMoney(People people);
}第三步,配置对应Mapper接口的xml文件书写sql语句
在Resource包中可以进行分层,将mybatis和Spring分开,再将Mapper和mybatis的核心配置文件分开
<?xml version="1.0" encoding="UTF-8"?>
<!DOCTYPE mapper PUBLIC "-//mybatis.org//DTD Mapper 3.0//EN" "http://mybatis.org/dtd/mybatis-3-mapper.dtd">
<mapper namespace="com.ujiuye.mapper.PeopleMapper">
    <insert id="updateMoney" parameterType="People">
        insert  people(id,name,money) values(#{id},#{name},#{money})
    </insert>
</mapper>
第四步,生成service接口和实现类,调用Mapper
//接口
package com.ujiuye.service;
import com.ujiuye.pojo.People;
public interface PeopleService {
public boolean updateMoney(People people);
}
//实现类
package com.ujiuye.service;
import com.ujiuye.mapper.PeopleMapper;
import com.ujiuye.pojo.People;
import org.springframework.stereotype.Service;
import javax.annotation.Resource;
@Service
public class PeopleServiceImpl implements PeopleService{
@Resource
private PeopleMapper peopleMapper;
@Override
public boolean updateMoney(People people) {
return peopleMapper.updateMoney(people)>0;
}
}
第五步,配置Spring的核心配置文件
第一步先加入注解的扫描
<context:component-scan base-package="com.ujiuye"></context:component-scan>第二步引入外部配置文件jdbc.properties来给数据源赋值
<context:property-placeholder location="classpath:jdbc.properties"></context:property-placeholder>第三步引入数据源,使用到了DriverMangerDataSource这个工具类
    <bean name="dataSource" class="org.springframework.jdbc.datasource.DriverManagerDataSource">
<!--        给工具类里的属性赋值-->
        <property name="driverClassName" value="${jdbc.driverClassName}"></property>
        <property name="url" value="${jdbc.url}"></property>
        <property name="username" value="${jdbc.username}"></property>
        <property name="password" value="${jdbc.password}"></property>
    </bean>
第四步引入SqlSessionFactory工厂,使用到了SqlSessionFactoryBean这个工具类
    <bean name="sqlSessionFactory" class="org.mybatis.spring.SqlSessionFactoryBean">
<!--        这个工具类需要一个数据源-->
        <property name="dataSource" ref="dataSource"></property>
<!--        引入别名的属性,扫描pojo包-->
        <property name="typeAliasesPackage" value="com.ujiuye.pojo"></property>
<!--        引入Mapper映射接口的地址-->
        <property name="mapperLocations" value="classpath:mybatis/mapper/*Mapper.xml"></property>
<!--        引入分页-->
     </bean>
第五步引入Mapper,配置Mapper的扫描
    <bean id="mapperScan" class="org.mybatis.spring.mapper.MapperScannerConfigurer">
<!--        指定工厂的名字,需要的是value字符串-->
        <property name="sqlSessionFactoryBeanName" value="sqlSessionFactory" ></property>
<!--        指定了包,能生成接口的实现类-->
        <property name="basePackage" value="com.ujiuye.mapper"></property>
    </bean>
第六步加入事务的控制,使用到了tx标签,不要忘记在头上加入tx的约束哦
 <bean name="tx" class="org.springframework.jdbc.datasource.DataSourceTransactionManager">
<!--        给事务管理加入数据源属性赋值-->
        <property name="dataSource" ref="dataSource"></property>
    </bean>
<!--    开启事务的注解-->
    <tx:annotation-driven transaction-manager="tx"></tx:annotation-driven>
第六步,书写测试类进行测试
//@RunWith注解的作用是让测试运行于Spring测试环境,以便在测试开始的时候自动创建Spring的应用上下文
@RunWith(SpringJUnit4ClassRunner.class)
//@ContextConfiguration这个注解是来标注我们想要导入这个测试类的某些bean
@ContextConfiguration(locations ="classpath:spring/springContext.xml")
public class MyTest {
//从Spring容器中拿出PeopleService对象
@Resource
private PeopleService peopleService;
//测试增加方法
@Test
public void update(){
//现身成修改的对象
People people = new People();
people.setName("geigei");
people.setMoney(10000.0);
boolean b = peopleService.updateMoney(people);
if (b){
System.out.println("添加用户成功");
}else {
System.out.println("添加用户失败");
}
}
}Spring整合mybatis的入门案例也完成了,感谢大家的观看


 1304
1304


 被折叠的 条评论
为什么被折叠?


