


什么是 MySQL 主从同步
当 master(主)库的数据发生变化的时候,变化会实时的同步到slave(从)库。
主从同步有什么好处
1、水平扩展数据库的负载能力
2、容错,高可用。Failover/High Availability
3、数据备份
主从同步的原理是什么
首先我们来了解 master-slave 的体系结构。
如下图:

不管是 delete、update、insert,还是创建函数、存储过程,所有的操作都在 master 上。
当 master 有操作的时候,slave 会快速的接收到这些操作,从而做同步。
但是,这个机制是怎么实现的呢?
在 master 机器上,主从同步事件会被写到特殊的 log 文件中(binary-log);
在 slave 机器上,slave 读取主从同步事件,并根据读取的事件变化,在 slave 库上做相应的更改。
如此,就实现了主从同步了!下面我们来详细的了解。
主从同步事件有哪些
上面说到,在 master 机器上,主从同步事件会被写到特殊的 log 文件中(binary-log);
主从同步事件有3种形式:statement、row、mixed。
1、statement:会将对数据库操作的 sql 语句写入到 binlog 中。
2、row:会将每一条数据的变化写入到 binlog 中。
3、mixed:statement 与 row 的混合。MySQL 决定什么时候写 statement 格式的,什么时候写 row 格式的 binlog。
在 master 上的操作
当 master 上的数据发生改变的时候,该事件(insert、update、delete)变化会按照顺序写入到binlog中。
binlog dump线程
当 slave 连接到 master 的时候,master机器会为slave开启binlog dump线程。
当 master 的 binlog 发生变化的时候,binlog dump线程会通知slave,并将相应的binlog内容发送给slave。
在 slave 上的操作
当主从同步开启的时候,slave上会创建2个线程。
I/O线程:该线程连接到 master 机器,master 机器上的 binlog dump 线程会将 binlog的内容发送给该 I/O 线程。该 I/O 线程接收到 binlog 内容后,再将内容写入到本地的relay log。
SQL线程:该线程读取 I/O 线程写入的 relay log。并且根据 relay log 的内容对 slave 数据库做相应的操作。
查看上述线程
使用 SHOW PROCESSLIST 命令可以查看,如图,在 master 机器上查看 binlog dump线程。

如图,在 slave 机器上查看I/O、SQL线程。


下面的实战演练,都是基于上面的环境。当然,其他环境也大同小异。
os:ubuntu16.04
mysql:5.7.17
工具
2台机器:
master IP:192.168.33.22
slave  IP:192.168.33.33
master 机器上的操作
1、更改配置文件
我们找到文件
/etc/mysql/mysql.conf.d/mysqld.cnf
配置如下:
#your master ip
bind-address = 192.168.33.22
#在master-slave架构中,每台机器节点都需要有唯一的server-id
server-id = 1
#开启binlog
log_bin = /var/log/mysql/mysql-bin.log
2、重启 MySQL,以使配置文件生效。
sudo systemctl restart mysql
3、创建主从同步的 MySQL user
$ mysql -u root -p
Password:

##创建slave1用户,并指定该用户只能在主机192.168.33.33上登录。
mysql> CREATE USER 'slave1'@'192.168.33.33' IDENTIFIED BY 'slavepass';
Query OK, 0 rows affected (0.00 sec)

##为slave1赋予REPLICATION SLAVE权限。
mysql> GRANT REPLICATION SLAVE ON *.* TO 'slave1'@'192.168.33.33';
Query OK, 0 rows affected (0.00 sec)
4、为 MySQL 加读锁
为了主库与从库的数据保持一致,我们先为 MySQL 加入读锁,使其变为只读。
mysql> FLUSH TABLES WITH READ LOCK;
Query OK, 0 rows affected (0.00 sec)
5、记录下来 MASTER REPLICATION LOG 的位置
mysql> SHOW MASTER STATUS;
+------------------+----------+--------------+------------------+-------------------+
| File             | Position | Binlog_Do_DB | Binlog_Ignore_DB | Executed_Gtid_Set |
+------------------+----------+--------------+------------------+-------------------+
| mysql-bin.000001 |      613 |              |                  |                   |
+------------------+----------+--------------+------------------+-------------------+
1 row in set (0.00 sec)
6、将 master DB 中现有的数据信息导出
mysqldump -u root -p --all-databases --master-data > dbdump.sql
7、解除 master DB 的读锁
mysql> UNLOCK TABLES;
8、将步骤 6 中的 dbdump.sql 文件 copy 到 slave
scp dbdump.sql ubuntu@192.168.33.33:/home/ubuntu
slave 机器上的操作
1、更改配置文件
我们找到文件
/etc/mysql/mysql.conf.d/mysqld.cnf
更改配置如下:
#your slave ip
bind-address = 192.168.33.33
#master-slave结构中,唯一的server-id
server-id = 2
#开启binlog
log_bin = /var/log/mysql/mysql-bin.log
2、重启 MySQL,以使配置文件生效
sudo systemctl restart mysql
3、导入从 master DB。导出的 dbdump.sql 文件,以使 master-slave 数据一致
$ mysql -u root -p < /home/ubuntu/dbdump.sql
4、使 slave 与 master 建立连接,从而同步
$ mysql -u root -p
Password:

mysql> STOP SLAVE;
Query OK, 0 rows affected, 1 warning (0.00 sec)

mysql> CHANGE MASTER TO
    -> MASTER_HOST='192.168.33.22',
    -> MASTER_USER='slave1',
    -> MASTER_PASSWORD='slavepass',
    -> MASTER_LOG_FILE='mysql-bin.000001',
    -> MASTER_LOG_POS=613;
Query OK, 0 rows affected, 2 warnings (0.01 sec)

mysql> START SLAVE;
Query OK, 0 rows affected (0.00 sec)
经过如此设置之后,就可以进行 master-slave 同步了~
MySQL主从搭建
首先准备好两台centos7的服务器
1.关闭防火墙
systemctl stop firewalld
setenforce 0
2.安装MySQL客户端和服务端
yum -y install mariadb mariadb-server
3.启动MySQL服务
systemctl enable mariadb
systemctl start mariadb
4.更改配置文件,开启二进制日志
vim /etc/my.cnf
在mysqld下增加内容:
server-id=1
 log-bin=mysql-bin
保存退出后重启MySQL
systemctl restart mariadb
5.登录到本地mysql上,给从(slave)主机授权 同步日志的权限
grant replication slave on *.* to 'tom'@'192.168.153.%' identified by '123';
flush privileges;
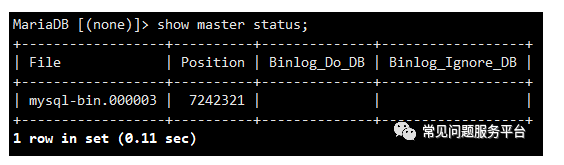
6.查看二进制日志和位置
主(master)配置完毕
从(slave)主机的操作
1.关闭防火墙
systemctl stop firewalld
setenforce 0
2.安装MySQL客户端和服务端
yum -y install mariadb mariadb-server
3.启动MySQL服务
1 systemctl enable mariadb
2 systemctl start mariadb
4.更改配置文件,开启二进制日志
vim /etc/my.cnf
在mysqld下增加内容:
server-id=1
 log-bin=mysql-bin
保存退出后重启MySQL
systemctl restart mariadb
登录本地mysql上,执行同步master二进制日志操作
mysql> stop slave;           \\停止slave同步
mysql> change master to
    -> master_host='192.168.153.171',    \\master主机的ip地址
    -> master_user='tom',                  \\登录master主机的账号
    -> master_password='123',               \\登录的密码
    -> master_log_file='mysql-bin.000003',   \\二进制日志文件
    -> master_log_pos=7242321;         \\二进制日志文件的位置
mysql> start slave;               \\开启slave同步
查询slave状态
mysql> show slave status \G;
注意以下两个线程的状态都为Yes,说明配置成功
       Slave_IO_Running: Yes
       Slave_SQL_Running: Yes
测试
在主上创建一个数据库,在从查看能够成功同步既是成功!
SHELL脚本实现,部署mysql主从架构。
思路是这样的:
1)master.sh脚本用来安装master的mysql
2)然后通过expect脚本+rsync工具把slave.sh脚本、/etc/my.cnf、 /etc/init.d/mysqld 还有mysqldump下来的all.sql,以及在master下载下来的mysql二进制安装包传到slave上
3)通过expect脚本来运行slave.sh的脚本来安装,并且配置好主从,期间,用slave.tmp来记录master机子的binlog的状态,以便于传到slave后用命令添加进去。
cp_slave.expect
#!/usr/bin/expect
set user [lindex $argv 0]
set host [lindex $argv 1]
set passwd [lindex $argv 2]
set file [lindex $argv 3]
spawn rsync -avzP $file $user@$host:/tmp
set timeout 600
expect {
“yes/no” { send “yes\r”}
“password:” { send “$passwd\r” }
}
expect eof
ins_rsync.expect
#!/usr/bin/expect
set user [lindex $argv 0]
set host [lindex $argv 1]
set passwd [lindex $argv 2]
spawn ssh $user@$host
expect {
“yes/no” { send “yes\r”;exp_continue}
“password:” { send “$passwd\r” }
}
expect “]*”
send “yum install -y rsync\rexit\r”
interact
slave.expect
#!/usr/bin/expect
set host [lindex $argv 0]
set passwd [lindex $argv 1]
set cm [lindex $argv 2]
spawn ssh root@$host
expect {
“yes/no” { send “yes\r”}
“password:” { send “$passwd\r” }
}
expect “]*”
send “$cm\rexit\r”
interact
slave.sh
#!/bin/bash
####this is for building slave script
##by lv.
####master ip address
mas_ip=192.168.47.24
###mysql password conf
my_passwd=hd8832508
####replication user and password
rp_user=hd
rp_passwd=hd8832508
###check ok
check(){
if [ $? != 0 ]
then
echo “error,please check log.”
exit 1
fi
}
##close seliux
sed -i ‘s/SELINUX=enforcing/SELINUX=disabled/’ /etc/selinux/config
selinux_s=`getenforce`
if [ $selinux_s == “Enforcing”  -o $selinux_s == “enforcing” ]
then
setenforce 0
fi
##close iptables
iptables-save > /etc/sysconfig/iptables_`date +%s`
iptables -F
service iptables save
##install the mirror.aliyun.com
cd /etc/yum.repos.d/
if rpm -qa |grep epel-release >/dev/null
then
rpm -e epel-release
fi
if [ -f epel.repo ]
then
/bin/mv epel.repo epel.repo.bak
fi
yum install -y wget
if [ -f CentOS-Base.repo ]
then
/bin/mv CentOS-Base.repo CentOS-Base.repo.bak
wget -O /etc/yum.repos.d/CentOS-Base.repo http://mirrors.aliyun.com/repo/Centos-6.repo
wget http://mirrors.aliyun.com/repo/epel-6.repo -O /etc/yum.repos.d/epel.repo
fi
yum clean all
yum makecache
#first to update datetime
[ `rpm -qa |grep ntpdate|wc -l` -eq 1 ] || yum install -y ntpdate
ntpdate 0.openwrt.pool.ntp.org 2>&1 >/dev/null;clock -w
###install lib software
syum(){
if ! rpm -qa|grep -q $1
then
yum install -y $1
check
else
echo “$1 is already installed”
fi
}
## install some packges for the first on setup.
for p in gcc perl perl-devel libaio libaio-devel pcre-devel zlib-devel cmake glibc pcre compat-libstdc++-33
do
syum $p
done
###check file is already in tmp
if [ ! -f /tmp/my.cnf ] && [ ! -f /tmp/mysqld ] && [ ! -f /tmp/mysql-* ] && [ ! -f /tmp/slave.tmp ]
then
echo “error,please try to sync again”
exit 1
fi
mysql=`ls /tmp |grep tar.gz`
version=`echo /tmp/$mysql|awk -F – ‘{print $2}’|cut -d. -f2`
######install mysql
cd /tmp
tar -zxf $mysql
mv echo $mysql|sed ‘s/.tar.gz//g’ /usr/local/mysql
cd /usr/local/mysql
if ! grep “^mysql:” /etc/passwd
then
useradd -s /sbin/nologin -M mysql
check
fi
[ -d /data/mysql ] && /bin/mv /data/mysql /data/mysql_date +%s
mkdir -p /data/mysql
chown -R mysql:mysql /data/mysql
###initialize
case $version in
1)
/usr/local/mysql/scripts/mysql_install_db –user=mysql –datadir=/data/mysql
check
sed -i ‘/^server-id/’d /tmp/my.cnf
check
sed -i ‘/[mysqld]/a\server-id=2’ /tmp/my.cnf
check
;;
6)
/usr/local/mysql/scripts/mysql_install_db –user=mysql –datadir=/data/mysql
check
sed -i ‘/^server_id/’d /tmp/my.cnf
check
sed -i ‘/[mysqld]/a\server_id = 2’ /tmp/my.cnf
check
;;
7)
pswd5_7=/usr/local/mysql/bin/mysqld –user=mysql –datadir=/data/mysql –initialize 2>&1 |sed -r -n ‘/localhost: /p’|sed ‘s/.* //g’
/usr/local/mysql/bin/mysql_ssl_rsa_setup –datadir=/data/mysql
check
sed -i ‘/^server_id/’d /tmp/my.cnf
check
sed -i ‘/[mysqld]/a\server_id = 2’ /tmp/my.cnf
check
;;
esac
###cp conf file
/bin/cp -rf /tmp/my.cnf /etc/my.cnf
check
/bin/cp -rf /tmp/mysqld /etc/init.d/
check
chmod 755 /etc/init.d/mysqld
chkconfig –add mysqld
chkconfig mysqld on
service mysqld start
check
####change mysql password
if [
v
e
r
s
i
o
n
−
e
q
7
]
t
h
e
n
/
u
s
r
/
l
o
c
a
l
/
m
y
s
q
l
/
b
i
n
/
m
y
s
q
l
−
u
r
o
o
t
−
p
version -eq 7 ] then /usr/local/mysql/bin/mysql -uroot -p
version−eq7]then/usr/local/mysql/bin/mysql−uroot−ppswd5_7 –connect-expired-password -e “set password=password(‘
m
y
p
a
s
s
w
d
’
)
;
”
c
h
e
c
k
e
l
s
e
/
u
s
r
/
l
o
c
a
l
/
m
y
s
q
l
/
b
i
n
/
m
y
s
q
l
−
u
r
o
o
t
−
e
“
s
e
t
p
a
s
s
w
o
r
d
=
p
a
s
s
w
o
r
d
(
‘
my_passwd’);” check else /usr/local/mysql/bin/mysql -uroot -e “set password=password(‘
mypasswd’);”checkelse/usr/local/mysql/bin/mysql−uroot−e“setpassword=password(‘my_passwd’);”
check
fi
###input date
if [ -f /tmp/all.sql ]
then
/usr/local/mysql/bin/mysql -uroot -pKaTeX parse error: Expected 'EOF', got '#' at position 66: …or.” exit 1 fi #̲#####binlog sla…my_passwd -e “stop slave;”
check
###configure slave
/usr/local/mysql/bin/mysql -uroot -p
m
y
p
a
s
s
w
d
−
e
“
c
h
a
n
g
e
m
a
s
t
e
r
t
o
m
a
s
t
e
r
h
o
s
t
=
’
my_passwd -e “change master to master_host=’
mypasswd−e“changemastertomasterhost=’mas_ip’,master_port=3306,master_user=’
r
p
u
s
e
r
’
,
m
a
s
t
e
r
p
a
s
s
w
o
r
d
=
’
rp_user’,master_password=’
rpuser’,masterpassword=’rp_passwd’,master_log_file=’
s
l
a
v
e
b
i
n
’
,
m
a
s
t
e
r
l
o
g
p
o
s
=
slave_bin’,master_log_pos=
slavebin’,masterlogpos=slave_pos;”
check
###start slave
/usr/local/mysql/bin/mysql -uroot -pKaTeX parse error: Expected 'EOF', got '#' at position 35: … slave;” check #̲##check repecat…my_passwd -e “show slave status\G;”|grep ‘Slave_IO_Running:’slaveIO=echo $show|awk -F’:’ ‘{print $2}’Slave_SQL=echo $show|awk -F’:’ ‘{print $2}’if [ $slaveIO == Yes ] && [$Slave_SQL == Yes ] then echo “mysql repliation is start” /bin/rm -rf /tmp/all.sql /tmp/$mysql /tmp/mysqld /tmp/my.cnf /tmp/slave.tmp else echo “error,please check the log.” fi master.sh #!/bin/bash #####this is building mysql replication### ##by lv. ml=pwdar=arch###mysql password conf my_passwd=hd8832508 ####replication user and password rp_user=hd rp_passwd=hd8832508 ###slave conf s_user=root s_host=192.168.47.25 s_passwd=hd8832508 ###check ok check(){ if [ $? != 0 ] then echo “error,please check log.” exit 1 fi } ####check the file is exist for wj in $ml/cp_slave.expect $ml/ins_rsync.expect $ml/slave.expect $ml/slave.sh do if [ ! -f $wj ] then echo “error,your miss $wj file.” exit 1 else /bin/chmod +x $wj check fi done ##close seliux sed -i ‘s/SELINUX=enforcing/SELINUX=disabled/’ /etc/selinux/config selinux_s=getenforceif [ $selinux_s == “Enforcing” -o $selinux_s == “enforcing” ] then setenforce 0 fi ##close iptables iptables-save > /etc/sysconfig/iptables_date +%siptables -F service iptables save ##install the mirror.aliyun.com aliyun(){ cd /etc/yum.repos.d/ if rpm -qa |grep epel-release >/dev/null then rpm -e epel-release fi if [ -f epel.repo ] then /bin/mv epel.repo epel.repo.bak fi yum install -y wget if [ -f CentOS-Base.repo ] then /bin/mv CentOS-Base.repo CentOS-Base.repo.bak wget -O /etc/yum.repos.d/CentOS-Base.repo http://mirrors.aliyun.com/repo/Centos-6.repo wget http://mirrors.aliyun.com/repo/epel-6.repo -O /etc/yum.repos.d/epel.repo fi yum clean all yum makecache } if [grep “aliyun.com” /etc/yum.repos.d/CentOS-Base.repo|wc -l-eq 0 ] then aliyun else echo “aliyun epel is already installed.” fi #first to update datetime [rpm -qa |grep ntpdate|wc -l` -eq 1 ] || yum install -y ntpdate
ntpdate 0.openwrt.pool.ntp.org 2>&1 >/dev/null;clock -w
###install lib software
syum(){
if ! rpm -qa|grep -q $1
then
yum install -y $1
check
else
echo “$1 is already installed”
fi
}
install some packges for the first on setup.
for p in gcc perl perl-devel libaio libaio-devel pcre-devel zlib-devel cmake glibc pcre compat-libstdc+±33
do
syum KaTeX parse error: Expected 'EOF', got '#' at position 8: p done #̲##variables,fuc…ar-glibc23.tar.gz
mysql_5_6=http://mirrors.sohu.com/mysql/MySQL-5.6/mysql-5.6.31-linux-glibc2.5-KaTeX parse error: Double subscript at position 18: ….tar.gz mysql_5_̲7=http://mirror…ar.tar.gz
#######################################
conf_mysql(){
cd /usr/local/mysql
if ! grep “^mysql:” /etc/passwd
then
useradd -s /sbin/nologin -M mysql
check
fi
[ -d /data/mysql ] && /bin/mv /data/mysql /data/mysql_date +%s
mkdir -p /data/mysql
chown -R mysql:mysql /data/mysql
###initialize
case KaTeX parse error: Expected 'EOF', got '&' at position 234: … –initialize 2>&̲1 |sed -r -n ‘/…/a\datadir = /data/mysql’ /etc/my.cnf
check
else
/bin/cp -rf support-files/my-default.cnf /etc/my.cnf
check
sed -i ‘/^[mysqld]KaTeX parse error: Undefined control sequence: \socket at position 3: /a\̲s̲o̲c̲k̲e̲t̲ ̲= /tmp/mysql.so…/a\port = 3306’ /etc/my.cnf
sed -i ‘/^[mysqld]KaTeX parse error: Undefined control sequence: \datadir at position 3: /a\̲d̲a̲t̲a̲d̲i̲r̲ ̲= /data/mysql’ …/a\basedir = /usr/local/mysql’ /etc/my.cnf
fi
####/etc/init.d/mysqld
if [ $version == 5.7 ]
then
/bin/cp support-files/mysql.server /etc/init.d/mysqld
check
sed -i ‘s#^datadir=#datadir=/data/mysql#’ /etc/init.d/mysqld
sed -i ‘s#^basedir=#basedir=/usr/local/mysql#’ /etc/init.d/mysqld
check
chmod 755 /etc/init.d/mysqld
chkconfig –add mysqld
chkconfig mysqld on
service mysqld start
check
else
/bin/cp support-files/mysql.server /etc/init.d/mysqld
sed -i ‘s#^datadir=#datadir=/data/mysql#’ /etc/init.d/mysqld
chmod 755 /etc/init.d/mysqld
chkconfig –add mysqld
chkconfig mysqld on
service mysqld start
check
fi
}
###install mysql
insall_mysql(){
echo “Chose the version of mysql.”
select mysql_v in 5.1 5.6 5.7
do
case $mysql_v in
5.1)
cd /usr/local/src
[ -f ${mysql_5_1##/} ] || wget $mysql_5_1
tar zxf ${mysql_5_1##/}
check_ok
[ -d /usr/local/mysql ] && /bin/mv /usr/local/mysql /usr/local/mysql_date +%s
mv echo ${mysql_5_1##*/}|sed ‘s/.tar.gz//g’ /usr/local/mysql
check_ok
version=5.1
conf_mysql
cp_mysql
break
;;
5.6)
cd /usr/local/src
[ -f ${mysql_5_6##/} ] || wget $mysql_5_6
tar zxf ${mysql_5_6##/}
check_ok
[ -d /usr/local/mysql ] && /bin/mv /usr/local/mysql /usr/local/mysql_bak
mv echo ${mysql_5_6##*/}|sed ‘s/.tar.gz//g’ /usr/local/mysql
check_ok
version=5.6
conf_mysql
cp_mysql
break
;;
5.7)
cd /usr/local/src
[ -f ${mysql_5_7##/} ] || wget $mysql_5_7
tar zxf ${mysql_5_7##/}
check_ok
[ -d /usr/local/mysql ] && /bin/mv /usr/local/mysql /usr/local/mysql_bak
mv echo ${mysql_5_7##*/}|sed ‘s/.tar.gz//g’ /usr/local/mysql
check_ok
version=5.7
conf_mysql
cp_mysql
break
;;
*)
echo “only 1(5.1) 2(5.6) or 3(5.7) ”
exit 1
;;
esac
done
}
####change mysql password
passwd_mysql(){
if [
v
e
r
s
i
o
n
=
=
5.7
]
t
h
e
n
/
u
s
r
/
l
o
c
a
l
/
m
y
s
q
l
/
b
i
n
/
m
y
s
q
l
−
u
r
o
o
t
−
p
version == 5.7 ] then /usr/local/mysql/bin/mysql -uroot -p
version==5.7]then/usr/local/mysql/bin/mysql−uroot−ppswd5_7 –connect-expired-password -e “set password=password(‘
m
y
p
a
s
s
w
d
’
)
;
”
c
h
e
c
k
e
l
s
e
/
u
s
r
/
l
o
c
a
l
/
m
y
s
q
l
/
b
i
n
/
m
y
s
q
l
−
u
r
o
o
t
−
e
“
s
e
t
p
a
s
s
w
o
r
d
=
p
a
s
s
w
o
r
d
(
‘
my_passwd’);” check else /usr/local/mysql/bin/mysql -uroot -e “set password=password(‘
mypasswd’);”checkelse/usr/local/mysql/bin/mysql−uroot−e“setpassword=password(‘my_passwd’);”
check
fi
}
if [ ps aux|grep mysql|wc -l -gt 1 ]
then
echo “mysql is already start”
else
insall_mysql
passwd_mysql
fi
####start install slave
echo “#############################”
echo “## ##”
echo “## slave install ##”
echo “## ##”
echo “#############################”
##first check master tool
if ! rpm -qa|grep -q rsync
then
yum install -y rsync
fi
if ! rpm -qa|grep -q expect
then
yum install -y expect
fi
###replication building for master first
if [ ps aux|grep mysql|wc -l -gt 1 ] && [ grep “log_bin = mysql-bin” /etc/my.cnf|wc -l -eq 0 ] && [ grep “log-bin=mysql-bin” /etc/my.cnf|wc -l -eq 0 ]
then
/etc/init.d/mysqld stop
check
sed -i ‘/^[mysqld]KaTeX parse error: Undefined control sequence: \server at position 3: /a\̲s̲e̲r̲v̲e̲r̲_id = 1’ /etc/m…/a\log_bin = mysql-bin’ /etc/my.cnf
sed -i ‘/^[mysqld]KaTeX parse error: Undefined control sequence: \binlog at position 3: /a\̲b̲i̲n̲l̲o̲g̲_format = “MIXE…my_passwd -e “show master status \G;”|grep File|awk ‘{print KaTeX parse error: Expected 'EOF', got '}' at position 2: 2}̲’` master_pos=`…my_passwd -e “show master status \G;”|grep Position|awk ‘{print $2}’echo $master_bin >>/tmp/slave.tmp echo $master_pos >>/tmp/slave.tmp /usr/local/mysql/bin/mysql -uroot -p$my_passwd -e “grant replication slave on *.* to $rp_user@’$s_host’ identified by ‘$rp_passwd’;” check /usr/local/mysql/bin/mysql -uroot -p$my_passwd -e “flush privileges;” check ###dump date /usr/local/mysql/bin/mysqldump -uroot -p$my_passwd –single-transaction -A > /tmp/all.sql check ####cp file to slave if [pwd` != $ml ]
then
cd $ml
fi
./ins_rsync.expect $s_user $s_host $s_passwd
for file in /usr/local/src/mysql-* /etc/my.cnf /etc/init.d/mysqld ./slave.sh /tmp/slave.tmp /tmp/all.sql
do
./cp_slave.expect $s_user $s_host $s_passwd $file
done
./slave.expect $s_host $s_passwd /tmp/slave.sh
参考链接 :
涨知识!MySQL 主从同步原理原来是这样的 :https://mp.weixin.qq.com/s/RnRdACcOM1FqJYLa_rfFjA
Windows下MySql主从配置实战教程 :https://mp.weixin.qq.com/s/OSTaRJJz8y-t3_EyP38dqg


 1万+
1万+


 被折叠的 条评论
为什么被折叠?
被折叠的 条评论
为什么被折叠?
 到【灌水乐园】发言


