


总结
我们前进到更真实的项目:
less_basic_project
├── my_awesome_package
│   ├── calculation_engine.py
│   ├── __init__.py
│   ├── permissions.py
├── pyproject.toml
└── tests
    ├── conftest.py
    ├── test_calculation_engine.py
    └── test_permissions.py
使用pyproject.toml配置pytest:
[tool.pytest.ini_options] # mandatory section name
addopts = "-s --no-header --no-summary" # force cmd flags
testpaths = [ # what directories contain tests
    "tests",
]
pythonpath = [ # what to add to the python path
    "."
]
我们简化了 pytest 调用,以获得自动递归测试发现,解决导入问题并使输出更清晰。
我们还可以利用“conftest.py”来定义整个项目的夹具,并缓存它们的执行:
@pytest.fixture(scope="module") # run once for each test file
def a_fixture():
    ...
即使没有众多的插件,我们也可以使用许多标志来微调 pytest 的行为,其中包括:
-x:第一次失败时停止--pdb:失败时启动pdb调试-k <filter>:仅发现与筛选器匹配的测试--ff:从上次运行失败的测试开始--nf:从新文件开始--sw:从上一次运行停止的地方开始--no-header/--no-summary:删除输出中的大块文本--vevbosity=x:控制输出细粒度,从0级到3级。
再说一句就上路
我保证,下一部分我们将回答诸如“要测试什么”之类的实际问题。但在我们继续之前,我们需要再熟悉下我们的工具。
你看,pytest是一个很棒的工具,但目前为止,我只展示了玩具示例,所以当然一切都很好。不过,你会有一个大项目,包含大量文件、导入、配置等。因此,你需要知道如何再复杂地情况下使用pytest。
真实的项目布局
让我们创建一个更可能使用到的文件结构:
less_basic_project
├── my_awesome_package
│   ├── __init__.py
│   └── the_code_to_test.py
├── pyproject.toml
└── tests
    └── the_tests.py
现在我们有了一个less_basic_project的项目根目录,其中包含两个目录。"tests"目录包含项目的测试,“my_awesome_package"包含项目源代码。此外,__init__.py用于导入。最后,项目根目录下的"pyproject.toml”,是python项目的标准配置文件。
第一个ImportError
如果你走到项目的根目录下,像个好人一样运行pytest tests/the_tests.py,你会摔倒:
$ pytest tests/the_tests.py
...
tests/the_tests.py:4: in <module>
    from the_code_to_test import add
E   ModuleNotFoundError: No module named 'the_code_to_test'
事实上,the_code_to_test不再是正确的路径,它已经是包的一部分了,我们需要修复"the_tests.py"的import:
将
from the_code_to_test import add
改为
from my_awesome_package.the_code_to_test import add
现在应该没问题了,你知道的,sys.path会将当前目录添加进来,因此我们能找到my_awssome_package。但事实并非如此,再次运行pytest,再次崩溃:
$ pytest tests/the_tests.py
...
tests/the_tests.py:4: in <module>
    from my_awesome_package.the_code_to_test import add
E   ModuleNotFoundError: No module named 'my_awesome_package'

pytest可执行文件是个例外,当前目录没有被添加到sys.path中。如果你使用python -m pytest执行测试,就能正常运行:
python -m pytest tests/the_tests.py
================= test session starts ================
platform linux -- Python 3.10.13, pytest-7.3.0, pluggy-1.0.0
rootdir: /path/to/less_basic_project
plugins: django-4.5.2, clarity-1.0.1
collected 4 items


tests/the_tests.py ....


================= 4 . in 0.01s  ================
这就是我推荐使用-m的原因。不幸的是,这会显得非常啰嗦:
python -m pytest -s test/the_tests.py
自动发现测试
pytest可以自动扫描符合命名规则的测试文件,默认的测试文件命是test_xxx格式。
让我们将the_code_to_test.py的功能明确,并重命名为calculation_engine.py,然后将其测试文件也重命名为test_calculation_engine.py,别忘了修改import!
我们得到
less_basic_project
├── my_awesome_package
│   ├── calculation_engine.py
│   ├── __init__.py
├── pyproject.toml
└── tests
    └── test_calculation_engine.py <- change imports here
现在我们可以运行:
python -m pytest tests
pytest会自动寻找测试并执行。
下面我们新加一个功能,确保我们有一个安全系统:
my_awesome_package/permissions.py
def can_access(file_path):
    return True
以及相应的测试 tests/test_permissions.py:
from my_awesome_package.permissions import can_access

def test_can_access():
    assert can_access("/")
再次运行:
 python -m pytest tests
================= test session starts ================
platform linux -- Python 3.10.13, pytest-7.3.0, pluggy-1.0.0
rootdir: /path/to/less_basic_project
plugins: django-4.5.2, clarity-1.0.1
collected 5 items


tests/test_calculation_engine.py ....                                 [ 80%]
tests/test_permissions.py .                                           [100%]


================= 5 . in 0.01s  ================
pytest会自动寻找测试并执行。
Pytest 配置
Pytest 可以从“pyproject.toml”文件配置,可以将所需的默认行为放在那里,命令行中的内容都会覆盖此默认配置。
下面是一个例子:
[tool.pytest.ini_options] # mandatory section name
addopts = "-s" # force a command line option
testpaths = [ # what directories contain tests
    "tests",
]
pythonpath = [ # what to add to the python path
    "."
]
有了这个,你就可以直接使用pytest了:
pytest
================= test session starts ================
platform linux -- Python 3.10.13, pytest-7.3.0, pluggy-1.0.0
rootdir: /path/to/less_basic_project
plugins: django-4.5.2, clarity-1.0.1
collected 5 items
tests/test_calculation_engine.py::test_add_integers
This is run before each test
.
We tested with 5


This is run after each test


tests/test_calculation_engine.py::test_add_strings
This is run before each test
.
This is run after each test


tests/test_calculation_engine.py::test_add_floats .
tests/test_calculation_engine.py::test_add_mixed_types .
tests/test_permissions.py::test_can_access .
配置文件将当前目录(.)添加到sys.path,在"test"目录中查找测试,添加-s选项输出到命令行。
请注意,pythonpath选项在pytest的版本7中添加,如果你的Pytest版本较低,可能需要额外的插件。此外,其他工具可能也有类似的sys.path问题。最后,你可能想咬紧牙关,为整个项目完成PATHONPATH。但这是另一个话题,我们现在继续关注pytest。
还要考虑到在许多情况下,例如 CI、任务运行器(doit、nox…)、git 钩子,我仍然会使用 python -m pytest ,来避免其他问题。因此,虽然手动执行很方便,但请记住 -m 是我们的救世主。
更多配置
pytest 是充分可配置的,运行 pytest -h 会得到一面充满选项、标志和 env var 的文本墙,您可以使用它来调整其行为。一旦你确信你了解了这个库是如何工作的,你绝对应该探索这些。同时,我将首先指出几个值得您花时间的旋钮:
-x:第一次失败时停止--pdb:失败时启动pdb调试-k <filter>:仅发现与筛选器匹配的测试--ff:从上次运行失败的测试开始--nf:从新文件开始--sw:从上一次运行停止的地方开始--no-header/--no-summary:删除输出中的大块文本--vevbosity=x:控制输出细粒度,从0级到3级。
事实上,对于该系列的其余部分,我将在“pyproject.toml”中设置它:
addopts = "-s --no-header --no-summary"
这将使测试运行更加清晰。
但是,这并不是配置 pytest 的唯一方法。您已经了解了另一个:命名约定。还有一些特定的调用约定。当您想要针对特定测试时,最有用的是在路径中使用“::”,因为您可以执行“pytest path/to/test_file.py::test_function”。
例如,我指向调用test_add_strings,我会使用pytest tests/test_calculation_engine.py::test_add_strings
我说更多配置!
Pytest 带有一个功能齐全的插件系统,每个插件系统都可以更改您的 pytest 配置,还可以添加您可以从命令行或“pyproject.toml”设置的全新设置。一旦它们安装在虚拟环境中,它们就会自动加载,除非您在配置中禁用它们。
例如,如果我 pip install pytest-sugar ,pytest-sugar插件将安装并在我的下一次测试运行时自动加载,为输出提供进度条:
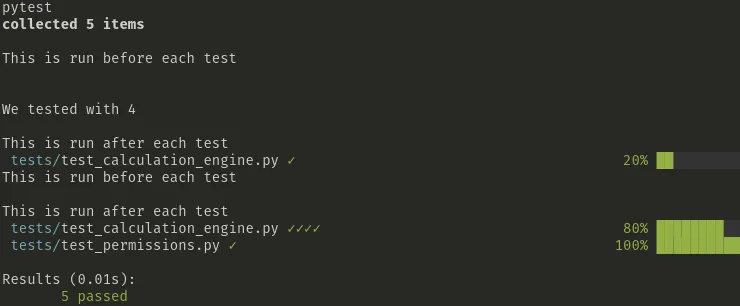
它还将添加 pytest 选项 --force-sugar 。
虽然我觉得 pytest-sugar 很漂亮,但我个人并没有使用它,这只是插件工作原理的一个例子。有大量的插件,有些提供代码覆盖率,有些提供数据库设置,有些rest客户端,有些fake数据…生态系统丰富、强大且非常有用。
配置还有另一面:如何将测试与文本编辑器集成。这本身就是一篇完整的文章,而且有这么多的IDE,有这么多不同的偏好,我们不太可能帮助每个人。我可能至少在 VSCode 上写一篇文章,我还在思考。
更多多多多多配置!!!
是的,conf 在 pytest 中非常疯狂。这是最后一个,我发誓。
如果创建一个名为“conftest.py”的文件并将其放在“tests”目录下,则可以以编程方式影响pytest在python中的工作方式。
我们不会讨论你可以用 conftest.py 做的所有事情,因为它很快就会变得深奥。更不用说您实际上可以创建几个相互级联和覆盖的“conftest.py”。这是一个潘多拉魔盒。
在“conftest.py”中,您可以做的最重要的事情是共享夹具和范围。
想一想我们的夹具:
@pytest.fixture()
def random_number():
    yolo = random.randint(0, 10)
    yield yolo
    print(f"\nWe tested with {yolo}")
它在在“test_calculation_engine.py”中,我们能在“test_permissions.py”中使用random_number吗?
显然不行。但是,如果您将其移动到“conftest.py”,那么突然间,同层的所有测试都可以访问夹具。
less_basic_project
├── my_awesome_package
│   ├── calculation_engine.py
│   ├── __init__.py
│   ├── permissions.py
├── pyproject.toml
└── tests
    ├── conftest.py
    ├── test_calculation_engine.py
    └── test_permissions.py
conftest.py中包含:
import random
import pytest

@pytest.fixture()
def random_number():
    yolo = random.randint(0, 10)
    yield yolo
    print(f"\nWe tested with {yolo}")
我们从“test_calculation_engine.py”中删除了该夹具。
这引出了范围(scope),默认情况下,每个使用夹具的测试都会调用一次夹具。
但是,对于某些测试,例如数据库设置、网络连接、文件创建、数据生成等,您可能希望夹具在每组测试中实际运行一次,或者在整个测试运行中实际运行一次。
您可以使用 scope 参数执行此操作:
@pytest.fixture(scope="module") # run once for each test file
def random_number():
    yolo = random.randint(0, 10)
    yield yolo
    print(f"\nWe tested with {yolo}")
scoped的值可设置为 “function” (默认值)、 “module” (一个 py 文件)、 “package” (整个目录)或 “session” (一次运行)。
如果您不需要 yield 的值,但想要副作用,您还可以autouse强制夹具运行为所有测试运行,即使测试没有使用名为 random_number 的参数:@pytest.fixture(autouse=True)。
scope 并且 autouse 可以一起使用,谨慎使用,这很容易过度使用。
关于缓存
出于教学原因,我向你展示了一个干净的项目树,但实际上,如果你现在看一眼你的项目树,它看起来更像是这样(YMMV):
less_basic_project
├── my_awesome_package
│   ├── calculation_engine.py
│   ├── __init__.py
│   ├── permissions.py
│   └── __pycache__
│       ├── calculation_engine.cpython-310.pyc
│       ├── __init__.cpython-310.pyc
│       └── permissions.cpython-310.pyc
├── pyproject.toml
├── .pytest_cache
│   ├── CACHEDIR.TAG
│   ├── .gitignore
│   ├── README.md
│   └── v
│       └── cache
│           ├── lastfailed
│           ├── nodeids
│           └── stepwise
└── tests
    ├── conftest.py
    ├── __pycache__
    │   ├── conftest.cpython-310-pytest-8.1.1.pyc
    │   ├── test_calculation_engine.cpython-310-pytest-8.1.1.pyc
    │   └── test_permissions.cpython-310-pytest-8.1.1.pyc
    ├── test_calculation_engine.py
    └── test_permissions.py
这是因为 python 和 pytest 都有自己的缓存机制。这些文件不是您应该提交到 VCS 的内容(例如 git),可以删除它们。缓存可以让测试运行得更快,并确保一些功能如--ff可用。


 被折叠的 条评论
为什么被折叠?
被折叠的 条评论
为什么被折叠?
 到【灌水乐园】发言


