全文步骤:
CXF+Spring整合发布SOAP协议的服务
服务端
第一步:创建web项目(引入jar包)
第二步:创建SEI接口
第三步:创建SEI实现类
第四步:配置Spring配置文件,applicationContext.xml,<jaxws:server,
第五步:配置web.xml,spring配置文件,listener,cxf的servlet
第六步:部署tomcat下,启动tomcat
第七步:测试服务是否发布成功
WSDL地址规则:http://ip:端口号/项目名称/servlet拦截路径/服务名称?wsdl
客户端
第一步:引入jar包
第二步:生成客户端
第三步:配置spring的配置文件,applicationContext.xml,<jaxws:client>
第四步:初始化spring上下文,获取接口实现类,调用查询方法
服务端:
- 创建web项目,导入cxf的jar包
- 编写applicationContext.xml文件以及web.xml
<?xml version="1.0" encoding="UTF-8"?>
<beans xmlns="http://www.springframework.org/schema/beans"
	xmlns:xsi="http://www.w3.org/2001/XMLSchema-instance" xmlns:jaxws="http://cxf.apache.org/jaxws"
	xmlns:jaxrs="http://cxf.apache.org/jaxrs" xmlns:cxf="http://cxf.apache.org/core"
	xsi:schemaLocation="http://www.springframework.org/schema/beans
				            http://www.springframework.org/schema/beans/spring-beans.xsd
				            http://cxf.apache.org/jaxrs http://cxf.apache.org/schemas/jaxrs.xsd
				            http://cxf.apache.org/jaxws http://cxf.apache.org/schemas/jaxws.xsd
				            http://cxf.apache.org/core http://cxf.apache.org/schemas/core.xsd">
	<!-- endpoint封装 -->
	<jaxws:endpoint address="/hello" implementor="cn.itcast.ws.cxf.server.Helloworld"></jaxws:endpoint>
	<!-- <jaxws:server发布SOAP协议的服务 ,对JaxWsServerFactoryBean类封装-->
	<jaxws:server address="/weather" serviceClass="cn.itcast.ws.cxf.server.WeatherInterface">
		<jaxws:serviceBean>
			<ref bean="weatherInterface"/>
		</jaxws:serviceBean>
		<!-- 配置拦截器 -->
		<jaxws:inInterceptors>
			<ref bean="inIntercepter"/>
		</jaxws:inInterceptors>
		<jaxws:outInterceptors>
			<ref bean="outIntercepter"/>
		</jaxws:outInterceptors>
	</jaxws:server>
	<!-- 配置拦截器的bean -->
	<bean name="inIntercepter" class="org.apache.cxf.interceptor.LoggingInInterceptor"/>
	<bean name="outIntercepter" class="org.apache.cxf.interceptor.LoggingOutInterceptor"/>
	<!-- 配置服务实现类 -->
	<bean name="weatherInterface" class="cn.itcast.ws.cxf.server.WeatherInterfaceImpl"/>
</beans>
<?xml version="1.0" encoding="UTF-8"?>
<web-app version="3.0"
xmlns="http://java.sun.com/xml/ns/javaee"
xmlns:xsi="http://www.w3.org/2001/XMLSchema-instance"
xsi:schemaLocation="http://java.sun.com/xml/ns/javaee
http://java.sun.com/xml/ns/javaee/web-app_3_0.xsd">
<display-name></display-name>
<!-- 设置spring加载环境 -->
<context-param>
<!-- contextConfigLocation不能修改 -->
<param-name>contextConfigLocation</param-name>
<param-value>classpath:applicationContext.xml</param-value>
</context-param>
<listener>
<listener-class>org.springframework.web.context.ContextLoaderListener</listener-class>
</listener>
<!-- 配置CXF的servlet -->
<servlet>
<servlet-name>cxf</servlet-name>
<servlet-class>org.apache.cxf.transport.servlet.CXFServlet</servlet-class>
</servlet>
<servlet-mapping>
<servlet-name>cxf</servlet-name>
<url-pattern>/ws/*</url-pattern>
</servlet-mapping>
<welcome-file-list>
<welcome-file>index.jsp</welcome-file>
</welcome-file-list>
</web-app>
3.编写接口,实现类
package cn.itcast.ws.cxf.server;
/**
 * SEI接口实现类
 * @author wujinxing
 *
 */
public class WeatherInterfaceImpl implements WeatherInterface {
	@Override
	public String queryWeather(String cityName) {
		System.out.println("from client..."+cityName);
		if("北京".equals(cityName)){
			return "冷且霾";
		} else {
			return "暖且晴";
		}
	}
}
package cn.itcast.ws.cxf.server;
import javax.jws.WebService;
import javax.xml.ws.BindingType;
import javax.xml.ws.soap.SOAPBinding;
/**
* SEI接口
* @author wujinxing
*
*/
@WebService
@BindingType(SOAPBinding.SOAP12HTTP_BINDING)
public interface WeatherInterface {
public String queryWeather(String cityName);
}以及一个endpoint发布的类,配置已经写在applicationContext.xml中
package cn.itcast.ws.cxf.server;

import javax.jws.WebService;
/**
 *
 * @author wujinxing
 *
 */
@WebService
public class Helloworld {
	public String sayHello(String name){
		return "hello,"+name;
	}
}
使用tomcat启动服务,打开http://127.0.0.1:8080/spring_cxf_server/ws/ 如下图

客户端
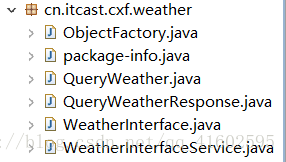
利用上篇讲解的方法,在cmd中输入命令,得到服务类,,新建java项目作为客户端,将类粘贴进去

新建资源文件夹,新建applicationContext.xml,可从上文粘贴
<?xml version="1.0" encoding="UTF-8"?>
<beans xmlns="http://www.springframework.org/schema/beans"
	xmlns:xsi="http://www.w3.org/2001/XMLSchema-instance" xmlns:jaxws="http://cxf.apache.org/jaxws"
	xmlns:jaxrs="http://cxf.apache.org/jaxrs" xmlns:cxf="http://cxf.apache.org/core"
	xsi:schemaLocation="http://www.springframework.org/schema/beans
				            http://www.springframework.org/schema/beans/spring-beans.xsd
				            http://cxf.apache.org/jaxrs http://cxf.apache.org/schemas/jaxrs.xsd
				            http://cxf.apache.org/jaxws http://cxf.apache.org/schemas/jaxws.xsd
				            http://cxf.apache.org/core http://cxf.apache.org/schemas/core.xsd">

    <!-- jaxws:client实现客户端 -->
    <jaxws:client id="weatherClient" address="http://127.0.0.1:8080/spring_cxf_server/ws/weather" serviceClass="cn.itcast.cxf.weather.WeatherInterface"></jaxws:client>

</beans>
新建类:
package cn.itcast.cxf.client;

import org.springframework.context.ApplicationContext;
import org.springframework.context.support.ClassPathXmlApplicationContext;
import cn.itcast.cxf.weather.WeatherInterface;

public class WeatherClient {

	public static void main(String[] args) {
		//初始化spring的上下文
		ApplicationContext context = new ClassPathXmlApplicationContext("classpath:applicationContext.xml");

		WeatherInterface weatherInterface = (WeatherInterface) context.getBean("weatherClient");

		String weather = weatherInterface.queryWeather("保定");

		System.out.println(weather);

	}
}
运行,可得到结果:


 354
354

 被折叠的 条评论
为什么被折叠?


