


官方文档
参考文章:
针对本次学习的SpringSecurity做一下笔记,写的乱七八糟的供自己看,需要的可以看上面的文章
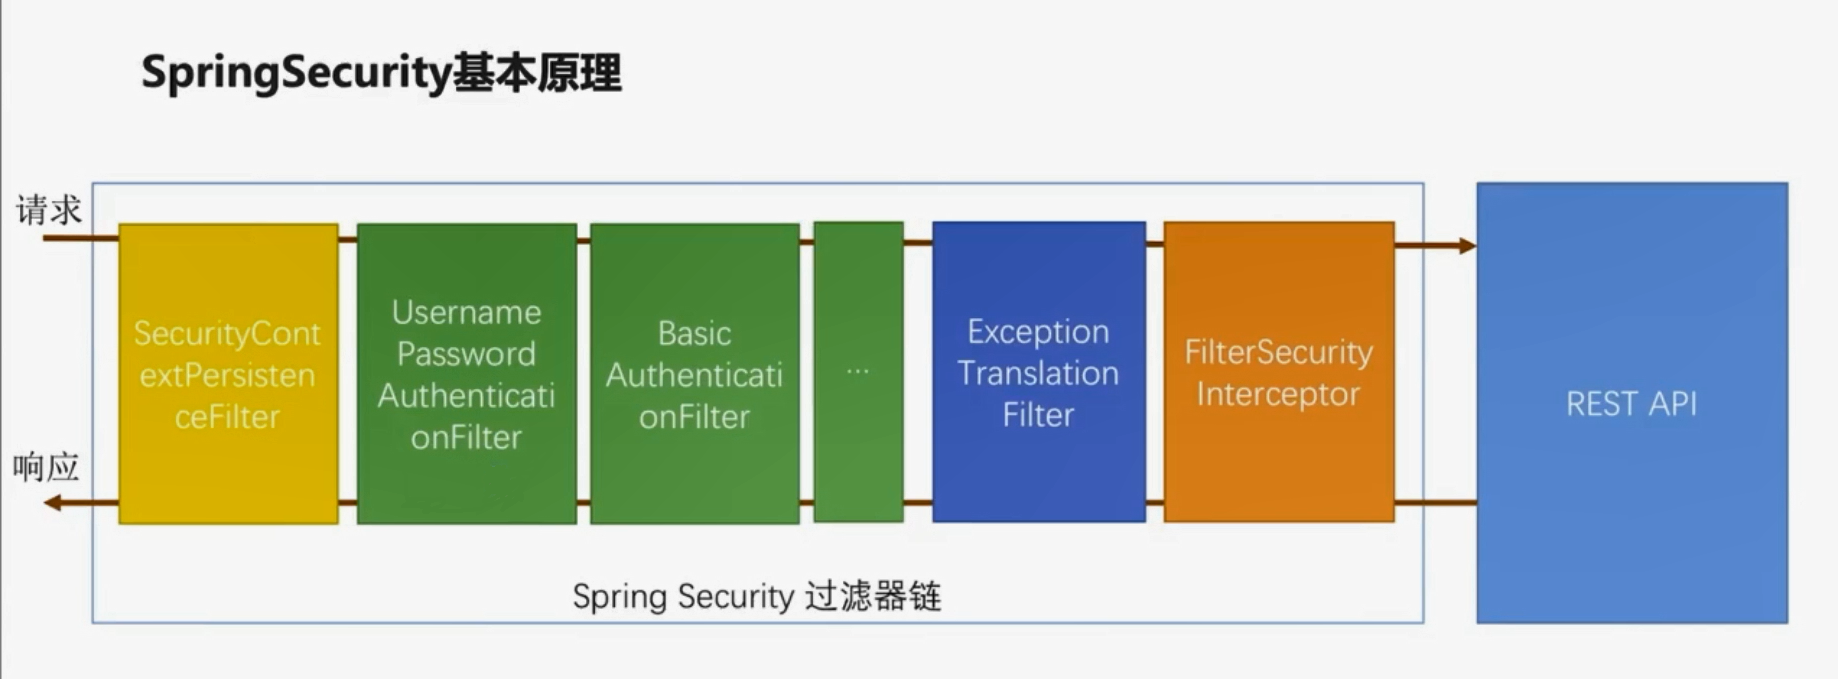
简介
Spring Security是一个框架,提供针对常见攻击的身份验证,授权和保护。通过对命令式和反应式应用程序的一流支持,它是保护基于Spring的应用程序的事实标准。相对Shiro来说SpringSecurity的功能更强大
使用的版本
SpringBoot 2.2.4 , SpringSecurity 5.2.1
简单使用
1 导入依赖 pom
<dependency>
    <groupId>org.springframework.boot</groupId>
    <artifactId>spring-boot-starter-data-jdbc</artifactId>
</dependency>
<dependency>
    <groupId>org.springframework.boot</groupId>
    <artifactId>spring-boot-starter-security</artifactId>
</dependency>
<dependency>
    <groupId>org.springframework.boot</groupId>
    <artifactId>spring-boot-starter-web</artifactId>
</dependency>

<dependency>
    <groupId>org.springframework.boot</groupId>
    <artifactId>spring-boot-devtools</artifactId>
    <scope>runtime</scope>
    <optional>true</optional>
</dependency>
<dependency>
    <groupId>org.springframework.boot</groupId>
    <artifactId>spring-boot-starter-thymeleaf</artifactId>
</dependency>
<dependency>
    <groupId>mysql</groupId>
    <artifactId>mysql-connector-java</artifactId>
    <scope>runtime</scope>
</dependency>
<dependency>
    <groupId>org.projectlombok</groupId>
    <artifactId>lombok</artifactId>
    <optional>true</optional>
</dependency>
<dependency>
    <groupId>org.springframework.boot</groupId>
    <artifactId>spring-boot-starter-test</artifactId>
    <scope>test</scope>
    <exclusions>
        <exclusion>
            <groupId>org.junit.vintage</groupId>
            <artifactId>junit-vintage-engine</artifactId>
        </exclusion>
    </exclusions>
</dependency>
<dependency>
    <groupId>org.springframework.security</groupId>
    <artifactId>spring-security-test</artifactId>
    <scope>test</scope>
</dependency>
2 yml
没有用到数据库
spring:
  datasource:
    url: jdbc:mysql://localhost:3306/blog_security?useSSL=false&serverTimezone=GMT%2B8
    driver-class-name: com.mysql.cj.jdbc.Driver
    username: root
    password: 123456

  devtools:
    restart:
      enabled: true
随便创建一个Controller
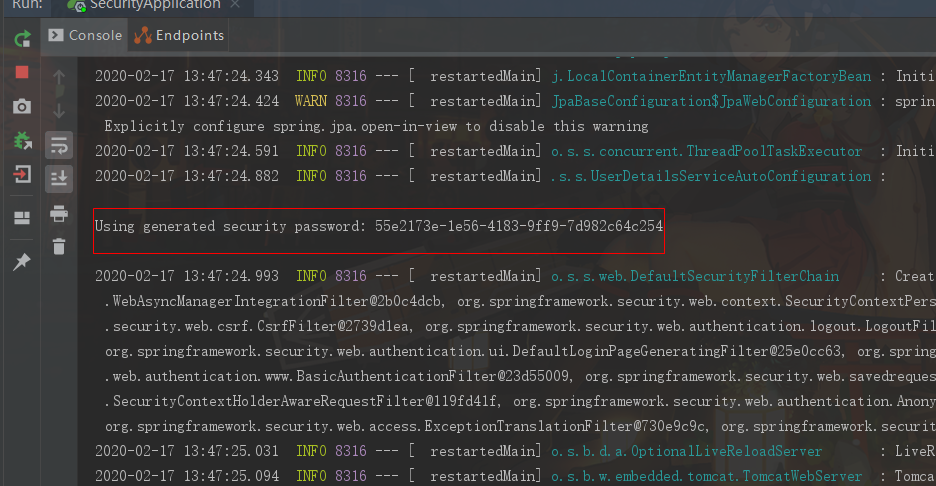
当访问项目 时 url 默认会跳转到 http://localhost:8080/login
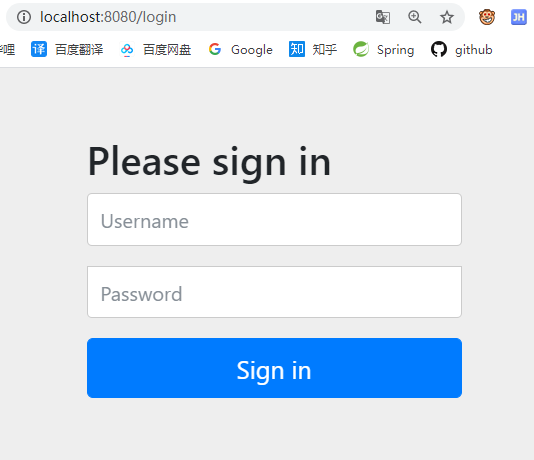
Spring Security默认进行URL访问进行拦截,并提供了验证的登录页面
Username默认为user,Password随机生成(实际就是UUID),查看控制台。
也可以在yml中配置账号密码
spring:
  security:
    user:
      name: chy
      password: 123456
自定义登录接口
1 定义 MyUserDetailsSerice实现UserDetailsService接口
@Component
public class MyUserDetailsService implements UserDetailsService {
// 用户名 密码 角色
    @Override
    public UserDetails loadUserByUsername(String username) throws UsernameNotFoundException {
        return new User(username,"123456", AuthorityUtils.commaSeparatedStringToAuthorityList("admin"));
    }
}
2 配置拦截请求
@Configuration
public class MySecurityConfig extends WebSecurityConfigurerAdapter {
@Override
protected void configure(HttpSecurity http) throws Exception {
http.formLogin()// 表单验证
.and()
.authorizeRequests()
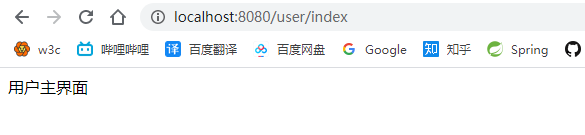
.antMatchers("/user/index").permitAll()//任何人访问,没有任何限制
.anyRequest()//任何请求
.authenticated();//都需要认证
}
}
- authorizeRequests 哪些需要保护
- antMatchers 设置路径
- .permitAll() 任何人都可访问,没有限制
- formLogin是采用的是表单认证方式,还有个 httpBasic认证,一般不用
- and()方法类似于xml配置中的结束标签
这样配置后,控制台将不再打出 密码(UUID),配置yml也是如此
仅仅这两个配置,登录是会出现以下错误,
 默认会进行加密比较
解决这个有两种方式
一、继承PassawordEncoder接口
不加密进行对比
/**
 * 用于编码密码的服务接口的实现类。
 */
@Component
public class MyPasswordEncoder implements PasswordEncoder {

    /**
     *  编码原始密码。通常,良好的编码算法应用SHA-1或更大的哈希与8字节或更大的随机生成的盐相结合。
     * @param rawPassword 密码,一个可读的字符值序列
     * @return
     */
    @Override
    public String encode(CharSequence rawPassword) {
        return rawPassword.toString();
    }

    /**
     * 验证从存储中获得的编码密码是否与提交的原始密码匹配。如果密码匹配,返回true;如果不匹配,返回false。存储的密码本身永远不会被解码。
     * @param rawPassword 预设的验证密码。要编码和匹配的原始密码
     * @param encodedPassword 表单输入的密码。来自存储的编码密码与之比较
     * @return
     */
    @Override
    public boolean matches(CharSequence rawPassword, String encodedPassword) {
        return encodedPassword.equals(rawPassword.toString());
    }
}
二、注入密码编码器对象
加密对比
在MySecurityConfig中直接注入一个BCryptPasswordEncoder对象。它实现了PasswordEncoder接口,并重写了encode和matches方法,添加以下代码
@Configuration
public class MySecurityConfig extends WebSecurityConfigurerAdapter {

   @Bean
   public PasswordEncoder passwordEncoder() {
       return new BCryptPasswordEncoder();
   }
   ...
}
那么自己的密码也需要进行加密了
@Slf4j
@Component
public class MyUserDetailsService implements UserDetailsService {
   @Autowired
   PasswordEncoder passwordEncoder;
   @Override
   public UserDetails loadUserByUsername(String username) throws UsernameNotFoundException {
       // 这里应该是从数据库中把密码查询出来,一般注册时候就已经把加密的存进去了
       String password = passwordEncoder.encode("123456");
       log.info("password:{}",password);
       return new User(username,password, AuthorityUtils.commaSeparatedStringToAuthorityList("admin"));
   }
}
可成功登录
相对完整的例子
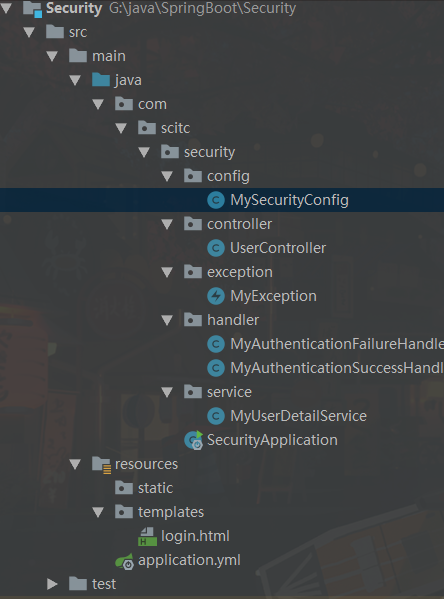
**项目结构 **
pom,yml都不变不变
UserController
@Controller
public class UserController {
    @GetMapping("/login")
    public String login(){
        return "login";
    }
    @GetMapping("/")
    @ResponseBody
    public String index(){
        return "主界面";
    }

    @GetMapping("/hello")
    @ResponseBody
    public String hello(){
        return "Hello World";
    }

    @GetMapping("/user/common")
    @ResponseBody
    public String common(){
        return "UserCommon 均可访问";
    }

    @GetMapping("/user/admin")
    @ResponseBody
    public String admin(){
        return "只有拥有admin角色才可进行访问";
    }

    // 登录成功后,这里可以展示当前用户信息
    @GetMapping("/info")
    @ResponseBody
    public Object getCurrentUser(Authentication authentication) {
        return authentication;
    }
    // 也可以这样 只需要 principal
    @GetMapping("/me")
    @ResponseBody
    public Object getCurrentUser2(@AuthenticationPrincipal UserDetails userDetails) {
        return userDetails;
    }
}
MyUserDetailService
这里的多写了一下目的是为了区分用户所拥有的角色,相关信息本应从数据库查询出来
@Component
public class MyUserDetailService implements UserDetailsService {
@Autowired
private PasswordEncoder passwordEncoder;
@Override
public UserDetails loadUserByUsername(String username) throws UsernameNotFoundException {
// 密码应该是注册时把密码加密,存入数据中 取出来的
String password = passwordEncoder.encode("123456");
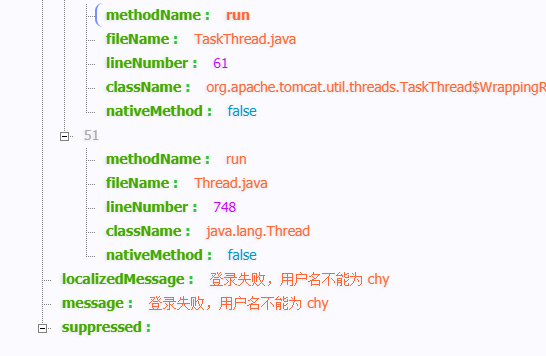
if(username.equals("admin")){
return new User(username,password, AuthorityUtils.commaSeparatedStringToAuthorityList("admin"));
}else if(username.equals("chy")){
throw new ValidateException("登录失败,用户名不能为 chy");
}else {
return new User(username,password, AuthorityUtils.commaSeparatedStringToAuthorityList("user"));
}
}
}
定义了一个 ValidateException,目的是可在登录验证信息是抛出异常,登录失败可被 处理器拿到错误信息
public class ValidateExceptionextends AuthenticationException {
    public ValidateException(String msg) {
        super(msg);
    }
}
登录成功处理器 MyAuthenticationSuccessHandler
也可实现 AuthenticationSuccessHandler
springsecurity默认登录成功后则是返回登录之前的页面
我们如果使用继承的方式,可以根据配置文件的信息决定是返回 登录前的页面 还是返回json,若是返回登录前的页面,我们可以直接调用父类的super.onAuthenticationSuccess()即可
//1. 登录成功处理器
@Slf4j
@Component("myAuthenticationSuccessHandler")
//public class MyAuthenticationSuccessHandler implements AuthenticationSuccessHandler {
public class MyAuthenticationSuccessHandler extends SimpleUrlAuthenticationSuccessHandler {
    @Autowired
    private ObjectMapper objectMapper ;

    @Override
    public void onAuthenticationSuccess(HttpServletRequest request, HttpServletResponse response, Authentication authentication) throws IOException, ServletException {
        log.info("登录成功");
        response.setContentType("application/json;charset=utf-8");
        response.getWriter().write(objectMapper.writeValueAsString(authentication));
//        super.onAuthenticationSuccess(request,response,authentication);
    }
}
登录失败处理器 MyAuthenticationFailureHandler
同上
@Component("myAuthenticationFailureHandler")
@Slf4j
//public class MyAuthenticationFailureHandler implements AuthenticationFailureHandler {
public class MyAuthenticationFailureHandler extends SimpleUrlAuthenticationFailureHandler {

    @Autowired
    private ObjectMapper objectMapper;

    @Override
    public void onAuthenticationFailure(HttpServletRequest request, HttpServletResponse response, AuthenticationException exception) throws IOException, ServletException {
        log.info("登录失败");
        // http状态,200,成功
        response.setStatus(HttpStatus.OK.value());
        response.setContentType("application/json;charset=utf-8");
        response.getWriter().write(objectMapper.writeValueAsString(exception));// exception.getMessage() 也可返回错误信息   我们可以之定义一个异常  继承 AuthenticationException
    }
}
配置类
如: MyAuthenticationSuccessHandler类型是 AuthenticationSuccessHandler,而我们已声明@Component("myAuthenticationSuccessHandler"),可直接调用
@Configuration
public class MySecurityConfig extends WebSecurityConfigurerAdapter {
    // 注入 成功,失败处理器
    @Autowired
    private AuthenticationSuccessHandler myAuthenticationSuccessHandler;
    @Autowired
    private AuthenticationFailureHandler myAuthenticationFailureHandler;

    @Override
    protected void configure(HttpSecurity http) throws Exception {
//        super.configure(http);
        http.formLogin()
                .loginPage("/login")// 自定义登录页
                .loginProcessingUrl("/auth/form") //登录提交表单的地址
                .successHandler(myAuthenticationSuccessHandler)
                .failureHandler(myAuthenticationFailureHandler)
                .and()
                .authorizeRequests()
                .antMatchers("/user/common","/login").permitAll()// 放行
                .antMatchers("/user/admin").hasRole("admin")// 只有拥有admin角色才能访问
                .anyRequest().authenticated()
                .and()
                .csrf().disable();// 都需要验证  关闭 csrf 不然 post请求无法通过
    }
    @Bean
    public PasswordEncoder passwordEncoder(){
        return new BCryptPasswordEncoder();
    }
}
还有个自定义的前端登录页面
<!DOCTYPE html>
<html lang="en">
<head>
<meta charset="UTF-8">
<title>Title</title>
</head>
<body>
<h1>表单登录</h1>
<form action="/auth/form" method="post">
用户名:<input type="text" name="username"><br/>
密   码:<input type="password" name="password"><br/>
<button type="submit">登录</button>
</form>
</body>
</html>
例子测试
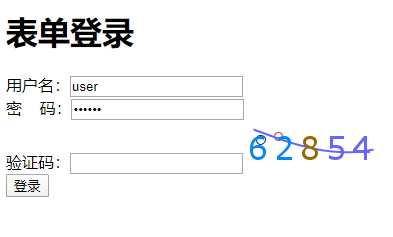
访问时,将会直接跳转的登录页面,
-
chy用户登录
-
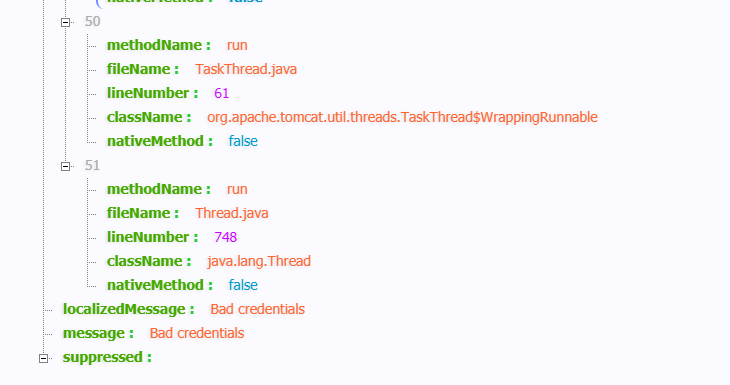
其他用户登录,输入错误的密码(密码不为123456)
-
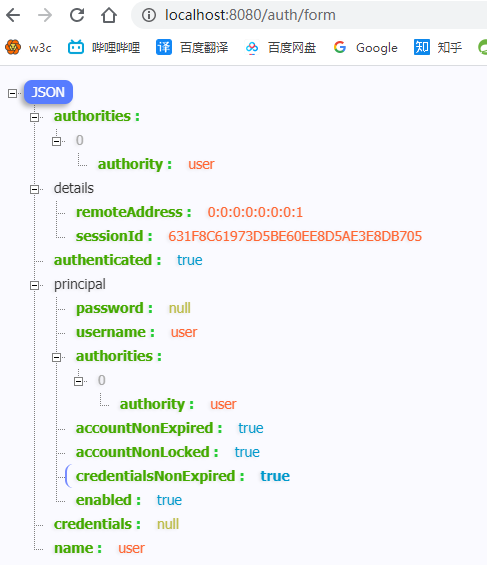
使用密码123456登录成功,则返回用户的信息,并不会返回密码
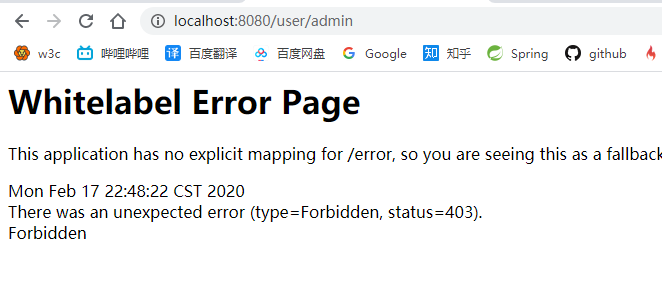
- 没有 admin 角色的用户访问
/user/admin
private RequestCache requestCache = new HttpSessionRequestCache();// request缓存
private RedirectStrategy redirectStrategy = new DefaultRedirectStrategy();
- RequestCache 从缓存中取到上一个请求
- redirectStrategy 重定向
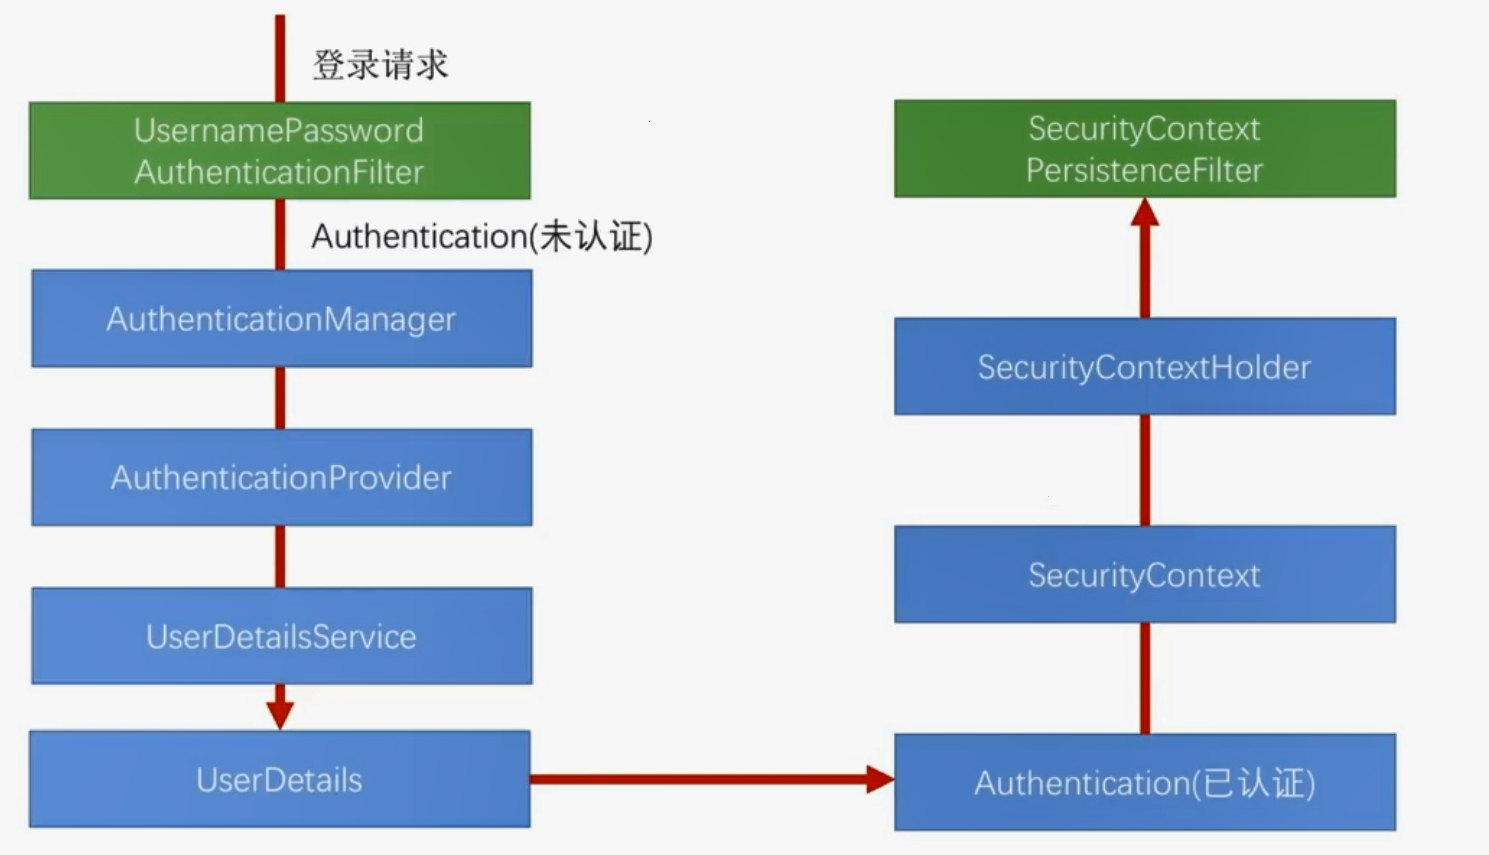
认证流程
添加图片验证码功能
- 我们需要一个生产验证码的接口
- 编写一个Filter在
UsernamePasswordAuthenticationFilter之前执行
验证码相关
使用的是 码云 上面开源的EasyCaptcha,直接拿来用就好了
<dependency>
    <groupId>com.github.whvcse</groupId>
    <artifactId>easy-captcha</artifactId>
    <version>1.6.2</version>
</dependency>
一个pojo类 ImageCode,封装验证码的
@Data
@NoArgsConstructor
public class ImageCode {
    private String code;
    private LocalDateTime expire;

    // 传入有效时间
    public ImageCode(String code,int expire){
        this.code = code;
        this.expire = LocalDateTime.now().plusSeconds(expire);// 当前时间加上 s
    }
    // 判断是否过期
    public boolean isExpired(){
        return LocalDateTime.now().isAfter(expire);// 判断当前时间是否在expire时间之后
    }
}
生成验证码接口
/**
 * 生成验证码接口
 */
public interface ValidateGenerator {
    void generator(ServletWebRequest request) throws IOException;
}
实现类
@Component("imageValidateGenerator")
@Slf4j
public class ImageValidateGenerator implements ValidateGenerator {
    public static final String CODE_IMAGE = "SESSION_KEY_CODE_IMAGE";
    @Override
    public void generator(ServletWebRequest request) throws IOException {

        // 三个参数分别为宽、高、位数
        SpecCaptcha specCaptcha = new SpecCaptcha(130, 48, 5);
        // 设置字体
        specCaptcha.setFont(new Font("Verdana", Font.PLAIN, 32));  // 有默认字体,可以不用设置
        // 设置类型,纯数字、纯字母、字母数字混合
        specCaptcha.setCharType(Captcha.TYPE_ONLY_NUMBER);

        // 验证码存入session
        ImageCode imageCode  = new ImageCode(specCaptcha.text().toLowerCase(),60);// 设置有效60s时间
        log.info("生成验证码是:{}",specCaptcha.text().toLowerCase());
        request.getRequest().getSession().setAttribute(CODE_IMAGE,imageCode);
       	specCaptcha.out( request.getResponse().getOutputStream());
    }
}
生成验证码的请求
@RestController
public class ValidateController {

    @Autowired
    private ValidateGenerator imageValidateGenerator;

    @GetMapping("/code/image")
    public void captcha(HttpServletRequest request, HttpServletResponse response) throws Exception {
        // 设置请求头为输出图片类型
        response.setContentType("image/gif");
       imageValidateGenerator.generator(new ServletWebRequest(request, response));
    }
}
Filter来验证验证码
@Getter
@Setter
@Slf4j
public class ImageValidateFilter extends OncePerRequestFilter {
    private AuthenticationFailureHandler myAuthenticationFailureHandler;

    @Override
    protected void doFilterInternal(HttpServletRequest request, HttpServletResponse response, FilterChain filterChain) throws ServletException, IOException {

        // 如果是登录请求
        if ("/auth/form".equals(request.getRequestURI()) && "POST".equals(request.getMethod())) {
            try {
                validate(request);
            } catch (ValidateException e) {
                myAuthenticationFailureHandler.onAuthenticationFailure(request,response,e);
                return;
            }
        }
        // 非登录
        filterChain.doFilter(request,response);

    }

    private void validate(HttpServletRequest request) throws ServletRequestBindingException {
        // 获取验证码,
        String requestCode = ServletRequestUtils.getStringParameter(request, "imageCode");
        // session中获取
        ImageCode imageCode = (ImageCode) request.getSession().getAttribute(ImageValidateGenerator.CODE_IMAGE);

        if (StringUtils.isEmpty(requestCode)) {
            throw new ValidateException("验证码不能为空");
        }
        if (imageCode == null) {
            throw new ValidateException("验证码不存在");
        }
        if (imageCode.isExpired()) {
            throw new ValidateException("验证码已过期");
        }
        if (!requestCode.equals(imageCode.getCode())) {
            throw new ValidateException("验证码错误");
        }
        // session 删除验证码
        request.getSession().removeAttribute(ImageValidateGenerator.CODE_IMAGE);
    }

}
html页面添加一行
验证码:<input type="text" name="imageCode" > <img src="/code/image"/><br/>
最后添加MySecurityConfig中的配置,主要是把自己的Filter放在UsernamePasswordAuthenticationFilter之前执行
@Configuration
public class MySecurityConfig extends WebSecurityConfigurerAdapter {
	...

    @Override
    protected void configure(HttpSecurity http) throws Exception {
        ImageValidateFilter imageFilter = new ImageValidateFilter();
        imageFilter.setMyAuthenticationFailureHandler(myAuthenticationFailureHandler);

        http.addFilterBefore(imageFilter, UsernamePasswordAuthenticationFilter.class) // 自己的过滤器加在 UsernamePasswordAuthenticationFilter 前面
                .formLogin()
                .loginPage("/login")// 自定义登录页
                .loginProcessingUrl("/auth/form") //登录提交表单的地址
                .successHandler(myAuthenticationSuccessHandler)
                .failureHandler(myAuthenticationFailureHandler)
                .and()
                .authorizeRequests()
                .antMatchers("/user/common","/login","/code/image").permitAll()// 放行
                .antMatchers("/user/admin").hasRole("admin")// 只有拥有admin角色才能访问
                .anyRequest().authenticated()
                .and()
                .csrf().disable();// 都需要验证  关闭 csrf 不然 post请求无法通过
    }
 	...
}
效果:可成功验证:
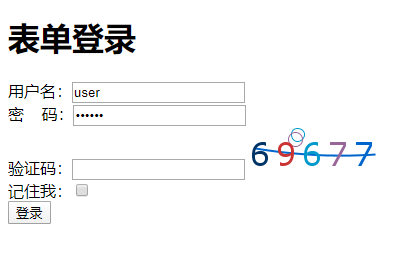
添加记住我功能


html添加一行
name 必须为 remember-me,value可以不需要
记住我:<input type="checkbox" name="remember-me" value="true"><br/>
修改MySecurityConfig 为
需要引入springjdbc包
@Configuration
public class MySecurityConfig extends WebSecurityConfigurerAdapter {
    // 注入 成功,失败处理器
    @Autowired
    private AuthenticationSuccessHandler myAuthenticationSuccessHandler;
    @Autowired
    private AuthenticationFailureHandler myAuthenticationFailureHandler;

    @Autowired
    private UserDetailsService myUserDetailService;

    @Autowired
    private DataSource dataSource;

    @Bean
    public PersistentTokenRepository persistentTokenRepository(){
        JdbcTokenRepositoryImpl repository = new JdbcTokenRepositoryImpl();
        repository.setDataSource(dataSource);
        repository.setCreateTableOnStartup(true);// 第一次启动就创建表,后面再次启动需要关闭

        return repository;
    }
    @Override
    protected void configure(HttpSecurity http) throws Exception {
        ImageValidateFilter imageFilter = new ImageValidateFilter();
        imageFilter.setMyAuthenticationFailureHandler(myAuthenticationFailureHandler);

//        super.configure(http);
        http.addFilterBefore(imageFilter, UsernamePasswordAuthenticationFilter.class) // 自己的过滤器加在 UsernamePasswordAuthenticationFilter 前面
                .formLogin()
                    .loginPage("/login")// 自定义登录页
                    .loginProcessingUrl("/auth/form") //登录提交表单的地址
                    .successHandler(myAuthenticationSuccessHandler)
                    .failureHandler(myAuthenticationFailureHandler)
                    .and()
                .rememberMe()
                    .tokenRepository(persistentTokenRepository())
                    .userDetailsService(myUserDetailService)
                    .tokenValiditySeconds(3600 * 24 * 7)//一周有效
                    .and()
                .authorizeRequests()
                    .antMatchers("/user/common","/login","/code/image").permitAll()// 放行
                    .antMatchers("/user/admin").hasRole("admin")// 只有拥有admin角色才能访问
                    .anyRequest().authenticated()
                    .and()
                    .csrf().disable();// 都需要验证  关闭 csrf 不然 post请求无法通过
    }
    @Bean
    public PasswordEncoder passwordEncoder(){
        return new BCryptPasswordEncoder();
    }
}
repository.setCreateTableOnStartup(false);第一次启动就创建表,后面再次启动需要关闭,不然会报错
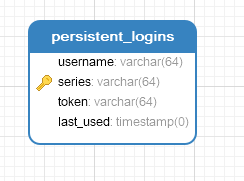
也可以点进JdbcTokenRepositoryImpl手动创表
如果只添加 .rememberMe(),不配它下面的信息,就会在cookie中保存一条 remember-me的cookie

而配置了数据源, 就会保存用Cookie 中的加密串,登录时到数据库中验证,如果通过,自动登录才算通过。


 551
551


 被折叠的 条评论
为什么被折叠?
被折叠的 条评论
为什么被折叠?
 到【灌水乐园】发言


