


本篇博客承接上一篇ansible的部署以及基本模块的使用
自动化部署httpd服务
通过分步部署httpd服务来理解playbooks的基本使用。
编写playbooks时默认间隔是两个空格,所以为了方便编写,我们设置一下编写playbooks的yml文件时使用TAB键跳两个空格。
[devops@server1 ansible]$ cd
[devops@server1 ~]$ ls
ansible
[devops@server1 ~]$ vim .vimrc
autocmd filetype yaml setlocal ai ts=2 sw=2 et

接下来就可以编写playbooks了。
[devops@server1 ansible]$ vim httpd.yml
文件名要以yml后缀结尾
---
- hosts: webservers		##指定主机
  tasks:					##任务
    - name: install httpd		##名字随意,不重复就行
      yum:
        name: httpd				##服务名称
        state: latest			##版本为最新版

    - name: start httpd
      service:					##指定服务
        name: httpd
        state: started
在webservers组上的主机安装并启动httpd服务。我们看一下之前编写的文件
[devops@server1 ansible]$ ls
ansible.cfg  httpd.yml  inventory
[devops@server1 ansible]$ vim inventory
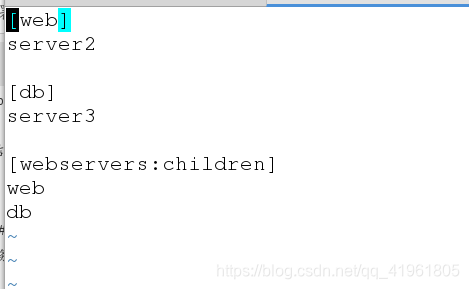
webservers组包含两个组。
[devops@server1 ansible]$ ansible-playbook httpd.yml --syntax-check

检测语法,如果有错会进行报错。
[devops@server1 ansible]$ ansible-playbook httpd.yml
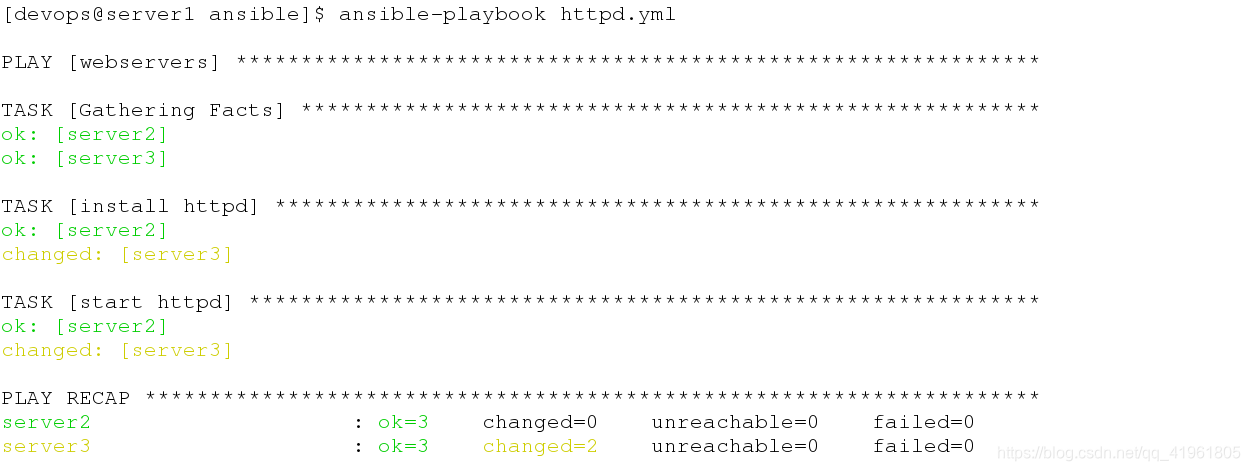
在server3上安装并打开httpd服务,因为server2已经安装过了,所以没有重新进行安装,这里我们发现,模块的使用也和前面使用-m选项使用模块一样,只不过这里整合到一个文件中了。
接下来要对playbooks进行进一步的优化。
[devops@server1 ansible]$ ls
ansible.cfg  httpd.yml  inventory
[devops@server1 ansible]$ vim httpd.yml
---
- hosts: webservers
  tasks:
    - name: install httpd
      yum:
        name: httpd
        state: latest
    - name: create index.html			##写发布目录文件
      copy:
        content: "test.hang.com\n"
        dest: /var/www/html/index.html

    - name: start httpd
      service:
        name: httpd
        state: started
[devops@server1 ansible]$ ansible-playbook httpd.yml
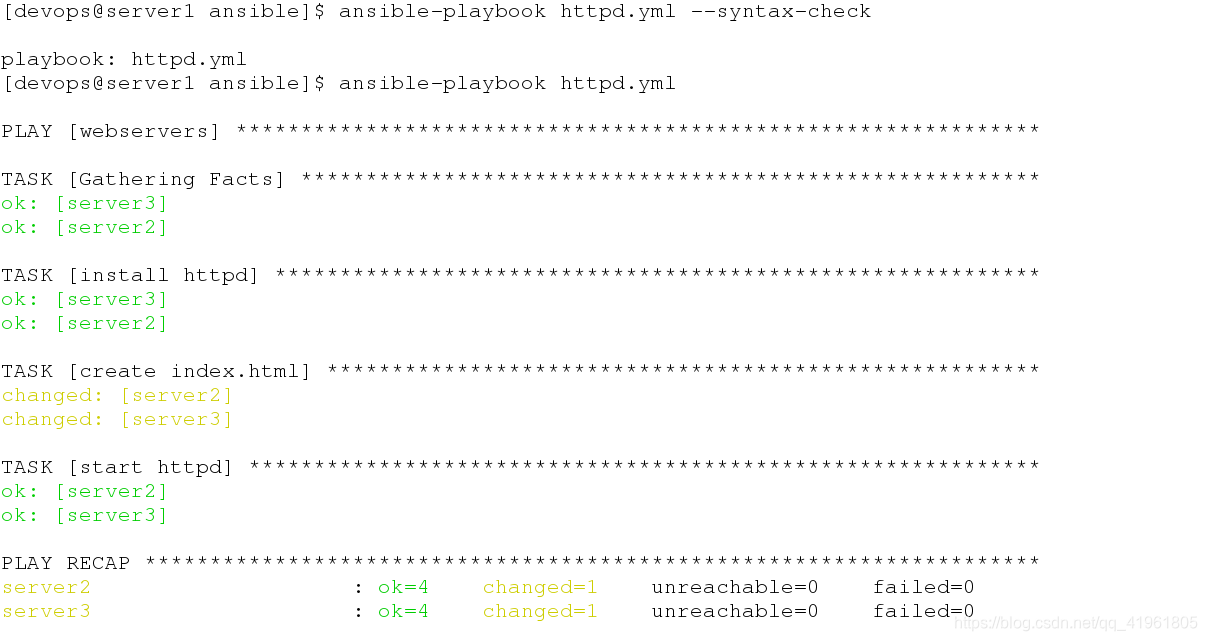
推送。这样,我们就知道怎么去修改或创建远程主机的文件了

测试,两台主机发布页上的内容一样。
[devops@server1 ansible]$ ansible web -m setup

用setup模块可以查看主机下可以使用的参数变量。
[devops@server1 ansible]$ mkdir files
[devops@server1 ansible]$ ls
ansible.cfg  files  httpd.yml  inventory
[devops@server1 ansible]$ cd files/
[devops@server1 files]$ ls
[devops@server1 files]$ ls
[devops@server1 files]$ scp server2:/etc/httpd/conf/httpd.conf .
httpd.conf                                 100%   11KB  11.5KB/s   00:00
[devops@server1 files]$ ls
httpd.conf
创建files目录,用来存放部署服务时用到的文件。
[devops@server1 ansible]$ vim httpd.yml
---
- hosts: webservers
  tasks:
    - name: install httpd
      yum:
        name: httpd
        state: latest

    - name: create index.html
      copy:
        content: "test.hang.com\n"
        dest: /var/www/html/index.html

    - name: configure httpd			##复制主配置文件到远程主机
      copy:
        src: files/httpd.conf
        dest: /etc/httpd/conf/httpd.conf
        owner: root
        group: root
        mode: 644
      notify: restart httpd			##配置文件修改后要重启服务才能生效

    - name: start httpd
      service:
        name: httpd
        state: started
        enabled: true
  handlers:							##设置使httpd服务重启
    - name: restart httpd
      service:
        name: httpd
        state: restarted
[devops@server1 ansible]$ vim files/httpd.conf

此时,在server1内修改主配置文件,把端口修改为8080了。
[devops@server1 ansible]$ ansible-playbook httpd.yml
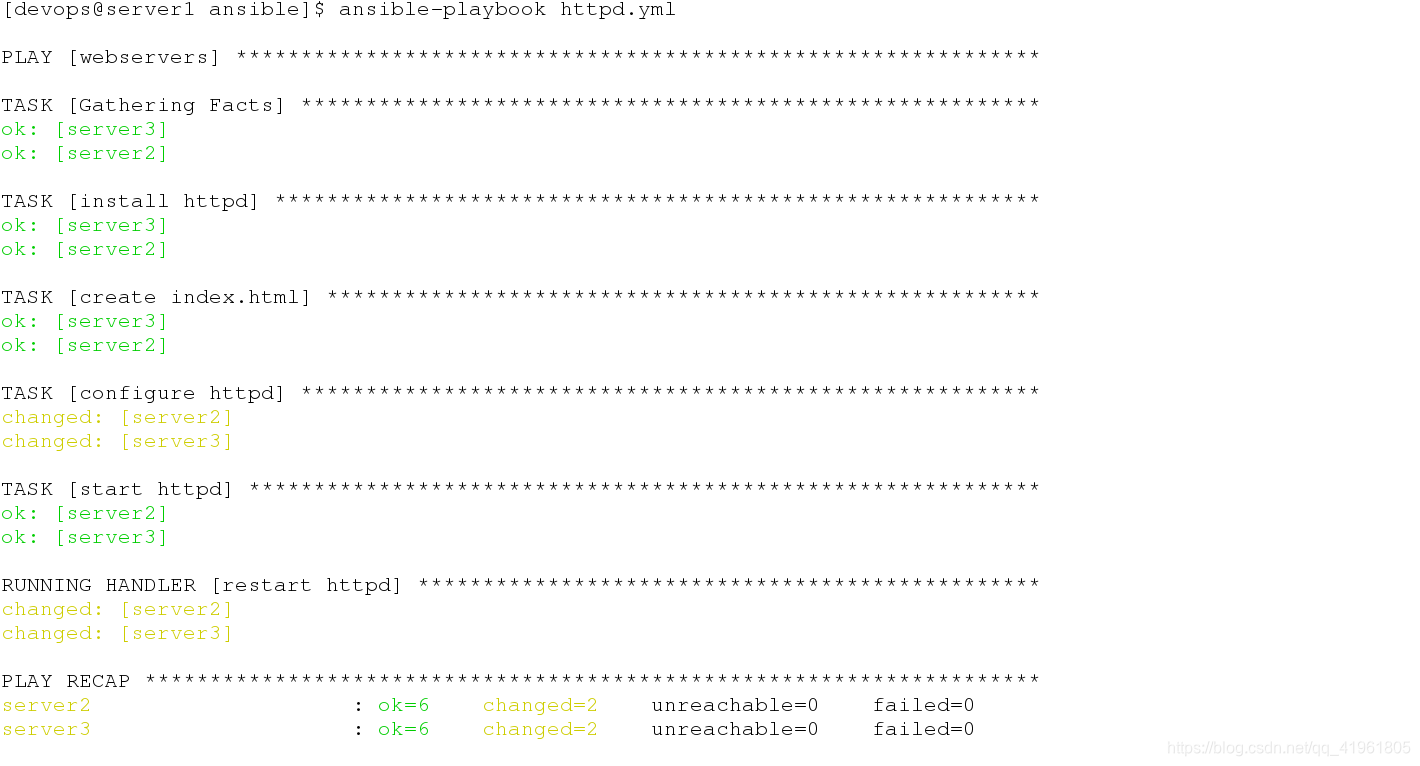
推送。

在server2查看8080端口已经起来了,这样就实现了批量自动修改多台主机服务的配置。
[devops@server1 ansible]$ vim httpd.yml
---
- hosts: webservers
  tasks:
    - name: install httpd
      yum:
        name: httpd
        state: latest

    - name: create index.html
      copy:
        content: "{{ ansible_facts['hostname'] }}\n"		##设置变量为主机名
        dest: /var/www/html/index.html

    - name: configure httpd
      copy:
        src: files/httpd.conf
        dest: /etc/httpd/conf/httpd.conf
        owner: root
        group: root
        mode: 644
      notify: restart httpd

    - name: start httpd
      service:
        name: httpd
        state: started
        enabled: true

    - name: start firewalld									##配置firewalld
      service:
        name: firewalld
        state: started
        enabled: true

    - name: configure firewalld
      firewalld:
      service: http
        state: enabled
        permanent: yes
        immediate: yes


  handlers:
    - name: restart httpd
      service:
        name: httpd
        state: restarted
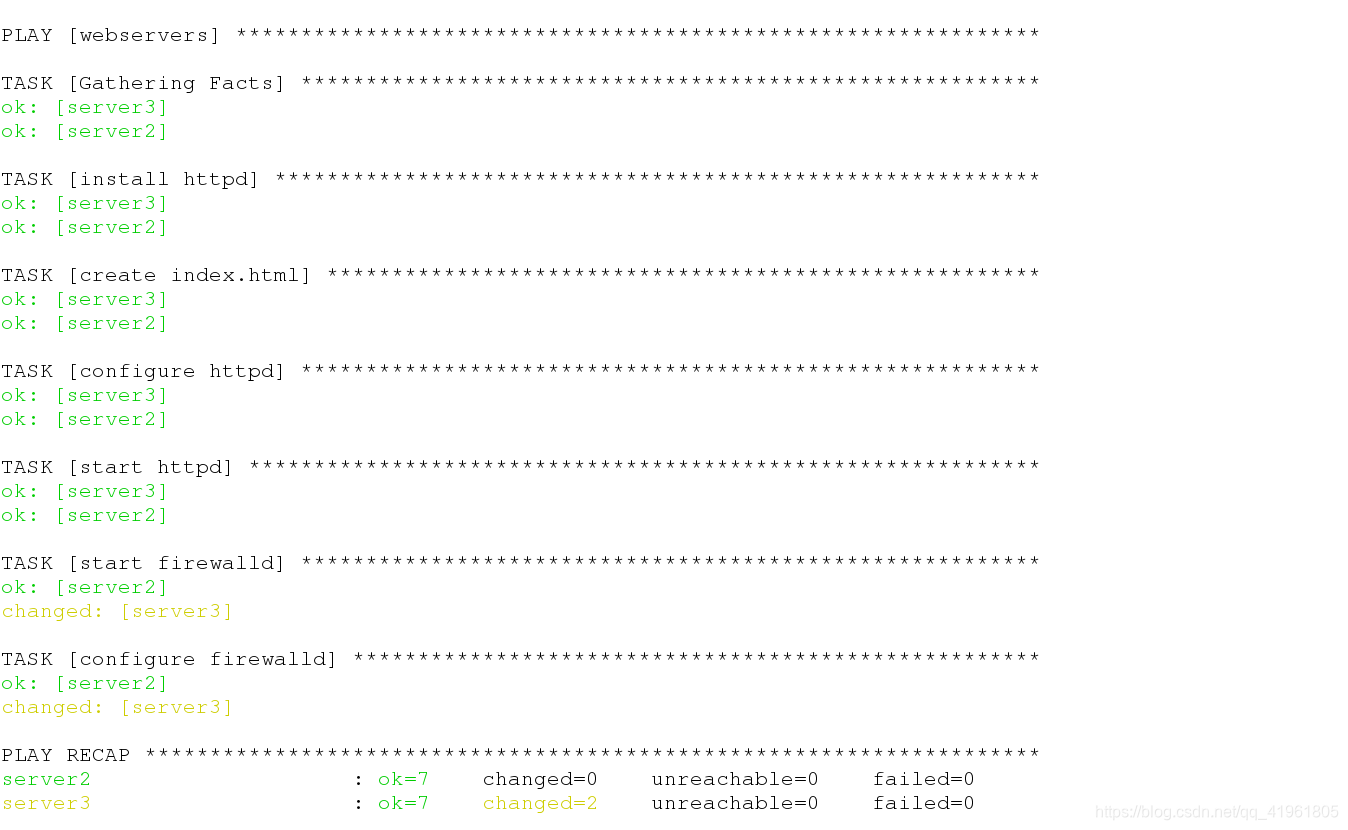
添加firewalld部署,允许httpd服务.
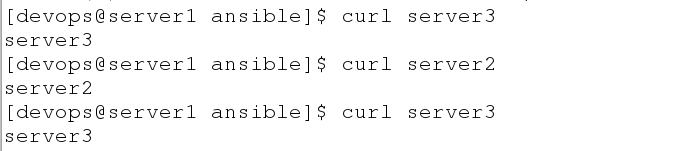
访问时放问到设置的主机名变量。
[devops@server1 ansible]$ ansible web -m setup
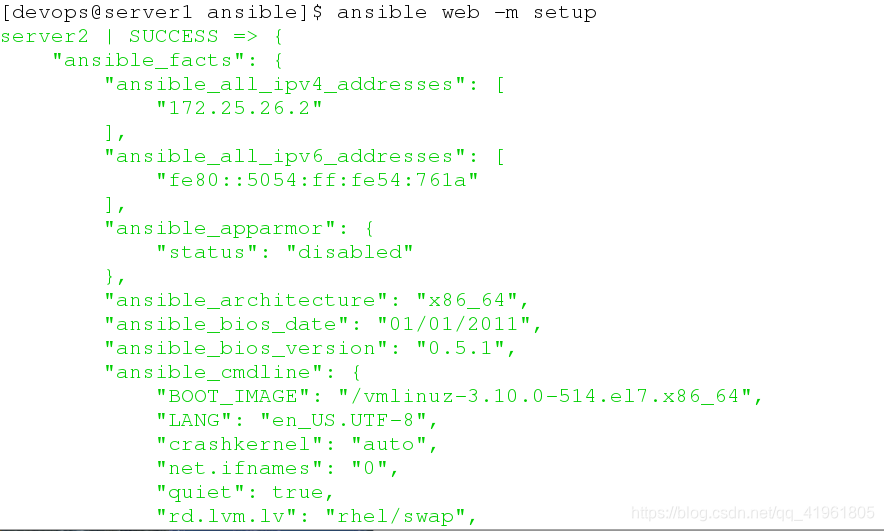
前面也说到了,这样查看参数列表

这就是上面写入的内容,在编写普拉页books的时候通常用{{ ansible_facts[’’]}}取值,可以看到,hostname前面的ansible_是可以省略。

取变量时是一层一层往下取的,如要取eth0则要输入{{ ansible_facts[‘eth0’][‘device’] }},以次类推。
下面说一下tags标签的使用
[devops@server1 ansible]$ vim httpd.yml
    - name: create index.html
      copy:
        content: "{{ ansible_facts['hostname'] }}\n"
        dest: /var/www/html/index.html
      tags: index						##做标签。
这里只是对上面已有的代码进行修改,并没有删除独立,要注意进行对照,我在这部分的代码做了一个标签,命名为index,这个可以根据自己的需求进行修改。
[devops@server1 ansible]$ ansible-playbook httpd.yml -t index
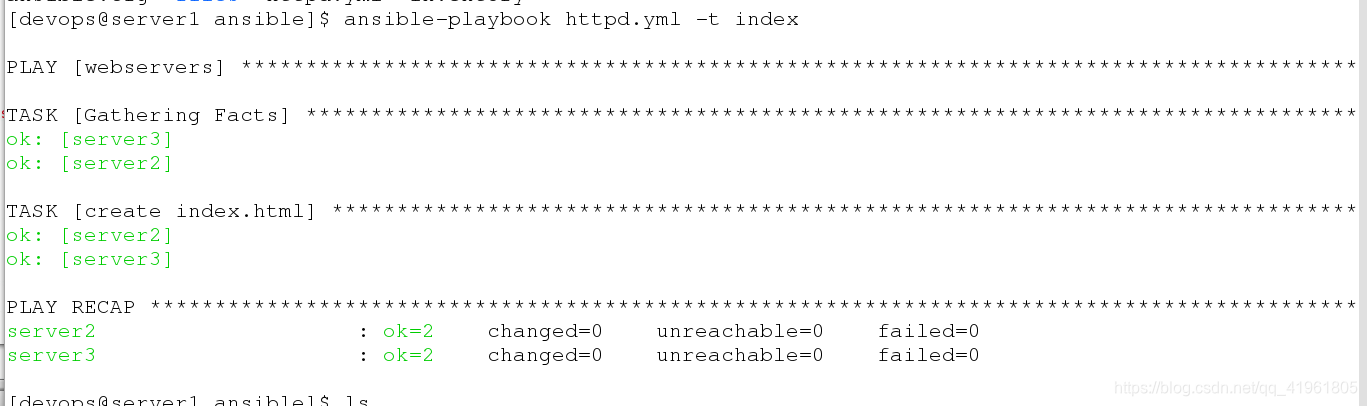 推送时用-t选项指定标签名index,之后执行的只有打标签这部分内容。
下面,我们在设置一下在yml文件中添加httpd服务的端口,实现在推送时修改端口。
[devops@server1 ansible]$ vim httpd.yml
---
- hosts: webservers
  vars:
    http_port: 8080								## 添加端口信息
  tasks:
    - name: install httpd
      yum:
        name: httpd
        state: latest

    - name: create index.html
      copy:
        content: "{{ ansible_facts['hostname'] }}\n"
        dest: /var/www/html/index.html
      tags: index

    - name: configure httpd
      template:									##模版
        src: files/httpd.conf
        dest: /etc/httpd/conf/httpd.conf
        owner: root
        group: root
        mode: 644
      notify: restart httpd

    - name: start httpd
      service:
        name: httpd
        state: started
        enabled: true

    - name: start firewalld
      service:
        name: firewalld
        state: started
        enabled: true
    - name: configure firewalld
      firewalld:
        service: http
        state: enabled
        permanent: yes
        immediate: yes


  handlers:
    - name: restart httpd
      service:
        name: httpd
        state: restarted
[devops@server1 ansible]$ ls
ansible.cfg  files  httpd.yml  inventory
[devops@server1 ansible]$ vim files/httpd.conf

修改主配置文件,端口是上面yml文件中的变量,上面设置的端口为8080.
[devops@server1 ansible]$ ansible-playbook httpd.yml

推送。

在server2查看,端口已经改为8080.


 2万+
2万+


 被折叠的 条评论
为什么被折叠?
被折叠的 条评论
为什么被折叠?
 到【灌水乐园】发言


