


![]()
在此功能中,我将介绍使用OpenCV和Python代码设置对象检测和跟踪所需的功能。使用随附的代码片段,您可以轻松设置Raspberry Pi和网络摄像头,以便制作用于物体检测的便携式图像传感器。
本文适用于任何希望在Raspberry Pi项目中使用OpenCV的人。一些项目可以包括用于避障或航路点跟踪的Raspberry Pi机器人车辆。此外,包括对象计数和监视。
物体检测
对象检测建立在我上一篇文章的基础上,我在其中应用颜色范围以允许通过蒙版显示感兴趣的区域。在此功能中,我继续使用颜色作为对对象进行分类的方法。如果我可以按颜色对对象进行分类,我可以跟踪从视频帧到视频帧的对象。为此,对象必须与周围区域的颜色不同。但是,可以使用OpenCV方法过滤掉相似颜色的较小对象。
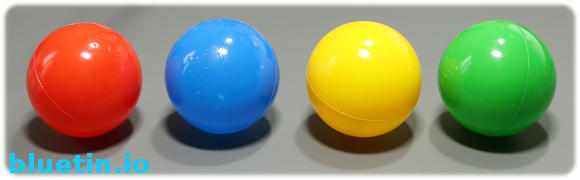
塑料儿童游戏坑球红色,蓝色,黄色和绿色
对于Pi Wars挑战,我的机器人需要能够检测和跟踪不同颜色的圆形塑料球。因此,我将使用这些圆球的示例来测试下面的代码。
我将使用颜色对这些塑料球进行分类,但请注意,这不是对对象进行分类的唯一方法。由于塑料球是一种良好的固体均匀颜色,因此在这种情况下,通过颜色进行物体检测是最佳选择。
使用Python进行对象检测
下面的所有代码片段都包含在本文末尾附近的示例OpenCV示例程序中。
对象分类
颜色阈值
塑料玩坑球作为检测对象
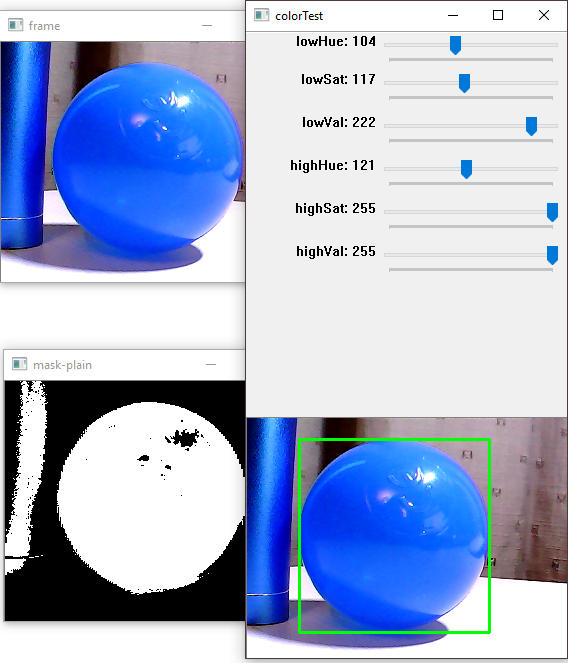
我选择按颜色检测塑料球,所以我需要设置颜色范围,我可以用它来分类每个彩色球。
blue = (104, 117, 222, 121, 255, 255)我使用数组来保存较低和较高颜色阈值的值。颜色阈值使用HSV(色调饱和度值)颜色配置文件。
颜色转换
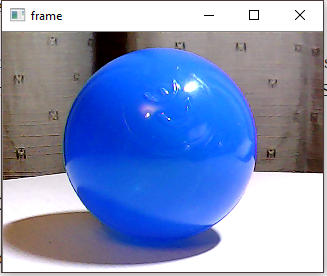
frameHSV = cv2.cvtColor(frame, cv2.COLOR_BGR2HSV)
在我可以使用定义彩色球的HSV配置文件值之前,我必须将捕获的网络摄像头帧转换为HSV颜色配置文件。
创建一个面具
物体检测掩模
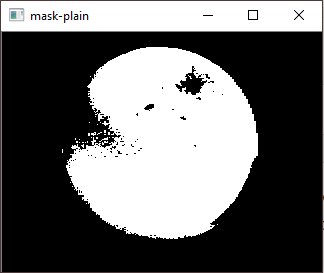
colorLow = np.array([lowHue,lowSat,lowVal])
colorHigh = np.array([highHue,highSat,highVal])
mask = cv2.inRange(frameHSV, colorLow, colorHigh)
在这里,我使用我为球设置的颜色范围来创建蒙版。掩模将使查找检测到的对象周围的轮廓更有效。白色区域是在上面设置的颜色范围内找到的感兴趣区域。我可以使用各种图像滤镜来改善图像蒙版。然而,应用滤光器以获得完美的掩模在处理能力方面可能是昂贵的。
OpenCV轮廓
查找轮廓
im2, contours, hierarchy = cv2.findContours(mask, cv2.RETR_TREE, cv2.CHAIN_APPROX_SIMPLE)现在我有一个可以使用的图像蒙版,我可以继续寻找轮廓。第三个参数,轮廓近似方法,只收集直线的端点坐标。蒙版中的所有白色斑点都将应用轮廓。找到的轮廓的数组列表将位于轮廓变量中。
(可选)绘制所有轮廓
OpenCV查找轮廓示例
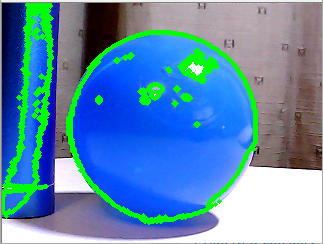
cv2.drawContours(frame, contours, -1, (0,255,0), 3)检测到两个对象,并且一些较深的蓝色超出了之前设置的阈值范围。如果面罩的质量很嘈杂,那么会有很多轮廓 - 许多小轮廓。为了获得有用的物体检测,我需要删除不需要的轮廓。
上图显示了塑料球盘旋的轮廓; 我的目标是在下一步中将其分离出来。
(可选)查找最大轮廓
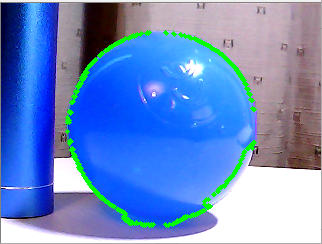
查找最大轮廓示例 - OpenCV方法
contour_sizes = [(cv2.contourArea(contour), contour) for contour in contours]
biggest_contour = max(contour_sizes, key=lambda x: x[0])[1]
cv2.drawContours(frame, biggest_contour, -1, (0,255,0), 3)
上面的OpenCV Python代码找到了所有轮廓中最大的轮廓。然后在原始图像上绘制最大的轮廓。由于球是最大的蓝色物体,我可以可靠地探测到球。然而,球必须保持主要的蓝色物体并保持焦点以便可靠地跟踪。
所以在这一点上,我能够改进OpenCV对象检测。我现在只检测一个项目。在这种情况下,物体检测的质量非常好。但是,移动网络摄像头或物体甚至改变光线条件都会使检测质量变得不可预测。
边界矩形
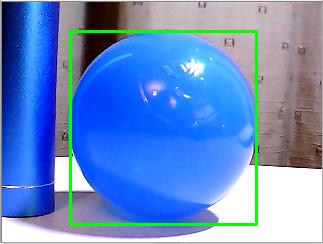
OpenCV方法 - 边界矩形示例
contour_sizes = [(cv2.contourArea(contour), contour) for contour in contours]
biggest_contour = max(contour_sizes, key=lambda x: x[0])[1]
x,y,w,h = cv2.boundingRect(biggest_contour)
cv2.rectangle(frame,(x,y),(x+w,y+h),(0,255,0),2)
从示例图像中可以看出,只需很少的Python代码,我就可以获得良好的OpenCV对象检测。上面Python代码的第三行揭示了我如何提取有关检测到的对象的有用数据。此外,我可以看到这些数据是如何用于在检测到的对象周围绘制边界框的。
如果我在像Raspberry Pi这样的嵌入式设备中使用OpenCV,我将只使用上面代码的前三行。以上代码应遵循查找轮廓方法。
x,y坐标和宽度,高度尺寸将在网络摄像头帧更新之间不断变化。此外,对于环境条件可变的较大物体,坐标和尺寸将发生更大的变化。
资源
- OpenCV - 轮廓 - 入门 - 链接。
- OpenCV - 轮廓特征 - 链接。
- 用于Windows的Python 3+下载 - 链接。
- 用于OpenCV Python绑定的包装程序包(用于Windows平台) - 链接。
- 使用Raspberry Pi相机和OpenCV - Link。
相关文章

从Shell脚本 - 链接安装OpenCV到Raspberry Pi 。

使用Python进行OpenCV颜色检测和过滤 - 链接。
使用OpenCV和Python多线程的Pi Camera视频捕获 - 链接。
还可以在这里找到GitHub上的代码。
对象检测Python测试代码
请参考以前的文章在这里是否需要帮助运行下面的OpenCV的Python测试代码。
#!/usr/bin/env python3

"""
File: opencv-webcam-object-detection.py

This Python 3 code is published in relation to the article below:
https://www.bluetin.io/opencv/opencv-color-detection-filtering-python/

Website:    www.bluetin.io
Author:     Mark Heywood
Date:	    31/12/2017
Version     0.1.0
License:    MIT
"""

from __future__ import division
import cv2
import numpy as np
import time

def nothing(*arg):
        pass

FRAME_WIDTH = 320
FRAME_HEIGHT = 240

# Initial HSV GUI slider values to load on program start.
#icol = (36, 202, 59, 71, 255, 255)    # Green
#icol = (18, 0, 196, 36, 255, 255)  # Yellow
#icol = (89, 0, 0, 125, 255, 255)  # Blue
#icol = (0, 100, 80, 10, 255, 255)   # Red
#icol = (104, 117, 222, 121, 255, 255)   # test
icol = (0, 0, 0, 255, 255, 255)   # New start

cv2.namedWindow('colorTest')
# Lower range colour sliders.
cv2.createTrackbar('lowHue', 'colorTest', icol[0], 255, nothing)
cv2.createTrackbar('lowSat', 'colorTest', icol[1], 255, nothing)
cv2.createTrackbar('lowVal', 'colorTest', icol[2], 255, nothing)
# Higher range colour sliders.
cv2.createTrackbar('highHue', 'colorTest', icol[3], 255, nothing)
cv2.createTrackbar('highSat', 'colorTest', icol[4], 255, nothing)
cv2.createTrackbar('highVal', 'colorTest', icol[5], 255, nothing)

# Initialize webcam. Webcam 0 or webcam 1 or ...
vidCapture = cv2.VideoCapture(0)
vidCapture.set(cv2.CAP_PROP_FRAME_WIDTH,FRAME_WIDTH)
vidCapture.set(cv2.CAP_PROP_FRAME_HEIGHT,FRAME_HEIGHT)

while True:
    timeCheck = time.time()
    # Get HSV values from the GUI sliders.
    lowHue = cv2.getTrackbarPos('lowHue', 'colorTest')
    lowSat = cv2.getTrackbarPos('lowSat', 'colorTest')
    lowVal = cv2.getTrackbarPos('lowVal', 'colorTest')
    highHue = cv2.getTrackbarPos('highHue', 'colorTest')
    highSat = cv2.getTrackbarPos('highSat', 'colorTest')
    highVal = cv2.getTrackbarPos('highVal', 'colorTest')

    # Get webcam frame
    _, frame = vidCapture.read()

    # Show the original image.
    cv2.imshow('frame', frame)

    # Convert the frame to HSV colour model.
    frameHSV = cv2.cvtColor(frame, cv2.COLOR_BGR2HSV)

    # HSV values to define a colour range we want to create a mask from.
    colorLow = np.array([lowHue,lowSat,lowVal])
    colorHigh = np.array([highHue,highSat,highVal])
    mask = cv2.inRange(frameHSV, colorLow, colorHigh)
    # Show the first mask
    cv2.imshow('mask-plain', mask)

    im2, contours, hierarchy = cv2.findContours(mask, cv2.RETR_TREE, cv2.CHAIN_APPROX_SIMPLE)

    contour_sizes = [(cv2.contourArea(contour), contour) for contour in contours]
    biggest_contour = max(contour_sizes, key=lambda x: x[0])[1]

    #cv2.drawContours(frame, biggest_contour, -1, (0,255,0), 3)

    x,y,w,h = cv2.boundingRect(biggest_contour)
    cv2.rectangle(frame,(x,y),(x+w,y+h),(0,255,0),2)

    #cv2.drawContours(frame, contours, -1, (0,255,0), 3)

    #cv2.drawContours(frame, contours, 3, (0,255,0), 3)

    #cnt = contours[1]
    #cv2.drawContours(frame, [cnt], 0, (0,255,0), 3)

    # Show final output image
    cv2.imshow('colorTest', frame)

    k = cv2.waitKey(5) & 0xFF
    if k == 27:
        break
    print('fps - ', 1/(time.time() - timeCheck))

cv2.destroyAllWindows()
vidCapture.release()


 2万+
2万+


 被折叠的 条评论
为什么被折叠?
被折叠的 条评论
为什么被折叠?
 到【灌水乐园】发言


