


点击上方“小白学视觉”,选择加"星标"或“置顶”
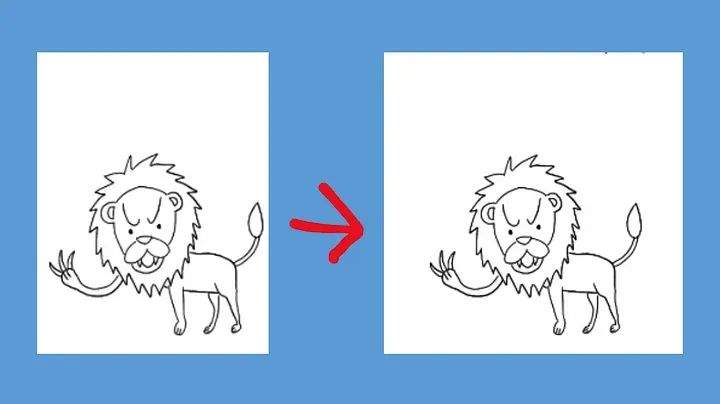
重磅干货,第一时间送达使用 CV2 在 Python 中以编程方式完成如下操作:将非方形图像转换为方形图像
因此,6 年来,我第一次将一些图片上传到 Instagram。我画了一些愚蠢的漫画,想上传它来娱乐一下。然而,问题:
我有 10 张图片要上传
每个图像都有不同的尺寸
Instagram 会自动将你的图像 (ew) 裁剪为
方形
4:5 纵横比
9:16 纵横比
所以我需要一种方法来为我的图像添加白色填充,使它们都是正方形。
以下是我如何使用 Python 实现的:
文件夹结构
- myimages
  - 1.png
  - 2.png
  - 3.png
  - 4.png
  - 5.png
  - 6.png
run.py
安装依赖
pip install opencv-python完整代码
# run.py

import cv2
import os

# replace this with your own folder name
# your folder should contain all images you want to squarify
folder = 'yourfolder'

new_folder = f'{folder}_new'
if not os.path.exists(new_folder):
    os.mkdir(new_folder)

for filename in os.listdir(folder):
    if '.png' not in filename.lower():
        continue

    filepath = f'{folder}/{filename}'
    img = cv2.imread(filepath)

    h, w = img.shape[:2]
    px, py = 0, 0

    if h > w:
        px = (h-w)//2
    elif h < w:
        py = (w-h)//2

    newimg = cv2.copyMakeBorder(
        img, py, py, px, px, borderType=cv2.BORDER_CONSTANT, value=[255,255,255]
    )

    cv2.imwrite(f'{new_folder}/{filename}', newimg)
代码中发生了什么
import cv2
import os

# replace this with your own folder name
# your folder should contain all images you want to squarify
folder = 'myimages'

# name of folder the NEW images will be in
new_folder = f'{folder}_new'

# if this folder doesn't exist, create it
if not os.path.exists(new_folder):
    os.mkdir(new_folder)

# looping through all images in our folder
for filename in os.listdir(folder):

    # ignoring anything that isn't an image
    # rememeber to change this is you're using jpg or something else
    if '.png' not in filename.lower():
        continue

    filepath = f'{folder}/{filename}'

    # reading the image using cv2.imread
    # img is a numpy 3d array
    img = cv2.imread(filepath)

    # extracting height/width of image
    h, w = img.shape[:2]

    # px --> number of padding pixels to add on left/right
    # py --> number of padding pixels to add on top/bottom
    px, py = 0, 0

    # checking if image height is more than image width
    if h > w:
        # calculating pixels to add to left/right
        # py will be 0
        px = (h-w)//2
    elif h < w:
        # calculating pixels to add to top/bottom
        # py will be 0
        py = (w-h)//2

    # creating new image with padding
    newimg = cv2.copyMakeBorder(
        img, py, py, px, px,
        borderType=cv2.BORDER_CONSTANT,
        value=[255,255,255]  # white (change this if you want other colors)
    )

    # saving our image
    cv2.imwrite(f'{new_folder}/{filename}', newimg)
运行后的结果文件夹结构
- myimages
  - 1.png
  - 2.png
  - 3.png
  - 4.png
  - 5.png
  - 6.png
- myimages_new
  - 1.png
  - 2.png
  - 3.png
  - 4.png
  - 5.png
  - 6.png
run.py
运行我们的 Python 脚本后,该myimages_new文件夹会自动生成。对于myimages中的每张图片,都会在myimages_new 中生成对应的同名正方形图片。
下载1:OpenCV-Contrib扩展模块中文版教程

在「小白学视觉」公众号后台回复:扩展模块中文教程,即可下载全网第一份OpenCV扩展模块教程中文版,涵盖扩展模块安装、SFM算法、立体视觉、目标跟踪、生物视觉、超分辨率处理等二十多章内容。


下载2:Python视觉实战项目52讲
在「小白学视觉」公众号后台回复:Python视觉实战项目,即可下载包括图像分割、口罩检测、车道线检测、车辆计数、添加眼线、车牌识别、字符识别、情绪检测、文本内容提取、面部识别等31个视觉实战项目,助力快速学校计算机视觉。


下载3:OpenCV实战项目20讲
在「小白学视觉」公众号后台回复:OpenCV实战项目20讲,即可下载含有20个基于OpenCV实现20个实战项目,实现OpenCV学习进阶。


交流群

欢迎加入公众号读者群一起和同行交流,目前有SLAM、三维视觉、传感器、自动驾驶、计算摄影、检测、分割、识别、医学影像、GAN、算法竞赛等微信群(以后会逐渐细分),请扫描下面微信号加群,备注:”昵称+学校/公司+研究方向“,例如:”张三 + 上海交大 + 视觉SLAM“。请按照格式备注,否则不予通过。添加成功后会根据研究方向邀请进入相关微信群。请勿在群内发送广告,否则会请出群,谢谢理解~


 被折叠的 条评论
为什么被折叠?
被折叠的 条评论
为什么被折叠?
 到【灌水乐园】发言


