


 本文详细介绍了Vue.js中的常用指令,包括v-for用于遍历数据渲染,v-if和v-show用于条件渲染,以及v-bind用于动态绑定属性。文章通过实例展示了这些指令的使用方式,如v-for在商品列表和购物车场景的应用,v-if与v-show的区别,以及v-bind在动态更新class和style属性中的作用。
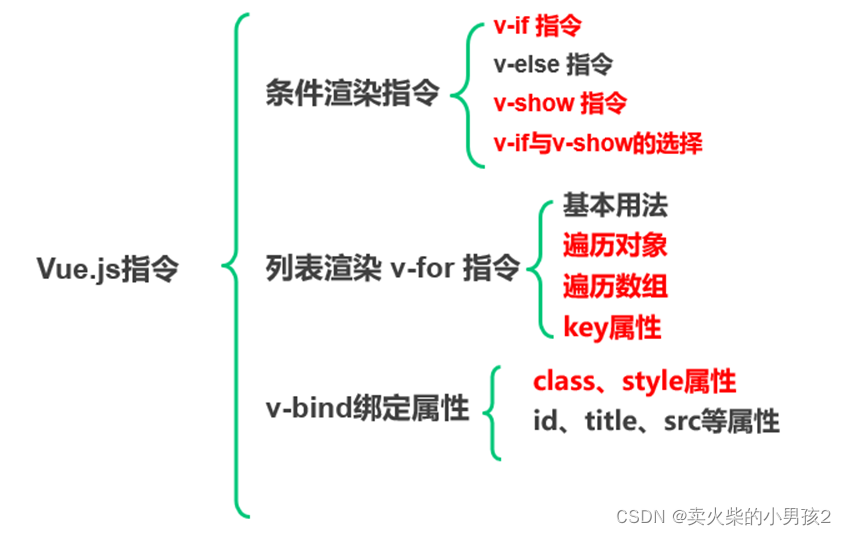
一、Vue常用指令
1、定义:Vue常用指令是带有v-前缀的特殊属性,例如v-for、v-if、v-show、v-bind。
2、作用:当表达式的值改变时 ,将其产生的连带影响 ,响应式的作用于DOM。
DOM ← { }
二、v-for指令
1、遍历data中的数据,并在页面中渲染出来
2、语法
v-for="(item,index) in telList"item 表示每次遍历得到的元素 index 表示item的索引,可选参数 telList 表示数组或者对象
3、遍历对象
<!DOCTYPE html>
<html>
<head>
  <title>遍历对象</title>
  <meta charset="utf-8">
  <script src="lib/vue.js"></script>
</head>
<body>
  <div id="app">
    <ul>
      <li v-for="(item,index) in telList"><!-- v-for指令基于一个数组或对象渲染一个列表,它和JavaScript的遍历语法相似,v-for="item in items" ,items可以代表数组,item是当前被遍历的数组元素项。 -->
        {{index}} - {{key}} - {{value}}
      </li>
    </ul>
  </div>
</body>
  <script type="text/javascript">
    new Vue({
      el:"#app",
      data:{
        //遍历数据
        person: {
          name: "卖核弹的小男孩",
          age: 21
        }
      },
    })
  </script>
</html>
4、我们可以从浏览器中看出
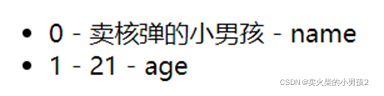
index代表当前对象的索引值、value 表示对象的属性值、 item 代表当前对象的属性名
5、v-for指令用的频率相当高,比如项目中的商品列表页面,一条一条的商品列表便是使用循环遍历出来的,还有常用购票人列表,肯定也是拿到后台数据库的数据,进行循环遍历显示的。
6、遍历数组
<!DOCTYPE html>
<html>
<head>
  <title>遍历数组</title>
  <meta charset="utf-8">
  <script src="lib/vue.js"></script>
</head>
<body>
  <div id="app">
    <ul>
      <li v-for="(item,index) in telList">
        索引:{{index}} - 名称:{{item.name}} - 价格:{{item.price}}
      </li>
    </ul>
  </div>
</body>
  <script type="text/javascript">
    new Vue({
      el:"#app",
      data:{
        //遍历数据
        telList:[
          { name: 'vivo s10', price:2700 },
          { name: 'oppo a5', price:899 }
        ]
      },
    })
  </script>
</html>7、购物车案例
<!DOCTYPE html>
<html>
<head>
  <title>购物车案例</title>
  <meta charset="utf-8">
  <script src="lib/vue.js"></script>
  <style>
table {
  border: 1px solid #e9e9e9;
  border-collapse: collapse;
  border-spacing: 0;
  empty-cells: show;
}
tr {
  line-height: 30px;
}
tr:nth-child(2n) {
  background-color: #efefef;
}
th,
td {
  padding: 8px 16px;
  text-align: left;
}
th {
  background: #cfeef0;
  color: #5c6b77;
  font-weight: 600;
  white-space: nowrap;
}
.totalnum {
  margin-top: 10px;
}
</style>

</head>
<body>
  <div id="app">
   <div>
      <table>
        <thead>
          <tr>
            <th></th>
            <th>商品名称</th>
            <th>商品单价</th>
            <th>商品数量</th>
          </tr>
        </thead>
        <tbody>
          <tr v-for="(item,index) in telList" v-if="item.count != 0">  <!-- 当item.count不等于零时显示行标签元素 -->
            <td>{{index+1}}</td>
            <td>{{item.name}}</td>
            <td>{{item.price}}</td>
            <td>{{item.count}}</td>
          </tr>
        </tbody>
      </table>
      <div>
        总价:{{totalprice}}¥
      </div>
  </div>
  </div>
</body>
<script type="text/javascript">
  var telList=[
    {
      name:"xiaomi12",
      price:3600,
      count:10
    },
    {
      name:"huaweiP50",
      price:7500,
      count:5
    },
    {
      name:"iphone13",
      price:8900,
      count:1
    },
    {//因为这个数组里count的值为0,所以不会被v-for渲染出来
      name:"vivoX5",
      price:7200,
      count:0
    }
  ]
  new Vue({
    el:"#app",
      data:{
      telList,
    },
    computed:{
      totalprice(){
        //计算总价
        let total=0
        for (var i=0; i< this.telList.length; i++) {
          total+=this.telList[i].price*this.telList[i].count    //total存储第一次价格和数量相乘后的数据,并在下一次加上第二次价格乘与数量的值,以此类推
          //i=0 this.telList[0].price*this.telList[0].count    3600*10  当i=0的时候,该区域内的价格和数量相乘
          //i=1 this.telList[1].price*this.telList[1].count    7500*5
          //i=0 this.telList[0].price*this.telList[0].count    8900*1
          //......
        }
        return total  // 返回数据
      }
    }
  })
</script>
</html>
三、条件渲染指令
1、分类:v-if指令、v-else指令、v-show指令
2、作用:可以根据表达式的值在DOM中渲染或销毁元素或者组件
四、v-if指令
1、被称为条件渲染指令,它根据表达式结果的真假,确定是否显示当前元素,true表示显示该元素;false表示隐藏该元素,可以用来实现一些简单的条件判断
2、语法
<h1 v-if="isShow">表达式的值为真就能显示</h1>3、案例
<!DOCTYPE html>
<html>
<head>
  <title>v-if指令</title>
  <meta charset="utf-8">
  <script src="lib/vue.js"></script>
</head>
<body>
  <div id="app">
    <h2 v-if="isShow">{{message}}</h2>
    <h2 v-else>如果isShow为false,就显示我</h2>
  </div>
  <script>
    new Vue({
      el:"#app",
      data:{
        message:"isShow的值为true时显示hello Vue",
        isShow: ture
      }
    })
  </script>
</html>
五、v-else指令
1、v-else指令为v-if添加一个“else块”,v-else元素必须立即跟在v-if元素的后面,否则不能被识别
2、v-else 后面不需要表达式,v-if为true,后面的v-else不会渲染到HTML,v-if为false,后面的v-else才会渲染到HTML
3、表达式
<h2 v-if="isShow">表达式的值为真就能显示</h2>
<h2 v-else>v-if不成立的时候就显示</h2>4、案例
<!DOCTYPE html>
<html>
<head>
  <title>v-if指令</title>
  <meta charset="utf-8">
  <script src="lib/vue.js"></script>
</head>
<body>
  <div id="app">
    <h2 v-if="isShow">{{message}}</h2>
    <h2 v-else>如果isShow的值为false,就显示我</h2>
  </div>
  <script>
    new Vue({
      el:"#app",
      data:{
        message:"isShow的值为true时显示hello Vue",
        isShow:false
      }
    })
  </script>
</html>
六、v-show指令
1、控制切换一个元素的显示和隐藏。根据表达式结果的真假,确定是否显示当前元素
true表示显示该元素;false表示隐藏该元素
2、语法
<p v-show="status == 1">当status为1时显示该行</p>3、status的值为2,所以表达式的值为false,在p元素上加载了内联样式display:none,所以p元素被隐藏掉了。
七、v-if和v-show
1、区别:
v-show也是条件渲染指令,和v-if指令不同的是:
①v-if指令满足条件时,把元素创建出来并渲染到html中,不满足条件时,会把元素删除,所以元素不会渲染到html中。
②使用v-show指令的元素始终会被渲染到HTML,它只是简单地为元素设置CSS的style属性。不满足条件的元素会被设置style="display:none"样式,将元素隐藏起来。
2、应用场景
①v-if 指令有更高的切换消耗,v-if当条件成立的时候会将元素加上,不成立的时候,就会移除dom,并且内部的指令不会执行。
②v-show 指令有更高的初始渲染消耗,v-show只是简单的隐藏和显示,
如果需要频繁切换使用 v‐show 较好,如果在运行时条件不大可能改变 使用v‐if 较好。因此具体问题具体分析。
八、v-bind指令
1、v-bind指令主要用法是动态更新HTML元素上的属性,链接的href属性被动态的设置了,当数据变化的时候,就会重新渲染。
<!DOCTYPE html>
<html>
<head>
	<title>v-bind绑定数据和元素</title>
	<script src="lib/vue.js"></script>
</head>
<body>
    <div id="app">
      <a v-bind:href="url">链接</a>
      <br>
      <img v-bind:src="img">
  </div>

  <script type="text/javascript">
  	var app = new Vue({
  		el:"#app",
  		data:{
  			url:'https://www.baidu.com/',
  			img:'https://www.baidu.com/img/PCtm_d9c8750bed0b3c7d089fa7d55720d6cf.png'
  		}
  	})
  </script>
</body>
</html>
在动态的数据绑定中,最常见的两个需求是元素的样式名称class和内联样式style的动态绑定,它们也是HTML的属性,因此可以使用v-bind指令。
2、绑定class的方式
①对象语法,给v-bind:class设置一个对象,可以动态的切换class
<!DOCTYPE html>
<html>
<head>
    <title>动态切换class</title>
    <script src="lib/vue.js"></script>
</head>

<body>

    <style>
        .active {
            color: red;
        }
        .line {
            font-size: 100px;
        }
    </style>

    <div id="app">
        <p :class="{active:isActive,line:isLine}">对象语法</p><!-- 对象的名active,表示要添加的类名,isActive是vue中的数据,表示在什么情况下添加该类名,对应为真才添加。-->
    </div>
    <script>
        new Vue({
            el: '#app',
            data: {
                isActive: true,
                isLine: true
            }
        })
    </script>

</body>
</html>②类名active依赖于数据isActive,当其为true时,p会拥有类名active的样式,为false时则没有
③对象中也可以传入多个属性,来动态切换class,另外特别强调一点,动态绑定的class可以与普通的class共存。
v-bind:class="{active: isActive, danger: hasError}"案例
<!DOCTYPE html>
<html>

<head>
    <title>动态切换class</title>
    <script src="lib/vue.js"></script>
</head>

<body>

    <style>
        .box {/*普通的class*/
            background-color: #eef;
        }

        .active {
            color: red;
        }
        .danger {
            font-size: 30px;
        }
    </style>

    <ul id="app" v-bind:class="{active: isActive, danger: hasError}">
        <li>学习Vue</li>
    </ul>

    <script>
        var vm = new Vue({
            el: '#app',
            data: {
                isActive: true,
                hasError: true
            }
        })
    </script>

</body>
</html>3、绑定style内联样式
①使用v-bind:style(即 :style)可以给元素绑定内联样式,方法与:class类似
<div :style="{'color':colorValue,'fontSize':sizeValue+'px'}">style内联样式绑定</div>案例:
<!DOCTYPE html>
<html>
<head>
    <title>style内联样式绑定</title>
    <script src="lib/vue.js"></script>
</head>
<body>
    <div id="app">
        <div :style="{'color':colorValue,'fontSize':sizeValue+'px'}">style内联样式绑定</div>
    </div>
    <script>
        new Vue({
            el: '#app',
            data: {
                colorValue: 'red',
                sizeValue: 50
            }
        })
    </script>
</body>
</html>
②大多数情况下,直接写一长串的样式不便于阅读和维护,实际的开发中一般是写在data或者computed里,下面以data的形式来改写。
<!DOCTYPE html>
<html>
<head>
  <meta charset="UTF-8">
  <title>绑定内联样式</title>
</head>
<body>
  <div id="app">
    <div :style="styles">绑定内联样式</div>
  </div>
  <script src="lib/vue.js"></script>
  <script>
    new Vue({
        el: '#app',
        data() {  //这里的data写成函数的形式,用return返回
            return {
                styles:{
                    border: '1px solid #000',  //边框样式
                    fontSize: 22 + 'px'  //字体大小
                }
            }
        }
    })
  </script>
</body>
</html>
九、购物车完整案例
<!DOCTYPE html>
<html>
<head>
	<title>购物车完整案例</title>
	<meta charset="utf-8">
	<script src="lib/vue.js"></script>
	<style>
table {
  border: 1px solid #e9e9e9;
  border-collapse: collapse;
  border-spacing: 0;
  empty-cells: show;
}
tr {
  line-height: 30px;
}
tr:nth-child(2n) {
  background-color: #efefef;
}
th,
td {
  padding: 8px 16px;
  text-align: left;
}
th {
  background: #cfeef0;
  color: #5c6b77;
  font-weight: 600;
  white-space: nowrap;
}
.totalnum {
  margin-top: 10px;
}
</style>

</head>
<body>
  <div id="app">
   <div>
      <table>
        <thead>
          <tr>
            <th></th>
            <th>商品名称</th>
            <th>商品单价</th>
            <th>商品数量</th>
          </tr>
        </thead>
        <tbody>
          <tr v-for="(item,index) in telList" v-if="item.count != 0">  <!-- 当item.count不等于零时显示行标签元素 -->
            <td>{{index+1}}</td>
            <td>{{item.name}}</td>
            <td>{{item.price}}</td>
            <td>{{item.count}}</td>
          </tr>
        </tbody>
      </table>
      <div>
        总价:{{totalprice}}¥
      </div>
  </div>
  </div>
</body>
<script type="text/javascript">
	var telList=[
		{
        	name:"xiaomi12",
        	price:3600,
        	count:10
        },
        {
        	name:"huaweiP50",
        	price:7500,
        	count:5
        },
        {
        	name:"iphone13",
        	price:8900,
        	count:1
        },
        {
        	name:"vivoX5",
        	price:7200,
        	count:0
        }
    ]
	new Vue({
		el:"#app",
    	data:{
    	telList,
    },
    computed:{
    	totalprice(){
    		//计算总价
    		let total=0
    		for (var i=0; i< this.telList.length; i++) {
    			total+=this.telList[i].price*this.telList[i].count    //total存储第一次价格和数量相乘后的数据,并在下一次加上第二次价格乘与数量的值,以此类推
    			//i=0 this.telList[0].price*this.telList[0].count    3600*10  当i=0的时候,该区域内的价格和数量相乘
    			//i=1 this.telList[1].price*this.telList[1].count    7500*5
    			//i=0 this.telList[0].price*this.telList[0].count    8900*1
    			//......
    		}
    		return total
    	}
    }
	})
</script>
</html>
十、总结


 526
526

 被折叠的 条评论
为什么被折叠?
被折叠的 条评论
为什么被折叠?
 到【灌水乐园】发言


