


多线程基础知识
1. 线程的使用
1.1 线程的实现方式
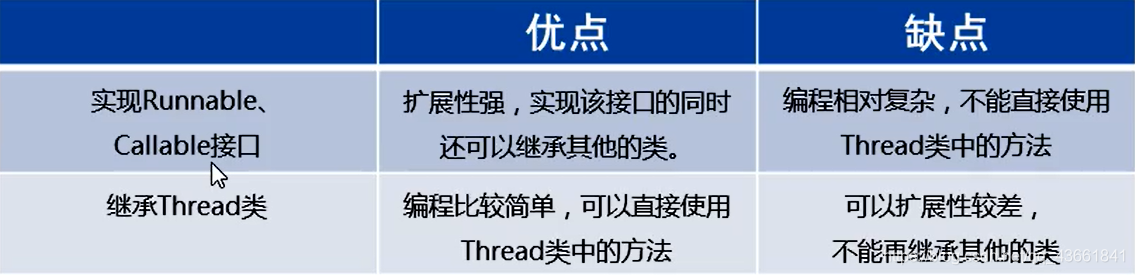
1> 继承Thread类 2>实现Runnable 3> 实现Callable接口
Thread类本质是实现了Runnable接口的一个实例,代表一个线程的实例。
启动方式是通过Thread类的start()方法,start()方法是一个native方法,启动一个新线程,并执行run方法
方式1.继承Thread类
1> 定义一个类MyThread继承Thread类
2> 在MyThread类中从写run()方法
3> 创建MyThread类的对象
4> 启动线程
/**
 * @program: javase
 * @description: 继承Thread类实现多线程
 * @Author: 小白白
 * @create: 2019/12/06 - 12:54
 **/
public class MyThread extends Thread{

    @Override
    public void run() {

        for (int i = 0; i < 20; i++){

            System.out.println("线程开启了" + i);
        }
    }
}
/**
 * @program: javase
 * @description: 继承Thread类的测试类
 * @Author: 小白白
 * @create: 2019/12/06 - 12:56
 **/
public class MyThread_text {

    public static void main(String[] args) {

        //创建一个线程对象
        MyThread t1 = new MyThread();
        //创建一个线程对象
        MyThread t2 = new MyThread();
        //开启一个线程
        t1.start();
        //开启第二条线程
        t2.start();
    }
}
方式2.实现Runnable接口
1.定义一个类MyRunnable实现Runnable接口
2.在MyRunnable类中重写run()方法
3.创建Runnable类的对象
4.创建Thread类的对象,把MyRunnbable独享作为构造方法的参数
5.启动线程
package com.zxh.Thread.Demo;
/**
 * @program: javase
 * @description: 实现Runnable接口
 * @Author: 小白白
 * @create: 2019/12/06 - 14:01
 **/
public class MyRunnable implements Runnable{

    @Override
    public void run() {

        //线程启动后执行的代码
        for (int i = 0; i < 100;i++){

            System.out.println("第二种方法实现多线程" + i);
        }
    }
}
/**
 * @program: javase
 * @description: 实现Runnable接口的测试类
 * @Author: 小白白
 * @create: 2019/12/06 - 14:03
 **/
public class MyRunnable_test {

    public static void main(String[] args) {

        //创建了一个参数的对象
        MyRunnable myRunnableTest = new MyRunnable();
        //创建了一个线程对象,并把参数传递给这个线程
        //在线程启动之后,执行的就是参数里面的run方法
        Thread t= new Thread(myRunnableTest);
        //开启线程
        t.start();
 最低0.47元/天 解锁文章


 411
411


 被折叠的 条评论
为什么被折叠?
被折叠的 条评论
为什么被折叠?
 到【灌水乐园】发言


