


小声名:最终目的是实现android+服务器端+数据库端这样的最终项目。 但是由于刚接触(能力尚薄弱)只能先从一个简单的demo开始,后期有那个环节不清楚或者有bug也可以通过这个项目去思考(也就是说,这个项目会让你踩很大一部分的坑)。
正文开始
项目大体可分为三部重要
-
下载mysql软件,创建一个数据库文件(我命名的是***“login”***),在此数据库中创建一个表(我命名的是***“user”***);开启数据库访问权限(否则连接报错无权访问);
-
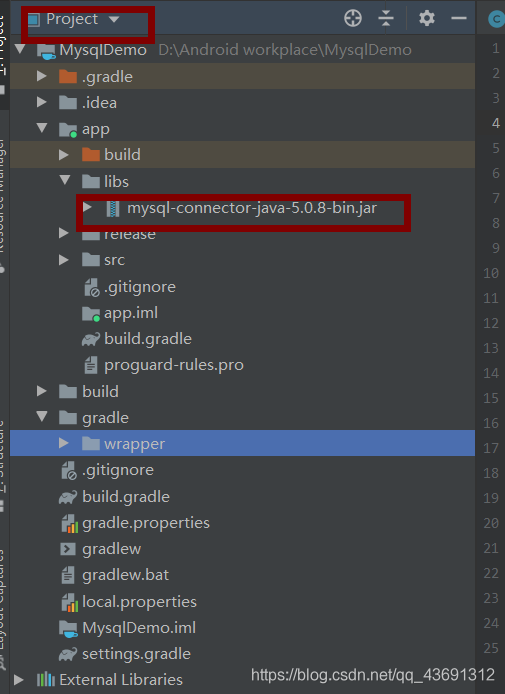
下载mysql官方jabc包(这里我使用的是jdbc5.x版本),一定要对应mysql软件版本,5.x版本连不上8.0.x的mysql数据库,相反同理;在Project视图中,放入到app/libs目录中
-
在配置文件中加权限,访问网络:
<uses-permission android:name="android.permission.INTERNET"/>
代码环节:
**
- manifest配置文件
**
<?xml version="1.0" encoding="utf-8"?>
<manifest xmlns:android="http://schemas.android.com/apk/res/android"
    package="vip.mtmy.mysqldemo">
    <uses-permission android:name="android.permission.INTERNET"/>
    <application
        android:allowBackup="true"
        android:icon="@mipmap/ic_launcher"
        android:label="@string/app_name"
        android:roundIcon="@mipmap/ic_launcher_round"
        android:supportsRtl="true"
        android:theme="@style/AppTheme">
        <activity android:name=".MainActivity">
            <intent-filter>
                <action android:name="android.intent.action.MAIN" />

                <category android:name="android.intent.category.LAUNCHER" />
            </intent-filter>
        </activity>
        <activity android:name=".Registered"/>
        <activity android:name=".Login_OK"
            android:label="@string/app_name">
        </activity>
    </application>

</manifest>
**
- 主函数
**
package vip.mtmy.mysqldemo;

import android.app.Activity;
import android.content.Intent;
import android.os.Bundle;
import android.os.Looper;
import android.util.Log;
import android.view.View;
import android.widget.Button;
import android.widget.EditText;
import android.widget.Toast;


public class MainActivity extends Activity {

    public Button btn_registered;
    //注册按钮
    public  EditText textid;
    //id输入框
    public  EditText textpwd;
    //密码输入框
    public Button btn_login;
    //登录按钮
    @Override
    protected void onCreate(Bundle savedInstanceState) {
        super.onCreate(savedInstanceState);
        setContentView(R.layout.login_1);

        //控件、事件初始化
        initview();


    }

    private void initview() {

        // 控件的初始化
        textid=findViewById(R.id.textid);
        textpwd=findViewById(R.id.textpwd);
        btn_login=findViewById(R.id.btn_login);
        btn_registered=findViewById(R.id.btn_registered);

        btn_login.setOnClickListener(new View.OnClickListener() {
            @Override
            public void onClick(View view) {
                //建立新子线程,主线程中不可运行数据库操作
                new Thread(new Runnable(){
                    public void run(){

                        DBConnection dbConnection=new DBConnection(textid.getText().toString().trim(),textpwd.getText().toString().trim(),1);
                        //对输入内容进行获取提交
                        Log.d("Actibity", String.valueOf(dbConnection.th));
                        //打印日志,用于调试


                        /*
                        界面反馈,判断是否可以在数据库中找到对应的id和password
                         */
                        if (dbConnection.th==true) {

                            runOnUiThread(new Runnable() {
                                @Override
                                public void run() {
                                    Toast.makeText(MainActivity.this, "登录成功", Toast.LENGTH_SHORT).show();
                                }
                            });
                            /*
                            如果找到,toast提示“登录成功”,后跳转到一个新的页面
                             */
                            Intent intent2 = new Intent(MainActivity.this, Login_OK.class);
                            startActivity(intent2);
                        }
                        else{
                            runOnUiThread(new Runnable() {
                                @Override
                                public void run() {
                                    Toast.makeText(MainActivity.this, "登陆失败", Toast.LENGTH_SHORT).show();
                                }
                            });
                        }
                    }
                }).start();


                }


        });

        btn_registered.setOnClickListener(new View.OnClickListener() {
            @Override
            public void onClick(View view) {
                Intent intent=new Intent(MainActivity.this,Registered.class);
                //注册页面跳转
                startActivity(intent);
            }
        });
    }

}
**
- java方法:DBConnection
**
package vip.mtmy.mysqldemo;
import android.content.Intent;
import android.util.Log;
import android.widget.Toast;

import java.sql.Connection;
import java.sql.DriverManager;
import java.sql.PreparedStatement;
import java.sql.ResultSet;

public class DBConnection {

    public String txtid=null;
    public String txtpwd=null;
    private static final String DBDRIVER = "com.mysql.jdbc.Driver";
    //5.0.x特用是这样,如果是用的jdbc8.0.x,则是“com.mysql.cj.jdbc.Driver”
    private static final String DBURL = "JDBC:mysql://192.168.1.4:3306/login";
    //login是前面所讲的数据库名
    private static final String DBUSER = "root";
    //数据用户名
    private static final String DBPASSWORD = "123456";
    //数据库用户密码
    private static final String tag="DBConnection";
    //设置日志所用,非关键代码

    public boolean th=false;
    //判断登录状况
    public boolean tp=false;
    //判断注册状况
    //第一个参数用来上传id、password,a用来表示状态码,请求
    public DBConnection(String txtid, String txtpwd, int a) {
        this.txtid=txtid;
        this.txtpwd=txtpwd;
        if (a==1){
            Login_GO();
        }
        if (a==2){
            RegiSql();
        }
    }


    public  boolean Login_GO() {

        PreparedStatement stmt = null;
        try {
            Class.forName(DBDRIVER);
            //加载驱动程序
            Log.d(tag, "驱动加载成功");
            Connection conn = DriverManager.getConnection(DBURL, DBUSER, DBPASSWORD);
            //连接数据库
            String sql = "select * from user where id = ? and password = ?";
            Log.d("he",sql);
            PreparedStatement preparedStatement=conn.prepareStatement(sql);
            preparedStatement.setString(1,txtid);
            preparedStatement.setString(2,txtpwd);
            ResultSet rs = preparedStatement.executeQuery();
            //取得操作结果,true或false
            th=rs.next();
            Log.d(tag+"th==", String.valueOf(th));
            //打印
            rs.close();
            preparedStatement.close();;
            conn.close();
            return true;
        } catch (Exception e) {
            e.printStackTrace();
            return false;
        }

    }
    public  boolean RegiSql(){

        int u=0;
        try {
            Class.forName(DBDRIVER);
            //加载驱动程序
            Log.d(tag, "驱动加载成功");
            Connection conn = DriverManager.getConnection(DBURL, DBUSER, DBPASSWORD);

            String sql = "insert into user values(?,?)";
            Log.d(tag,sql);

            PreparedStatement pst=conn.prepareStatement(sql);

            pst.setString(1,txtid);//id
            pst.setString(2,txtpwd);//密码
            pst.execute();//类似于结束,提交请求
            tp=true;

            Log.d("OK","插入成功啦");
            pst.close();
            conn.close();
            return true;
        } catch (Exception e) {
            e.printStackTrace();
            return false;
        }

    }

}
**
- 注册活动Registered
**
package vip.mtmy.mysqldemo;

import android.app.Activity;
import android.os.Bundle;
import android.view.View;
import android.widget.Button;
import android.widget.EditText;
import android.widget.Toast;

public class Registered extends Activity {

    public Button btn_registered;
    public EditText textid;
    public  EditText textpwd;

    protected void onCreate(Bundle savedInstanceState) {

        super.onCreate(savedInstanceState);
        setContentView(R.layout.tregistered);

        initview();
    }

    private void initview() {

        // 控件的初始化
        textid=findViewById(R.id.textid);
        textpwd=findViewById(R.id.textpwd);
        btn_registered=findViewById(R.id.btn_registered);

        btn_registered.setOnClickListener(new View.OnClickListener() {
            @Override
            public void onClick(View view) {
                new Thread(new Runnable() {
                    public void run() {
                        DBConnection dbConnection = new DBConnection(textid.getText().toString().trim(), textpwd.getText().toString().trim(), 2);

                        if (dbConnection.tp == true) {
                            runOnUiThread(new Runnable() {
                                @Override
                                public void run() {

                                    Toast.makeText(Registered.this, "注册成功!", Toast.LENGTH_SHORT).show();
                                }
                            });
                        } else {
                            runOnUiThread(new Runnable() {
                                @Override
                                public void run() {
                                    Toast.makeText(Registered.this, "注册失败!", Toast.LENGTH_SHORT).show();
                                }
                            });
                        }

                    }
                }).start();
            }
        });
    }
}
**
- 登录成功活动Login_OK
**
package vip.mtmy.mysqldemo;

import android.app.Activity;
import android.os.Bundle;
import android.widget.ImageView;

public class Login_OK extends Activity {

    ImageView imageView;
    protected void onCreate(Bundle savedInstanceState) {

        super.onCreate(savedInstanceState);
        setContentView(R.layout.login_ok);

    }
}
**
- 布局文件login_1
**
<?xml version="1.0" encoding="utf-8"?>
<RelativeLayout
    xmlns:android="http://schemas.android.com/apk/res/android"
    xmlns:app="http://schemas.android.com/apk/res-auto"
    xmlns:tools="http://schemas.android.com/tools"
    android:layout_width="match_parent"
    android:layout_height="match_parent">

    <ImageView
        android:id="@+id/imageView"
        android:layout_width="wrap_content"
        android:layout_height="252dp"
        android:background="@drawable/login_background" />

    <RelativeLayout
        android:layout_marginTop="300dp"
        android:id="@+id/login_idpwd"
        android:layout_width="250dp"
        android:layout_height="200dp"
        android:layout_centerHorizontal="true">

        <EditText
            android:id="@+id/textid"
            android:layout_width="250dp"
            android:layout_height="wrap_content"
            android:layout_marginTop="10dp"
            android:hint="请输入账号"
            android:textSize="20dp" />

        <EditText
            android:id="@+id/textpwd"
            android:layout_width="250dp"
            android:layout_marginTop="30dp"
            android:layout_below="@+id/textid"
            android:layout_height="wrap_content"
            android:hint="请输入密码"
            android:textSize="20dp" />
    </RelativeLayout>

    <LinearLayout
        android:layout_width="wrap_content"
        android:layout_height="wrap_content"
        android:layout_centerHorizontal="true"
        android:layout_below="@+id/login_idpwd">
        <Button
            android:id="@+id/btn_login"
            android:layout_width="wrap_content"
            android:layout_height="wrap_content"
            android:text="登录" />
        <Button
            android:id="@+id/btn_registered"
            android:layout_width="wrap_content"
            android:layout_height="wrap_content"
            android:text="注册" />

    </LinearLayout>


</RelativeLayout>
- 布局文件login_ok
 <?xml version="1.0" encoding="utf-8"?>
<LinearLayout
    xmlns:android="http://schemas.android.com/apk/res/android"
    xmlns:app="http://schemas.android.com/apk/res-auto"
    xmlns:tools="http://schemas.android.com/tools"
    android:layout_width="match_parent"
    android:layout_height="match_parent"
    android:background="@drawable/login_ok1">


    <TextView
        android:id="@+id/textView"
        android:layout_width="wrap_content"
        android:layout_height="wrap_content"
        android:layout_weight="1"
        android:text="TextView" />
</LinearLayout>
- 注册界面registered
<?xml version="1.0" encoding="utf-8"?>
<RelativeLayout
    xmlns:android="http://schemas.android.com/apk/res/android"
    xmlns:app="http://schemas.android.com/apk/res-auto"
    xmlns:tools="http://schemas.android.com/tools"
    android:layout_width="match_parent"
    android:layout_height="match_parent"
    tools:ignore="MissingDefaultResource">

    <ImageView
        android:id="@+id/imageView"
        android:layout_width="wrap_content"
        android:layout_height="252dp"
        android:background="@drawable/ttt"/>

    <RelativeLayout
        android:layout_marginTop="300dp"
        android:id="@+id/login_idpwd"
        android:layout_width="250dp"
        android:layout_height="200dp"
        android:layout_centerHorizontal="true">

        <EditText
            android:id="@+id/textid"
            android:layout_width="250dp"
            android:layout_height="wrap_content"
            android:layout_marginTop="10dp"
            android:hint="请输入账号"
            android:textSize="20dp" />

        <EditText
            android:id="@+id/textpwd"
            android:layout_width="250dp"
            android:layout_marginTop="30dp"
            android:layout_below="@+id/textid"
            android:layout_height="wrap_content"
            android:hint="请输入密码"
            android:textSize="20dp" />
    </RelativeLayout>

    <LinearLayout
        android:layout_width="wrap_content"
        android:layout_height="wrap_content"
        android:layout_centerHorizontal="true"
        android:layout_below="@+id/login_idpwd">
        <Button
            android:id="@+id/btn_registered"
            android:layout_width="wrap_content"
            android:layout_height="wrap_content"
            android:text="注册" />

    </LinearLayout>


</RelativeLayout>
附上源代码:https://download.csdn.net/download/qq_43691312/12677788


 1340
1340


 被折叠的 条评论
为什么被折叠?
被折叠的 条评论
为什么被折叠?
 到【灌水乐园】发言


