


一.起因
图片标注费时费力 ,如果可以用自己之前训练好的模型标注剩下还未标注的图片那多好。(第一次训练的数据集太少效果不太理想)
二.自动标注程序
1.将视频转换成图片(如果识别的是图片则不需要这一步)
拍照片太慢太累,拍视频会快一些。如果需要识别的是一个视频,需要把视频每一帧保存或者每隔几秒保存一帧,然后再进行识别。
将视频转换成一帧帧图片的程序如下:
import cv2

vc = cv2.VideoCapture('data/mp4/02.mp4')  # 读入视频文件
c = 1
d = 0
if vc.isOpened():  # 判断是否正常打开
    rval, frame = vc.read()
else:
    rval = False

timeF = 10  # 视频帧计数间隔频率
# try:

while rval:  # 循环读取视频帧
    rval, frame = vc.read()
    if (c % timeF == 0):  # 每隔timeF帧进行存储操作
        d = d+1
        cv2.imwrite('data/images/' + str(d) + '.jpg', frame)  # 存储为图像
        print(d)
    c = c + 1
    cv2.waitKey(1)
vc.release()
我将转换完的图片保存在data/images文件夹内
2.图片识别
半自动标注的程序采用的是yolov5的detect.py程序
detect.py程序分析:
import argparse                     #这个库可以让我们直接在命令行中就可以向程序中传入参数并让程序运行
import time
from pathlib import Path

import cv2
import torch
import torch.backends.cudnn as cudnn
from numpy import random

from models.experimental import attempt_load
from utils.datasets import LoadStreams, LoadImages
from utils.general import check_img_size, check_requirements, check_imshow, non_max_suppression, apply_classifier, \
    scale_coords, xyxy2xywh, strip_optimizer, set_logging, increment_path
from utils.plots import plot_one_box
from utils.torch_utils import select_device, load_classifier, time_synchronized


def detect(save_img=False):
    # 获取输出文件夹,输入源,权重,参数等参数
    source, weights, view_img, save_txt, imgsz = opt.source, opt.weights, opt.view_img, opt.save_txt, opt.img_size
    webcam = source.isnumeric() or source.endswith('.txt') or source.lower().startswith(
        ('rtsp://', 'rtmp://', 'http://'))

    # Directories 目录
    save_dir = Path(increment_path(Path(opt.project) / opt.name, exist_ok=opt.exist_ok))  # increment run增量运行
    (save_dir / 'labels' if save_txt else save_dir).mkdir(parents=True, exist_ok=True)  # make dir

    # Initialize 获取设备
    set_logging()
    device = select_device(opt.device)
    half = device.type != 'cpu'  # half precision only supported on CUDA 如果设备为gpu,使用Float16

    # Load model 加载Float32模型,确保用户设定的输入图片分辨率能整除32(如不能则调整为能整除并返回)
    model = attempt_load(weights, map_location=device)  # load FP32 model
    stride = int(model.stride.max())  # model stride 模型步幅
    imgsz = check_img_size(imgsz, s=stride)  # check img_size
    model.half()  # to FP16 设置Float16
    # Set Dataloader 通过不同的输入源来设置不同的数据加载方式
    vid_path, vid_writer = None, None
    if webcam:
        view_img = check_imshow()
        cudnn.benchmark = True  # set True to speed up constant image size inference  设置True可加速恒定图像大小推断
        dataset = LoadStreams(source, img_size=imgsz, stride=stride)
    else:
        save_img = True
        dataset = LoadImages(source, img_size=imgsz, stride=stride)

    # Get names and colors
    # 获取类别名字
    names = model.module.names if hasattr(model, 'module') else model.names
    # 设置画框的颜色
    colors = [[random.randint(0, 255) for _ in range(3)] for _ in names]

    # Run inference 运行推理
    if device.type != 'cpu':
        model(torch.zeros(1, 3, imgsz, imgsz).to(device).type_as(next(model.parameters())))  # run once 进行一次前向推理,测试程序是否正常
    t0 = time.time()
    """
      path 图片/视频路径
      img 进行resize+pad之后的图片
      img0 原size图片
      cap 当读取图片时为None,读取视频时为视频源
      """
    for path, img, im0s, vid_cap in dataset:
        img = torch.from_numpy(img).to(device)
        # 图片也设置为Float16
        img = img.half() if half else img.float()  # uint8 to fp16/32
        img /= 255.0  # 0 - 255 to 0.0 - 1.0
        # 没有batch_size的话则在最前面添加一个轴
        if img.ndimension() == 3:
            img = img.unsqueeze(0)

        # Inference
        t1 = time_synchronized()

        """
        前向传播 返回pred的shape是(1, num_boxes, 5+num_class)
        h,w为传入网络图片的长和宽,注意dataset在检测时使用了矩形推理,所以这里h不一定等于w
        num_boxes = h/32 * w/32 + h/16 * w/16 + h/8 * w/8
        pred[..., 0:4]为预测框坐标
        预测框坐标为xywh(中心点+宽长)格式
        pred[..., 4]为objectness置信度
        pred[..., 5:-1]为分类结果
        """
        pred = model(img, augment=opt.augment)[0]

        # Apply NMS
        """
                pred:前向传播的输出
                conf_thres:置信度阈值
                iou_thres:iou阈值
                classes:是否只保留特定的类别
                agnostic:进行nms是否也去除不同类别之间的框
                经过nms之后,预测框格式:xywh-->xyxy(左上角右下角)
                pred是一个列表list[torch.tensor],长度为batch_size
                每一个torch.tensor的shape为(num_boxes, 6),内容为box+conf+cls
                """
        pred = non_max_suppression(pred, opt.conf_thres, opt.iou_thres, classes=opt.classes, agnostic=opt.agnostic_nms)
        t2 = time_synchronized()

        # Process detections
        # 对每一张图片作处理
        for i, det in enumerate(pred):  # detections per image
            if webcam:  # batch_size >= 1
                p, s, im0, frame = path[i], '%g: ' % i, im0s[i].copy(), dataset.count
            else:
                p, s, im0, frame = path, '', im0s, getattr(dataset, 'frame', 0)

            p = Path(p)  # to Path
            # 设置保存图片/视频的路径
            save_path = str(save_dir / p.name)  # img.jpg
            # 设置保存框坐标txt文件的路径
            txt_path = str(save_dir / 'labels' / p.stem) + ('' if dataset.mode == 'image' else f'_{frame}')  # img.txt
            s += '%gx%g ' % img.shape[2:]  # print string
            gn = torch.tensor(im0.shape)[[1, 0, 1, 0]]  # normalization gain whwh
            if len(det):
                # Rescale boxes from img_size to im0 size
                # 调整预测框的坐标:基于resize+pad的图片的坐标-->基于原size图片的坐标
                # 此时坐标格式为xyxy
                det[:, :4] = scale_coords(img.shape[2:], det[:, :4], im0.shape).round()

                # Print results
                # 打印检测到的类别数量
                for c in det[:, -1].unique():
                    n = (det[:, -1] == c).sum()  # detections per class
                    s += f"{n} {names[int(c)]}{'s' * (n > 1)}, "  # add to string

                # Write results
                for *xyxy, conf, cls in reversed(det):
                    if save_txt:  # Write to file
                        xywh = (xyxy2xywh(torch.tensor(xyxy).view(1, 4)) / gn).view(-1).tolist()  # normalized xywh
                        # 将xyxy(左上角+右下角)格式转为xywh(中心点+宽长)格式,并除上w,h做归一化,转化为列表再保存
                        line = (cls, *xywh, conf) if opt.save_conf else (cls, *xywh)  # label format
                        with open(txt_path + '.txt', 'a') as f:
                            f.write(('%g ' * len(line)).rstrip() % line + '\n')
                            # 在原图上画框

                    if save_img or view_img:  # Add bbox to image
                        label = f'{names[int(cls)]} {conf:.2f}'
                        plot_one_box(xyxy, im0, label=label, color=colors[int(cls)], line_thickness=3)

            # Print time (inference + NMS)
            # 打印前向传播+nms时间
            print(f'{s}Done. ({t2 - t1:.3f}s)')

            # Stream results
            # 如果设置展示,则show图片/视频
            if view_img:
                cv2.imshow(str(p), im0)
                cv2.waitKey(1)  # 1 millisecond

            # Save results (image with detections)
            # 设置保存图片/视频
            if save_img:
                if dataset.mode == 'image':
                    cv2.imwrite(save_path, im0)
                else:  # 'video'
                    if vid_path != save_path:  # new video
                        vid_path = save_path
                        if isinstance(vid_writer, cv2.VideoWriter):
                            vid_writer.release()  # release previous video writer

                        fourcc = 'mp4v'  # output video codec
                        fps = vid_cap.get(cv2.CAP_PROP_FPS)
                        w = int(vid_cap.get(cv2.CAP_PROP_FRAME_WIDTH))
                        h = int(vid_cap.get(cv2.CAP_PROP_FRAME_HEIGHT))
                        vid_writer = cv2.VideoWriter(save_path, cv2.VideoWriter_fourcc(*fourcc), fps, (w, h))
                    vid_writer.write(im0)

    if save_txt or save_img:
        # 打开保存图片和txt的路径(好像只适用于MacOS系统)
        s = f"\n{len(list(save_dir.glob('labels/*.txt')))} labels saved to {save_dir / 'labels'}" if save_txt else ''
        # 打印总时间
        print(f"Results saved to {save_dir}{s}")

    print(f'Done. ({time.time() - t0:.3f}s)')

"""
    weights:训练的权重
    source:测试数据,可以是图片/视频路径,也可以是'0'(电脑自带摄像头),也可以是rtsp等视频流
    output:网络预测之后的图片/视频的保存路径
    img-size:网络输入图片大小
    conf-thres:置信度阈值
    iou-thres:做nms的iou阈值
    device:设置设备
    view-img:是否展示预测之后的图片/视频,默认False
    save-txt:是否将预测的框坐标以txt文件形式保存,默认False
    classes:设置只保留某一部分类别,形如0或者0 2 3
    agnostic-nms:进行nms是否也去除不同类别之间的框,默认False
    augment:推理的时候进行多尺度,翻转等操作(TTA)推理
    update:如果为True,则对所有模型进行strip_optimizer操作,去除pt文件中的优化器等信息,默认为False
    """
if __name__ == '__main__':
    parser = argparse.ArgumentParser()
    parser.add_argument('--weights', nargs='+', type=str, default='best.pt', help='model.pt path(s)')
    parser.add_argument('--source', type=str, default='data/images', help='source')  # file/folder, 0 for webcam
    parser.add_argument('--img-size', type=int, default=640, help='inference size (pixels)')
    parser.add_argument('--conf-thres', type=float, default=0.25, help='object confidence threshold')
    parser.add_argument('--iou-thres', type=float, default=0.45, help='IOU threshold for NMS')
    parser.add_argument('--device', default='', help='cuda device, i.e. 0 or 0,1,2,3 or cpu')
    parser.add_argument('--view-img', action='store_true', help='display results')
    parser.add_argument('--save-txt', action='store_true', help='save results to *.txt')
    parser.add_argument('--save-conf', action='store_true', help='save confidences in --save-txt labels')
    parser.add_argument('--classes', nargs='+', type=int, help='filter by class: --class 0, or --class 0 2 3')
    parser.add_argument('--agnostic-nms', action='store_true', help='class-agnostic NMS')
    parser.add_argument('--augment', action='store_true', help='augmented inference')
    parser.add_argument('--update', action='store_true', help='update all models')
    parser.add_argument('--project', default='runs/detect', help='save results to project/name')
    parser.add_argument('--name', default='exp', help='save results to project/name')
    parser.add_argument('--exist-ok', action='store_true', help='existing project/name ok, do not increment')
    opt = parser.parse_args()
    print(opt)  #输出参数
    detect()
为了更好的理解程序我将程序执行不到的地方全部去掉
更改程序参数配置
parser.add_argument('--weights', nargs='+', type=str, default='best.pt', help='model.pt path(s)')
 #default=改成你的模型
parser.add_argument('--source', type=str, default='data/images', help='source')
 # file/folder, 0 for webcam  default= 改成你放图片的路径
yolov5为我们提供了一种保存txt文件的程序(save-txt:是否将预测的框坐标以txt文件形式保存,默认False)我们只需要启用这个参数就可以了
python detect.py --save-txt
然后程序会将生成的txt文件放在runs\detect\exp1\labels这个目录下,将识别完的图片放在runs\detect\exp1这个目录下(每执行一次程序exp名称会改变,exp exp1 exp2。。。)
需要在labels这个目录里加一个class.txt(里面写你分类)
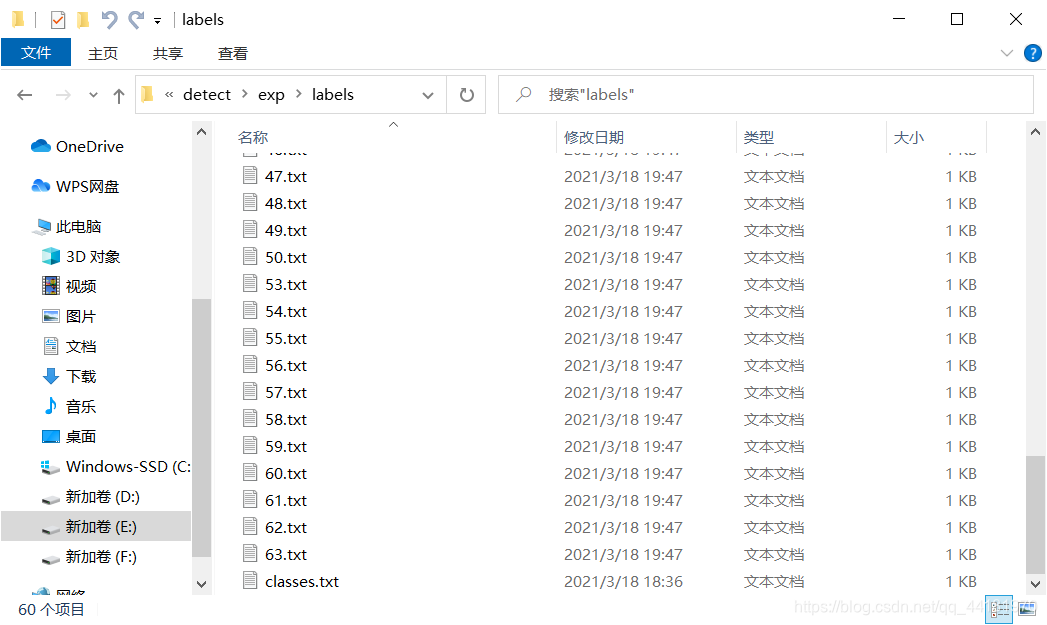
我的classes.txt里面内容是
fishJ
fishL
fishU
三.验证并修正
自动标注不能保证每张图片都能识别到,这时候就需要手动修改一下
打开labelImg软件更改Open Dir和Change Save Dir
labelImg软件的下载和使用参考:yolov5训练模型
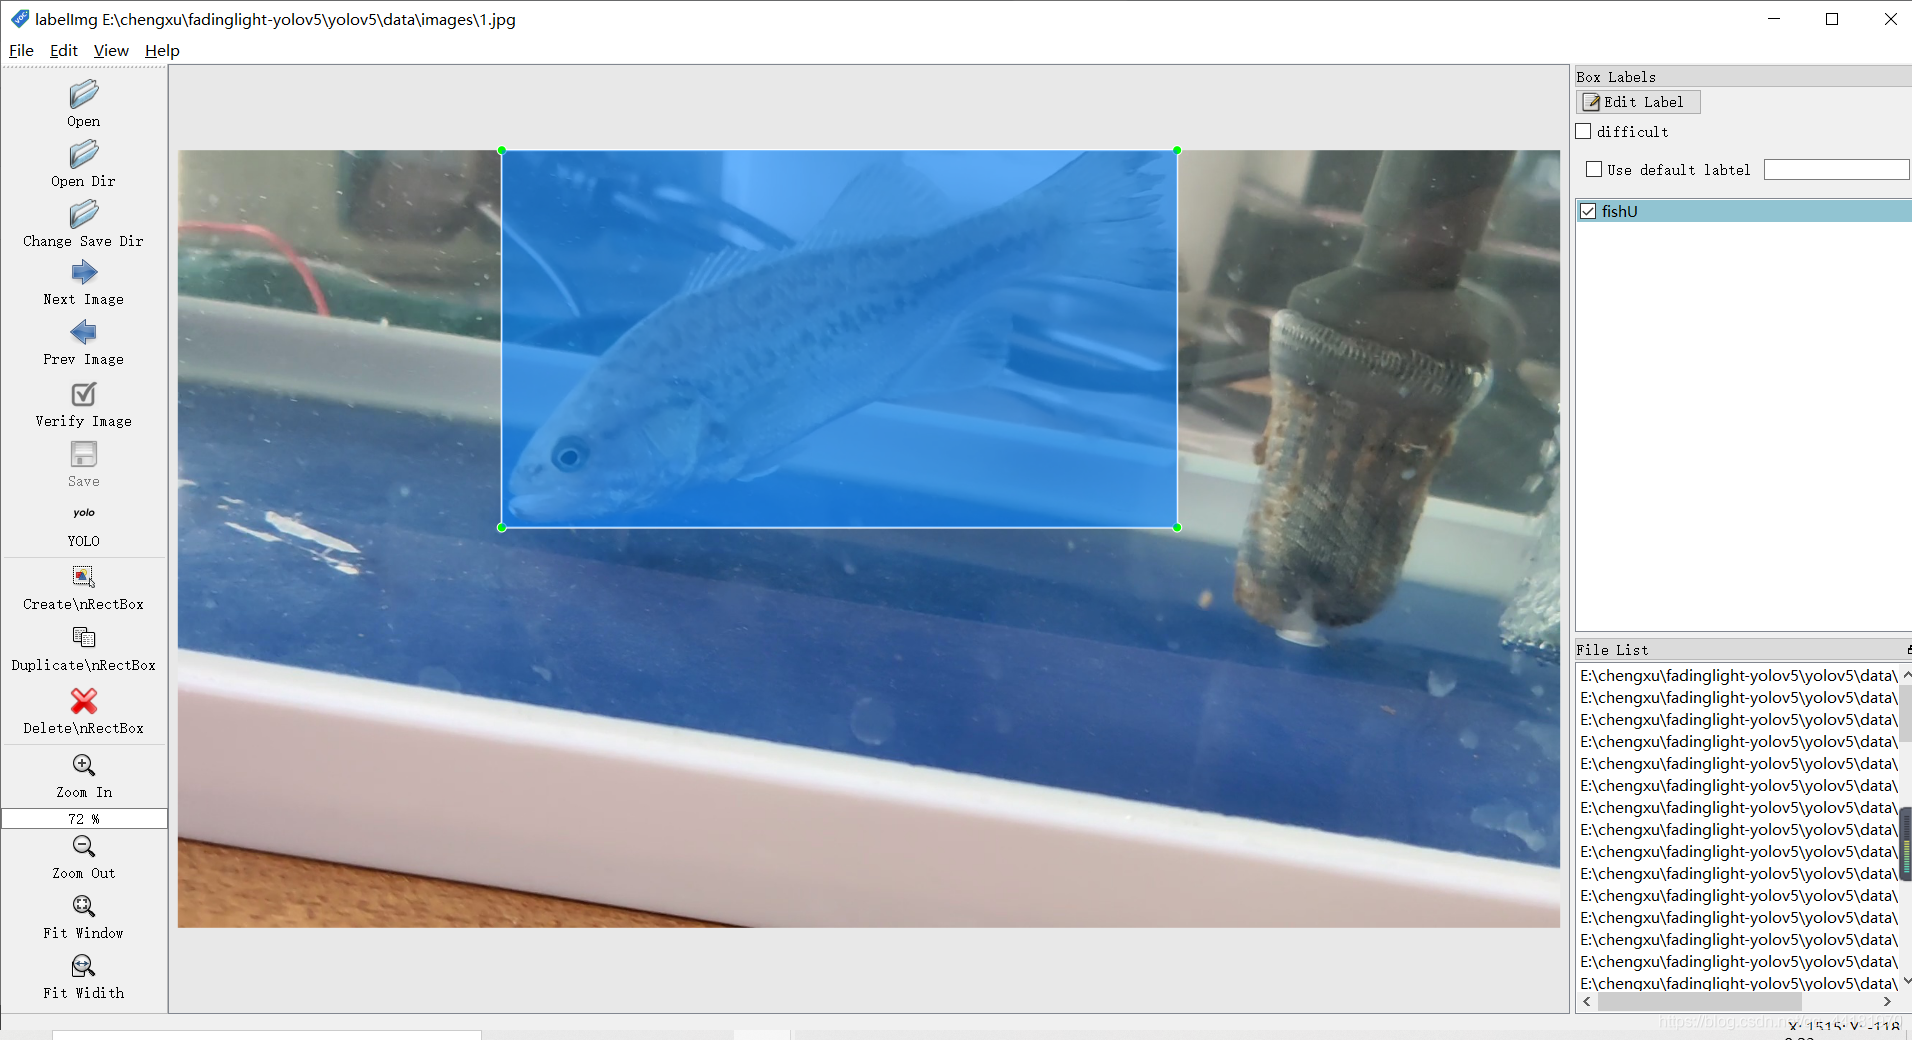
可以看到半自动标注效果还是不错的
学习时间
2021.3.19


 282
282


 被折叠的 条评论
为什么被折叠?
被折叠的 条评论
为什么被折叠?
 到【灌水乐园】发言


