


你可能会好奇为什么在这里我们又要介绍CBV开发模式, 在前面的文章中, 我们调用视图函数都是使用 FBV 开发模式, 用的好好的为什么又要换呢? 其实不然,这是一个循序渐进的过程, 就像编程基础 和 框架开发, 我们都要学, 只不过是顺序的不同而已。
在这篇文章中, 我们要介绍关于 CBV开发模式 与 FBV 开发模式的区别, 以及他们各种的优点和使用场所, 最后我们一起阅读 Views 的源码理解一下 CBV模式下的请求是如何分发的,非常的神奇.
工具: pycharm 2020
《django 从入门到 放弃 》第十篇
沙漏在下雨
记录学习中的一点一滴......
FBV 开发模式:
- FBV开发模式 全名为:
function based views, 是一种基于函数的视图调用,他的优点就是简单上手,不需要去继承函数, 所以我们也不需要去阅读很多底层代码,缺点就是不符合python的面向对象的思想, 也就是不可以去继承和多态。 - 我们之前 用的基本都是 FBV开发模式, 这里我们给出一个例子.
在urls.py 中
#urls.py
from django.urls import path
from app01 import views

urlpatterns = [
	path('login.html',  views.login, name="login"),
]
在views.py中
from django.shortcuts import HttpResponse
from django.shortcuts import  render

def login(request):
	if request.method == "GET":
		return render(request, "xxx.html", locals())
	else:
		return HttpResponse("ok")
以上, 就是一个简易的 FBV 开发模式, 其实我们在 urls.py 文件中, django也给了我们注释 :
Function views
    1. Add an import:  from my_app import views
    2. Add a URL to urlpatterns:  path('', views.home, name='home')

Class-based views
    1. Add an import:  from other_app.views import Home
    2. Add a URL to urlpatterns:  path('', Home.as_view(), name='home')
那下面我们讲一讲CBV开发模式:
CBV 开发模式:
- CBV开发模式, 全称为
class based views是一种基于类的视图函数调用,符合python的面向对象思想, 可以完好的继承和多态, CBV开发模式将各种方式用函数分开,实现了功能的分离, 比如可以直接使用 get(), post() 之类的方法, 同时省去了我们用 if 进行逻辑的判断, 提高了代码的可读性, 但是也有弊端, 如果我们的代码不是很规范,或者继承的类过于多的时候,CBV开发模式这个时候,就不是一个很好的选择,而选择FBV开发模式, 这二种模式,都可以用, 一般用CBV开发模式用的更多一点, 这个看个人习惯吧, 下面我们举例看一看 CBV开发模式的调用方式.
在 urls.py 文件下;
Class-based views
    1. Add an import:  from other_app.views import Home
    2. Add a URL to urlpatterns:  path('', Home.as_view(), name='home')
我们可以看到这样的一个提示, 这是调用的方法, 基于类的使用, 所以我们也需要在views.py 里面创建一个类函数,
# urls.py
from django.urls import path
from app01 import views
urlpatterns = [
	path('', views.Home.as_views(), name="home"),
]
然后在 views.py 文件下
from django.views import View

class Home(View): #需要继承自View类
    def get(self,request):
        return HttpResponse("ok")
    def post(self,request):
        pass
使用这个方式我们需要继承一个类
from django.views import View 我们创建的类,就必须继承这个类, 不然就无法实现逻辑分发的功能, 那这个CBV开发模式是怎么实现的呢? 我们阅读一下源码.
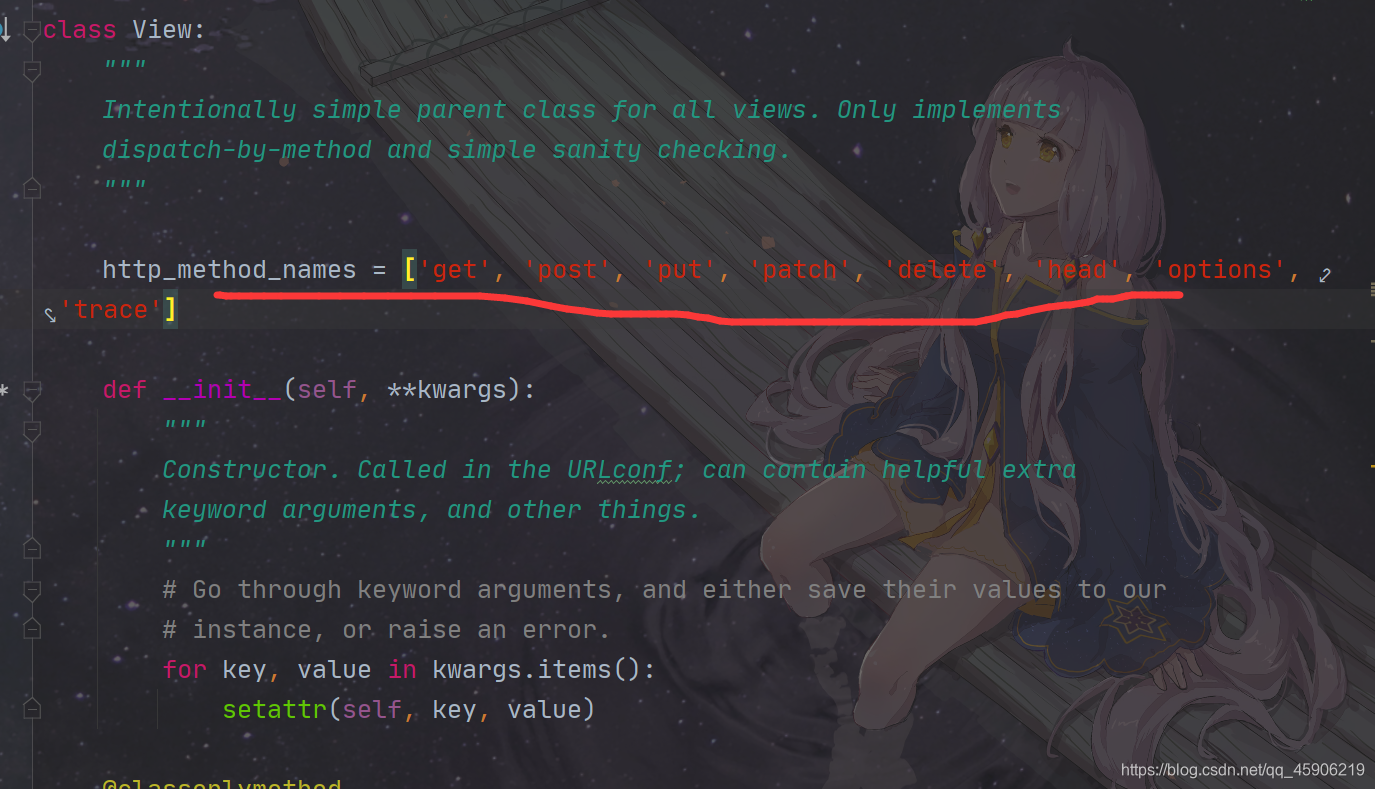
进入 Views 这个类, 第一个就可以看到 http_method_names , 这是一个列表,里面包括各种请求的方式, Views类里面封装了这些方法, 可以让我们直接使用 get(), post() … 之类的方法就直接调用, 省去了if判断, 那继续往下看。
接下来 我们看 as_views() 方法, 因为我们在配置路由的时候,调用了这个方法。
  def as_view(cls, **initkwargs):
        """Main entry point for a request-response process."""
        for key in initkwargs:
            if key in cls.http_method_names:
                raise TypeError(
                    'The method name %s is not accepted as a keyword argument '
                    'to %s().' % (key, cls.__name__)
                )
            if not hasattr(cls, key):
                raise TypeError("%s() received an invalid keyword %r. as_view "
                                "only accepts arguments that are already "
                                "attributes of the class." % (cls.__name__, key))

        def view(request, *args, **kwargs):
            self = cls(**initkwargs)
            self.setup(request, *args, **kwargs)
            if not hasattr(self, 'request'):
                raise AttributeError(
                    "%s instance has no 'request' attribute. Did you override "
                    "setup() and forget to call super()?" % cls.__name__
                )
            return self.dispatch(request, *args, **kwargs)
        view.view_class = cls
        view.view_initkwargs = initkwargs

        # take name and docstring from class
        update_wrapper(view, cls, updated=())

        # and possible attributes set by decorators
        # like csrf_exempt from dispatch
        update_wrapper(view, cls.dispatch, assigned=())
        return view
- 阅读源码我们可以知道, 前面在 for 循环 里面进行了一些异常的判断和抛出, 然后就是 def views() 函数, 之后,调用了 update_wrapper() ,这个方法, 通过继续观察, 还是其关键作用的还是下面的 update_wrapper(view, cls.dispatch, assigned=()) 这个方法, 参数中将 view, cls.dispatch, 其实都是这个类的方法, 我们找到 dispach() 方法。
    def dispatch(self, request, *args, **kwargs):
        # Try to dispatch to the right method; if a method doesn't exist,
        # defer to the error handler. Also defer to the error handler if the
        # request method isn't on the approved list.
        if request.method.lower() in self.http_method_names:
            handler = getattr(self, request.method.lower(), self.http_method_not_allowed)
        else:
            handler = self.http_method_not_allowed
        return handler(request, *args, **kwargs)
dispatch 中文就是调度,分发的意思, 而且在这个源码中, 也给了提示, 就是调度,抛开这些, 我们阅读源码。
-
如果我们的方法名小写 在 这个 self.http_method_names: 里面, 也就是在规定的方法里面, 那么就去取这个方法名的函数, 最后返回给 Handler,进行下面的操作, 最后实现了 请求的分发, 否则就会抛出错误异常。
-
如果还刚兴趣, 可以进入 Handler 源码里面进行阅读, 我这里只是抛砖引玉.
CBV中类属性设置方法
类属性的设置方法有两种,一种可以是使用 Python 方法,即继承父类,重写其相应的属性,或者添加新的属性,第二种方式我们可以使用路由中的 as_view() 方法传递参数属性值,从而来指定类的属性。示例如下所示
#第一种方式重写父类
class Home(View): #需要继承自View类
    username='me'
    def get(self,request):
        return HttpResponse("ox")
    def post(self,request):
        pass
class LoginViewChild(LoginView):
    #继承后重写类属性
    username = 'me'

#第二种方法也可以
urlpatterns = [
   path(r'Home/', Home.as_view(username="me"))

]
在这篇文章中, 我们要介绍关于 CBV开发模式 与 FBV 开发模式的区别, 以及他们各种的优点和使用场所, 最后我们一起阅读 Views 的源码理解一下 CBV模式下的请求是如何分发的,非常的神奇.


 347
347


 被折叠的 条评论
为什么被折叠?
被折叠的 条评论
为什么被折叠?
 到【灌水乐园】发言


