


轮播图案例
思路整理:
一:HTML页面部分
1、首先创建可视窗口添加6张图片,添加CSS样式
2、添加左右切换按钮,设置样式
3、添加图片导航器,设置样式,添加悬停样式
示例代码如下:
    <style>
        .container {
            width: 1226px;
            height: 460px;
            position: relative;
            overflow: hidden;
            margin: 0 auto;
        }

        .img-list {
            width: 7356px;
            height: 460px;
            position: absolute;
            /* 相对于父级移动 */
        }

        .img-list img {
            width: 1226px;
            height: 460px;
            display: block;
            float: left;
        }

        .img-controls {
            width: 100%;
            position: absolute;
            top: 50%;
            transform: translateY(-50%);
            overflow: hidden;
        }

        .img-controls #left,
        #right {
            width: 41px;
            height: 69px;
            display: block;
        }

        .img-controls #left {
            background-image: url("../imgs/icon-slides.png");
            background-repeat: no-repeat;
            background-position: -84px 50%;
        }

        .img-controls #left:hover {
            background-image: url("../imgs/icon-slides.png");
            background-repeat: no-repeat;
            background-position: 0 50%;
        }

        .img-controls #right {
            background-image: url("../imgs/icon-slides.png");
            background-repeat: no-repeat;
            background-position: -125px 50%;
            position: absolute;
            right: 0px;
            top: 0%;
        }

        .img-controls #right:hover {
            background-image: url("../imgs/icon-slides.png");
            background-repeat: no-repeat;
            background-position: -42px 50%;
        }

        .img-direction {
            list-style: none;
            padding: 0;
            margin: 0;
            overflow: hidden;
            position: absolute;
            bottom: 20px;
            left: 50%;
            transform: translateX(-50%);
        }

        .img-direction li {
            width: 8px;
            height: 8px;
            background-color: rgba(0, 0, 0, 0.4);
            border: 2px solid #fff;
            border-color: rgba(255, 255, 255, 0.3);
            border-radius: 6px;
            margin: 0 5px;
            float: left;
        }

        /* .img-direction li:hover {
            background-color: #f5f5f5;
            border-color: rgba(0, 0, 0, 0.4);
            cursor: pointer;
            /* 设置鼠标样式
        } */

        #img-direction .active {
            background-color: #f5f5f5;
            border-color: rgba(0, 0, 0, 0.4);
            cursor: pointer;
        }
    </style>
</head>

<body>
    <!-- 可视窗口 -->
    <div class="container">
        <div class="img-list">
            <img src="../imgs/1.jpg">
            <img src="../imgs/2.jpg">
            <img src="../imgs/3.jpg">
            <img src="../imgs/4.jpg">
            <img src="../imgs/5.jpg">
            <img src="../imgs/2.jpg">
        </div>
        <!--    左右切换按钮-->
        <div class="img-controls">
            <a href="#" id="left"></a>
            <a href="#" id="right"></a>
        </div>
        <!--    图片导航器-->
        <ul id="img-direction" class="img-direction">
            <li class="active"></li>
            <li></li>
            <li></li>
            <li></li>
            <li></li>
            <li></li>
        </ul>
    </div>
</body>
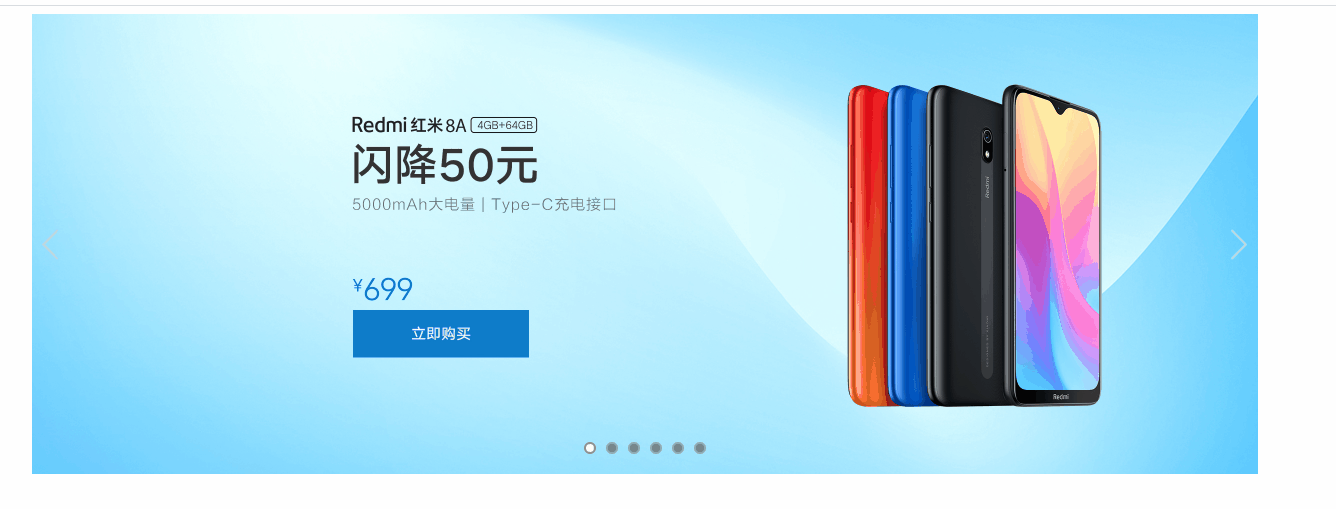
HTML部分静态效果图:

二、javascript部分
1、实现点击按钮达到左右切换图片的效果。
2、实现图片导航器的切换效果,并绑定上对应的图片。
3、添加切换图片实现淡入淡出效果。
4、实现自动轮播效果。
javascript部分代码如下:
<script>
    var $imgList = $('.img-list'); //获取图片容器元素
    var listLeft = parseInt($imgList.css('left')); //获取图片容器当前的left的属性值
    var $imgs = $('.img-list>img') //获取所有图片
    var imgSum = $imgs.length; //获取所有图片的数量
    const WIDTH = parseInt($('.container').css('width')); //获取可视窗口的宽度
    var $imgDir = $('.img-direction>li'); //获取图片当行器中所有<li>元素
    var index = 0; //表示当前切换图片的索引值
    // 向右切换按钮的逻辑 - 所有图片的容器向左移动
    $('#right').click(function (event) {
        // 为当前动画添加动画
        $($imgs[index]).animate({
            opacity: 0
        }, 200, function () {
            if (index < (imgSum - 1)) {
                // 1、将图片的索引值进行更新
                index++;
                //2、将图片容器当前的left属性值减少1226px
                listLeft -= WIDTH;
            } else {
                // 1、将图片的索引值进行更新为第一章图片
                index = 0;
                // 2、将图片容器当前的left属性值更新为0
                listLeft = 0;
            }
            // 3、将更新后的left属性值重新为图片容器进行设置
            $imgList.css('left', listLeft);
            // 4、根据当前图片的索引值,查找对应的图片导航器
            $($imgDir[index]).addClass('active').siblings('li').removeClass();
        })
        event.preventDefault(); //阻止默认行为
    });
    // 向左切换按钮的逻辑 - 所有图片的容器向右移动
    $('#left').click(function (event) {
        // 为当前图片添加动画
        $($imgs[index]).animate({
            opacity: 0
        }, 200, function () {
            if (index > 0) {
                // 1、将图片的索引值进行更新
                index--;
                //2、将图片容器当前的left属性值增加1226px
                listLeft += WIDTH;
            } else if (index == 0) {
                // 1、将图片的索引值进行更新为第一张图片
                index = imgSum - 1;
                // 2、将图片容器当前的left属性值更新
                listLeft = -index * WIDTH;
            }
            // 3、将更新后的left属性值重新为图片容器进行设置
            $imgList.css('left', listLeft);
            // 4、根据当前图片的索引值,查找对应的图片导航器
            $($imgDir[index]).addClass('active').siblings('li').removeClass();

        })
        event.preventDefault(); //阻止默认行为
    });

    // 图片导航器
    var $imgDir = $('.img-direction>li');
    $imgDir.mouseover(function () {
        // 1、实现图片导航器的切换效果
        $(this).addClass('active').siblings('li').removeClass();
        /* 2、根据当前图片导航器的切换效果
            $.inArray(value,arr)
            * value - 表示在指定数组或集合中查找的数据
            * arr - 表示数组或集合
        */
        index = $.inArray(this, $imgDir);
        listLeft = -index * WIDTH;
        $imgList.css('left', listLeft);
    });
    // 自动轮播效果
    setInterval(function () {
        if (index < (imgSum - 1)) {
            // 1、将图片的索引值进行更新
            index++;
            //2、将图片容器当前的left属性值减少1226px
            listLeft -= WIDTH;
        } else {
            // 1、将图片的索引值进行更新为第一章图片
            index = 0;
            // 2、将图片容器当前的left属性值更新为0
            listLeft = 0;
        }
        // 3、将更新后的left属性值重新为图片容器进行设置
        $imgList.css('left', listLeft);

        // 4、根据当前图片的索引值,查找对应的图片导航器
        $($imgDir[index]).addClass('active').siblings('li').removeClass();
    }, 800);

    /*
    模拟事件实现自动轮播,但实现效果轮播速度太快
    function mytrigger(){
        $('#right').trigger('click');
        mytrigger();
    }
    mytrigger(); */
</script>
综合效果如下所示:
三:遇到的问题
1、setInterval()方法:可按照指定的周期(以毫秒计)来调用函数或计算表达式。
setInterval()方法会不停地调用函数,直到 clearInterval()被调用或窗口被关闭。
2、自动轮播效果与淡入淡出效果有冲突,自动轮播后会改变opacity的值为0。使用时需要注意。
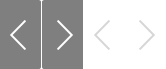
附上一张左右切换按键图:
 使用jQuery需要在HTML页面引入此链接,文件才可以运行:
<script src="https://s3.pstatp.com/cdn/expire-1-M/jquery/3.0.0/jquery.min.js"></script>


 2563
2563


 被折叠的 条评论
为什么被折叠?
被折叠的 条评论
为什么被折叠?
 到【灌水乐园】发言


