


目录
摘要
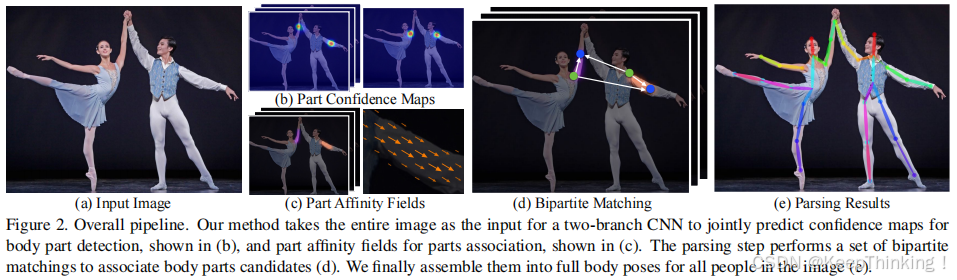
OpenPose是由卡内基梅隆大学提出的基于CNN和PAFs技术的人体姿态估计模型,是对早期CPM等模型的改进。它通过PAFs解决了多人姿态估计中关键点检测与图像中的个体相关联的难题,采用多阶段CNN框架逐步优化结果,实现了高精度、鲁棒的多人姿态估计。OpenPose在COCO和MPII等数据集上取得了领先性能,支持人体、手部、面部和动物姿态估计,广泛应用于动作识别、运动分析等领域。
Abstract
OpenPose is a human pose estimation model proposed by Carnegie Mellon University, based on CNN and PAFs technology. It is an improvement over earlier models such as CPM . By utilizing PAFs, OpenPose addresses the challenging issue of associating detected keypoints with individuals in multi-person pose estimation. It employs a multi-stage CNN framework to progressively refine the results, achieving high-precision and robust multi-person pose estimation. OpenPose has demonstrated leading performance on datasets such as COCO and MPII. It supports pose estimation for the human body, hands, face, and animals, and is widely applied in fields such as action recognition and motion analysis.
OpenPose
论文地址:[1611.08050] Realtime Multi-Person 2D Pose Estimation using Part Affinity Fields
项目地址:OpenPose
模型架构
OpenPose模型架构分为两个主要部分:特征提取网络和多阶段预测网络。
- 特征提取网络
使用预训练的 VGG-19 作为骨干网络,如下图C模块,以提取输入图像的多尺度特征图像F。这些特征被用于后续的关键点检测和PAFs预测。
- 多阶段预测网络
每个阶段包含两个分支,如下图所示:
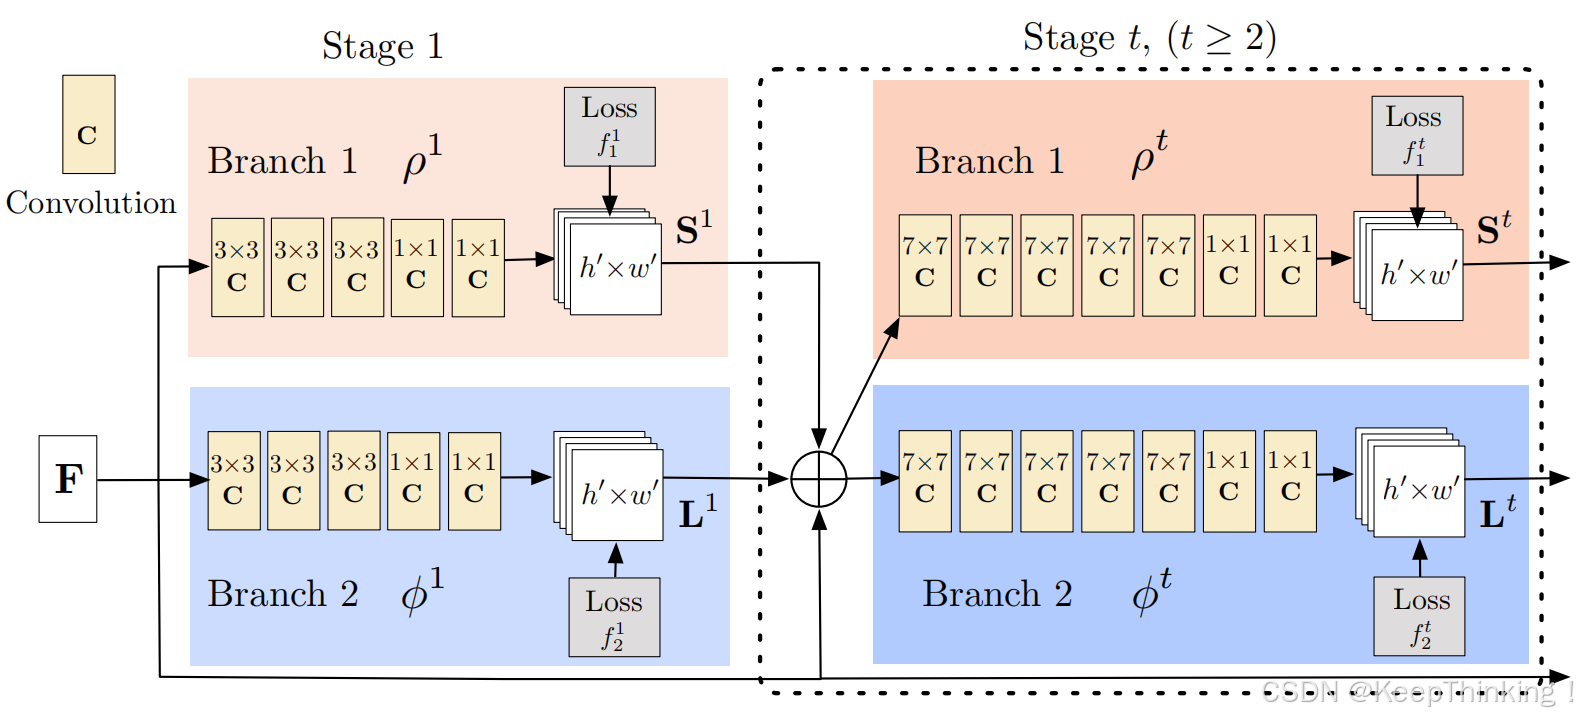
(1)关键点检测分支(Branch 1):预测关键点的热力图,表示每个关键点的概率分布。损失函数如下:
(2)PAFs分支(Branch 2):预测部分关联场,表示关键点之间的关联向量场。损失函数如下:
每个阶段的输出会作为下一阶段的输入,通过迭代优化逐步提高预测精度。
总损失函数:
PAFs
以往的工作是先进行人物识别定位后,再进行关键点的检测。这样做虽然精确度会提高,但是检测速度很慢,而且不利于有遮挡的情况。PAFs的核心任务是解决多人姿态估计中的关键点匹配问题,即判断检测到的关键点是否属于同一个人,并将这些关键点正确地分配到对应的人体实例中。如下图所示:
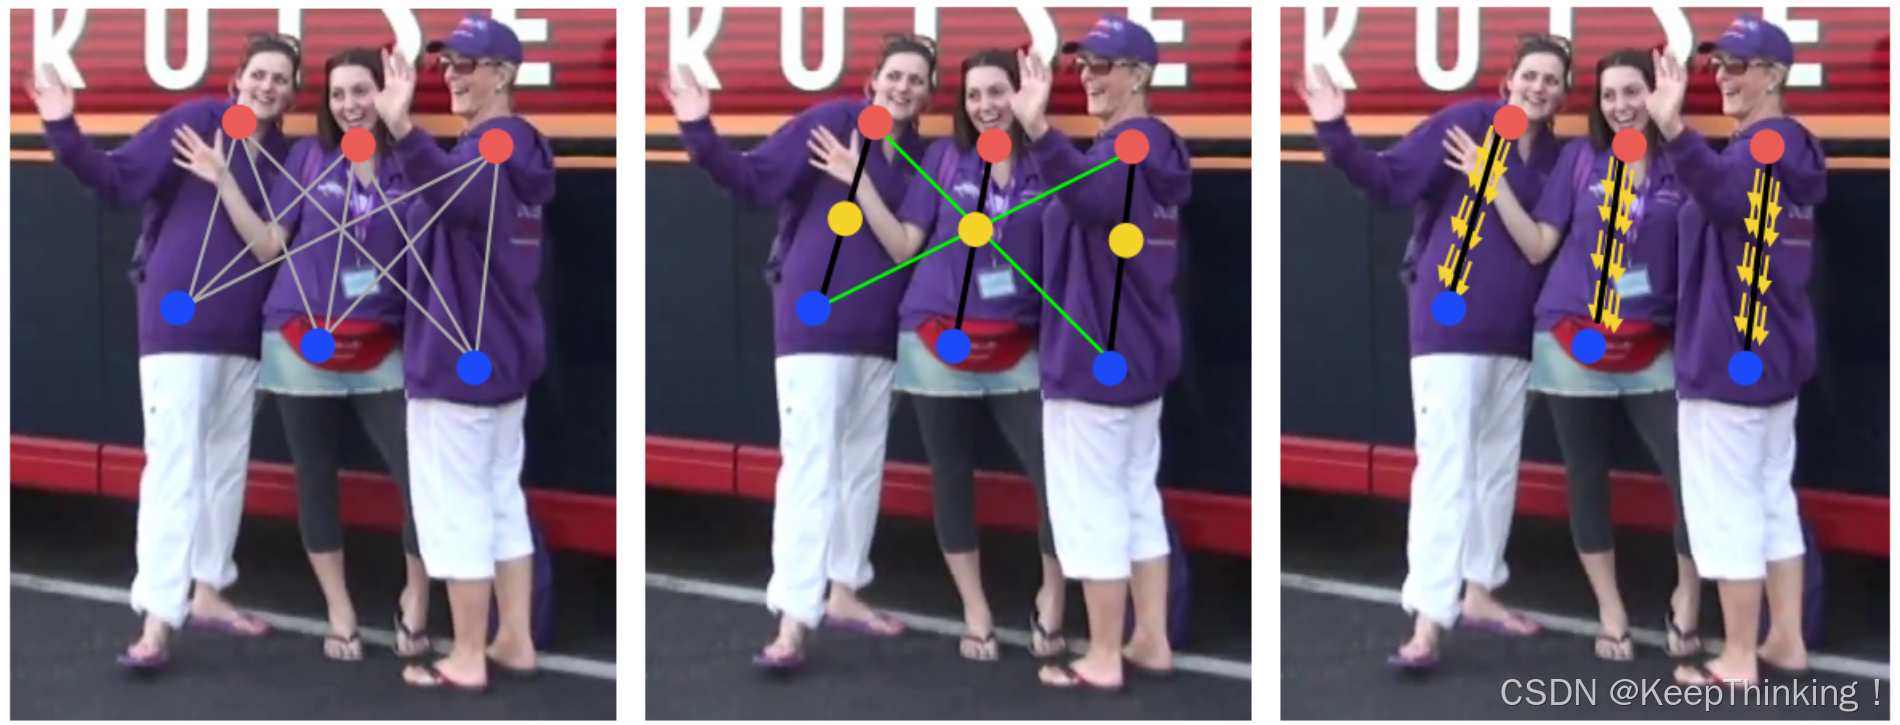
如何区分一对关键点是否属于同一个人
- 学习关键点之间的关联信息
PAFs是一种2D向量场,表示图像中两个关键点之间的关联方向和强度。对于每一对关键点,如:肘部和手腕,PAFs会在图像中的每个像素位置生成一个2D向量,指向从一个关键点到另一个关键点的方向。如果一对关键点属于同一个人,它们之间的PAFs向量场会形成一个连续的、方向一致的关联路径。
- 计算PAFs得分
对每一对关键点计算其关联得分,公式如下:
是
和
之间的直线路径;
是PAFs再路径点
处的向量;
是
若
会较大;反之。
- 阈值判断
通过设定一个阈值,可以判断一对关键点是否属于同一个人。过程及结果如下图所示:
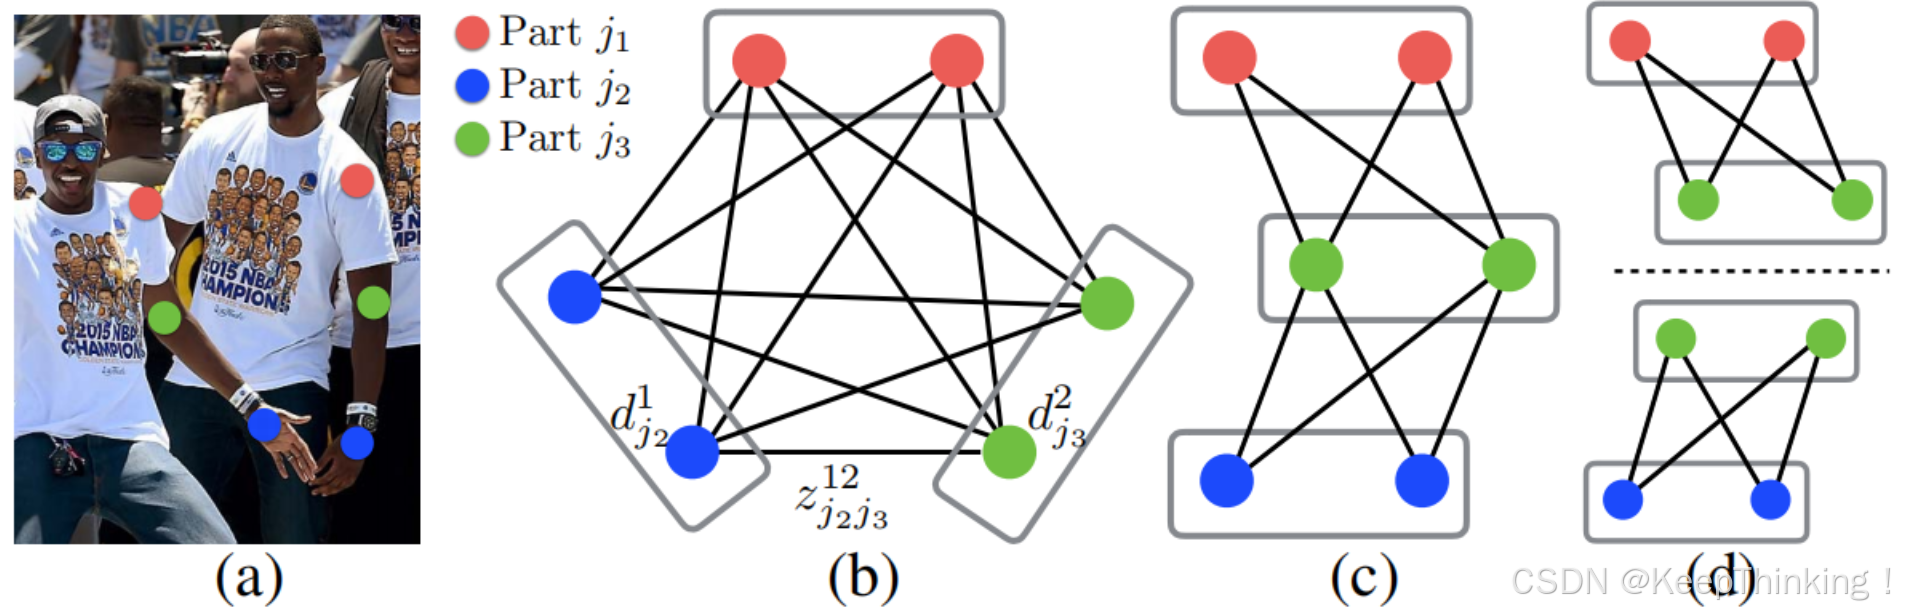
如何将关键点与人进行匹配
将关键点匹配问题转化为二分图匹配问题,如:肘部和手腕,构建一个二分图,其中一侧是所有检测到的肘部关键点,另一侧是所有检测到的手腕关键点。边的权重是PAFs得分。
使用贪婪匹配算法或匈牙利算法,对二分图进行匹配。通过匹配算法,可以将关键点分配到对应的人体实例中。对于每个检测到的人体实例,根据匹配结果构建完整的人体姿态。例如,如果肘部和手腕
被匹配到同一个人,则将它们连接起来形成一条肢体。
代码
请确保Python版本为 3.7 ,避免版本兼容性问题。直接使用PyCharm运行
build_CPU/examples/tutorial_api_python/01_body_from_image.py,如遇到No module named 'pyopenpose'问题,参考如下方法:(1)将openpose-prosperity\build_CPU\python\openpose\Release下所有文件复制到openpose-prosperity\build_CPU\bin中;
(2)将openpose-prosperity\build_CPU\x64\Release下所有文件复制到openpose-prosperity\build_CPU\bin中;
(3)将openpose-prosperity下的models文件夹复制到openpose-prosperity\build_CPU\bin中;
(4)将openpose-prosperity\build_CPU\examples\tutorial_api_python中所需要运行的代码和图像也复制到openpose-prosperity\build_CPU\bin中;
(5)因为文件位置做了改动,所以运行代码中部分代码也需要修改,以01_body_from_image.py为例,如下所示:
GPU运行同理如上。


以下是OpenPose基于预训练模型的简易示例:
import cv2
import torch
from torchvision.transforms import functional as F
from openpose import OpenPose

# 初始化 OpenPose 模型
# 这里使用了预训练的 OpenPose 模型,加载了人体姿态估计的权重
model = OpenPose(pretrained=True, device="cuda" if torch.cuda.is_available() else "cpu")
model.eval()

# 加载图片
image_path = "example.jpg"  # 测试图片路径
image = cv2.imread(image_path)
image = cv2.cvtColor(image, cv2.COLOR_BGR2RGB)  # OpenPose 需要 RGB 格式的图片

# 将图片转换为 Tensor
image_tensor = F.to_tensor(image).unsqueeze(0)  # 添加批次维度
image_tensor = image_tensor.to(model.device)

# 进行姿态估计
with torch.no_grad():
    keypoints, _ = model(image_tensor)  # 返回关键点和置信度图

# 解析关键点
keypoints = keypoints[0]  # 取出第一个批次的结果
num_people = keypoints.shape[0]  # 获取人数
num_keypoints = keypoints.shape[1]  # 获取每个个体的关键点数量

print(f"Detected {num_people} people with {num_keypoints} keypoints each.")

# 可视化关键点
image_with_keypoints = image.copy()
for person in keypoints:
    for keypoint in person:
        x, y, confidence = keypoint
        if confidence > 0.5:  # 只绘制置信度大于 0.5 的关键点
            cv2.circle(image_with_keypoints, (int(x), int(y)), radius=2, color=(0, 255, 0), thickness=-1)

# 显示结果
cv2.imshow("OpenPose Keypoints", cv2.cvtColor(image_with_keypoints, cv2.COLOR_RGB2BGR))
cv2.waitKey(0)
cv2.destroyAllWindows()
测试代码如下:
# From Python
# It requires OpenCV installed for Python
import sys
import cv2
import os
from sys import platform
import argparse
try:
# Import Openpose (Windows/Ubuntu/OSX)
dir_path = os.path.dirname(os.path.realpath(__file__))
try:
# Windows Import
if platform == "win32":
# Change these variables to point to the correct folder (Release/x64 etc.)
# sys.path.append(dir_path + '/../../python/openpose/Release');
# os.environ['PATH'] = os.environ['PATH'] + ';' + dir_path + '/../../x64/Release;' + dir_path + '/../../bin;'
import pyopenpose as op
else:
# Change these variables to point to the correct folder (Release/x64 etc.)
sys.path.append('../../python');
# If you run `make install` (default path is `/usr/local/python` for Ubuntu), you can also access the OpenPose/python module from there. This will install OpenPose and the python library at your desired installation path. Ensure that this is in your python path in order to use it.
# sys.path.append('/usr/local/python')
from openpose import pyopenpose as op
except ImportError as e:
print('Error: OpenPose library could not be found. Did you enable `BUILD_PYTHON` in CMake and have this Python script in the right folder?')
raise e
# Flags
parser = argparse.ArgumentParser()
parser.add_argument("--image_path", default="192.jpg", help="Process an image. Read all standard formats (jpg, png, bmp, etc.).")
args = parser.parse_known_args()
# Custom Params (refer to include/openpose/flags.hpp for more parameters)
params = dict()
params["model_folder"] = "models"
# Add others in path?
for i in range(0, len(args[1])):
curr_item = args[1][i]
if i != len(args[1])-1: next_item = args[1][i+1]
else: next_item = "1"
if "--" in curr_item and "--" in next_item:
key = curr_item.replace('-','')
if key not in params: params[key] = "1"
elif "--" in curr_item and "--" not in next_item:
key = curr_item.replace('-','')
if key not in params: params[key] = next_item
# Construct it from system arguments
# op.init_argv(args[1])
# oppython = op.OpenposePython()
# Starting OpenPose
opWrapper = op.WrapperPython()
opWrapper.configure(params)
opWrapper.start()
# Process Image
datum = op.Datum()
imageToProcess = cv2.imread(args[0].image_path)
datum.cvInputData = imageToProcess
opWrapper.emplaceAndPop(op.VectorDatum([datum]))
# Display Image
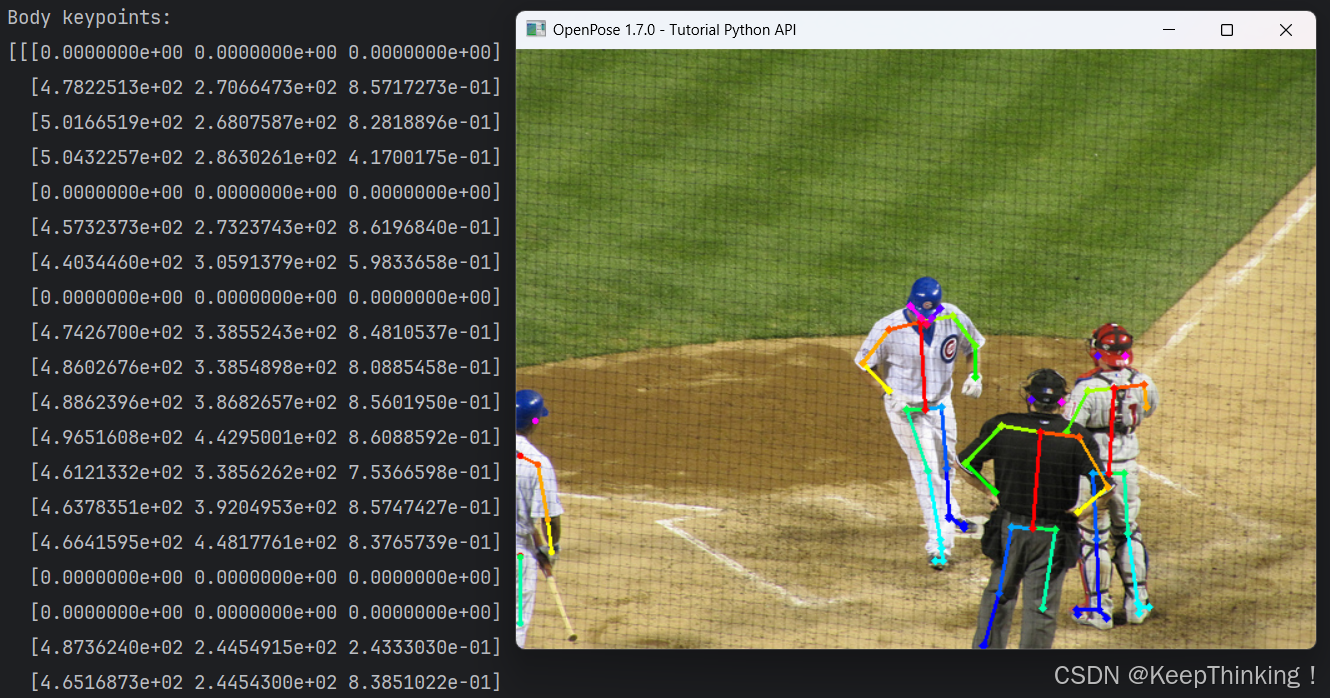
print("Body keypoints: \n" + str(datum.poseKeypoints))
cv2.imshow("OpenPose 1.7.0 - Tutorial Python API", datum.cvOutputData)
cv2.waitKey(0)
except Exception as e:
print(e)
sys.exit(-1)输入图像:
测试结果:

总结
OpenPose是一种基于深度学习的多人姿态估计模型,通过引入PAFs和多阶段CNN架构,解决了多人场景中关键点检测与关联的难题,实现了高效、鲁棒的姿态估计。开创了多人姿态估计的先河,简化了后处理步骤,并通过开源推动了学术和工业界的广泛应用。OpenPose的成功启发了未来研究,包括轻量化设计、多模态融合、全局关联信息建模以及扩展到3D姿态估计等方向,为计算机视觉领域的发展提供了重要参考。


 998
998

 被折叠的 条评论
为什么被折叠?
被折叠的 条评论
为什么被折叠?
 到【灌水乐园】发言


