


目录
在application.properties配置redis

本文是本人以前笔记,如果说是在掘金上看到的话没错,还是本人程程呀 的个人主页 - 动态 - 掘金目前只有这一个。如果有哪里不对的话欢迎各位大佬指出问题,本人是一个小白。上一篇文章链接为:http://t.csdn.cn/njrA2 ,本篇是连接http://t.csdn.cn/njrA2。
如果是springboot的话请看sspringboot创建项目_程程呀是小白的博客-CSDN博客_springboot创建项目 ,这个是从头开始的还没有学完springboot,一起学习呀!!!!
springboot整合Redis
添加依赖
<dependency>
    <groupId>org.springframework.boot</groupId>
    <artifactId>spring-boot-starter-data-redis</artifactId>

</dependency>

<!--spring2.x集成所需common-pool2-->
<dependency>
    <groupId>org.apache.commons</groupId>
    <artifactId>commons-pool2</artifactId>

</dependency>
在application.properties配置redis
#redis服务器地址
spring.redis.host=192.168.1.6
#redis服务器连接端口
spring.redis.port=6379
#redis数据库索引(默认为0)
spring.redis.database=0
#连接超时时间(毫秒)
spring.redis.timeout=1800000
#连接池最大连接数(用负值表示没有限制)
spring.redis.lettuce.pool.max-idle=20
#最大阻塞等待时间(负数表示没有限制)
spring.redis.jedis.pool.max-idle=5
#连接池中的最小空闲连接
spring.redis.lettuce.pool.min-idle=0
添加redis配置类
@EnableCaching
@Configuration
public class RedisConfig extends CachingConfigurationSelector {
@Bean
public RedisTemplate<String, Object> redisTemplate(RedisConnectionFactory factory) {
RedisTemplate<String, Object> template = new RedisTemplate<>();
RedisSerializer<String> redisSerializer = new StringRedisSerializer();
Jackson2JsonRedisSerializer jackson2JsonRedisSerializer = new Jackson2JsonRedisSerializer(Object.class);
ObjectMapper om = new ObjectMapper();
om.setVisibility(PropertyAccessor.ALL, JsonAutoDetect.Visibility.ANY);
om.enableDefaultTyping(ObjectMapper.DefaultTyping.NON_FINAL);
jackson2JsonRedisSerializer.setObjectMapper(om);
template.setConnectionFactory(factory);
//key序列化方式
template.setKeySerializer(redisSerializer);
//value序列化
template.setValueSerializer(jackson2JsonRedisSerializer);
//value hashmap序列化
template.setHashValueSerializer(jackson2JsonRedisSerializer);
return template;
}
@Bean
public CacheManager cacheManager(RedisConnectionFactory factory) {
RedisSerializer<String> redisSerializer = new StringRedisSerializer();
Jackson2JsonRedisSerializer jackson2JsonRedisSerializer = new Jackson2JsonRedisSerializer(Object.class);
//解决查询缓存转换异常的问题
ObjectMapper om = new ObjectMapper();
om.setVisibility(PropertyAccessor.ALL, JsonAutoDetect.Visibility.ANY);
om.enableDefaultTyping(ObjectMapper.DefaultTyping.NON_FINAL);
jackson2JsonRedisSerializer.setObjectMapper(om);
// 配置序列化(解决乱码的问题),过期时间600秒
RedisCacheConfiguration config = RedisCacheConfiguration.defaultCacheConfig()
.entryTtl(Duration.ofSeconds(600))
.serializeKeysWith(RedisSerializationContext.SerializationPair.fromSerializer(redisSerializer))
.serializeValuesWith(RedisSerializationContext.SerializationPair.fromSerializer(jackson2JsonRedisSerializer))
.disableCachingNullValues();
RedisCacheManager cacheManager = RedisCacheManager.builder(factory)
.cacheDefaults(config)
.build();
return cacheManager;
}
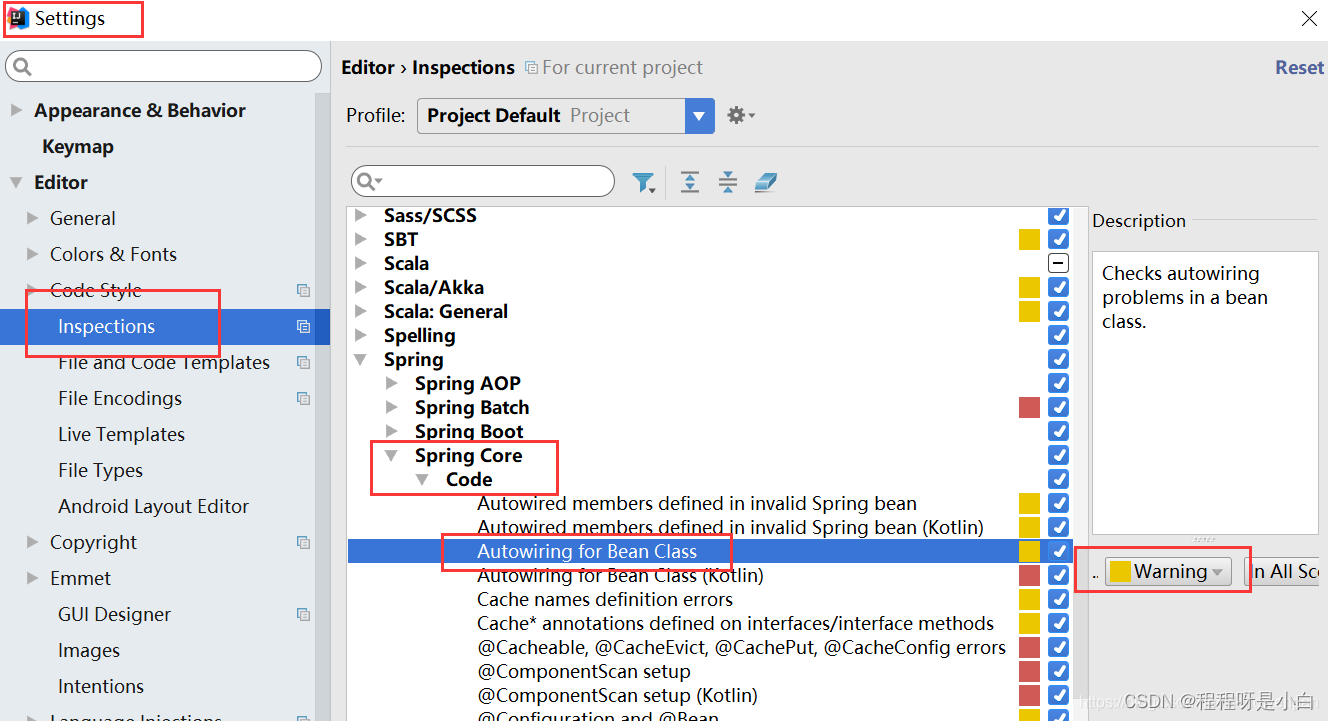
}如果factory一直下面有红线可以:降低Autowired检测的级别,将Severity的级别由之前的error改成warning或其它可以忽略的级别
测试一下
@RestController

@RequestMapping("/redisText")

public class RedisController {

    @Autowired

    private RedisTemplate redisTemplate;

    @GetMapping

    public String testRedis(){

        //设置值到redis

        redisTemplate.opsForValue().set("name","lucy");

        //从redis获取值

        String name=(String) redisTemplate.opsForValue().get("name");

        return name;

    }

}
正确结果为
lucy
如果错误的话很有可能是common-pool2版本问题。改为下图所示应该可以了
<!--spring2.x集成所需common-pool2-->
<dependency>
<groupId>org.apache.commons</groupId>
<artifactId>commons-pool2</artifactId>
</dependency>
本文是本人以前笔记,如果说是在掘金上看到的话没错,还是本人程程呀 的个人主页 - 动态 - 掘金目前只有这一个。如果有哪里不对的话欢迎各位大佬指出问题,本人是一个小白。
上一篇文章链接为:http://t.csdn.cn/njrA2 ,本篇是连接http://t.csdn.cn/njrA2。
如果是springboot的话请看sspringboot创建项目_程程呀是小白的博客-CSDN博客_springboot创建项目 ,这个是从头开始的还没有学完springboot,一起学习呀!!!!


 251
251


 被折叠的 条评论
为什么被折叠?
被折叠的 条评论
为什么被折叠?
 到【灌水乐园】发言


