


1、新建工程,把工程编码改为utf-8
2.把JSP的编码格式改为utf-8
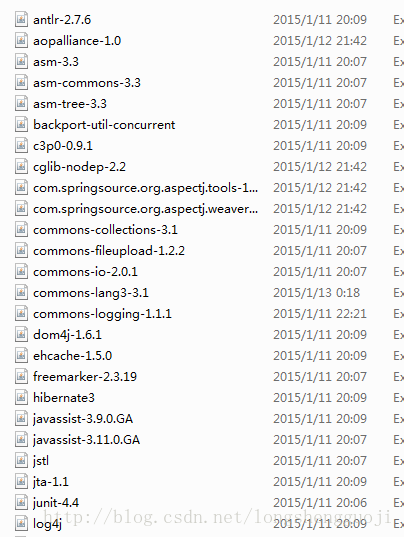
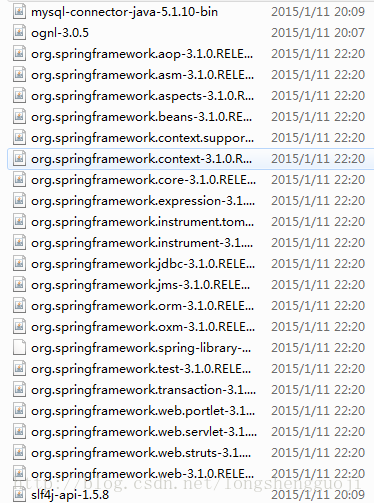
3.把所需jar包放入到lib下
4、建立三个src folder
Src:存放源代码
Config:存放配置文件
Test:存放测试文件
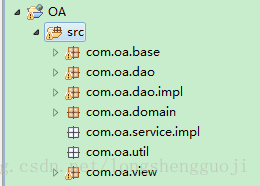
5、在src下建立package包
domain
dao
daoImpl
service
serviceImpl
view
util
在WebRoot文件夹下建立几个新的文件夹
script :存放javascript文件
style:存放style文件
-----img:存放图片资源
6.在WEB-INF文件夹下建立JSP文件夹,目录如下:
Jsp:存放jsp文件
7.在WebRoot—>WEB-INFàlib文件夹下放置所需的jar包

8、整合spring和hibernate
8.1 添加配置文件
在config目录中添加spring配置文件application.xml
Hibernate配置文件hibernate.cfg.xml和jdbc.properties
在domain包中新建POJO类Users和其对应的映射文件Users.hbm.xml
8.2 具体文件代码
具体文件的代码如下:
Users类代码为:
- package com.oa.domain;
- public class Users
- {
- private long uid;
- public long getUid()
- {
- return uid;
- }
- public void setUid(long uid)
- {
- this.uid = uid;
- }
- }
Users.hbm.xml文件代码为:
- <?xml version="1.0" encoding="utf-8"?>
- <!DOCTYPE hibernate-mapping PUBLIC "-//Hibernate/Hibernate Mapping DTD 3.0//EN"
- "http://hibernate.sourceforge.net/hibernate-mapping-3.0.dtd">
- <hibernate-mapping>
- <!-- 用来描述一个持久化类
- name 类的全名
- table 表名,可以不写,默认值和类名一样
- catalog 数据库名称,一般不写
- -->
- <class name="com.oa.domain.Users" table="Users" lazy="true">
- <!-- 标示属性,和数据库主键对应 ,将Users类的pid映射为表中的主键pid
- column 列名称
- length 数据库的字段长度,默认数据库最高的长度
- type 类型
- -->
- <id name="uid" column="uid" length="5" type="java.lang.Long">
- <!-- 主键产生器
- 告诉hibernate容器用什么样的方式产生主键
- 用数据库本身的自动增长,不用hibernate的
- -->
- <generator class="native"></generator>
- </id>
- </class>
- </hibernate-mapping>
Jdbc.properties中代码为:
- driverClass=com.mysql.jdbc.Driver
- jdbcUrl=jdbc\:mysql\://localhost\:3306/oa
- username=root
- password=340621
hibernate配置文件hibernate.cfg.xml代码为:
- <?xml version='1.0' encoding='utf-8'?>
- <!DOCTYPE hibernate-configuration PUBLIC
- "-//Hibernate/Hibernate Configuration DTD 3.0//EN"
- "http://hibernate.sourceforge.net/hibernate-configuration-3.0.dtd">
- <hibernate-configuration>
- <!--
- 一个session-factory只能连接一个数据库
- -->
- <session-factory>
- <!--
- 设置数据库方言
- -->
- <property name="dialect">
- org.hibernate.dialect.MySQLDialect
- </property>
- <!--
- 作用:根据持久化类和映射文件生成表
- validate 只验证不生成
- create-drop 当hibernate启动时生成表,hibernate结束时删除表
- create 只要启动hibernate时生成表
- update 在启动hibernate容器时检查持久化类和映射文件是不是对应,不对应则创建
- -->
- <property name="hbm2ddl.auto">update</property>
- <!--
- 显示hibernate内部生成的sql语句
- -->
- <property name="show_sql">true</property>
- <property name="connection.pool_size">1</property>
- <!-- 声明映射文件 -->
- <mapping resource="com/oa/domain/Users.hbm.xml" />
- <mapping resource="com/oa/domain/Role.hbm.xml" />
- </session-factory>
- </hibernate-configuration>
Spring配置文件代码为:
- <?xml version="1.0" encoding="UTF-8"?>
- <beans xmlns="http://www.springframework.org/schema/beans"
- xmlns:xsi="http://www.w3.org/2001/XMLSchema-instance"
- xmlns:aop="http://www.springframework.org/schema/aop"
- xmlns:tx="http://www.springframework.org/schema/tx"
- xmlns:context="http://www.springframework.org/schema/context"
- xsi:schemaLocation="http://www.springframework.org/schema/beans
- http://www.springframework.org/schema/beans/spring-beans-3.0.xsd
- http://www.springframework.org/schema/aop
- http://www.springframework.org/schema/aop/spring-aop-3.0.xsd
- http://www.springframework.org/schema/tx
- http://www.springframework.org/schema/tx/spring-tx-3.0.xsd
- http://www.springframework.org/schema/context
- http://www.springframework.org/schema/context/spring-context-3.0.xsd
- ">
- <!-- 0,配置bean的自动扫描与装配 -->
- <context:component-scan base-package="com.oa"></context:component-scan>
- <!-- 1,配置数据源 -->
- <!-- 1.1,导入 jdbc.properties 配置文件 -->
- <context:property-placeholder location="classpath:jdbc.properties" />
- <!-- 1.2,配置数据源(c3p0) -->
- <bean id="dataSource" class="com.mchange.v2.c3p0.ComboPooledDataSource">
- <!-- 数据库连接信息 -->
- <property name="jdbcUrl" value="${jdbcUrl}"></property>
- <property name="user" value="${username}"></property>
- <property name="password" value="${password}"></property>
- <property name="driverClass" value="${driverClass}"></property>
- <!-- 其他配置 -->
- <!--初始化时获取三个连接,取值应在minPoolSize与maxPoolSize之间。Default: 3 -->
- <property name="initialPoolSize" value="3"></property>
- <!--连接池中保留的最小连接数。Default: 3 -->
- <property name="minPoolSize" value="3"></property>
- <!--连接池中保留的最大连接数。Default: 15 -->
- <property name="maxPoolSize" value="5"></property>
- <!--当连接池中的连接耗尽的时候c3p0一次同时获取的连接数。Default: 3 -->
- <property name="acquireIncrement" value="3"></property>
- <!-- 控制数据源内加载的PreparedStatements数量。如果maxStatements与maxStatementsPerConnection均为0,则缓存被关闭。Default: 0 -->
- <property name="maxStatements" value="8"></property>
- <!--maxStatementsPerConnection定义了连接池内单个连接所拥有的最大缓存statements数。Default: 0 -->
- <property name="maxStatementsPerConnection" value="5"></property>
- <!--最大空闲时间,1800秒内未使用则连接被丢弃。若为0则永不丢弃。Default: 0 -->
- <property name="maxIdleTime" value="1800"></property>
- </bean>
- <!-- 2,配置SessionFactory(整合Hibernate) -->
- <bean id="sessionFactory" class="org.springframework.orm.hibernate3.LocalSessionFactoryBean">
- <property name="dataSource" ref="dataSource"></property>
- <property name="configLocation" value="classpath:hibernate.cfg.xml"></property>
- </bean>
- <!-- 3,配置声明式事务 -->
- <!-- 3.1,配置事务管理器 -->
- <bean id="transactionManager" class="org.springframework.orm.hibernate3.HibernateTransactionManager">
- <property name="sessionFactory" ref="sessionFactory"></property>
- </bean>
- <!-- 3.2,配置基于注解的事务支持-->
- <tx:annotation-driven transaction-manager="transactionManager"/>
- </beans>
8.3编写测试文件:
一般测试spring和hibernate是否整合是通过sessionFactory来进行,具体方法为:
在test文件夹中新建SessionFactoryTest类,具体代码为:
- package com.oa.test;
- import org.hibernate.SessionFactory;
- import org.junit.Test;
- import org.springframework.context.ApplicationContext;
- importorg.springframework.context.support.ClassPathXmlApplicationContext;
- public class SessionFactoryTest
- {
- privateApplicationContext context = new ClassPathXmlApplicationContext("applicationContext.xml");
- @Test
- publicvoid testSession()
- {
- SessionFactorysf = (SessionFactory) context.getBean("sessionFactory");
- //System.out.println(sf.);
- }
- }
执行测试文件,没有出错,说明spring和hibernate成功整合
9、整合spring和Struts2
9.1添加配置文件
在config目录中添加Struts2配置文件struts.xml
在view包中新建UserAction
9.2添加代码
UserAction类代码如下:
- package com.oa.view;
- import org.springframework.context.annotation.Scope;
- import org.springframework.stereotype.Controller;
- import com.opensymphony.xwork2.ActionSupport;
- //基于注解的配置
- @Controller
- @Scope("prototype")
- // Scope为prototype,保证action的多实例
- public class RoleAction extends ActionSupport
- {
- public String list()
- {
- return "list";
- }
- public String delete()
- {
- return "toList";
- }
- public String addUI()
- {
- return "addUI";
- }
- public String add()
- {
- return "toList";
- }
- public String editUI()
- {
- return "editUI";
- }
- public String edit()
- {
- return "toList";
- }
- }
Struts.xml配置代码如下:
- <?xml version="1.0" encoding="UTF-8" ?>
- <!DOCTYPE struts PUBLIC
- "-//Apache Software Foundation//DTD Struts Configuration 2.3//EN"
- "http://struts.apache.org/dtds/struts-2.3.dtd">
- <struts>
- <constant name="struts.devMode" value="true" />
- <!-- 把action扩展名改为.do -->
- <constant name="struts.action.extension" value="do"/>
- <!-- 把主题设为simple -->
- <constant name="struts.ui.theme" value="simple" />
- <package name="default" namespace="/" extends="struts-default">
- <action name="test" class="com.oa.test.ActionTest" method="execute">
- <result name="success" type="dispatcher">/test.jsp</result>
- </action>
- <!-- 配置roleAction -->
- <action name="role_*" class="roleAction" method="{1}">
- <result name="list">/WEB-INF/jsp/roleAction/list.jsp</result>
- <result name="addUI">/WEB-INF/jsp/roleAction/addUI.jsp</result>
- <result name="editUI">/WEB-INF/jsp/roleAction/editUI.jsp</result>
- <result name="toList" >/WEB-INF/jsp/roleAction/list.jsp</result>
- </action>
- </package>
- <!-- Add packages here -->
- </struts>
9.3 编写测试文件
10.配置web.xml
加入spring的监听器
- <!-- 配置Spring的用于初始化ApplicationContext对象的监听器 -->
- <listener>
- <listener-class>org.springframework.web.context.ContextLoaderListener</listener-class>
- </listener>
- <context-param>
- <param-name>contextConfigLocation</param-name>
- <param-value>classpath:applicationContext.xml</param-value>
- </context-param>
加入struts2的过滤器
<!-- 配置Struts2核心过滤器 -->
<filter>
<filter-name>struts2</filter-name>
<filter-class>org.apache.struts2.dispatcher.ng.filter.StrutsPrepareAndExecuteFilter</filter-class>
</filter>
<filter-mapping>
<filter-name>struts2</filter-name>
<url-pattern>/*</url-pattern>
</filter-mapping>


 208
208

 被折叠的 条评论
为什么被折叠?
被折叠的 条评论
为什么被折叠?
 到【灌水乐园】发言


