


1.demo效果
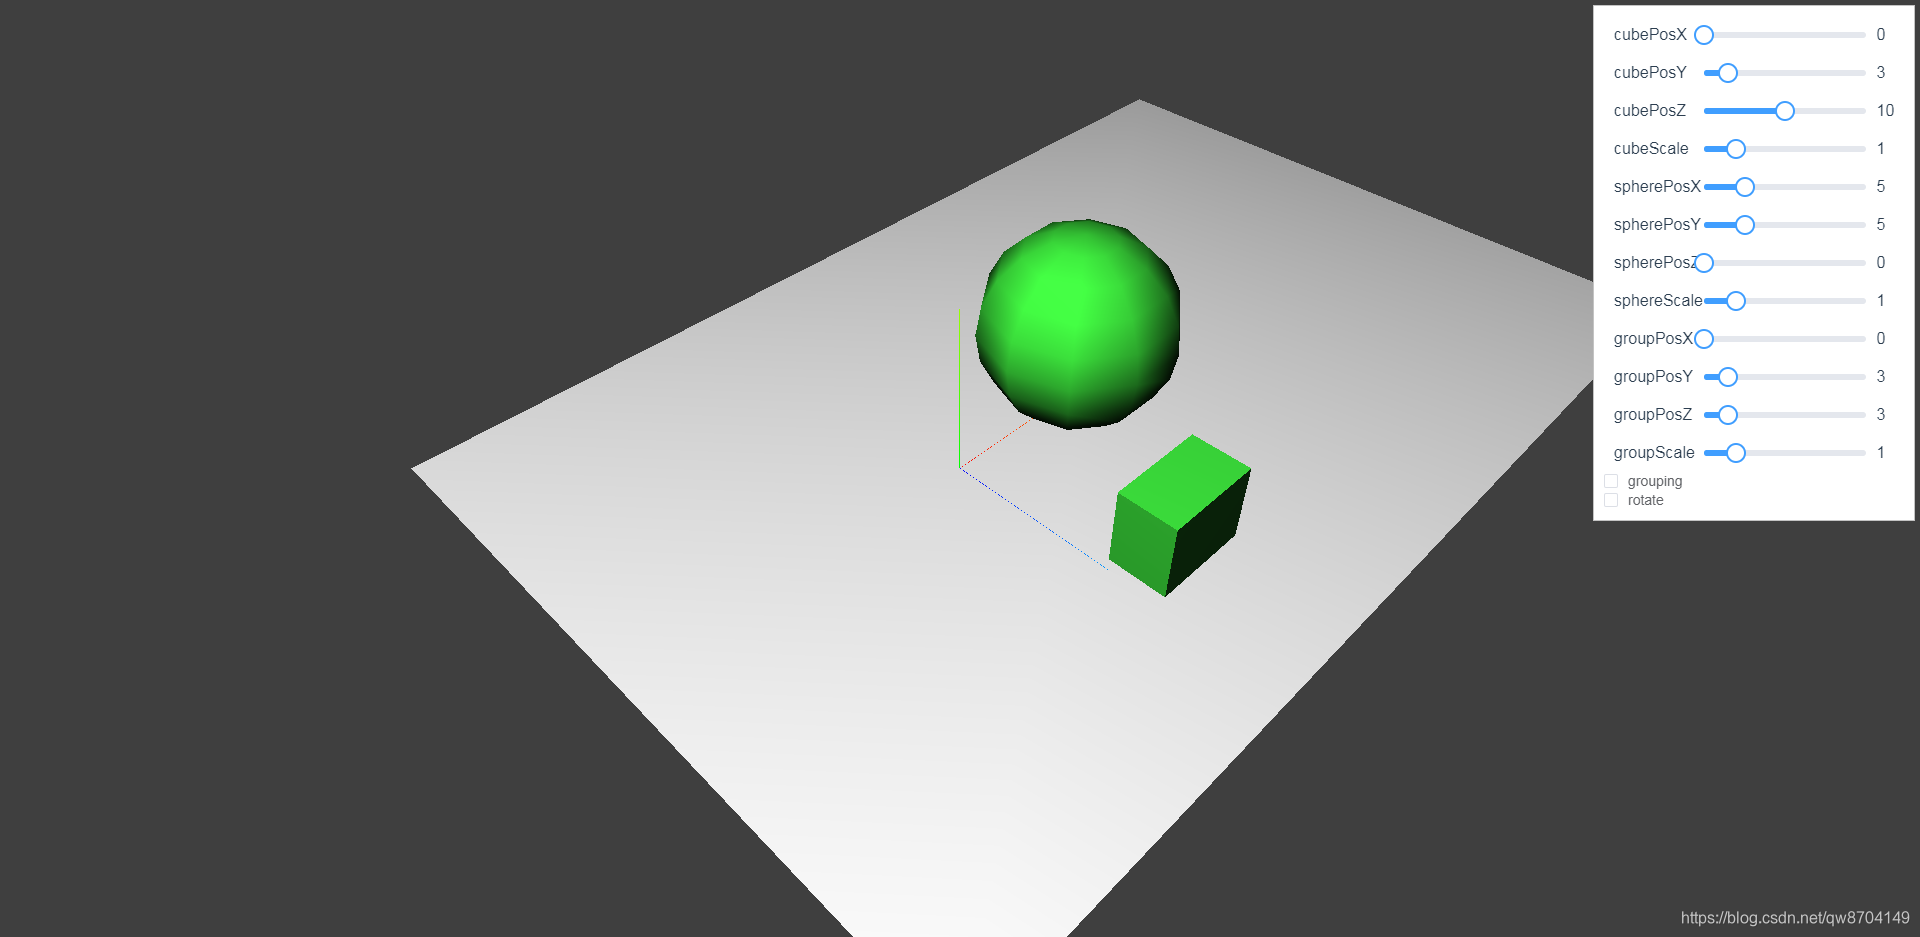
如上图,该demo支持以下功能:
- 可以通过cubePosX、cubePosY、cubePosZ属性单独控制立方体的位置,通过cubeScale属性单独控制立方体的缩放比例。
- 可以通过spherePosX、spherePosY、spherePosZ属性单独控制球体体的位置,通过sphereScale属性单独控制球体体的缩放比例
- 可以通过groupPosX、groupPosY、groupPosZ属性同时控制立方体和球体的位置,通过groupScale属性同时控制立方体和球体的缩放比例
- 可以勾选rotate属性让立方体和球体独立旋转,可以同时勾选grouping属性是球体和立方体作为一个整体旋转
2.实现要点
2.1 创建立方体和球体
这里我们不仅需要创建立方体和球体,还需要通过设置position属性和scale属性来控制它们的位置和缩放比例
const material = new THREE.MeshLambertMaterial({ color: 0x44ff44 })

// 创建方块
const cubeGeom = new THREE.BoxGeometry(5, 4, 3)
this.cube = new THREE.Mesh(cubeGeom, material)
this.cube.scale = new THREE.Vector3(
  this.properties.cubeScale.value,
  this.properties.cubeScale.value,
  this.properties.cubeScale.value
)
this.cube.position.set(
  this.properties.cubePosX.value,
  this.properties.cubePosY.value,
  this.properties.cubePosZ.value
)
// 创建球体
const sphereGeom = new THREE.SphereGeometry(5, 10, 10)
this.sphere = new THREE.Mesh(sphereGeom, material)
this.sphere.scale = new THREE.Vector3(
  this.properties.sphereScale.value,
  this.properties.sphereScale.value,
  this.properties.sphereScale.value
)
this.sphere.position.set(
  this.properties.spherePosX.value,
  this.properties.spherePosY.value,
  this.properties.spherePosZ.value
)
2.2 创建组合对象
上面的步骤我们创建了球体和立方体,但是还没有将它们添加到场景,为了能同时控制它们,我们需要创建一个组,像这样 const group = new THREE.Group()创建一个组,然后把球体和立方体添加到组中,这里需要通过组的position属性和scale属性来控制它的位置和缩放比例,最后将组添加到场景中
// 创建组合
this.group = new THREE.Group()
this.group.scale = new THREE.Vector3(
  this.properties.groupScale.value,
  this.properties.groupScale.value,
  this.properties.groupScale.value
)
this.group.position.set(
  this.properties.groupPosX.value,
  this.properties.groupPosY.value,
  this.properties.groupPosZ.value
)

this.group.add(this.cube)
this.group.add(this.sphere)
this.scene.add(this.group)
2.3 创建旋转动画
这里我们创建一个animation函数来实现demo的旋转动画,实现时需要通过rotate属性来判断是否需要旋转动画,同时需要通过grouping属性来判断是将整个组旋转还是立方体和球体分别独立旋转,最后将动画函数放在render函数中调用
animation () {
  if (this.properties.rotate) {
    if (this.properties.grouping) {
      this.group.rotation.y += 0.01
    } else {
      this.cube.rotation.y += 0.01
      this.sphere.rotation.y += 0.01
    }
  }
},
render () {
  this.animation()
  this.renderer.render(this.scene, this.camera)
  requestAnimationFrame(this.render)
}
3.demo代码
<template>
  <div>
    <div id="container"></div>
    <div class="controls-box">
      <section>

        <el-row>
          <div v-for="(item,key) in properties" :key="key">
            <div v-if="item&&item.name!=undefined">
              <el-col :span="8">
                <span class="vertice-span">{{item.name}}</span>
              </el-col>
              <el-col :span="13">
                <el-slider v-model="item.value" :min="item.min" :max="item.max" :step="item.step" :format-tooltip="formatTooltip" @change="redraw"></el-slider>
              </el-col>
              <el-col :span="3">
                <span class="vertice-span">{{item.value}}</span>
              </el-col>
            </div>
          </div>
        </el-row>
        <el-row>
          <el-checkbox v-model="properties.grouping" @change="redraw">grouping</el-checkbox>
        </el-row>
        <el-row>
          <el-checkbox v-model="properties.rotate" @change="redraw">rotate</el-checkbox>
        </el-row>

      </section>

    </div>
  </div>
</template>

<script>
import * as THREE from 'three'
import { OrbitControls } from 'three/examples/jsm/controls/OrbitControls.js'
export default {
  components: {},
  data () {
    return {
      properties: {
        cubePosX: {
          name: 'cubePosX',
          value: 0,
          min: 0,
          max: 20,
          step: 1
        },
        cubePosY: {
          name: 'cubePosY',
          value: 3,
          min: 0,
          max: 20,
          step: 1
        },
        cubePosZ: {
          name: 'cubePosZ',
          value: 10,
          min: 0,
          max: 20,
          step: 1
        },
        cubeScale: {
          name: 'cubeScale',
          value: 1,
          min: 0,
          max: 5,
          step: 0.1
        },
        spherePosX: {
          name: 'spherePosX',
          value: 5,
          min: 0,
          max: 20,
          step: 1
        },
        spherePosY: {
          name: 'spherePosY',
          value: 5,
          min: 0,
          max: 20,
          step: 1
        },
        spherePosZ: {
          name: 'spherePosZ',
          value: 0,
          min: 0,
          max: 20,
          step: 1
        },
        sphereScale: {
          name: 'sphereScale',
          value: 1,
          min: 0,
          max: 5,
          step: 0.1
        },
        groupPosX: {
          name: 'groupPosX',
          value: 0,
          min: 0,
          max: 20,
          step: 1
        },
        groupPosY: {
          name: 'groupPosY',
          value: 3,
          min: 0,
          max: 20,
          step: 1
        },
        groupPosZ: {
          name: 'groupPosZ',
          value: 3,
          min: 0,
          max: 20,
          step: 1
        },
        groupScale: {
          name: 'groupScale',
          value: 1,
          min: 0,
          max: 5,
          step: 0.1
        },
        grouping: false,
        rotate: false
      },
      cube: null,
      sphere: null,
      group: null,
      camera: null,
      scene: null,
      renderer: null,
      controls: null
    }
  },
  mounted () {
    this.init()
  },
  methods: {
    formatTooltip (val) {
      return val
    },
    // 初始化
    init () {
      this.createScene() // 创建场景
      this.createMesh() // 创建底座
      this.createCubeAndSphere() // 创建方块和球体
      this.createLight() // 创建光源
      this.createCamera() // 创建相机
      this.createRender() // 创建渲染器
      this.createControls() // 创建控件对象
      this.render() // 渲染
    },
    // 创建场景
    createScene () {
      this.scene = new THREE.Scene()
      // 显示三维坐标系
      const axis = new THREE.AxesHelper(10)
      this.scene.add(axis)
    },
    // 创建底座
    createMesh () {
      const planeGeometry = new THREE.PlaneGeometry(60, 40, 1, 1) // 创建一个平面对象PlaneGeometry
      const planeMaterial = new THREE.MeshLambertMaterial({
        color: 0xffffff
      }) // 材质对象Material
      const plane = new THREE.Mesh(planeGeometry, planeMaterial)
      plane.receiveShadow = true

      // 设置平面位置
      plane.rotation.x = -0.5 * Math.PI
      plane.position.set(10, 0, 0)

      // 平面对象添加到场景中
      this.scene.add(plane)
    },
    // 创建光源
    createLight () {
      // 添加聚光灯
      const spotLight = new THREE.SpotLight(0xffffff)
      spotLight.position.set(-40, 60, 20)
      spotLight.castShadow = true
      this.scene.add(spotLight) // 聚光灯添加到场景中
      // 环境光
      const ambientLight = new THREE.AmbientLight(0x0c0c0c)
      this.scene.add(ambientLight)
    },
    // 创建相机
    createCamera () {
      const element = document.getElementById('container')
      const width = element.clientWidth // 窗口宽度
      const height = element.clientHeight // 窗口高度
      const k = width / height // 窗口宽高比
      // PerspectiveCamera( fov, aspect, near, far )
      this.camera = new THREE.PerspectiveCamera(45, k, 0.1, 1000)

      this.camera.position.set(-30, 40, 30) // 设置相机位置
      this.camera.lookAt(new THREE.Vector3(5, 0, 0)) // 设置相机方向
      this.scene.add(this.camera)
    },
    // 创建渲染器
    createRender () {
      const element = document.getElementById('container')
      this.renderer = new THREE.WebGLRenderer()
      this.renderer.setSize(element.clientWidth, element.clientHeight) // 设置渲染区域尺寸
      this.renderer.setClearColor(0x3f3f3f, 1) // 设置背景颜色
      element.appendChild(this.renderer.domElement)
    },
    // 创建方块和球体
    createCubeAndSphere () {
      const material = new THREE.MeshLambertMaterial({ color: 0x44ff44 })

      // 创建方块
      const cubeGeom = new THREE.BoxGeometry(5, 4, 3)
      this.cube = new THREE.Mesh(cubeGeom, material)
      this.cube.scale = new THREE.Vector3(
        this.properties.cubeScale.value,
        this.properties.cubeScale.value,
        this.properties.cubeScale.value
      )
      this.cube.position.set(
        this.properties.cubePosX.value,
        this.properties.cubePosY.value,
        this.properties.cubePosZ.value
      )
      // 创建球体
      const sphereGeom = new THREE.SphereGeometry(5, 10, 10)
      this.sphere = new THREE.Mesh(sphereGeom, material)
      this.sphere.scale = new THREE.Vector3(
        this.properties.sphereScale.value,
        this.properties.sphereScale.value,
        this.properties.sphereScale.value
      )
      this.sphere.position.set(
        this.properties.spherePosX.value,
        this.properties.spherePosY.value,
        this.properties.spherePosZ.value
      )

      // 创建组合
      this.group = new THREE.Group()
      this.group.scale = new THREE.Vector3(
        this.properties.groupScale.value,
        this.properties.groupScale.value,
        this.properties.groupScale.value
      )
      this.group.position.set(
        this.properties.groupPosX.value,
        this.properties.groupPosY.value,
        this.properties.groupPosZ.value
      )

      this.group.add(this.cube)
      this.group.add(this.sphere)
      this.scene.add(this.group)
    },

    redraw () {
      this.scene.remove(this.group)
      this.createCubeAndSphere()
    },
    animation () {
      if (this.properties.rotate) {
        if (this.properties.grouping) {
          this.group.rotation.y += 0.01
        } else {
          this.cube.rotation.y += 0.01
          this.sphere.rotation.y += 0.01
        }
      }
    },
    render () {
      this.animation()
      this.renderer.render(this.scene, this.camera)
      requestAnimationFrame(this.render)
    },
    // 创建控件对象
    createControls () {
      this.controls = new OrbitControls(this.camera, this.renderer.domElement)
    }
  }
}
</script>

<style>
#container {
  position: absolute;
  width: 100%;
  height: 100%;
}
.controls-box {
  position: absolute;
  right: 5px;
  top: 5px;
  width: 300px;
  padding: 10px;
  background-color: #fff;
  border: 1px solid #c3c3c3;
}
.vertice-span {
  line-height: 38px;
  padding: 0 2px 0 10px;
}
</style>


 1100
1100


 被折叠的 条评论
为什么被折叠?
被折叠的 条评论
为什么被折叠?
 到【灌水乐园】发言


