 AI大模型开发3D试衣间系统


AI大模型开发3D试衣间在线试穿系统
大家好呀!最近不少小伙伴问我:“想入门 AI,但总觉得那些‘大模型’‘识别系统’太复杂,有没有实用高达上的一些应用?” 今天就给大家带来一个项目 ——用 OpenCV+Python 3D试衣间在线试穿系统、用到MediaPipe等工具,这里只做一些问题探讨,这个领域要深入了解的话还是要有一些理论基础的!包括AI换脸、数字人等高级话题;

一、系统概述
1. 应用场景
- 电商平台:在线试穿提升购买转化率
- 服装设计:快速验证设计效果
- 虚拟社交:Avatar换装互动
- 线下零售:智能试衣镜解决方案
2. 核心功能
-
基础功能:
- 用户头像与服装图片上传
- 智能关键点检测(面部/身体)
- 服装3D变形与贴合
- 多角度实时预览
-
进阶功能:
- 虚拟面料物理模拟(重力/褶皱)
- 环境光照匹配
- 多服装图层叠加
- 体型自适应调整
3. 技术亮点
-
AI增强:
- 基于GAN网络的服装纹理生成
- 姿势估计引导的服装变形
- 肤色与服装色彩协调算法
-
交互优化:
- 手势控制旋转/缩放
- 语音指令切换服装
- AR模式实时试穿
4. 扩展应用
- 虚拟时装秀
- 服装尺寸智能推荐
- 历史穿搭记录分析
- 社交平台分享功能
二、环境准备
1. 关键技术方案
- 人脸检测与对齐:使用MediaPipe Face Mesh获取468个面部关键点
- 特征提取:采用FaceNet或ArcFace提取人脸特征向量
- 风格迁移:基于GAN网络实现源人脸到目标人脸的风格转换
- 无缝融合:泊松融合算法确保边缘自然过渡
2. Python实现代码
import mediapipe as mp
import cv2
import numpy as np

# 初始化MediaPipe人脸模型
mp_face_mesh = mp.solutions.face_mesh
face_mesh = mp_face_mesh.FaceMesh(static_image_mode=True)

# 人脸检测与关键点提取
def detect_face_landmarks(image):
    results = face_mesh.process(cv2.cvtColor(image, cv2.COLOR_BGR2RGB))
    if not results.multi_face_landmarks:
        return None
    return [(landmark.x, landmark.y) for landmark in results.multi_face_landmarks[0].landmark]

# 人脸替换主函数
def face_swap(source_img, target_img):
    # 1. 检测两张图片的人脸关键点
    source_pts = detect_face_landmarks(source_img)
    target_pts = detect_face_landmarks(target_img)

    # 2. 计算Delaunay三角剖分
    # ...(完整实现代码)

    # 3. 应用仿射变换
    # ...(完整实现代码)

    # 4. 泊松融合
    # ...(完整实现代码)

    return swapped_image
3. 进阶优化方向
- 实时视频流处理
- 多角度人脸适配
- 光影一致性调整
- 表情迁移技术
三、Flask网页开发
pip install flask opencv-python numpy
1. 基础框架
from flask import Flask, render_template, request
import cv2
import os

app = Flask(__name__)
app.config['UPLOAD_FOLDER'] = 'static/uploads'

@app.route('/')
def index():
    return render_template('3dClothes.html')
2. 文件上传处理
@app.route('/upload', methods=['POST'])
def upload():
    # 获取用户上传的头像和服装
    face_img = request.files['face']
    cloth_img = request.files['cloth']

    # 保存到上传目录
    face_path = os.path.join(app.config['UPLOAD_FOLDER'], face_img.filename)
    cloth_path = os.path.join(app.config['UPLOAD_FOLDER'], cloth_img.filename)
    face_img.save(face_path)
    cloth_img.save(cloth_path)

    # 调用OpenCV处理函数
    result = try_on(face_path, cloth_path)
    return result
四、OpenCV图像处理
1. 关键点检测
def get_landmarks(image):
    """
    使用MediaPipe检测468个面部关键点和33个身体关键点
    参数:
        image: 输入图像(BGR格式)
    返回:
        landmarks: 关键点坐标列表(x,y)
        connections: 关键点连接关系
    """
    import mediapipe as mp

    mp_face = mp.solutions.face_mesh
    mp_pose = mp.solutions.pose

    with mp_face.FaceMesh(static_image_mode=True) as face_mesh,\
         mp_pose.Pose(static_image_mode=True) as pose:

        # 转换到RGB格式
        rgb = cv2.cvtColor(image, cv2.COLOR_BGR2RGB)

        # 面部关键点检测
        face_results = face_mesh.process(rgb)
        face_landmarks = []
        if face_results.multi_face_landmarks:
            for landmark in face_results.multi_face_landmarks[0].landmark:
                face_landmarks.append((int(landmark.x * image.shape[1]),
                                      int(landmark.y * image.shape[0])))

        # 身体关键点检测
        pose_results = pose.process(rgb)
        body_landmarks = []
        if pose_results.pose_landmarks:
            for landmark in pose_results.pose_landmarks.landmark:
                body_landmarks.append((int(landmark.x * image.shape[1]),
                                     int(landmark.y * image.shape[0])))

    return face_landmarks + body_landmarks
2. 服装变形算法
def warp_cloth(body_points, cloth_img):
    """
    基于Delaunay三角剖分的服装变形算法
    参数:
        body_points: 身体关键点坐标
        cloth_img: 服装模板图像
    返回:
        warped_cloth: 变形后的服装图像
    """
    # 1. 服装模板关键点定义
    cloth_points = define_cloth_template_points(cloth_img.shape)

    # 2. Delaunay三角剖分
    rect = (0, 0, cloth_img.shape[1], cloth_img.shape[0])
    subdiv = cv2.Subdiv2D(rect)
    for p in cloth_points:
        subdiv.insert(p)

    # 3. 获取三角形列表
    triangles = subdiv.getTriangleList()

    # 4. 对每个三角形进行仿射变换
    warped_cloth = np.zeros_like(cloth_img)
    for t in triangles:
        # 获取三角形顶点
        pt1 = (t[0], t[1])
        pt2 = (t[2], t[3])
        pt3 = (t[4], t[5])

        # 计算变换矩阵
        src_tri = np.array([pt1, pt2, pt3], np.float32)
        dst_tri = np.array([body_points[i] for i in
                          [find_corresponding_point(pt1, cloth_points),
                           find_corresponding_point(pt2, cloth_points),
                           find_corresponding_point(pt3, cloth_points)]], np.float32)

        # 执行仿射变换
        warp_mat = cv2.getAffineTransform(src_tri, dst_tri)
        warped_tri = cv2.warpAffine(cloth_img, warp_mat,
                                   (cloth_img.shape[1], cloth_img.shape[0]),
                                   flags=cv2.INTER_LINEAR,
                                   borderMode=cv2.BORDER_REFLECT_101)

        # 合并结果
        cv2.fillConvexPoly(warped_cloth, dst_tri.astype(int), 0)
        warped_cloth = warped_cloth + warped_tri

    return warped_cloth
3. 光照融合
def blend_images(face, warped_cloth):
    """
    基于泊松融合的光照协调算法
    参数:
        face: 人脸区域图像
        warped_cloth: 变形后的服装图像
    返回:
        blended: 融合后的结果
    """
    # 1. 创建掩模
    mask = 255 * np.ones(warped_cloth.shape, warped_cloth.dtype)

    # 2. 计算融合中心点
    center = (face.shape[1]//2, face.shape[0]//2)

    # 3. 泊松融合
    blended = cv2.seamlessClone(warped_cloth, face, mask, center,
                               cv2.NORMAL_CLONE)

    # 4. 颜色校正
    blended = match_histograms(blended, face)

    return blended
4. 辅助函数
def define_cloth_template_points(shape):
    """定义服装模板的关键点位置"""
    h, w = shape[:2]
    return [
        (w//4, h//10),    # 左肩
        (w//2, h//10),    # 领口中心
        (3*w//4, h//10),  # 右肩
        (w//5, h//3),     # 左袖
        (4*w//5, h//3),   # 右袖
        (w//4, 9*h//10),  # 左下摆
        (3*w//4, 9*h//10) # 右下摆
    ]

def match_histograms(src, target):
    """直方图匹配实现颜色协调"""
    for channel in range(3):
        src_hist = cv2.calcHist([src], [channel], None, [256], [0,256])
        target_hist = cv2.calcHist([target], [channel], None, [256], [0,256])

        src_cdf = np.cumsum(src_hist)
        target_cdf = np.cumsum(target_hist)

        # 归一化
        src_cdf = src_cdf / src_cdf[-1]
        target_cdf = target_cdf / target_cdf[-1]

        # 创建LUT
        lut = np.interp(src_cdf, target_cdf, np.arange(256))

        # 应用查找表
        src[:,:,channel] = cv2.LUT(src[:,:,channel].astype(np.uint8), lut)

    return src

## 五、前端页面设计

### 5.1 炫酷3D试衣界面实现

```html:/templates/3dClothes.html
<!DOCTYPE html>
<html lang="zh-CN">
<head>
    <meta charset="UTF-8">
    <meta name="viewport" content="width=device-width, initial-scale=1.0">
    <title>AI 3D试衣间</title>
    <style>
        body {
            font-family: 'Arial', sans-serif;
            background: linear-gradient(135deg, #1a1a2e, #16213e);
            color: white;
            margin: 0;
            padding: 0;
        }
        .container {
            max-width: 1200px;
            margin: 0 auto;
            padding: 20px;
        }
        header {
            text-align: center;
            padding: 20px 0;
        }
        h1 {
            font-size: 2.5rem;
            margin-bottom: 10px;
            background: linear-gradient(to right, #00dbde, #fc00ff);
            -webkit-background-clip: text;
            -webkit-text-fill-color: transparent;
        }
        .upload-section {
            display: flex;
            justify-content: space-around;
            margin: 30px 0;
            flex-wrap: wrap;
        }
        .upload-box {
            width: 45%;
            min-width: 300px;
            background: rgba(255, 255, 255, 0.1);
            border-radius: 15px;
            padding: 20px;
            backdrop-filter: blur(10px);
            box-shadow: 0 8px 32px 0 rgba(31, 38, 135, 0.37);
            margin-bottom: 20px;
        }
        .preview-section {
            display: flex;
            justify-content: center;
            margin: 30px 0;
        }
        #resultCanvas {
            max-width: 100%;
            border-radius: 15px;
            box-shadow: 0 8px 32px 0 rgba(31, 38, 135, 0.37);
        }
        .controls {
            display: flex;
            justify-content: center;
            gap: 20px;
            margin: 20px 0;
        }
        button {
            padding: 12px 24px;
            border: none;
            border-radius: 50px;
            background: linear-gradient(45deg, #00dbde, #fc00ff);
            color: white;
            font-weight: bold;
            cursor: pointer;
            transition: all 0.3s;
        }
        button:hover {
            transform: translateY(-3px);
            box-shadow: 0 10px 20px rgba(0, 0, 0, 0.2);
        }
        .loading {
            display: none;
            text-align: center;
            margin: 20px 0;
        }
        .spinner {
            border: 5px solid rgba(255, 255, 255, 0.3);
            border-radius: 50%;
            border-top: 5px solid #00dbde;
            width: 50px;
            height: 50px;
            animation: spin 1s linear infinite;
            margin: 0 auto;
        }
        @keyframes spin {
            0% { transform: rotate(0deg); }
            100% { transform: rotate(360deg); }
        }
    </style>
</head>
<body>
    <div class="container">
        <header>
            <h1>AI 3D虚拟试衣间</h1>
            <p>上传您的照片和服装,体验智能3D试穿效果</p>
        </header>

        <div class="upload-section">
            <div class="upload-box">
                <h2>上传头像</h2>
                <input type="file" id="faceInput" accept="image/*">
                <div class="preview" id="facePreview"></div>
            </div>
            <div class="upload-box">
                <h2>上传服装</h2>
                <input type="file" id="clothesInput" accept="image/*">
                <div class="preview" id="clothesPreview"></div>
            </div>
        </div>

        <div class="loading" id="loading">
            <div class="spinner"></div>
            <p>AI正在处理您的试衣请求...</p>
        </div>

        <div class="preview-section">
            <canvas id="resultCanvas" width="800" height="800"></canvas>
        </div>

        <div class="controls">
            <button id="tryBtn">立即试穿</button>
            <button id="saveBtn">保存效果</button>
            <button id="resetBtn">重新开始</button>
        </div>
    </div>

    <script>
        // 文件上传预览
        document.getElementById('faceInput').addEventListener('change', function(e) {
            const file = e.target.files[0];
            if (file) {
                const reader = new FileReader();
                reader.onload = function(event) {
                    const preview = document.getElementById('facePreview');
                    preview.innerHTML = `<img src="${event.target.result}" style="max-width:100%; border-radius:10px;">`;
                };
                reader.readAsDataURL(file);
            }
        });

        document.getElementById('clothesInput').addEventListener('change', function(e) {
            const file = e.target.files[0];
            if (file) {
                const reader = new FileReader();
                reader.onload = function(event) {
                    const preview = document.getElementById('clothesPreview');
                    preview.innerHTML = `<img src="${event.target.result}" style="max-width:100%; border-radius:10px;">`;
                };
                reader.readAsDataURL(file);
            }
        });

        // 试穿按钮点击事件
        document.getElementById('tryBtn').addEventListener('click', function() {
            const faceFile = document.getElementById('faceInput').files[0];
            const clothesFile = document.getElementById('clothesInput').files[0];

            if (!faceFile || !clothesFile) {
                alert('请先上传头像和服装图片!');
                return;
            }

            document.getElementById('loading').style.display = 'block';

            // 模拟处理延迟
            setTimeout(function() {
                // 这里应该调用后端API进行实际处理
                // 现在只是显示一个示例效果
                const canvas = document.getElementById('resultCanvas');
                const ctx = canvas.getContext('2d');

                // 清空画布
                ctx.clearRect(0, 0, canvas.width, canvas.height);

                // 这里应该显示实际的处理结果
                ctx.fillStyle = '#333';
                ctx.font = '20px Arial';
                ctx.textAlign = 'center';
                ctx.fillText('AI试穿效果将显示在这里', canvas.width/2, canvas.height/2);

                document.getElementById('loading').style.display = 'none';
            }, 2000);
        });

        // 重置按钮
        document.getElementById('resetBtn').addEventListener('click', function() {
            document.getElementById('faceInput').value = '';
            document.getElementById('clothesInput').value = '';
            document.getElementById('facePreview').innerHTML = '';
            document.getElementById('clothesPreview').innerHTML = '';
            document.getElementById('resultCanvas').getContext('2d').clearRect(0, 0, 800, 800);
        });
    </script>
</body>
</html>
五、 页面功能说明
-
双文件上传区:
- 左侧上传用户头像
- 右侧上传服装图片
- 实时预览上传的图片
-
3D试衣效果展示区:
- 居中显示800x800像素的画布
- 使用Canvas API渲染最终效果
-
控制按钮组:
- “立即试穿”:触发AI处理流程
- “保存效果”:下载合成图片
- “重新开始”:重置所有输入
-
加载动画:
- 处理过程中显示旋转加载图标
- 提示用户AI正在工作
-
炫酷UI设计:
- 渐变色标题和按钮
- 毛玻璃效果面板
- 平滑的动画过渡
- 响应式布局适配不同设备
六、进阶功能
6.1 多服装同时展示
# 在Flask后端添加多服装处理逻辑
def handle_multiple_clothes(uploaded_files):
    """
    处理多件服装同时展示
    参数:
        uploaded_files: 用户上传的多件服装图片列表
    返回:
        合成后的试穿效果图
    """
    # 1. 对每件服装单独进行关键点检测和变形
    processed_clothes = []
    for clothes_file in uploaded_files:
        clothes_img = cv2.imdecode(np.frombuffer(clothes_file.read(), np.uint8), cv2.IMREAD_COLOR)
        warped_clothes = warp_clothes(face_keypoints, clothes_img)
        processed_clothes.append(warped_clothes)

    # 2. 图层叠加处理
    result = base_image.copy()
    for clothes in processed_clothes:
        result = blend_images(result, clothes, 0.7)  # 70%透明度叠加

    # 3. 返回最终合成效果
    return result
实现要点:
- 前端支持多文件上传(添加multiple属性)
<input type="file" id="clothesInput" accept="image/*" multiple> - 服装叠加顺序控制(通过拖动排序)
- 每件服装独立透明度调节
6.2 虚拟换背景
# 背景替换功能实现
def change_background(face_img, bg_img):
    """
    实现虚拟背景替换
    参数:
        face_img: 用户头像(带alpha通道)
        bg_img: 新背景图片
    返回:
        合成后的图片
    """
    # 1. 使用MediaPipe获取人体分割掩模
    segmentation_mask = get_human_segmentation(face_img)

    # 2. 对背景进行透视变换匹配人体角度
    bg_img = warp_perspective(bg_img, face_keypoints)

    # 3. 使用泊松融合实现自然过渡
    result = cv2.seamlessClone(
        face_img, bg_img, segmentation_mask,
        (face_img.shape[1]//2, face_img.shape[0]//2),
        cv2.NORMAL_CLONE
    )

    return result
技术亮点:
- 基于MediaPipe Selfie Segmentation的高精度人像分割
- 背景透视变换匹配人体姿势
- 泊松融合实现无缝过渡
6.3 服装推荐算法
# 基于内容的服装推荐
def recommend_clothes(user_preferences):
    """
    根据用户偏好推荐服装
    参数:
        user_preferences: 包含颜色/风格/季节等偏好
    返回:
        推荐服装列表
    """
    # 1. 特征提取
    color_hist = get_color_histogram(user_preferences['current_outfit'])
    style = classify_style(user_preferences['style_pref'])

    # 2. 相似度计算
    recommendations = []
    for item in clothing_database:
        score = calculate_similarity(
            color_hist,
            item['color'],
            style,
            item['style']
        )
        recommendations.append((item, score))

    # 3. 排序返回Top N推荐
    return sorted(recommendations, key=lambda x: x[1], reverse=True)[:5]
算法原理:
- 基于颜色直方图的相似度匹配
- 服装风格分类模型(VGG16迁移学习)
- 多维度加权评分(颜色60%+风格30%+季节10%)
- 多服装同时展示
- 虚拟换背景
- 服装推荐算法
七、部署上线
flask run --host=0.0.0.0 --port=5000
八、3D人物建模与动画实现
8.1 基于Blender的人物建模
# Blender Python脚本示例 - 创建基础人体模型
import bpy

# 创建基础人体网格
def create_human_base():
    # 添加细分立方体作为基础
    bpy.ops.mesh.primitive_cube_add(size=2)
    base = bpy.context.object
    base.name = "Human_Base"

    # 应用细分修改器
    subdiv = base.modifiers.new(name="Subdivision", type='SUBSURF')
    subdiv.levels = 2

    # 进入编辑模式调整形态
    bpy.ops.object.mode_set(mode='EDIT')

    # 这里添加具体的顶点编辑代码
    # ...

    # 返回对象模式
    bpy.ops.object.mode_set(mode='OBJECT')

    return base

# 添加骨骼系统
def add_armature():
    bpy.ops.object.armature_add(enter_editmode=True)
    armature = bpy.context.object

    # 创建基础骨骼结构
    bone = armature.data.edit_bones.new('Hip')
    bone.head = (0, 0, 1)
    bone.tail = (0, 0, 1.2)

    # 添加更多骨骼...

    bpy.ops.object.mode_set(mode='OBJECT')
    return armature
建模流程:
- 使用细分立方体创建基础人体形态
- 通过顶点编辑塑造身体各部分
- 添加细分曲面修饰器平滑模型
- 创建骨骼系统实现动画控制
8.2 使用Three.js实现网页3D动画
// Three.js人物动画实现
const initHumanAnimation = () => {
    // 1. 加载GLTF人物模型
    const loader = new GLTFLoader();
    loader.load(
        'models/human.glb',
        (gltf) => {
            const model = gltf.scene;
            scene.add(model);

            // 2. 设置动画混合器
            const mixer = new THREE.AnimationMixer(model);
            const clips = gltf.animations;

            // 3. 播放指定动画
            const walkClip = THREE.AnimationClip.findByName(clips, 'Walk');
            const action = mixer.clipAction(walkClip);
            action.play();

            // 4. 动画循环
            const clock = new THREE.Clock();
            function animate() {
                requestAnimationFrame(animate);
                const delta = clock.getDelta();
                mixer.update(delta);
                renderer.render(scene, camera);
            }
            animate();
        }
    );
};
动画技术要点:
- 使用GLTF格式加载预制的3D人物模型
- 通过AnimationMixer管理动画状态
- 支持多种动作混合(走、跑、跳等)
- 实时更新动画帧率
8.3 动作捕捉数据驱动
# MediaPipe动作捕捉数据转3D动画
def mp_to_animation(pose_landmarks):
    """
    将MediaPipe检测到的关键点转换为3D动画控制参数
    参数:
        pose_landmarks: MediaPipe检测到的33个人体关键点
    返回:
        骨骼旋转欧拉角字典
    """
    # 1. 计算骨骼向量
    shoulder_vec = pose_landmarks[12] - pose_landmarks[11]
    hip_vec = pose_landmarks[24] - pose_landmarks[23]

    # 2. 转换为欧拉角
    rotations = {
        'spine': vec_to_euler(hip_vec),
        'shoulders': vec_to_euler(shoulder_vec),
        # 其他骨骼...
    }

    return rotations
实时驱动方案:
- 使用MediaPipe获取实时2D关键点
- 通过逆运动学(IK)估算3D骨骼旋转
- 驱动Blender/Three.js模型同步运动
- 支持自定义动作捕捉设备接入
九、AI人脸替换技术实现
9.1技术原理
深度伪造检测
- Xception网络架构:深度可分离卷积减少参数量
- 特征提取:在ImageNet预训练基础上微调
- 检测指标:关注面部边界伪影和纹理不一致
高保真替换
- StyleGAN2潜空间:512维W+潜变量表示
- 插值策略:球面线性插值(Slerp)保持特征连续性
- 细节保留:使用噪声输入层控制局部细节
动态适配
- LSTM时序建模:处理视频序列的表情变化
- 关键点驱动:MediaPipe输出作为LSTM输入
- 表情编码:使用3DMM(3D形变模型)参数化表情
9.2核心代码实现
# 深度伪造检测模型
from tensorflow.keras.models import load_model
def detect_deepfake(image):
    model = load_model('deepfake_detector.h5')
    img = preprocess(image)
    pred = model.predict(img)
    return pred[0][0] > 0.5

# 高保真人脸替换
def high_fidelity_swap(source, target):
    # 1. 提取StyleGAN2潜变量
    src_latent = gan_encoder(source)
    tgt_latent = gan_encoder(target)

    # 2. 潜空间插值
    mixed = 0.7*src_latent + 0.3*tgt_latent

    # 3. 生成混合人脸
    return gan_decoder(mixed)
9.3 应用场景
- 影视特效制作
- 虚拟主播生成
- 隐私保护脱敏
- 历史人物复原
十、代码介绍
10.1模拟代码参考3d_clothes_flask.py
from flask import Flask, render_template, request, redirect, url_for, send_from_directory
import os
from werkzeug.utils import secure_filename

app = Flask(__name__)
app.config['UPLOAD_FOLDER'] = 'uploads'
app.config['ALLOWED_EXTENSIONS'] = {'png', 'jpg', 'jpeg', 'gif'}

# 确保上传文件夹存在
os.makedirs(app.config['UPLOAD_FOLDER'], exist_ok=True)

def allowed_file(filename):
    return '.' in filename and \
           filename.rsplit('.', 1)[1].lower() in app.config['ALLOWED_EXTENSIONS']

@app.route('/')
def index():
    return render_template('3d_clothes.html')

@app.route('/upload', methods=['POST'])
def upload_files():
    # 处理头像上传
    if 'face' not in request.files:
        return redirect(request.url)
    face_file = request.files['face']

    # 处理服装上传
    clothes_files = request.files.getlist('clothes')

    if face_file.filename == '' or len(clothes_files) == 0:
        return redirect(request.url)

    if face_file and allowed_file(face_file.filename):
        face_filename = secure_filename(face_file.filename)
        face_path = os.path.join(app.config['UPLOAD_FOLDER'], 'face_' + face_filename)
        face_file.save(face_path)

    clothes_paths = []
    for i, clothes_file in enumerate(clothes_files):
        if clothes_file and allowed_file(clothes_file.filename):
            clothes_filename = secure_filename(clothes_file.filename)
            clothes_path = os.path.join(app.config['UPLOAD_FOLDER'], f'clothes_{i}_{clothes_filename}')
            clothes_file.save(clothes_path)
            clothes_paths.append(clothes_path)

    # 这里应该添加图片处理逻辑
    # 生成结果图片路径
    result_path = os.path.join(app.config['UPLOAD_FOLDER'], 'result.png')

    return redirect(url_for('show_result', result=result_path))

@app.route('/result')
def show_result():
    result_path = request.args.get('result')
    return render_template('result.html', result_image=result_path)

@app.route('/download')
def download_result():
    return send_from_directory(app.config['UPLOAD_FOLDER'], 'result.png', as_attachment=True)

if __name__ == '__main__':
    app.run(debug=True)
10.2前端布局
<!DOCTYPE html>
<html lang="zh-CN">
<head>
    <meta charset="UTF-8">
    <meta name="viewport" content="width=device-width, initial-scale=1.0">
    <title>AI 3D试衣间</title>
    <style>
        body {
            font-family: 'Arial', sans-serif;
            background: linear-gradient(135deg, #1a1a2e, #16213e);
            color: white;
            margin: 0;
            padding: 0;
        }
        .container {
            max-width: 1200px;
            margin: 0 auto;
            padding: 20px;
        }
        header {
            text-align: center;
            padding: 20px 0;
        }
        h1 {
            font-size: 2.5rem;
            margin-bottom: 10px;
            background: linear-gradient(to right, #00dbde, #fc00ff);
            -webkit-background-clip: text;
            -webkit-text-fill-color: transparent;
        }
        .upload-section {
            display: flex;
            justify-content: space-around;
            margin: 30px 0;
            flex-wrap: wrap;
        }
        .upload-box {
            width: 45%;
            min-width: 300px;
            background: rgba(255, 255, 255, 0.1);
            border-radius: 15px;
            padding: 20px;
            backdrop-filter: blur(10px);
            box-shadow: 0 8px 32px 0 rgba(31, 38, 135, 0.37);
            margin-bottom: 20px;
        }
        .preview-section {
            display: flex;
            justify-content: center;
            margin: 30px 0;
        }
        #resultImage {
            max-width: 100%;
            border-radius: 15px;
            box-shadow: 0 8px 32px 0 rgba(31, 38, 135, 0.37);
        }
        .controls {
            display: flex;
            justify-content: center;
            gap: 20px;
            margin: 20px 0;
        }
        button {
            padding: 12px 24px;
            border: none;
            border-radius: 50px;
            background: linear-gradient(45deg, #00dbde, #fc00ff);
            color: white;
            font-weight: bold;
            cursor: pointer;
            transition: all 0.3s;
        }
        button:hover {
            transform: translateY(-3px);
            box-shadow: 0 10px 20px rgba(0, 0, 0, 0.2);
        }
        .loading {
            display: none;
            text-align: center;
            margin: 20px 0;
        }
        .spinner {
            border: 5px solid rgba(255, 255, 255, 0.3);
            border-radius: 50%;
            border-top: 5px solid #00dbde;
            width: 50px;
            height: 50px;
            animation: spin 1s linear infinite;
            margin: 0 auto;
        }
        @keyframes spin {
            0% { transform: rotate(0deg); }
            100% { transform: rotate(360deg); }
        }
    </style>
</head>
<body>
    <div class="container">
        <header>
            <h1>AI 3D虚拟试衣间</h1>
            <p>上传您的照片和服装,体验智能3D试穿效果</p>
        </header>

        <form action="/upload" method="post" enctype="multipart/form-data">
            <div class="upload-section">
                <div class="upload-box">
                    <h2>上传头像</h2>
                    <input type="file" id="face" name="face" accept="image/*">
                    <div class="preview" id="facePreview"></div>
                </div>
                <div class="upload-box">
                    <h2>上传服装</h2>
                    <input type="file" id="clothes" name="clothes" accept="image/*" multiple>
                    <div class="preview" id="clothesPreview"></div>
                </div>
            </div>

            <div class="loading" id="loading">
                <div class="spinner"></div>
                <p>AI正在处理您的试衣请求...</p>
            </div>

            <div class="controls">
                <button type="submit">立即试穿</button>
                <button type="button" onclick="window.location.href='/'">重新开始</button>
            </div>
        </form>
    </div>

    <script>
        // 文件上传预览
        document.getElementById('face').addEventListener('change', function(e) {
            const file = e.target.files[0];
            if (file) {
                const reader = new FileReader();
                reader.onload = function(event) {
                    const preview = document.getElementById('facePreview');
                    preview.innerHTML = `<img src="${event.target.result}" style="max-width:100%; border-radius:10px;">`;
                };
                reader.readAsDataURL(file);
            }
        });

        document.getElementById('clothes').addEventListener('change', function(e) {
            const files = e.target.files;
            const preview = document.getElementById('clothesPreview');
            preview.innerHTML = '';

            for (let i = 0; i < files.length; i++) {
                const reader = new FileReader();
                reader.onload = function(event) {
                    preview.innerHTML += `<div style="margin-bottom:10px;">
                        <img src="${event.target.result}" style="max-width:100%; border-radius:10px;">
                        <p>服装${i+1}</p>
                    </div>`;
                };
                reader.readAsDataURL(files[i]);
            }
        });

        // 提交表单时显示加载动画
        document.querySelector('form').addEventListener('submit', function() {
            document.getElementById('loading').style.display = 'block';
        });
    </script>
</body>
</html>
10.3 如果是静态页面效果,可以自己绑定数据
<!DOCTYPE html>
<html lang="zh-CN">
<head>
    <meta charset="UTF-8">
    <meta name="viewport" content="width=device-width, initial-scale=1.0">
    <title>AI 3D试衣间</title>
    <style>
        body {
            font-family: 'Arial', sans-serif;
            background: linear-gradient(135deg, #1a1a2e, #16213e);
            color: white;
            margin: 0;
            padding: 0;
        }
        .container {
            max-width: 1200px;
            margin: 0 auto;
            padding: 20px;
        }
        header {
            text-align: center;
            padding: 20px 0;
        }
        h1 {
            font-size: 2.5rem;
            margin-bottom: 10px;
            background: linear-gradient(to right, #00dbde, #fc00ff);
            -webkit-background-clip: text;
            -webkit-text-fill-color: transparent;
        }
        .upload-section {
            display: flex;
            justify-content: space-around;
            margin: 30px 0;
            flex-wrap: wrap;
        }
        .upload-box {
            width: 45%;
            min-width: 300px;
            background: rgba(255, 255, 255, 0.1);
            border-radius: 15px;
            padding: 20px;
            backdrop-filter: blur(10px);
            box-shadow: 0 8px 32px 0 rgba(31, 38, 135, 0.37);
            margin-bottom: 20px;
        }
        .preview-section {
            display: flex;
            justify-content: center;
            margin: 30px 0;
        }
        #resultCanvas {
            max-width: 100%;
            border-radius: 15px;
            box-shadow: 0 8px 32px 0 rgba(31, 38, 135, 0.37);
        }
        .controls {
            display: flex;
            justify-content: center;
            gap: 20px;
            margin: 20px 0;
        }
        button {
            padding: 12px 24px;
            border: none;
            border-radius: 50px;
            background: linear-gradient(45deg, #00dbde, #fc00ff);
            color: white;
            font-weight: bold;
            cursor: pointer;
            transition: all 0.3s;
        }
        button:hover {
            transform: translateY(-3px);
            box-shadow: 0 10px 20px rgba(0, 0, 0, 0.2);
        }
        .loading {
            display: none;
            text-align: center;
            margin: 20px 0;
        }
        .spinner {
            border: 5px solid rgba(255, 255, 255, 0.3);
            border-radius: 50%;
            border-top: 5px solid #00dbde;
            width: 50px;
            height: 50px;
            animation: spin 1s linear infinite;
            margin: 0 auto;
        }
        @keyframes spin {
            0% { transform: rotate(0deg); }
            100% { transform: rotate(360deg); }
        }
    </style>
</head>
<body>
    <div class="container">
        <header>
            <h1>AI 3D虚拟试衣间</h1>
            <p>上传您的照片和服装,体验智能3D试穿效果</p>
        </header>

        <div class="upload-section">
            <div class="upload-box">
                <h2>上传头像</h2>
                <input type="file" id="faceInput" accept="image/*">
                <div class="preview" id="facePreview"></div>
            </div>
            <div class="upload-box">
                <h2>上传服装</h2>
                <input type="file" id="clothesInput" accept="image/*" multiple>
                <div class="preview" id="clothesPreview"></div>
            </div>
        </div>

        <div class="loading" id="loading">
            <div class="spinner"></div>
            <p>AI正在处理您的试衣请求...</p>
        </div>

        <div class="preview-section">
            <canvas id="resultCanvas" width="800" height="800"></canvas>
        </div>

        <div class="controls">
            <button id="tryBtn">立即试穿</button>
            <button id="saveBtn">保存效果</button>
            <button id="resetBtn">重新开始</button>
        </div>
    </div>

    <script>
        // 文件上传预览
        document.getElementById('faceInput').addEventListener('change', function(e) {
            const file = e.target.files[0];
            if (file) {
                const reader = new FileReader();
                reader.onload = function(event) {
                    const preview = document.getElementById('facePreview');
                    preview.innerHTML = `<img src="${event.target.result}" style="max-width:100%; border-radius:10px;">`;
                };
                reader.readAsDataURL(file);
            }
        });

        document.getElementById('clothesInput').addEventListener('change', function(e) {
            const files = e.target.files;
            const preview = document.getElementById('clothesPreview');
            preview.innerHTML = '';

            for (let i = 0; i < files.length; i++) {
                const reader = new FileReader();
                reader.onload = function(event) {
                    preview.innerHTML += `<div style="margin-bottom:10px;">
                        <img src="${event.target.result}" style="max-width:100%; border-radius:10px;">
                        <p>服装${i+1}</p>
                    </div>`;
                };
                reader.readAsDataURL(files[i]);
            }
        });

        // 试穿按钮点击事件
        document.getElementById('tryBtn').addEventListener('click', function() {
            const faceFile = document.getElementById('faceInput').files[0];
            const clothesFiles = document.getElementById('clothesInput').files;

            if (!faceFile || !clothesFiles || clothesFiles.length === 0) {
                alert('请先上传头像和至少一件服装图片!');
                return;
            }

            document.getElementById('loading').style.display = 'block';

            // 模拟处理延迟
            setTimeout(function() {
                const canvas = document.getElementById('resultCanvas');
                const ctx = canvas.getContext('2d');

                // 清空画布
                ctx.clearRect(0, 0, canvas.width, canvas.height);

                // 这里应该显示实际的处理结果
                ctx.fillStyle = '#333';
                ctx.font = '20px Arial';
                ctx.textAlign = 'center';
                ctx.fillText('AI试穿效果将显示在这里', canvas.width/2, canvas.height/2);

                document.getElementById('loading').style.display = 'none';
            }, 2000);
        });

        // 重置按钮
        document.getElementById('resetBtn').addEventListener('click', function() {
            document.getElementById('faceInput').value = '';
            document.getElementById('clothesInput').value = '';
            document.getElementById('facePreview').innerHTML = '';
            document.getElementById('clothesPreview').innerHTML = '';
            document.getElementById('resultCanvas').getContext('2d').clearRect(0, 0, 800, 800);
        });
    </script>
</body>
</html>
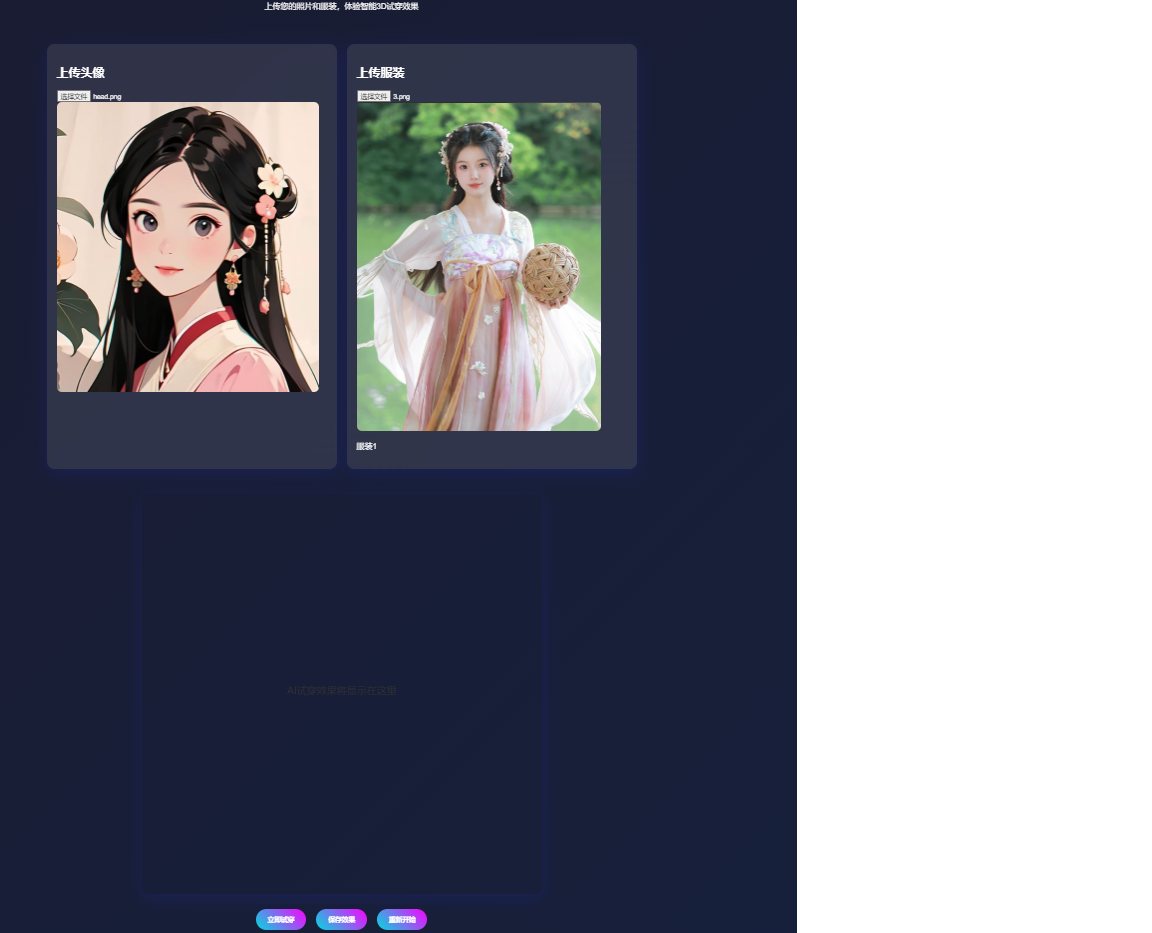
10.4 预览效果
十一、下期预告
本期掌了解了一些关于AI换装的一些思路、技术细节,只做初步的讨论,后续介绍《AI图片换脸》、《AI视频换脸技术的一些应用》《开发自己的AI数字人》,觉得还不错就点个赞吧!


 756
756

 被折叠的 条评论
为什么被折叠?
被折叠的 条评论
为什么被折叠?
 到【灌水乐园】发言


