


spring3已经封装rmi,用起来很方便,配置也很简单,不过真心忘记这个代码应该是copy的,不过是经过测试成功的,至于出处实在是不记得了。
1.环境:spring3.2.3 ,jdk6,eclipse( kepler版本)
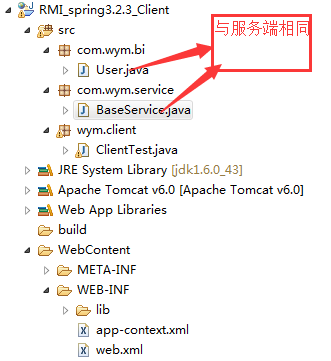
2 .代码目录:

3 详细代码:
web.xml:
<?xml version="1.0" encoding="UTF-8"?>
<web-app xmlns:xsi="http://www.w3.org/2001/XMLSchema-instance" xmlns="http://java.sun.com/xml/ns/javaee" xsi:schemaLocation="http://java.sun.com/xml/ns/javaee http://java.sun.com/xml/ns/javaee/web-app_2_5.xsd" id="WebApp_ID" version="2.5">
  <display-name>coolinkdemo</display-name>
  <listener>
    <listener-class>org.springframework.web.context.request.RequestContextListener </listener-class>
  </listener>
  <filter>
    <filter-name>encodingFilter</filter-name>
    <filter-class>org.springframework.web.filter.CharacterEncodingFilter</filter-class>
    <init-param>
      <param-name>encoding</param-name>
      <param-value>UTF-8</param-value>
    </init-param>
    <init-param>
      <param-name>forceEncoding</param-name>
      <param-value>true</param-value>
    </init-param>
  </filter>
  <filter-mapping>
    <filter-name>encodingFilter</filter-name>
    <url-pattern>/*</url-pattern>
  </filter-mapping>
  <servlet>
    <servlet-name>projectspringmvc</servlet-name>
    <servlet-class>org.springframework.web.servlet.DispatcherServlet</servlet-class>
    <init-param>
      <param-name>contextConfigLocation</param-name>
      <param-value>
		       		/WEB-INF/app-context.xml
       		</param-value>
    </init-param>
    <load-on-startup>1</load-on-startup>
  </servlet>
  <servlet-mapping>
    <servlet-name>projectspringmvc</servlet-name>
    <url-pattern>*.do</url-pattern>
  </servlet-mapping>
  <welcome-file-list>
    <welcome-file>index.jsp</welcome-file>
  </welcome-file-list>
</web-app>
spring配置文件:
<?xml version="1.0" encoding="UTF-8"?>
<beans xmlns="http://www.springframework.org/schema/beans"
	   xmlns:context="http://www.springframework.org/schema/context"
	   xmlns:aop="http://www.springframework.org/schema/aop"
	   xmlns:xsi="http://www.w3.org/2001/XMLSchema-instance"
	   xmlns:tx="http://www.springframework.org/schema/tx"
	   xsi:schemaLocation="
	        http://www.springframework.org/schema/beans
			http://www.springframework.org/schema/beans/spring-beans-3.2.xsd
			http://www.springframework.org/schema/context
			http://www.springframework.org/schema/context/spring-context-3.2.xsd
			http://www.springframework.org/schema/aop
			http://www.springframework.org/schema/aop/spring-aop-3.2.xsd
			http://www.springframework.org/schema/tx
			http://www.springframework.org/schema/tx/spring-tx-3.2.xsd">


	<bean id="baseRmiService" class="com.wym.service.impl.BaseServiceImpl"></bean>
    <bean id="baseServiceExporter" class="org.springframework.remoting.rmi.RmiServiceExporter">
    	<!-- 调用Service -->
    	<property name="service" ref="baseRmiService"></property>
    	<!-- value值是给用户调用 -->
    	<property name="serviceName" value="baseService"></property>
    	<!-- service 接口 -->
    	<property name="serviceInterface" value="com.wym.service.BaseService"></property>
    	<!-- 注册端口号 -->
    	<property name="registryPort" value="1200"></property>
    </bean>
</beans>
bean:
package com.wym.bi;

import java.io.Serializable;

public class User implements Serializable {


	private static final long serialVersionUID = -5019587642554006284L;
	private String name;
	private int age;

	public User(){

	}
	public User(String name, int age) {
		//super();
		this.name = name;
		this.age = age;
	}
	public String getName() {
		return name;
	}
	public void setName(String name) {
		this.name = name;
	}
	public int getAge() {
		return age;
	}
	public void setAge(int age) {
		this.age = age;
	}


}
接口:
package com.wym.service;

import com.wym.bi.User;

public interface BaseService {

	public String getHelloword(String name);
	public String getUser(User user);
}
接口实现类:
package com.wym.service.impl;

import com.wym.bi.User;
import com.wym.service.BaseService;

public class BaseServiceImpl implements BaseService {

	@Override
	public String getHelloword(String name) {
		// TODO Auto-generated method stub
		return "Welcome to Shanghai,"+name+" ! ";
	}

	@Override
	public String getUser(User user) {
		// TODO Auto-generated method stub
		return "name: "+user.getName()+"------->  age: "+user.getAge();
	}

}
服务启动程序:
package com.wym.service;

import org.springframework.context.support.FileSystemXmlApplicationContext;

public class BaseServiceTest {

	public static void main(String[] args) {
		FileSystemXmlApplicationContext context = new FileSystemXmlApplicationContext("/WebContent/WEB-INF/app-context.xml");
		BaseService baseService = (BaseService) context.getBean("baseRmiService");
		System.out.println("baseRmiService start...");

	}

}
右击运行即可开启服务。
下面是客户端代码:
客户端只有spring配置文件和调用程序不同:
<?xml version="1.0" encoding="UTF-8"?>
<beans xmlns="http://www.springframework.org/schema/beans"
	   xmlns:context="http://www.springframework.org/schema/context"
	   xmlns:aop="http://www.springframework.org/schema/aop"
	   xmlns:xsi="http://www.w3.org/2001/XMLSchema-instance"
	   xmlns:tx="http://www.springframework.org/schema/tx"
	   xsi:schemaLocation="
	        http://www.springframework.org/schema/beans
			http://www.springframework.org/schema/beans/spring-beans-3.2.xsd
			http://www.springframework.org/schema/context
			http://www.springframework.org/schema/context/spring-context-3.2.xsd
			http://www.springframework.org/schema/aop
			http://www.springframework.org/schema/aop/spring-aop-3.2.xsd
			http://www.springframework.org/schema/tx
			http://www.springframework.org/schema/tx/spring-tx-3.2.xsd">

	<bean id="baseService" class="org.springframework.remoting.rmi.RmiProxyFactoryBean">
		<!-- baseService是调用服务端serviceName的value -->
		<property name="serviceUrl" value="rmi://192.168.0.234:1200/baseService"></property>
		<!-- service接口 -->
		<property name="serviceInterface" value="com.wym.service.BaseService"></property>
	</bean>
</beans>
客户端启动调用程序
package wym.client;

import com.wym.bi.User;
import com.wym.service.BaseService;
import org.springframework.context.support.ClassPathXmlApplicationContext;
public class ClientTest {

    public static void main(String[] args) {
        ClassPathXmlApplicationContext context = new ClassPathXmlApplicationContext("file:D:/eclipse_workspace/RMI_spring3.2.3_Client/WebContent/WEB-INF/app-context.xml");
        BaseService baseService = (BaseService) context.getBean("baseService");
        System.out.println(baseService.getHelloword("Yunmin Wu"));
        User user = new User();
        user.setName("Dan Qiao");
        user.setAge(48);
        System.out.println(baseService.getUser(user));
    }
}
右击客户端调用程序,即可调用服务端的服务内容。


 584
584


 被折叠的 条评论
为什么被折叠?
被折叠的 条评论
为什么被折叠?
 到【灌水乐园】发言


