转自:http://blog.csdn.net/u012243115/article/details/46898573
一、config文件编写
Nginx提供了一种简单的方式将第三方的模块编译到Nginx中。首先把源代码文件全部放到一个目录下,同时在该目录中编写一个文件用于通知Nginx如何编译本模块,这个文件名必须为config。然后,在configure脚本执行时加入参数--add-module=PATH(新模块源代码以及config文件存放目录),就可以在编译Nginx之前把新模块添加进去,然后再编译(make)即可。
config文件格式
config文件其实是一个可执行的Shell脚本,如果只想开发一个HTTP模块,需要定义三个变量:
(1)ngx_adon_name
仅在configure执行时使用,一般设置为模块名称。
(2)HTTP_MODULES
保存所有的HTTP模块名称。每个模块间由空格相连。在重新设置这个变量时,不要直接覆盖,因此要如下设置:
"$HTTP_MODULESngx_http_mytest_module"
(3)NGX_ADDON_SRCS
用于指定新模块的源代码,多个待编译的源代码之间可以用空格相连。
注意,在设置这个变量时可以使用$ngx_addon_dir变量,它等价于configure执行时--add-module=PATH的PATH参数。
本例中的config文件内容如下:
- ngx_addon_name=ngx_http_mytest_module
- HTTP_MODULES="$HTTP_MODULES ngx_http_mytest_module"
- NGX_ADDON_SRCS="$NGX_ADDON_SRCS $ngx_addon_dir/ngx_http_mytest_module.c"
二、定义HTTP模块及处理用户请求
用C语言编写模块源码ngx_http_mytest_module.c。书中介绍了几个数据结构和函数,经过梳理,它们的关系是这样的:
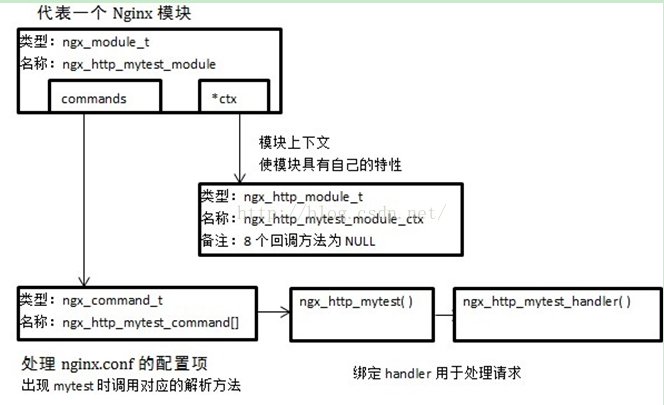
它们完成任务的具体过程和编码实现原书上都有(一些数据传递如HTTP请求的解析、数据传递是由Nginx的HTTP框架完成的,在模块代码中并未体现),记得添加头文件ngx_config.h、ngx_core.h和ngx_http.h:
ngx_http_mytest_module.c文件(与上面的config文件位于同一目录下)如下:
源码来源:http://nginx.weebly.com/31034203632830430721.html
- #include <ngx_config.h>
- #include <ngx_core.h>
- #include <ngx_http.h>
-
-
- static char *
- ngx_http_mytest(ngx_conf_t *cf, ngx_command_t *cmd, void *conf);
-
- static ngx_int_t ngx_http_mytest_handler(ngx_http_request_t *r);
-
-
-
- static ngx_command_t ngx_http_mytest_commands[] =
- {
-
- {
- ngx_string("mytest"),
- NGX_HTTP_MAIN_CONF | NGX_HTTP_SRV_CONF | NGX_HTTP_LOC_CONF | NGX_HTTP_LMT_CONF | NGX_CONF_NOARGS,
- ngx_http_mytest,
- NGX_HTTP_LOC_CONF_OFFSET,
- 0,
- NULL
- },
-
- ngx_null_command
- };
-
- static ngx_http_module_t ngx_http_mytest_module_ctx =
- {
- NULL,
- NULL,
-
- NULL,
- NULL,
-
- NULL,
- NULL,
-
- NULL,
- NULL
- };
-
- ngx_module_t ngx_http_mytest_module =
- {
- NGX_MODULE_V1,
- &ngx_http_mytest_module_ctx,
- ngx_http_mytest_commands,
- NGX_HTTP_MODULE,
- NULL,
- NULL,
- NULL,
- NULL,
- NULL,
- NULL,
- NULL,
- NGX_MODULE_V1_PADDING
- };
-
-
- static char *
- ngx_http_mytest(ngx_conf_t *cf, ngx_command_t *cmd, void *conf)
- {
- ngx_http_core_loc_conf_t *clcf;
-
-
-
-
- clcf = ngx_http_conf_get_module_loc_conf(cf, ngx_http_core_module);
-
-
-
-
- clcf->handler = ngx_http_mytest_handler;
-
- return NGX_CONF_OK;
- }
-
-
- static ngx_int_t ngx_http_mytest_handler(ngx_http_request_t *r)
- {
-
- if (!(r->method & (NGX_HTTP_GET | NGX_HTTP_HEAD)))
- {
- return NGX_HTTP_NOT_ALLOWED;
- }
-
-
- ngx_int_t rc = ngx_http_discard_request_body(r);
- if (rc != NGX_OK)
- {
- return rc;
- }
-
-
-
- ngx_str_t type = ngx_string("text/plain");
-
- ngx_str_t response = ngx_string("Hello World!");
-
- r->headers_out.status = NGX_HTTP_OK;
-
- r->headers_out.content_length_n = response.len;
-
- r->headers_out.content_type = type;
-
-
- rc = ngx_http_send_header(r);
- if (rc == NGX_ERROR || rc > NGX_OK || r->header_only)
- {
- return rc;
- }
-
-
- ngx_buf_t *b;
- b = ngx_create_temp_buf(r->pool, response.len);
- if (b == NULL)
- {
- return NGX_HTTP_INTERNAL_SERVER_ERROR;
- }
-
- ngx_memcpy(b->pos, response.data, response.len);
-
- b->last = b->pos + response.len;
-
- b->last_buf = 1;
-
-
- ngx_chain_t out;
-
- out.buf = b;
-
- out.next = NULL;
-
-
-
- return ngx_http_output_filter(r, &out);
- }
三、修改配置文件
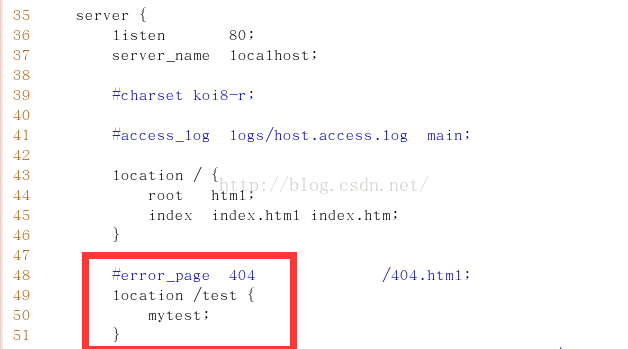
最后一步是修改nginx.conf配置,为http块中增加一个对应于mytest模块的location块:
- location /test {
- mytest;
- }
如下图所示:
四、编译安装新模块
重新编译Nginx源码使其包含新定义的模块(注需要把以前安装的删掉):
- ./configure --add-module=/home/nginx(这个路径是上面的conf和ngx_http_mytest_module.c文件所在的路径)
- make
- make install
五、验证结果
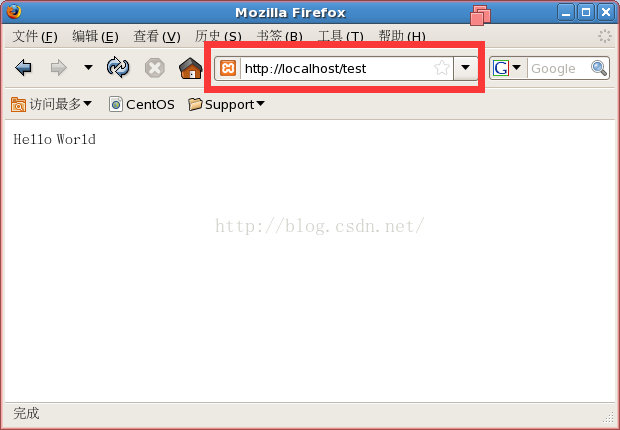
安装好Nginx之后,打开服务器:/usr/local/nginx/sbin/nginx
然后在浏览器输入:http://localhost/test即可看到Hello World字样。


 369
369

 被折叠的 条评论
为什么被折叠?
被折叠的 条评论
为什么被折叠?
 到【灌水乐园】发言


