


Win10 + VS2019 + OpenMVS1.1.1 + Vcpkg
参考资料:
【1】OpenMVS——https://github.com/cdcseacave/openMVS
【2】https://blog.csdn.net/baidu_40840693/article/details/84707105
1 VS2019安装
安装VisualStudio2019 Community,记得额外安装英文语言包,并设置默认语言为英语!!!!
Visual Studio2019下载地址
VS2019更改语言包
2 git安装
git for windows下载地址
https://git-scm.com/download/win
安装程序一路点next即可,记得将git安装地址添加到系统环境变量的path里。

3 vcpkg安装
可参考以下博客,其中有更详细的vcpkg安装步骤。若懒得看,可以从下面3.1开始看
【1】Vcpkg C/C++库管理工具安装和使用教程(链接VS2019)https://blog.csdn.net/qq_41023270/article/details/109274433
【2】利用vcpkg安装CGAL
3.1下载vcpkg
推荐C盘新建文件夹dev,然后从github网址下载vcpkg或者直接git下载
cd C:\
mkdir dev
cd dev
git clone https://github.com/microsoft/vcpkg
3.2安装vcpkg
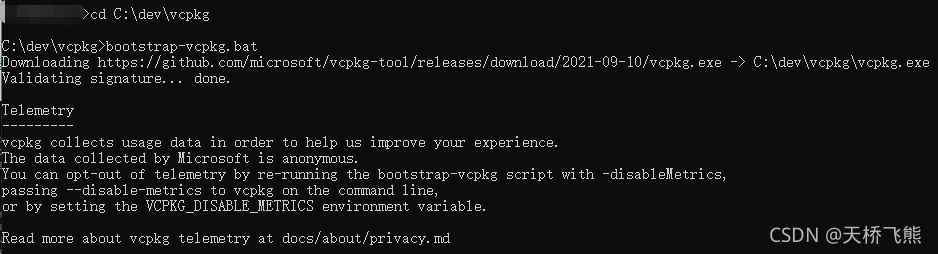
进入到vcpkg安装文件夹,运行bootstrap-vcpkg.bat
cd C:\dev\vcpkg
.\bootstrap-vcpkg.bat
由于网路问题这一步可能会失败,多试几次或者翻墙直到完成安装。
为了在Visual Studio中使用vcpkg,只需要进行一下操作,在之后的使用中就可以直接使用了(需要开启管理员权限),
vcpkg integrate install

链接成功,系统里所有C++编辑器都能与vcpkg建立链接了。
3.3 配置环境变量
在“系统变量 ”中,点击 “新建 ”,即可新建一个变量。
变量名:VCPKG_DEFAULT_TRIPLET
变量值:x64-windows
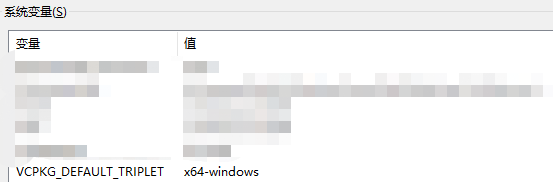
(PS:这是为了在vcpkg中安装各种库时默认选择x64版本)
4 Vcpkg下载OpenMVS依赖的三方库
在vpckg的安装目录(比如c:\dev\vcpkg)下输入安装命令:
我使用的安装命令为
vcpkg install zlib:x64-windows boost:x64-windows eigen3:x64-windows ceres:x64-windows opencv:x64-windows cgal:x64-windows glew:x64-windows glfw3:x64-windows
这里由于网络的原因会失败很多次,最好翻墙下载。 -。-
OpenMVS官方教程给出的示例如下:
#Make a toplevel directory for deps & build & src somewhere:
mkdir OpenMVS
cd OpenMVS

#Get and install dependencies using vcpkg;
#choose the desired triplet, like "x64-windows", by setting the VCPKG_DEFAULT_TRIPLET environment variable or by specifying it after each package:
vcpkg install zlib boost eigen3 ceres opencv cgal glew glfw3

#Get VCGLib (Required):
git clone https://github.com/cdcseacave/VCG.git
#Get and unpack OpenMVS in OpenMVS/src:
git clone https://github.com/cdcseacave/openMVS.git src
#Make build directory:
mkdir build
cd build
#Run CMake, where VCPKG_ROOT environment variable points to the root of vcpkg installation:
cmake . ..\src -G "Visual Studio 15 2017 Win64" -DCMAKE_TOOLCHAIN_FILE=%VCPKG_ROOT%\scripts\buildsystems\vcpkg.cmake -DVCPKG_TARGET_TRIPLET=x64-windows -DVCG_ROOT="..\VCG"

#Open the solution in MSVC and build it
5 下载和编译VCG和OpenMVS
从cmd进入需要下载和编译OpenMVS的文件夹,我的安装路径是F:\MVS_program\OpenMVS,git下载VCG和OpenMVS
cd F:\MVS_program\OpenMVS
git clone https://github.com/cdcseacave/VCG.git
git clone https://github.com/cdcseacave/openMVS.git src
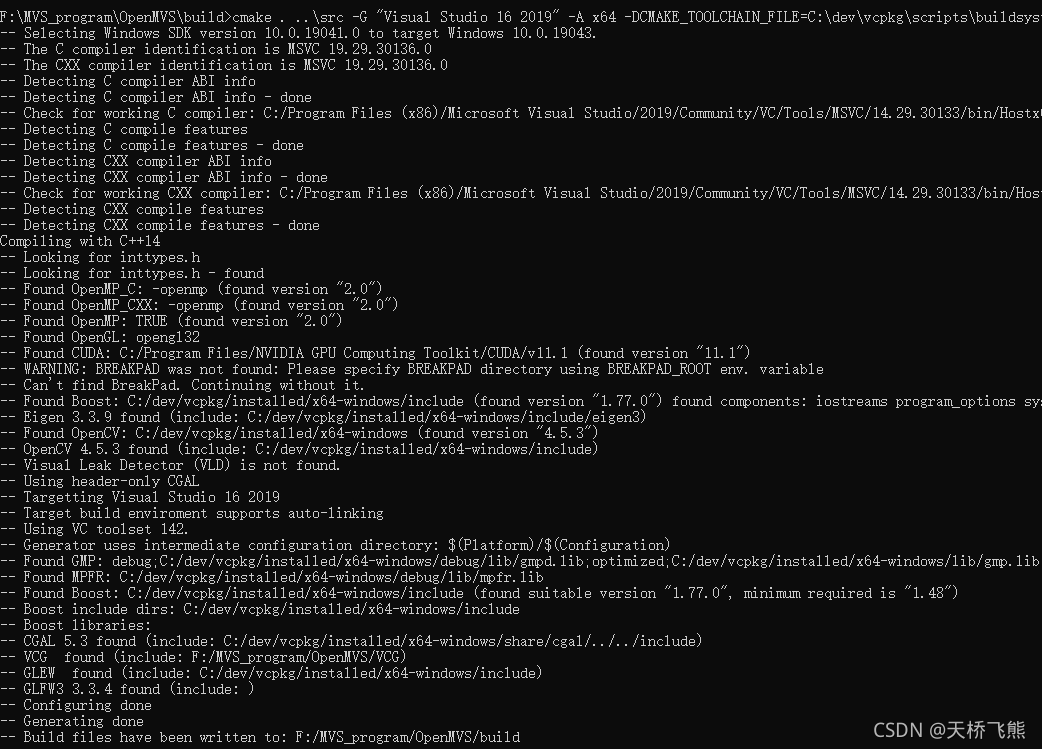
5.1Cmake命令
cmake . ..\src -G "Visual Studio 16 2019" -A x64 -DCMAKE_TOOLCHAIN_FILE=C:\dev\vcpkg\scripts\buildsystems\vcpkg.cmake -DVCPKG_TARGET_TRIPLET=x64-windows -DVCG_ROOT="..\VCG"
注意使用如下命令会出现错误
cmake . ..\src -G "Visual Studio 16 2019 Win64" -DCMAKE_TOOLCHAIN_FILE=C:\dev\vcpkg\scripts\buildsystems\vcpkg.cmake -DVCPKG_TARGET_TRIPLET=x64-windows -DVCG_ROOT="..\VCG"
CMake Error: Could not create named generator Visual Studio 16 2019 Win64,把"Visual Studio 16 2019 Win64" 换成 “Visual Studio 16 2019” -A x64 就好了
5.2 Cmake成功
6 VS打开.sln生成
6.1 编译ReconstructMesh.exe出现错误**
unresolved external symbol “void __cdecl boost::throw_exception(class std::exception const &,struct boost::source_location const &)”
(?throw_exception@boost@@YAXAEBVexception@std@@AEBUsource_location@1@@Z)
referenced in function “unsigned int __cdecl boost::multiprecision::backends::eval_lsb(struct boost::multiprecision::backends::gmp_int const &)”
(?eval_lsb@backends@multiprecision@boost@@YAIAEBUgmp_int@123@@Z)
6.2分析
无法解析的外部符号 boost::throw_exception已在函数 boost::multiprecision::backends::eval_lsb(struct boost::multiprecision::backends::gmp_int const &)中定义。
查找到eval_lsb函数在"C:\dev\vcpkg\installed\x64-windows\include\boost\multiprecision\gmp.hpp"中
 inline unsigned eval_lsb(const gmp_int& val)
{
   int c = eval_get_sign(val);
   if (c == 0)
   {
      BOOST_THROW_EXCEPTION(std::domain_error("No bits were set in the operand."));
   }
   if (c < 0)
   {
      BOOST_THROW_EXCEPTION(std::domain_error("Testing individual bits in negative values is not supported - results are undefined."));
   }
   return static_cast<unsigned>(mpz_scan1(val.data(), 0));
}
然后查找到BOOST_THROW_EXCEPTION函数的定义在“C:\dev\vcpkg\installed\x64-windows\include\boost\throw_exception.hpp”
#define BOOST_THROW_EXCEPTION(x) ::boost::throw_exception(x, BOOST_CURRENT_LOCATION)
namespace boost
{

#if defined( BOOST_NO_EXCEPTIONS )

BOOST_NORETURN void throw_exception(std::exception const& e); // user defined
BOOST_NORETURN void throw_exception(std::exception const& e, boost::source_location const& loc); // user defined

#endif
throw_exception函数需要由用户定义,在OpenMVS的Common.cpp中重定义了该函数,这导致eval_lsb和重定义的函数冲突么?(求解答)
"......\OpenMVS\src\libs\Common\Common.cpp"
#ifdef _USE_BOOST
#ifdef BOOST_NO_EXCEPTIONS
namespace boost {
	void throw_exception(std::exception const & e) {
		VERBOSE("exception thrown: %s", e.what());
		ASSERT("boost exception thrown" == NULL);
		exit(EXIT_FAILURE);
	}
} // namespace boost
#endif
#endif
6.3 我的解决方法——取消宏定义BOOST_NO_EXCEPTIONS
在文件"~~\OpenMVS\src\libs\Common\Types.h"中取消宏定义BOOST_NO_EXCEPTIONS
在“#define BOOST_NO_EXCEPTIONS ”这句前面加上双斜杠"//"
改动前:
// include usual boost libraries
#ifdef _USE_BOOST
#if 1
// disable exception support
#define BOOST_NO_UNREACHABLE_RETURN_DETECTION
#define BOOST_EXCEPTION_DISABLE
#define BOOST_NO_EXCEPTIONS
#endif
改动后:
//取消宏定义BOOST_NO_EXCEPTIONS
// include usual boost libraries
#ifdef _USE_BOOST
#if 1
// disable exception support
#define BOOST_NO_UNREACHABLE_RETURN_DETECTION
#define BOOST_EXCEPTION_DISABLE
//#define BOOST_NO_EXCEPTIONS
#endif
然后Debug和Release都编译通过了


 483
483


 被折叠的 条评论
为什么被折叠?
被折叠的 条评论
为什么被折叠?
 到【灌水乐园】发言


