


android5.0以上的系统自带了ethernet service,默认开机就会启动,默认ip获取方式是动态分配,这里记录下android5.1增加ethernet设置界面设置ip获取方式及开关.
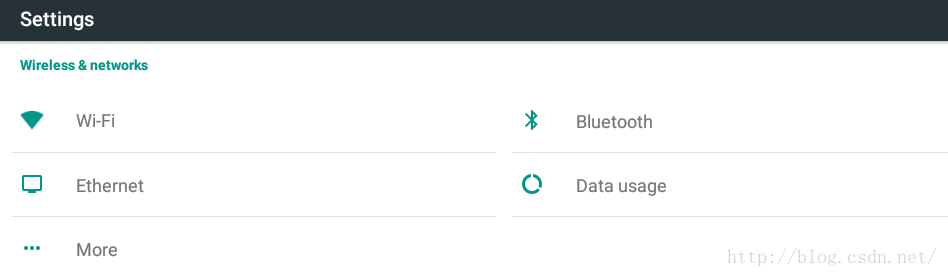
首先是界面方面要修改Settings增加ethernet设置界面
修改文件packages/apps/Settings/res/xml/dashboard_categories.xml在蓝牙后面加上如下代码
- android:id="@+id/ethernet_settings"
- android:icon="@drawable/ic_settings_dock"
- android:fragment="com.android.settings.ethernet.EthernetSettings"
- android:title="@string/ethernet_settings" />
其中的EthernetSettings后面进行说明,然后增加string修改文件packages/apps/Settings/res/values/strings.xml
增加如下内容
- "ethernet_settings">Ethernet
- "eth_config_title">Configure Ethernet device
- "eth_setting">Ethernet
- "eth_dev_list">Ethernet Devices:
- "eth_con_type">Connection Type
- "eth_con_type_dhcp">DHCP
- "eth_con_type_manual">Static IP
- "eth_dns">DNS address
- "eth_gw">Gateway address
- "eth_ipaddr">IP address
- "eth_quick_toggle_title">Ethernet
- "eth_quick_toggle_summary">Turn on Ethernet
- "eth_conf_perf_title">Ethernet configuration
- "eth_conf_summary">Configure Ethernet devices
- "eth_mask">Netmask
- "eth_toggle_summary_off">Turn off Ethernet
- "eth_toggle_summary_on">Turn on Ethernet
- "eth_settings_error">Failed to set: Please enter the valid characters 0~255
- "eth_settings_empty">can\'t be empty
- "eth_network_prefix_length">Network prefix length
接着修改文件packages/apps/Settings/src/com/android/settings/SettingsActivity.java增加
- import com.android.settings.ethernet.EthernetSettings;//add by hclydao
然后在R.id.bluetooth_settings,后增加
- R.id.ethernet_settings,//add by hclydao
在BluetoothSettings.class.getName(),后增加
- EthernetSettings.class.getName(),//add by hclydao
接着修改文件packages/apps/Settings/src/com/android/settings/Settings.java
在public static class WirelessSettingsActivity extends SettingsActivity { /* empty */ }后增加
- public static class EthernetSettingsActivity extends SettingsActivity { /* empty */ } //add by hclydao
这里面应该是声明与继承关系
接着修改
packages/apps/Settings/AndroidManifest.xml
- "Settings$EthernetSettingsActivity"
- android:label="@string/ethernet_settings"
- android:taskAffinity="">
- "android.intent.action.MAIN" />
- "com.android.settings.ETHERNET_SETTINGS" />
- "android.settings.ETHERNET_SETTINGS" />
- "android.intent.category.DEFAULT" />
- "android.intent.category.VOICE_LAUNCH" />
- "com.android.settings.SHORTCUT" />
- "com.android.settings.FRAGMENT_CLASS"
- android:value="com.android.settings.ethernet.EthernetSettings" />
- "com.android.settings.TOP_LEVEL_HEADER_ID"
- android:resource="@id/ethernet_settings" />
- "com.android.settings.PRIMARY_PROFILE_CONTROLLED"
- android:value="true" />
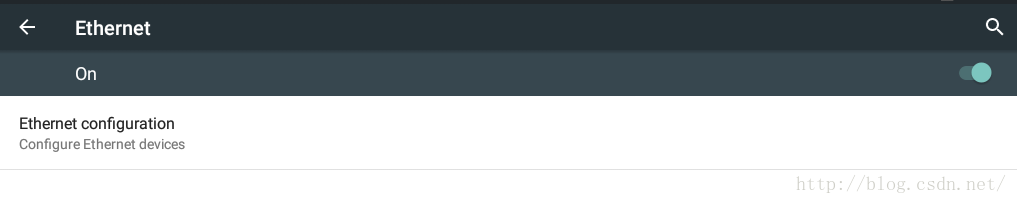
然后增加点击进去后的布局文件,增加
packages/apps/Settings/res/xml/ethernet_settings.xml
内容如下
- "1.0" encoding="utf-8"?>
- "http://schemas.android.com/apk/res/android"
- android:title="@string/ethernet_settings"
- xmlns:settings="http://schemas.android.com/apk/res/com.android.settings">
- android:title="@string/eth_conf_perf_title"
- android:summary="@string/eth_conf_summary"
- android:key="ETHERNET_CONFIG"
- android:persistent="false" />
编译后效果应该是这个样子的:
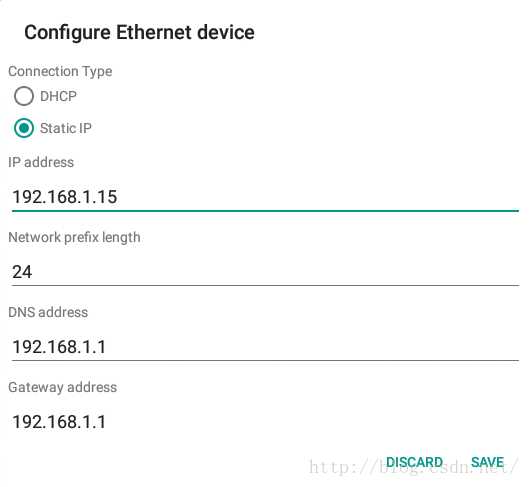
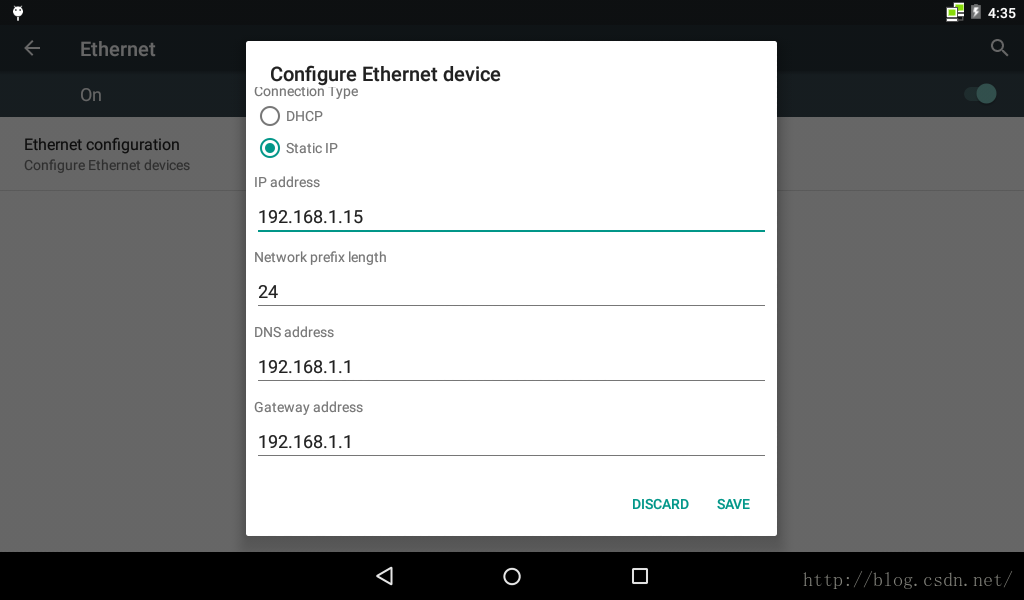
点击进去后会有一个Dialog布局,需要增加文件packages/apps/Settings/res/layout/eth_configure.xml
- "1.0" encoding="utf-8"?>
- "http://schemas.android.com/apk/res/android"
- android:layout_width="fill_parent"
- android:layout_height="wrap_content">
- android:layout_width="fill_parent"
- android:layout_height="wrap_content"
- android:padding="8dip"
- android:orientation="vertical">
- android:id="@+id/table"
- android:layout_width="fill_parent"
- android:layout_height="fill_parent"
- android:orientation="vertical">
- "@+id/eth_con_type"
- style="?android:attr/textAppearanceSmall"
- android:layout_width="fill_parent"
- android:layout_height="wrap_content"
- android:layout_marginTop="8dip"
- android:text="@string/eth_con_type" />
- "@+id/con_type"
- android:layout_width="fill_parent"
- android:layout_height="wrap_content"
- >
- "@+id/dhcp_radio"
- style="?android:attr/textAppearanceSmall"
- android:layout_width="fill_parent"
- android:layout_height="wrap_content"
- android:text="@string/eth_con_type_dhcp"
- >
- "@+id/manual_radio"
- style="?android:attr/textAppearanceSmall"
- android:layout_width="fill_parent"
- android:layout_height="wrap_content"
- android:text="@string/eth_con_type_manual"
- >
- "@+id/enterprise_wrapper"
- android:layout_width="fill_parent"
- android:layout_height="wrap_content"
- android:padding="0dip"
- android:orientation="vertical">
- "@+id/ipaddr_text"
- style="?android:attr/textAppearanceSmall"
- android:layout_width="fill_parent"
- android:layout_height="wrap_content"
- android:layout_marginTop="8dip"
- android:text="@string/eth_ipaddr" />
- "@+id/ipaddr_edit"
- android:layout_width="fill_parent"
- android:layout_height="wrap_content"
- android:layout_marginTop="2dip"
- android:singleLine="true" />
- "@+id/prefix_text"
- style="?android:attr/textAppearanceSmall"
- android:layout_width="fill_parent"
- android:layout_height="wrap_content"
- android:layout_marginTop="8dip"
- android:text="@string/eth_network_prefix_length" />
- "@+id/prefix_edit"
- android:layout_width="fill_parent"
- android:layout_height="wrap_content"
- android:layout_marginTop="2dip"
- android:singleLine="true" />
- "@+id/dns_text"
- style="?android:attr/textAppearanceSmall"
- android:layout_width="fill_parent"
- android:layout_height="wrap_content"
- android:layout_marginTop="8dip"
- android:text="@string/eth_dns" />
- "@+id/eth_dns_edit"
- android:layout_width="fill_parent"
- android:layout_height="wrap_content"
- android:layout_marginTop="2dip"
- android:singleLine="true" />
- "@+id/gw_text"
- style="?android:attr/textAppearanceSmall"
- android:layout_width="fill_parent"
- android:layout_height="wrap_content"
- android:layout_marginTop="8dip"
- android:text="@string/eth_gw" />
- "@+id/eth_gw_edit"
- android:layout_width="fill_parent"
- android:layout_height="wrap_content"
- android:layout_marginTop="2dip"
- android:singleLine="true" />
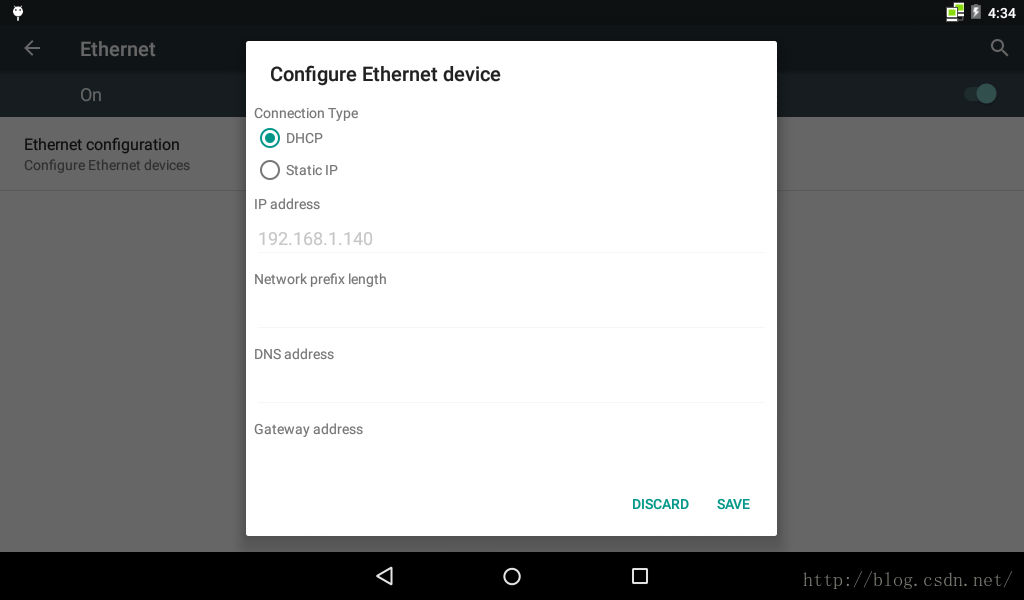
里面包括了dhcp与static ip的选择,以及static ip的设置
然后增加Settings/src/com/android/settings/ethernet/EthernetDialog.java以及packages/apps/Settings/src/com/android/settings/ethernet/EthernetSettings.java
这些是具体的实现,最后我会给下载地址
最后出来的效果应该是这样的:
配制界面
增加这些修改和文件后,基本上就可以进行动态设置了。但是设置的关于ethernet的开关是没有作用的,所以这里增加开关的控制
修改文件frameworks/base/core/java/android/provider/Settings.java
在Settings数据库中增加一个ethernet的控制
- public static final String ETHERNET_ON = "ethernet_on";//add by hclydao
在mHandler = new Handler(handlerThread.getLooper());后增加如下代码
- int enable = Settings.Global.getInt(mContext.getContentResolver(),Settings.Global.ETHERNET_ON,0);//add by hclydao
- if(enable != EthernetManager.ETH_STATE_ENABLED) {
- Log.i(TAG, "Ethernet is not enable");
- return;
- }
如果没有打开就直接返回,不启动Service后继的操作,然后增加两个接口
- class TstartThread extends Thread {
- public void run() {
- Looper.prepare();
- mTracker.start(mContext, mHandler);
- mStarted.set(true);
- Looper.loop();
- }
- }
- public void Trackstart() { //add by hclydao
- new TstartThread().start();
- }
- public void Trackstop() {
- Log.i(TAG, "Stop Ethernet service");
- Thread tstopthread = new Thread(new Runnable() {
- public void run() {
- Looper.prepare();
- mTracker.stop();
- mStarted.set(false);
- Looper.loop();
- }
- });
- tstopthread.start();
- }
同时要修改frameworks/base/core/java/android/net/EthernetManager.java文件增加
- public static final int ETH_STATE_UNKNOWN = 0;
- public static final int ETH_STATE_DISABLED = 1;
- public static final int ETH_STATE_ENABLED = 2;
- public void start() {
- try {
- mService.Trackstart();
- } catch (NullPointerException | RemoteException e) {
- }
- }
- public void stop() {
- try {
- mService.Trackstop();
- } catch (NullPointerException | RemoteException e) {
- }
- }
同时修改frameworks/base/core/java/android/net/IEthernetManager.aidl
增加
- void Trackstart();//add by hclydao
- void Trackstop();
跟踪测试时发现静态ip设置的时候有时候不成功,修改文件frameworks/opt/net/ethernet/java/com/android/server/ethernet/EthernetNetworkFactory.java
增加
- private Handler mHandler;
后增加
- mHandler = target;//add by hclydao
在if (!setStaticIpAddress(config.getStaticIpConfiguration())) {后增加
- //if error then stop and restart add by hclydao
- if((mContext != null) && (mHandler != null)) {
- Log.d(TAG, "Setting static ip failed now restart");
- stop();
- start(mContext,mHandler);
- }
然后在if (mNMService.getInterfaceConfig(iface).hasFlag("running")) {前面增加
- if(!iface.equals("eth0"))//add by hclydao make sure the interface is eth0
- continue;
这里只设置了一个设备名,为保存是eth0所以加上这句,防止意外.
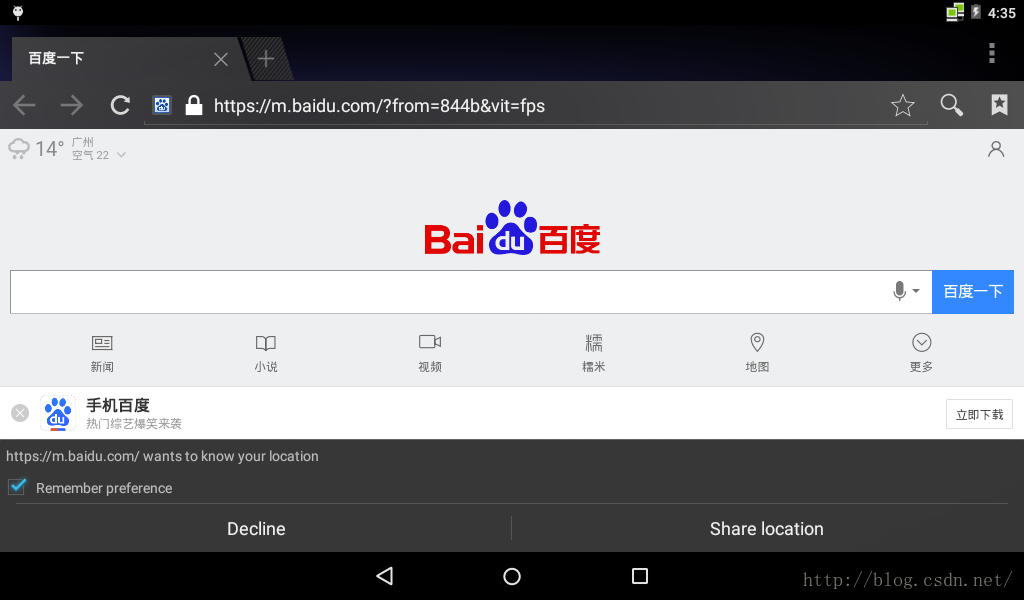
最后来增加Systemui statusbar中的状态提示,这里只增加了两种状态,一种是连接成功,一种是连接不成功,简单点来
修改frameworks/base/packages/SystemUI/res/layout/signal_cluster_view.xml
在
android:id="@+id/wifi_signal_spacer"
android:layout_width="4dp"
前增加
- android:id="@+id/ethernet_combo"
- android:layout_height="wrap_content"
- android:layout_width="wrap_content"
- android:layout_marginRight="-6dp"
- >
- android:id="@+id/ethernet_state"
- android:layout_height="wrap_content"
- android:layout_width="wrap_content"
- android:layout_alignParentRight="true"
- android:layout_centerVertical="true"
- android:scaleType="center"
- />
修改文件frameworks/base/packages/SystemUI/res/values/strings.xml
增加
- "accessibility_ethernet_connected">Ethernet connected.
- "accessibility_ethernet_disconnected">Ethernet disconnected.
- "accessibility_ethernet_connecting">Ethernet connecting.
frameworks/base/packages/SystemUI/src/com/android/systemui/statusbar/policy/NetworkControllerImpl.java
增加
- import android.net.EthernetManager;
在mWifiSignalController.notifyListeners();前面加上
- cluster.setEthernetIndicators(false,R.drawable.ethernet_disconnected,R.string.accessibility_ethernet_disconnected);
mWifiSignalController.setInetCondition(
mValidatedTransports.get(mWifiSignalController.getTransportType()) ? 1 : 0);
后面增加
- //add by hclydao
- int length = mSignalClusters.size();
- int ethicon = R.drawable.ethernet_connecting;
- int ethacc = R.string.accessibility_ethernet_connecting;
- if(mValidatedTransports.get(TRANSPORT_ETHERNET)) {
- ethicon = R.drawable.ethernet_connected;
- ethacc = R.string.accessibility_ethernet_connected;
- }
- for (int i = 0; i < length; i++) {
- mSignalClusters.get(i).setEthernetIndicators(mEthernetConnected, ethicon,ethacc);
- }
- //end add
在
void setIsAirplaneMode(boolean is, int airplaneIcon, int contentDescription);后增加
- public void setEthernetIndicators(boolean visible, int stateIcon, int contentDescription);
增加
- private boolean mEthernetVisible = false;//add by hclydao
- private int mEthernetStateId = 0;
- private int mEthernetDescription;
- ViewGroup mWifiGroup,mEthernetGroup;//modify by hclydao
- ImageView mVpn, mWifi, mAirplane, mNoSims,mEthernet;//modify by hclydao
在
mWifiAirplaneSpacer = findViewById(R.id.wifi_airplane_spacer);mWifiSignalSpacer = findViewById(R.id.wifi_signal_spacer);
mMobileSignalGroup = (LinearLayout) findViewById(R.id.mobile_signal_group);
后增加
- mEthernetGroup = (ViewGroup) findViewById(R.id.ethernet_combo);//add by hclydao
- mEthernet = (ImageView) findViewById(R.id.ethernet_state);
在
mWifi = null;mAirplane = null;
后增加
- mEthernetGroup = null;//add by hclydao
- mEthernet = null;
增加函数
- //add by hclydao
- @Override
- public void setEthernetIndicators(boolean visible, int stateIcon, int contentDescription) {
- mEthernetVisible = visible;
- mEthernetStateId = stateIcon;
- mEthernetDescription = contentDescription;
- apply();
- }
mWifiSignalSpacer.setVisibility(View.GONE);
}
后增加
- if (mEthernetVisible && !mWifiVisible) {//add by hclydao
- mEthernetGroup.setVisibility(View.VISIBLE);
- mEthernet.setImageResource(mEthernetStateId);
- mEthernetGroup.setContentDescription(mContext.getString(mEthernetDescription));
- } else {
- mEthernetGroup.setVisibility(View.GONE);
- }
在boolean anythingVisible = mNoSimsVisible || mWifiVisible || mIsAirplaneMode上增加
- || mEthernetVisible
最后效果图如下:
============================================
作者:hclydao
http://blog.csdn.net/hclydao
版权没有,但是转载请保留此段声明
============================================
http://blog.csdn.net/moyu123456789/article/details/50002099
http://my.oschina.net/hiliusl/blog/174973?fromerr=IPmtDOdk
相关源码下载地址:http://download.csdn.net/detail/hclydao/9472077
下载文件为zip文件,上传后自动在最后加了_ 下载后将_删除


 2008
2008

 被折叠的 条评论
为什么被折叠?
被折叠的 条评论
为什么被折叠?
 到【灌水乐园】发言


