


一旦你的程序docker化之后,你会遇到各种问题,比如原来采用的本地记日志的方式就不再方便了,虽然你可以挂载到宿主机,但你使用 --scale 的话,会导致记录日志异常,所以最好的方式还是要做日志中心化,另一个问题,原来一个请求在一个进程中的痉挛失败,你可以在日志中巡查出调用堆栈,但是docker化之后,原来一个进程的东西会拆成几个微服务,这时候最好就要有一个分布式的调用链跟踪,类似于wcf中的svctraceview工具。
一:搭建skywalking
gihub地址是:https://github.com/apache/incubator-skywalking 从文档中大概看的出来,大体分三个部分:存储,收集器,探针,存储这里就选用推荐的 elasticsearch。收集器准备和es部署在一起,探针就有各自语言的实现了,总之这里就有三个docker container:es,kibana,skywalking, 如果不用容器编排工具的话就比较麻烦。
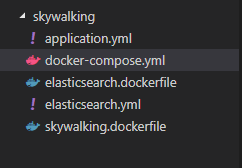
下面是本次搭建的一个目录结构:
1. elasticsearch.yml
es的配置文件,不过这里有一个坑,就是一定要将 network.publish_host:0.0.0.0 ,否则skywalking会连不上 9300端口。
network.publish_host: 0.0.0.0
transport.tcp.port: 9300
network.host: 0.0.0.0
2. elasticsearch.dockerfile
在up的时候,将这个es文件copy到 容器的config文件夹下。
FROM elasticsearch:5.6.4

EXPOSE 9200 9300

COPY elasticsearch.yml /usr/share/elasticsearch/config/
3. application.yml
skywalking的配置文件,这里也有一个坑:连接es的地址中,配置的 clustername一定要修改成和es的clustername保持一致,否则会连不上,这里容器之间用link进行互联,所以es的ip改成elasticsearch就可以了,其他的ip改成0.0.0.0 。
# Licensed to the Apache Software Foundation (ASF) under one
# or more contributor license agreements.  See the NOTICE file
# distributed with this work for additional information
# regarding copyright ownership.  The ASF licenses this file
# to you under the Apache License, Version 2.0 (the
# "License"); you may not use this file except in compliance
# with the License.  You may obtain a copy of the License at
#
#     http://www.apache.org/licenses/LICENSE-2.0
#
# Unless required by applicable law or agreed to in writing, software
# distributed under the License is distributed on an "AS IS" BASIS,
# WITHOUT WARRANTIES OR CONDITIONS OF ANY KIND, either express or implied.
# See the License for the specific language governing permissions and
# limitations under the License.

#cluster:
#  zookeeper:
#    hostPort: localhost:2181
#    sessionTimeout: 100000
naming:
  jetty:
    host: 0.0.0.0
    port: 10800
    contextPath: /
cache:
#  guava:
  caffeine:
remote:
  gRPC:
    host: 0.0.0.0
    port: 11800
agent_gRPC:
  gRPC:
    host: 0.0.0.0
    port: 11800
    #Set these two setting to open ssl
    #sslCertChainFile: $path
    #sslPrivateKeyFile: $path

    #Set your own token to active auth
    #authentication: xxxxxx
agent_jetty:
  jetty:
    host: 0.0.0.0
    port: 12800
    contextPath: /
analysis_register:
  default:
analysis_jvm:
  default:
analysis_segment_parser:
  default:
    bufferFilePath: ../buffer/
    bufferOffsetMaxFileSize: 10M
    bufferSegmentMaxFileSize: 500M
    bufferFileCleanWhenRestart: true
ui:
  jetty:
    host: 0.0.0.0
    port: 12800
    contextPath: /
storage:
  elasticsearch:
    clusterName: elasticsearch
    clusterTransportSniffer: true
    clusterNodes: elasticsearch:9300
    indexShardsNumber: 2
    indexReplicasNumber: 0
    highPerformanceMode: true
    ttl: 7
#storage:
#  h2:
#    url: jdbc:h2:~/memorydb
#    userName: sa
configuration:
  default:
#     namespace: xxxxx
# alarm threshold
    applicationApdexThreshold: 2000
    serviceErrorRateThreshold: 10.00
    serviceAverageResponseTimeThreshold: 2000
    instanceErrorRateThreshold: 10.00
    instanceAverageResponseTimeThreshold: 2000
    applicationErrorRateThreshold: 10.00
    applicationAverageResponseTimeThreshold: 2000
# thermodynamic
    thermodynamicResponseTimeStep: 50
    thermodynamicCountOfResponseTimeSteps: 40
4. skywalking.dockerfile
接下来就是 skywalking的 下载安装,使用dockerfile流程化。
FROM centos:7

LABEL username="hxc@qq.com"

WORKDIR /app

RUN yum install -y wget && \
    yum install -y java-1.8.0-openjdk

ADD http://mirrors.hust.edu.cn/apache/incubator/skywalking/5.0.0-RC2/apache-skywalking-apm-incubating-5.0.0-RC2.tar.gz /app

RUN tar -xf apache-skywalking-apm-incubating-5.0.0-RC2.tar.gz && \
    mv apache-skywalking-apm-incubating skywalking

RUN ls /app

#copy文件
COPY application.yml /app/skywalking/config/application.yml

WORKDIR /app/skywalking/bin

USER root

RUN  echo "tail -f /dev/null" >> /app/skywalking/bin/startup.sh

CMD ["/bin/sh","-c","/app/skywalking/bin/startup.sh" ]
5. docker-compose.yml
最后就是将这三个容器进行编排,要注意的是,因为收集器会将数据放入到es中,所有一定要将es的data挂载到宿主机的大硬盘下,否则你的空间会不足的。
version: '3.1'

services:

  #elastic 镜像
  elasticsearch:
    build:
      context: .
      dockerfile: elasticsearch.dockerfile
    # ports:
    #   - "9200:9200"
    #   - "9300:9300"
    volumes:
       - "/data/es2:/usr/share/elasticsearch/data"

  #kibana 可视化查询,暴露 5601
  kibana:
    image: kibana
    links:
      - elasticsearch
    ports:
      - 5601:5601
    depends_on:
      - "elasticsearch"

  #skywalking
  skywalking:
    build:
      context: .
      dockerfile: skywalking.dockerfile
    ports:
      - "10800:10800"
      - "11800:11800"
      - "12800:12800"
      - "8080:8080"
    links:
      - elasticsearch
    depends_on:
      - "elasticsearch"
二:一键部署
要部署在docker中,你还得需要安装docker-ce 和 docker-compose,大家可以参照官方安装一下。
1. Docker-ce 的安装
sudo yum remove docker \
docker-client \
docker-client-latest \
docker-common \
docker-latest \
docker-latest-logrotate \
docker-logrotate \
docker-selinux \
docker-engine-selinux \
docker-engine

sudo yum install -y yum-utils \
device-mapper-persistent-data \
lvm2

sudo yum-config-manager \
--add-repo \
https://download.docker.com/linux/centos/docker-ce.repo

sudo yum install docker-ce
然后启动一下docker 服务,可以看到版本是18.06.1
[root@localhost ~]# service docker start
Redirecting to /bin/systemctl start  docker.service
[root@localhost ~]# docker -v
Docker version 18.06.1-ce, build e68fc7a
2. docker-compose的安装
sudo curl -L "https://github.com/docker/compose/releases/download/1.22.0/docker-compose-$(uname -s)-$(uname -m)" -o /usr/local/bin/docker-compose

sudo chmod +x /usr/local/bin/docker-compose
3. 最后在centos上执行 docker-compopse up --build 就可以了,如果不想terminal上运行,可以加 -d 使用后台执行。
[root@localhost docker]# docker-compose up --build
Creating network "docker_default" with the default driver
Building elasticsearch
Step 1/3 : FROM elasticsearch:5.6.4
 ---> 7a047c21aa48
Step 2/3 : EXPOSE 9200 9300
 ---> Using cache
 ---> 8d66bb57b09d
Step 3/3 : COPY elasticsearch.yml /usr/share/elasticsearch/config/
 ---> Using cache
 ---> 02b516c03b95
Successfully built 02b516c03b95
Successfully tagged docker_elasticsearch:latest
Building skywalking
Step 1/12 : FROM centos:7
 ---> 5182e96772bf
Step 2/12 : LABEL username="hxc@qq.com"
 ---> Using cache
 ---> b95b96a92042
Step 3/12 : WORKDIR /app
 ---> Using cache
 ---> afdf4efe3426
Step 4/12 : RUN yum install -y wget &&     yum install -y java-1.8.0-openjdk
 ---> Using cache
 ---> 46be0ca0f7b5
Step 5/12 : ADD http://mirrors.hust.edu.cn/apache/incubator/skywalking/5.0.0-RC2/apache-skywalking-apm-incubating-5.0.0-RC2.tar.gz /app

 ---> Using cache
 ---> d5c30bcfd5ea
Step 6/12 : RUN tar -xf apache-skywalking-apm-incubating-5.0.0-RC2.tar.gz &&     mv apache-skywalking-apm-incubating skywalking
 ---> Using cache
 ---> 1438d08d18fa
Step 7/12 : RUN ls /app
 ---> Using cache
 ---> b594124672ea
Step 8/12 : COPY application.yml /app/skywalking/config/application.yml
 ---> Using cache
 ---> 10eaf0805a65
Step 9/12 : WORKDIR /app/skywalking/bin
 ---> Using cache
 ---> bc0f02291536
Step 10/12 : USER root
 ---> Using cache
 ---> 4498afca5fe6
Step 11/12 : RUN  echo "tail -f /dev/null" >> /app/skywalking/bin/startup.sh
 ---> Using cache
 ---> 1c4be7c6b32a
Step 12/12 : CMD ["/bin/sh","-c","/app/skywalking/bin/startup.sh" ]
 ---> Using cache
 ---> ecfc97e4c97d
Successfully built ecfc97e4c97d
Successfully tagged docker_skywalking:latest
Creating docker_elasticsearch_1 ... done
Creating docker_skywalking_1    ... done
Creating docker_kibana_1        ... done
Attaching to docker_elasticsearch_1, docker_kibana_1, docker_skywalking_1
elasticsearch_1  | [2018-09-17T23:51:57,886][INFO ][o.e.c.m.MetaDataCreateIndexService] [FC_bOh1] [service_metric_day] creating index, cause [api], templates [], shards [2]/[0], mappings [type]
elasticsearch_1  | [2018-09-17T23:51:57,962][INFO ][o.e.c.r.a.AllocationService] [FC_bOh1] Cluster health status changed from [YELLOW] to [GREEN] (reason: [shards started [[service_metric_day][0]] ...]).
elasticsearch_1  | [2018-09-17T23:51:58,115][INFO ][o.e.c.m.MetaDataCreateIndexService] [FC_bOh1] [application_metric_hour] creating index, cause [api], templates [], shards [2]/[0], mappings [type]
elasticsearch_1  | [2018-09-17T23:51:58,176][INFO ][o.e.c.r.a.AllocationService] [FC_bOh1] Cluster health status changed from [YELLOW] to [GREEN] (reason: [shards started [[application_metric_hour][1]] ...]).
elasticsearch_1  | [2018-09-17T23:51:58,356][INFO ][o.e.c.m.MetaDataCreateIndexService] [FC_bOh1] [application_metric_month] creating index, cause [api], templates [], shards [2]/[0], mappings [type]
elasticsearch_1  | [2018-09-17T23:51:58,437][INFO ][o.e.c.r.a.AllocationService] [FC_bOh1] Cluster health status changed from [YELLOW] to [GREEN] (reason: [shards started [[application_metric_month][0]] ...]).
elasticsearch_1  | [2018-09-17T23:51:58,550][INFO ][o.e.c.m.MetaDataCreateIndexService] [FC_bOh1] [instance_mapping_month] creating index, cause [api], templates [], shards [2]/[0], mappings [type]
elasticsearch_1  | [2018-09-17T23:52:05,544][INFO ][o.e.c.m.MetaDataCreateIndexService] [FC_bOh1] [gc_metric_minute] creating index, cause [api], templates [], shards [2]/[0], mappings [type]
从上图中可以看到 es,kibana,skywalking都启动成功了,你也可以通过docker-compose ps 看一下是否都起来了,netstat 看一下宿主机开放了哪些端口。
[root@localhost docker]# docker ps
CONTAINER ID        IMAGE                  COMMAND                  CREATED             STATUS              PORTS                                                                                                  NAMES
9aa90401ca16        kibana                 "/docker-entrypoint.…"   2 minutes ago       Up 2 minutes        0.0.0.0:5601->5601/tcp                                                                                 docker_kibana_1
c551248e32af        docker_skywalking      "/bin/sh -c /app/sky…"   2 minutes ago       Up 2 minutes        0.0.0.0:8080->8080/tcp, 0.0.0.0:10800->10800/tcp, 0.0.0.0:11800->11800/tcp, 0.0.0.0:12800->12800/tcp   docker_skywalking_1
765d38469ff1        docker_elasticsearch   "/docker-entrypoint.…"   2 minutes ago       Up 2 minutes        9200/tcp, 9300/tcp                                                                                     docker_elasticsearch_1
[root@localhost docker]# netstat -tlnp
Active Internet connections (only servers)
Proto Recv-Q Send-Q Local Address           Foreign Address         State       PID/Program name
tcp        0      0 192.168.122.1:53        0.0.0.0:*               LISTEN      2013/dnsmasq
tcp        0      0 0.0.0.0:22              0.0.0.0:*               LISTEN      1141/sshd
tcp        0      0 127.0.0.1:631           0.0.0.0:*               LISTEN      1139/cupsd
tcp        0      0 127.0.0.1:25            0.0.0.0:*               LISTEN      1622/master
tcp6       0      0 :::8080                 :::*                    LISTEN      38262/docker-proxy
tcp6       0      0 :::10800                :::*                    LISTEN      38248/docker-proxy
tcp6       0      0 :::22                   :::*                    LISTEN      1141/sshd
tcp6       0      0 ::1:631                 :::*                    LISTEN      1139/cupsd
tcp6       0      0 :::11800                :::*                    LISTEN      38234/docker-proxy
tcp6       0      0 ::1:25                  :::*                    LISTEN      1622/master
tcp6       0      0 :::12800                :::*                    LISTEN      38222/docker-proxy
tcp6       0      0 :::5601                 :::*                    LISTEN      38274/docker-proxy
[root@localhost docker]#
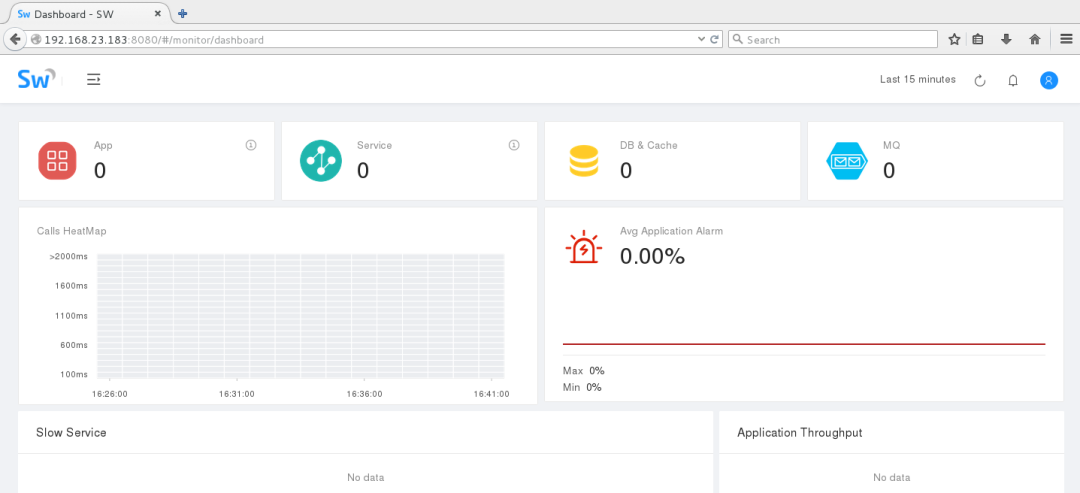
然后就可以看一些8080端口的可视化UI,默认用户名密码admin,admin,一个比较耐看的UI就出来了。
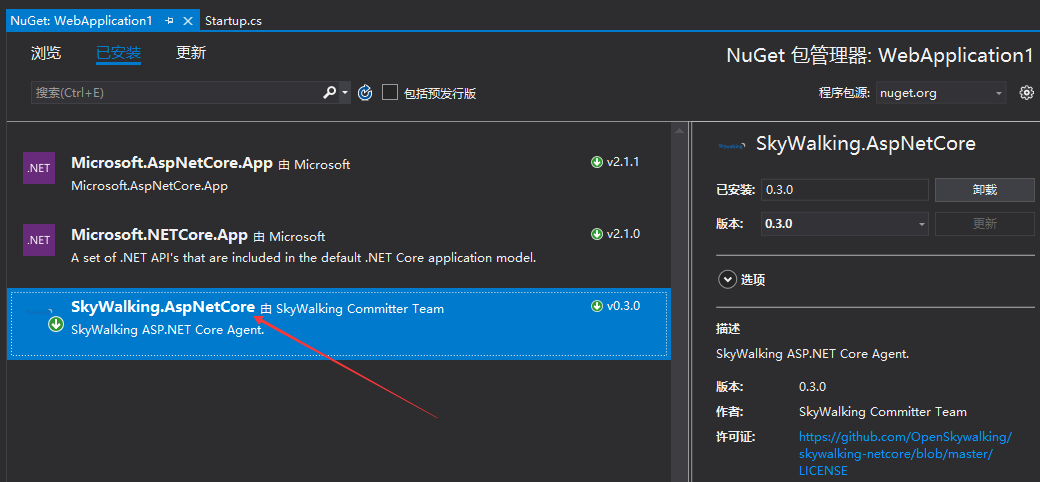
三:net下的探针
从nuget上拉取一个SkyWalking.AspNetCore探针进行代码埋点,github地址:https://github.com/OpenSkywalking/skywalking-netcore
在startup类中进行注入,在页面请求中进行一次cnblogs.com的请求操作,然后仔细观察一下调用链跟踪是一个什么样子?
namespace WebApplication1
{
   public class Startup
   {
       // This method gets called by the runtime. Use this method to add services to the container.
       // For more information on how to configure your application, visit https://go.microsoft.com/fwlink/?LinkID=398940
       public void ConfigureServices(IServiceCollection services)
       {
           services.AddSkyWalking(option =>
           {
               // Application code is showed in sky-walking-ui
               option.ApplicationCode = "10001 测试站点";

               //Collector agent_gRPC/grpc service addresses.
               option.DirectServers = "192.168.23.183:11800";
           });
       }

       // This method gets called by the runtime. Use this method to configure the HTTP request pipeline.
       public void Configure(IApplicationBuilder app, IHostingEnvironment env)
       {
           if (env.IsDevelopment())
           {
               app.UseDeveloperExceptionPage();
           }

           app.Run(async (context) =>
           {
               WebClient client = new WebClient();

               var str = client.DownloadString("http://cnblogs.com");

               await context.Response.WriteAsync(str);
           });
       }
   }
}
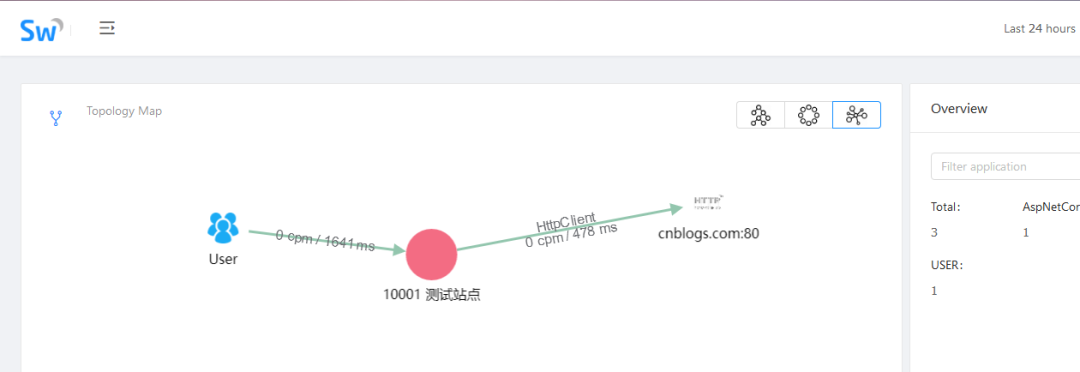
可以看到这张图还是蛮漂亮的哈,也方便我们快速的跟踪代码,发现问题,找出问题, 还有更多的功能期待你的挖掘啦。好了,本篇就说到这里,希望对你有帮助。


 464
464

 被折叠的 条评论
为什么被折叠?
被折叠的 条评论
为什么被折叠?
 到【灌水乐园】发言


