


1. 项目概述
1.1 项目背景介绍
BOS(Bussiness Operating System)-----业务操作系统
本项目物流BOS项目分为基础设置、取派、中转、路由、报表部分
1.2 常见的软件项目类型
OA:办公自动化系统
CRM:客户关系管理系统
ERP:企业资源计划平台
CMS:内容管理系统
BBS:论坛系统
1.3 项目开发流程(瀑布模型)
1、 需求调研分析----需求规格说明书
2、 设计阶段(概要设计、详细设计)------数据库设计文档、原型
3、 编码阶段(单元测试)
4、 测试阶段(集成测试、系统测试)
5、 上线与运维
1.4 本项目开发的功能
三个业务功能模块
*基础数据模块
*取派模块
*中转流程管理
两个系统功能模块
*用户管理
*权限管理
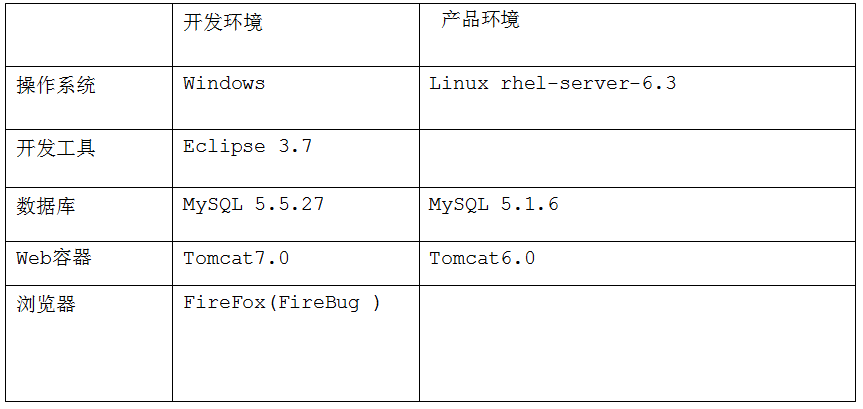
1.5 开发环境
1.6 技术选型
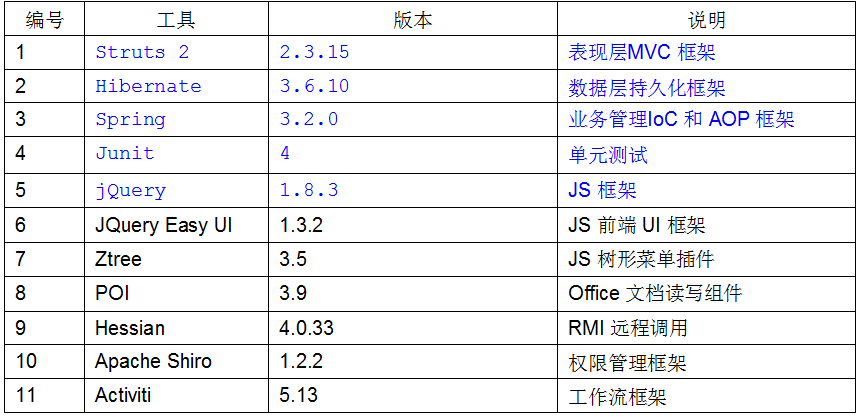
OCUpload一键上传插件、pinyin4j
2. 搭建项目开发环境
2.1 数据库环境
第一步:创建一个数据库
CREATE DATABASE bos1 CHARACTER SET utf8
第二步:创建一个数据库用户
CREATE USER 'user_bos' IDENTIFIED BY "123"
第三步:为用户授权
GRANT ALL ON bos1.* TO "user_bos"
第四步:使用新创建的用户登录数据库系统
2.2 Web项目环境
第一步:创建一个动态web项目
第二步:导入jar包(SSH、数据库驱动、日志)
第三步:配置web.xml(struts2过滤器、spring监听器、解决hibernate延迟加载的过滤器、解决中文乱码的过滤器)
- <?xml version="1.0" encoding="UTF-8"?>
- <web-app xmlns:xsi="http://www.w3.org/2001/XMLSchema-instance" xmlns="http://java.sun.com/xml/ns/javaee" xmlns:web="http://java.sun.com/xml/ns/javaee/web-app_2_5.xsd" xsi:schemaLocation="http://java.sun.com/xml/ns/javaee http://java.sun.com/xml/ns/javaee/web-app_2_5.xsd" version="2.5">
- <display-name>BOS</display-name>
- <!-- 中文乱码问题解决过滤器 -->
- <filter>
- <filter-name>characterFilter</filter-name>
- <filter-class>
- org.springframework.web.filter.CharacterEncodingFilter
- </filter-class>
- <!-- 提供初始化参数 -->
- <init-param>
- <param-name>encoding</param-name>
- <param-value>UTF-8</param-value>
- </init-param>
- </filter>
- <filter-mapping>
- <filter-name>characterFilter</filter-name>
- <url-pattern>/*</url-pattern>
- </filter-mapping>
- <!-- spring提供的解决hibernate延迟加载问题的过滤器 -->
- <filter>
- <filter-name>openSessionInView</filter-name>
- <filter-class>org.springframework.orm.hibernate3.support.OpenSessionInViewFilter</filter-class>
- </filter>
- <filter-mapping>
- <filter-name>openSessionInView</filter-name>
- <url-pattern>/*</url-pattern>
- </filter-mapping>
- <!-- spring
- * 设置初始化参数,确定spring配置文件位置
- * 使用监听器去加载配置文件,并将spring容器存放到ServletContext作用域
- -->
- <context-param>
- <param-name>contextConfigLocation</param-name>
- <param-value>classpath:applicationContext.xml</param-value>
- </context-param>
- <!-- spring监听器,加载xml文件 -->
- <listener>
- <listener-class>org.springframework.web.context.ContextLoaderListener</listener-class>
- </listener>
- <!-- struts
- * 配置struts2前端控制器,服务器在启动时,初始化init(FilerConfig)将自动调用
- * struts在初始化方法中,将自动的加载 classpath:struts.xml 文件 (src/config 两个源码目录都表示 类路径 classpath)
- -->
- <filter>
- <filter-name>struts2</filter-name>
- <filter-class>org.apache.struts2.dispatcher.ng.filter.StrutsPrepareAndExecuteFilter</filter-class>
- </filter>
- <filter-mapping>
- <filter-name>struts2</filter-name>
- <url-pattern>/*</url-pattern>
- <dispatcher>REQUEST</dispatcher>
- <dispatcher>FORWARD</dispatcher>
- </filter-mapping>
- <welcome-file-list>
- <welcome-file>index.jsp</welcome-file>
- </welcome-file-list>
- </web-app>
第四步:配置struts.xml,将WEB-INF下的jsp页面访问映射为Action访问路径
- <?xml version="1.0" encoding="UTF-8"?>
- <!DOCTYPE struts PUBLIC
- "-//Apache Software Foundation//DTD Struts Configuration 2.3//EN"
- "http://struts.apache.org/dtds/struts-2.3.dtd">
- <struts>
- <constant name="struts.devMode" value="true" />
- <constant name="struts.objectFactory" value="spring"/>
- <package name="basicstruts2" extends="struts-default">
- <!-- 需要进行权限控制的页面访问 -->
- <action name="page_*_*">
- <result type="dispatcher">/WEB-INF/pages/{1}/{2}.jsp</result>
- </action>
- </package>
- </struts>
第五步:配置spring 配置文件applicationContext.xml
数据源、LocalSessionFactoryBean、事务管理器、组件扫描、支持注解配置
- <?xml version="1.0" encoding="UTF-8"?>
- <beans xmlns="http://www.springframework.org/schema/beans"
- xmlns:xsi="http://www.w3.org/2001/XMLSchema-instance"
- xmlns:context="http://www.springframework.org/schema/context"
- xmlns:aop="http://www.springframework.org/schema/aop"
- xmlns:tx="http://www.springframework.org/schema/tx"
- xsi:schemaLocation="http://www.springframework.org/schema/beans
- http://www.springframework.org/schema/beans/spring-beans.xsd
- http://www.springframework.org/schema/context
- http://www.springframework.org/schema/context/spring-context.xsd
- http://www.springframework.org/schema/aop
- http://www.springframework.org/schema/aop/spring-aop.xsd
- http://www.springframework.org/schema/tx
- http://www.springframework.org/schema/tx/spring-tx.xsd">
- <!-- 公共配置文件,web.xml配置加载核心文件 -->
- <!-- 1 加载properties文件
- jdbcinfo.properties
- jdbc.driverClass=com.mysql.jdbc.Driver
- jdbc.jdbcUrl=jdbc:mysql://localhost:3306/bos1
- jdbc.user=user_bos
- jdbc.password=123
- -->
- <context:property-placeholder location="classpath:jdbcinfo.properties"/>
- <!-- 2数据源 -->
- <bean id="dataSource" class="com.mchange.v2.c3p0.ComboPooledDataSource" >
- <property name="driverClass" value="${jdbc.driverClass}"></property>
- <property name="jdbcUrl" value="${jdbc.jdbcUrl}"></property>
- <property name="user" value="${jdbc.user}"></property>
- <property name="password" value="${jdbc.password}"></property>
- </bean>
- <!-- 3 配置hibernate SessionFactory -->
- <bean id="sessionFactory" class="org.springframework.orm.hibernate3.LocalSessionFactoryBean">
- <!-- 3.1 配置数据源
- * <property name="属性名" ref="另一个bean引用">
- name 必须是对象的setter方法推断获得,setDataSource(...), 去掉set DataSource ,首字母小写 dataSource
- * ref 其他bean引用 <bean id=""> 可以任意,一般情况与上面属性名称相同。
- -->
- <property name="dataSource" ref="dataSource"></property>
- <!-- 3.2 配置hibernate其他属性
- * 在hibernate.cfg.xml 配置文件 “hibernate.dialect” 和 “dialect” 等效的
- * 在spring配置文件中,必须使用“hibernate.dialect”
- -->
- <!-- 2.2 其他属性设置 -->
- <property name="hibernateProperties">
- <props>
- <!-- 方言 -->
- <prop key="hibernate.dialect">org.hibernate.dialect.MySQL5Dialect</prop>
- <!-- 显示sql语句 -->
- <prop key="hibernate.show_sql">true</prop>
- <!-- 格式化sql语句 -->
- <prop key="hibernate.format_sql">true</prop>
- <prop key="hibernate.hbm2ddl.auto">update</prop>
- </props>
- </property>
- <!-- 3.3 加载映射文件
- mappingResources 加载资源,从src获取,必须确定指定的资源
- mappingLocations 建议“classpath:” 可以通配符【】
- classpath:com/itheima/*/User.hbm.xml ,目录任意
- classpath:com/itheima/domain/*.hbm.xml, 文件名任意
- mappingDirectoryLocations 设置目录
- classpath:com/itheima/domain/
- mappingJarLocations 从jar获得配置文
- -->
- <property name="mappingDirectoryLocations" value="classpath:cn/feibai/bos/domain"></property>
- </bean>
- <!-- 4 事务管理 -->
- <!-- 4.1 事务管理器,spring事务必须在事务管理器平台上工作
- * 在hibernate中事务需要session,session是从sessionFactory中获取的。
- -->
- <bean id="txManager" class="org.springframework.orm.hibernate3.HibernateTransactionManager">
- <property name="sessionFactory" ref="sessionFactory"></property>
- </bean>
- <!-- 组件扫描 -->
- <context:component-scan base-package="cn.feibai.bos"/>
- <!-- 引入注解解析器 -->
- <context:annotation-config/>
- <!-- 事务注解支持 -->
- <tx:annotation-driven transaction-manager="transactionManager"/>
- </beans>
3. 主页设计(easyUI)
在项目中引入jQuery Easy UI
- <!-- 导入jquery核心类库 -->
- <script type="text/javascript"
- src="${pageContext.request.contextPath }/js/jquery-1.8.3.js"></script>
- <!-- 导入easyui类库 -->
- <script type="text/javascript"
- src="${pageContext.request.contextPath }/js/easyui/jquery.easyui.min.js"></script>
- <!-- 导入默认主题CSS文件-->
- <link id="easyuiTheme" rel="stylesheet" type="text/css"
- href="${pageContext.request.contextPath }/js/easyui/themes/default/easyui.css">
- <!-- 导入图标CSS文件 -->
- <link rel="stylesheet" type="text/css"
- href="${pageContext.request.contextPath }/js/easyui/themes/icon.css">
- <!-- 导入国际化信息文件-->
- <script
- src="${pageContext.request.contextPath }/js/easyui/locale/easyui-lang-zh_CN.js"
- type="text/javascript"></script>
3.1 Layout使用---页面布局
*layout控件用于布局可以对 div标签使用或者body使用
*布局后内容分为 东西南北中 五个部分,只有center区域是必须的

- <%@ page language="java" contentType="text/html; charset=UTF-8" pageEncoding="UTF-8"%>
- <!DOCTYPE html PUBLIC "-//W3C//DTD HTML 4.01 Transitional//EN" "http://www.w3.org/TR/html4/loose.dtd">
- <html>
- <head>
- <meta http-equiv="Content-Type" content="text/html; charset=UTF-8">
- <title>layout页面布局控件使用</title>
- <!-- 引入easyui相关资源文件 -->
- <!-- 导入jquery核心类库 -->
- <script type="text/javascript"
- src="${pageContext.request.contextPath }/js/jquery-1.8.3.js"></script>
- <!-- 导入默认主题CSS文件 -->
- <link rel="stylesheet" type="text/css"
- href="${pageContext.request.contextPath }/js/easyui/themes/default/easyui.css">
- <!-- 导入图标CSS文件 -->
- <link rel="stylesheet" type="text/css"
- href="${pageContext.request.contextPath }/js/easyui/themes/icon.css">
- <link rel="stylesheet" type="text/css"
- href="${pageContext.request.contextPath }/js/easyui/ext/portal.css">
- <link rel="stylesheet" type="text/css"
- href="${pageContext.request.contextPath }/css/default.css">
- <!-- 导入easyui类库 -->
- <script type="text/javascript"
- src="${pageContext.request.contextPath }/js/easyui/jquery.easyui.min.js"></script>
- <script type="text/javascript"
- src="${pageContext.request.contextPath }/js/easyui/ext/jquery.portal.js"></script>
- <script type="text/javascript"
- src="${pageContext.request.contextPath }/js/easyui/ext/jquery.cookie.js"></script>
- <!-- 导入国际化信息文件 -->
- <script
- src="${pageContext.request.contextPath }/js/easyui/locale/easyui-lang-zh_CN.js"
- type="text/javascript"></script>
- </head>
- <body class="easyui-layout">
- <!-- 每个div是一个区域 -->
- <div title="XXX系统" data-options="region:'north'" style="height: 100px">北部区域</div>
- <div title="系统菜单" data-options="region:'west'" style="width: 200px">西部区域</div>
- <div data-options="region:'center'" >中部区域</div>
- <div data-options="region:'east'" style="width: 100px">东部区域</div>
- <div data-options="region:'south'" style="height: 50px">南部区域</div>
- </body>
- </html>
3.2 Accordion----折叠面板
*fit:true 属性可以让accordion 的div的大小,占满父类容器
*为每个折叠面板设置title属性指定显示标题
*iconCls 可以显示面板标题左侧的图标

- <body class="easyui-layout">
- <!-- 每个div是一个区域 -->
- <div title="XXX系统" data-options="region:'north'" style="height: 100px">北部区域</div>
- <div title="系统菜单" data-options="region:'west'" style="width: 200px">
- <!-- 西部区域内:折叠面板 -->
- <div id="aa" class="easyui-accordion" data-options="fit:true">
- <!-- 每个子div是一个面板 -->
- <div title="Title1" data-options="iconCls:'icon-save'" >
- 内容一
- </div>
- <div title="Title2" data-options="iconCls:'icon-reload'" >
- 内容二
- </div>
- <div title="Title3">
- 内容三
- </div>
- </div>
- </div>
- <div data-options="region:'center'" >中部区域</div>
- <div data-options="region:'east'" style="width: 100px">东部区域</div>
- <div data-options="region:'south'" style="height: 50px">南部区域</div>
- </body>
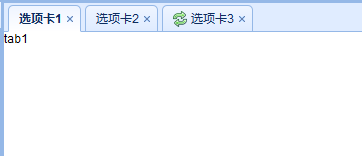
3.3 Tabs----选项卡面板
*通过设置closeable属性可以关闭选项卡
*fit:true 使选项卡适应父容器大小
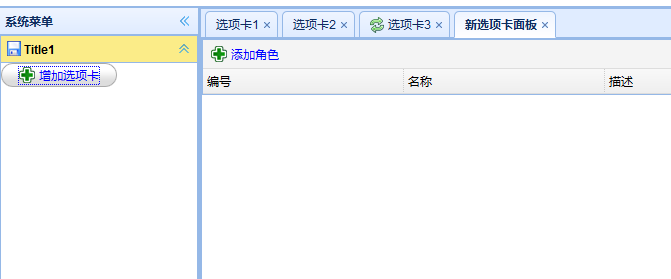
3.4 动态添加选项卡
*判断选项卡是否存在:$('#tt').tabs("exists","新选项卡面板")
*选中选项卡:$('#tt').tabs("select","新选项卡面板")
*添加选项卡:$('#tt').tabs('add',{选项卡属性:选项卡值});
*把一个jsp页面设置成选项卡新增选项卡内容:
src="page_admin_role"→<action name="page_*_*">
content:'<iframe src="page_admin_role" frameborder="0" width="100%" height="100%"></iframe>'
- <body class="easyui-layout">
- <!-- 每个div是一个区域 -->
- <div title="XXX系统" data-options="region:'north'" style="height: 100px">北部区域</div>
- <div title="系统菜单" data-options="region:'west'" style="width: 200px">
- <!-- 折叠面板 -->
- <div id="aa" class="easyui-accordion" data-options="fit:true">
- <!-- 每个子div是一个面板 -->
- <div title="Title1" data-options="iconCls:'icon-save'" >
- <!-- 动态增加选项卡按钮 -->
- <a id="btn" href="#" class="easyui-linkbutton" data-options="iconCls:'icon-add'">增加选项卡</a>
- <!-- 给按钮添加点击事件 -->
- <script type="text/javascript">
- $(function(){
- $("#btn").click(function(){
- //判断当前选项卡是否已经打开
- if($('#tt').tabs("exists","新选项卡面板")){
- //选中
- $('#tt').tabs("select","新选项卡面板");
- }else{
- // 添加一个选中状态的选项卡面板
- $('#tt').tabs('add',{
- title: '新选项卡面板',
- selected: true,
- closable:true,
- content:'<iframe src="page_admin_role" frameborder="0" width="100%" height="100%"></iframe>'
- });
- }
- });
- });
- </script>
- </div>
- <div title="Title2" data-options="iconCls:'icon-reload'" >
- 内容二
- </div>
- <div title="Title3">
- 内容三
- </div>
- </div>
- </div>
- <div data-options="region:'center'" >
- <!--中部区域内 选项卡 -->
- <div id="tt" class="easyui-tabs" data-options="fit:true">
- <div title="选项卡1" data-options="closable:true">
- tab1
- </div>
- <div title="选项卡2" data-options="closable:true" >
- tab2
- </div>
- <div title="选项卡3" data-options="iconCls:'icon-reload',closable:true">
- tab3
- </div>
- </div>
- </div>
- <div data-options="region:'east'" style="width: 100px">东部区域</div>
- <div data-options="region:'south'" style="height: 50px">南部区域</div>
- </body>
3.5 Ztree插件使用
官网:ztree.me
目录结构
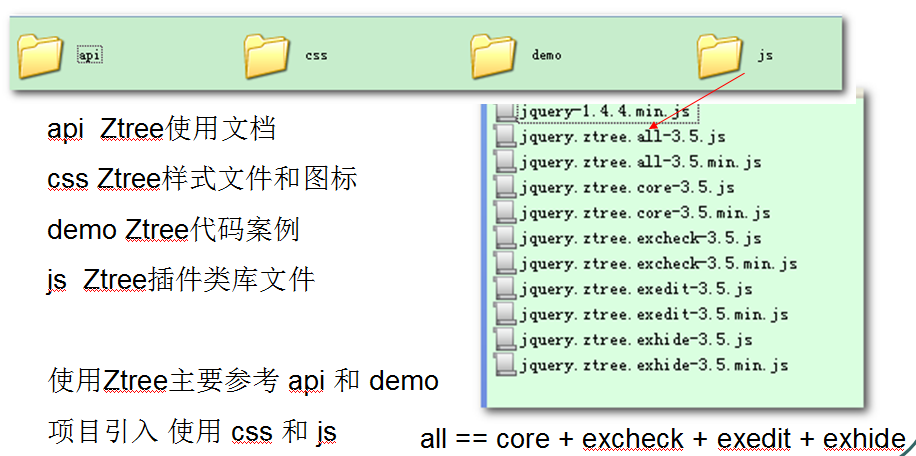
引入ztree
- <!-- 先引入 jquery的 js -->
- <script type="text/javascript"
- src="${pageContext.request.contextPath }/js/jquery-1.8.3.js“/>
- <!-- 引入ztree -->
- <script type="text/javascript" src="${pageContext.request.contextPath }/js/ztree/jquery.ztree.all-3.5.js“/>
- <!– 引入ztree样式文件-->
- <link rel="stylesheet" type="text/css" href="${pageContext.request.contextPath }/js/ztree/zTreeStyle.css"/>
步骤:
1.在显示树的地方写ul标签
<ul id="tree" class="ztree"></ul>
2.设置参数
var setting = {属性:值};
3.设置节点数据
var treeNodes = [{},{}..];
4.初始化树
$.fn.zTree.init($("#tree"), setting, treeNodes);
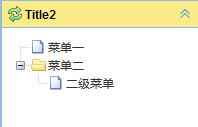
3.5.1 使用标准(StandardData)json数据构造ztree
- <!-- 导入ztree样式文件 -->
- <link rel="stylesheet" href="${pageContext.request.contextPath }/js/ztree/zTreeStyle.css" type="text/css">
- <!-- 导入ztree js文件 -->
- <script type="text/javascript" src="${pageContext.request.contextPath }/js/ztree/jquery.ztree.all-3.5.js"></script>
- ...
- <!-- 内容二内:点击加载ztree 在显示树的地方写ul标签-->
- <ul id="tree" class="ztree"></ul>
- <!-- 通过js编写setting对象-->
- <script type="text/javascript">
- $(function(){
- //使用StandardData构造Ztree
- //1.设置参数
- var setting = {};
- //2.设置节点数据
- var treeNodes = [
- {"name":"菜单一"},
- {"name":"菜单二","children":[{"name":"二级菜单"}]}
- ];
- //3.初始化树
- $.fn.zTree.init($("#tree"), setting, treeNodes);
- });
- </script>
- </div>
- <div title="Title3">
- 内容三
- </div>
- </div>
- </div>
3.5.2 使用简单(SimpleData)json数据构造ztree
区别:
1.data的simpleData参数设置为,enable: true 不使用json嵌套格式
2.节点数据不同: id 为本节点id / pId为父节点id / "pId"="0" 为根节点

- <div title="Title3">
- <!-- 内容三内:点击加载ztree 在显示树的地方写ul标签-->
- <ul id="tree2" class="ztree"></ul>
- <!-- 通过js编写setting对象-->
- <script type="text/javascript">
- $(function(){
- //使用SimpleData构造Ztree
- //1.设置参数,enable: true 不使用json嵌套格式
- var setting = {
- data: {
- simpleData: {
- enable: true,
- idKey: "id",
- pIdKey: "pId",
- rootPId: 0,
- }
- }
- };
- //2.设置节点数据
- var treeNodes = [
- {"id":"1","pId":"0","name":"菜单1"},
- {"id":"2","pId":"0","name":"菜单2"},
- {"id":"3","pId":"2","name":"2级菜单3"}
- ];
- //3.初始化树
- $.fn.zTree.init($("#tree2"), setting, treeNodes);
- });
- </script>
- </div>
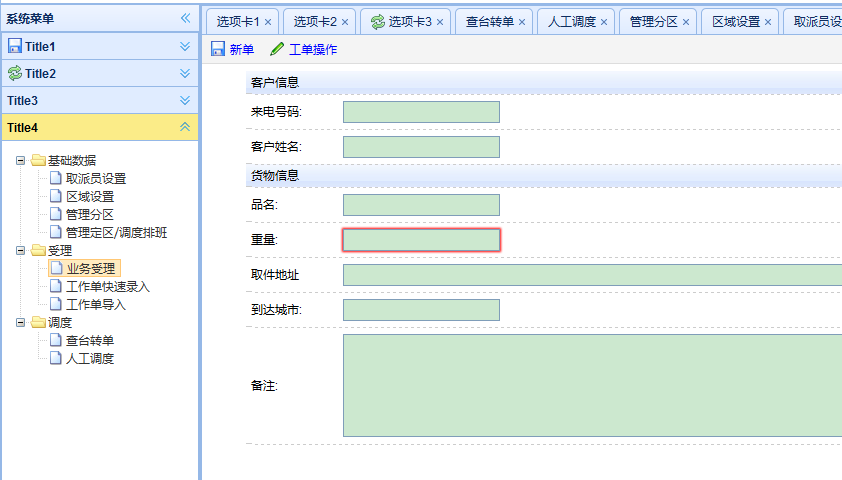
3.5.3 使用ajax加载远程json数据
*点击节点事件的回调Function 参数说明
event:标准的 js event 对象
treeId:对应 zTree 的 treeId
treeNode:被点击的节点 JSON 数据对象
- <div title="Title4">
- <!-- 内容四内:点击加载ztree 在显示树的地方写ul标签-->
- <ul id="tree3" class="ztree"></ul>
- <!-- 通过js编写setting对象-->
- <script type="text/javascript">
- $(function(){
- //使用ajax加载宣城json数据
- //1.设置点击事件的回调函数
- var setting = {
- data: {
- simpleData: {
- enable: true
- }
- },
- callback: {
- onClick:function(event,treeId,treeNode){
- //判断当前点击的选项page属性是否存在是否存在
- //例(有page):{ "id":"11", "pId":"0", "name":"基础数据"},
- //例(无page):{ "id":"112", "pId":"11", "name":"取派员设置", "page":"page_base_staff.action"},
- if(treeNode.page!=undefined){
- //有page就添加到右边的选项卡
- //判断当前选项卡是否已经打开存在
- if($('#tt').tabs("exists",treeNode.name)){
- //选中
- $('#tt').tabs("select",treeNode.name);
- }else{
- // 添加一个选中状态的选项卡面板
- $('#tt').tabs('add',{
- title:treeNode.name,
- closable:true,
- content:'<iframe src="'+treeNode.page+'" frameborder="0" width="100%" height="100%"></iframe>'
- });
- }
- }
- }
- }
- };
- //ajax请求
- var url="${pageContext.request.contextPath }/json/menu.json";
- $.post(url,{},function(data){
- //返回值data为节点数据直接初始化
- $.fn.zTree.init($("#tree3"), setting,data);
- });
- });
- </script>
- </div>
- </div>
- lt;/div>
4. 使用PowerDesigner设计数据库
*PowerDesigner 的 4 种模型文件
概念数据模型(CDM)
物理数据模型(PDM)
面向对象模型(OOM)
业务程序模型(BPM)
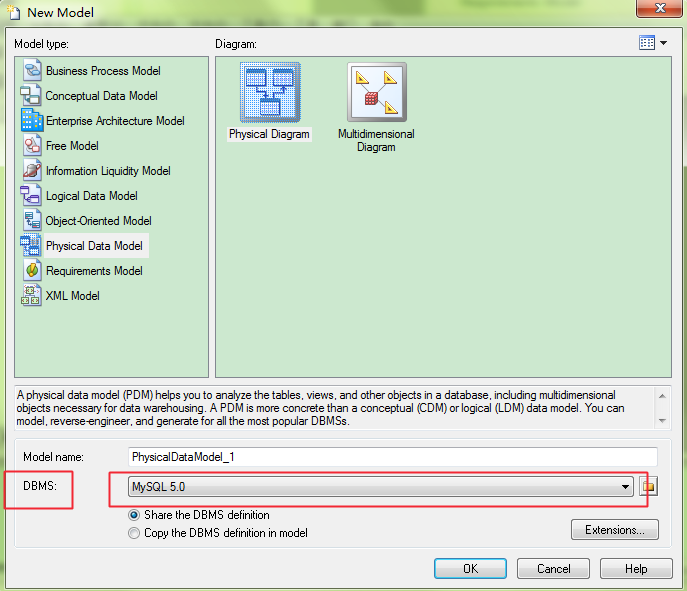
1.创建PDM模型工作空间
点击文件建立新模型或者右键工作空间创建PDM
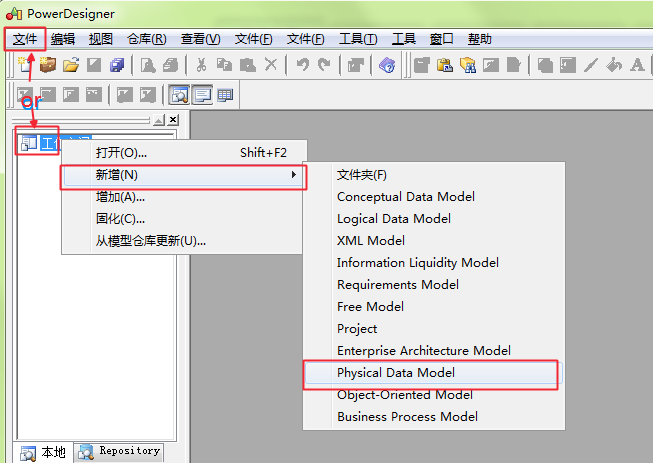
DBMS没有选项的话,点击右侧文件夹找安装目录下\Resource Files\DBMS ,就有选项了
2.创建表
右键PDM模型→新增→table
或拖拽右侧图形化界面的table图标

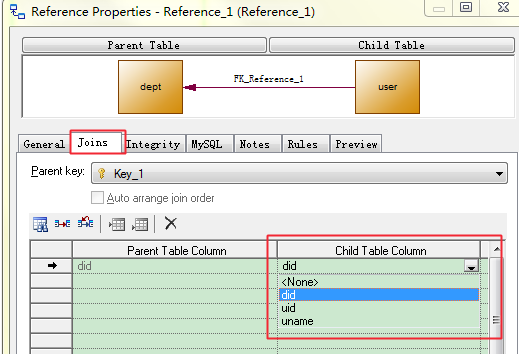
3建立外键
选择图形界面的Reference图标点击子表拖动虚线指向父表即可生成fk外键关系

双击中间的连线选择join可以编辑外键
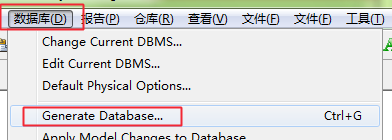
4生成sql文件:
选择数据库→Generate Database


 440
440

 被折叠的 条评论
为什么被折叠?
被折叠的 条评论
为什么被折叠?
 到【灌水乐园】发言


