


1. 业务受理部分需求分析
整个BOS项目分为:基础设置、取派、中转、路由、报表。
受理功能为整个取派的一部分
受理环节,是物流业务的开始,作为服务前端,客户通过电话、网络等多种方式进行委托,业务受理员通过与客户交流,获取客户的服务需求和具体委托信息,将服务指令输入我司服务系统。
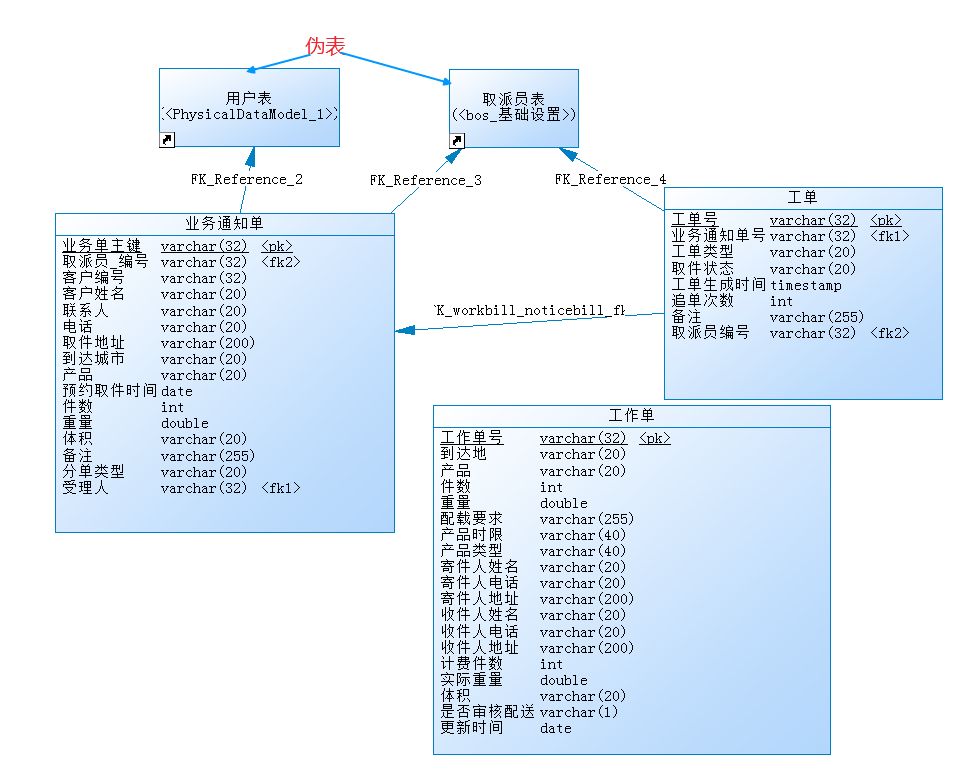
业务通知单:客户通过打电话方式进行物流委托,物流公司业务人员将委托信息录入到bos系统中------业务通知单
工单:业务人员将业务通知单信息录入到系统后,BOS系统会尝试根据客户的取件地址自动找到取派员,为取派员产生一个取货的任务-----工单
工作单:取派员将货物从客户住处取回物流公司,将货物的相关信息(寄件人信息、收件人信息)录入到bos系统中------工作单
2. 根据pdm导出sql脚本文件
3. 业务受理功能实现
3.1 在crm系统中扩展方法---根据手机号查询客户信息
注意:需要将CustomerService接口中扩展的方法复制到bos接口中
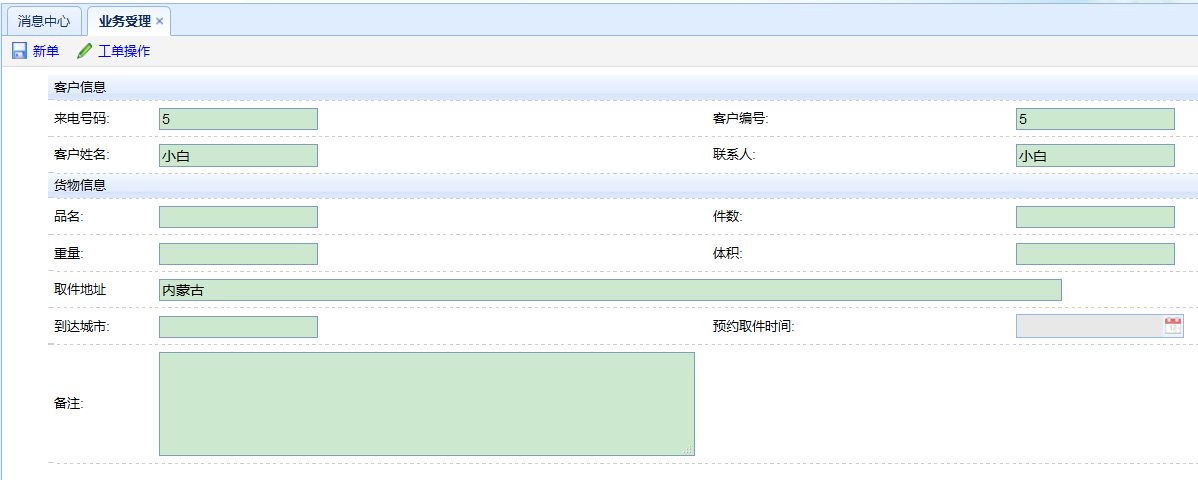
3.2 在业务受理页面调整
业务受理页面:
目的:通过电话号码字段触发丢失焦点发送ajax查询此手机号的相关用户信息回显到当前表单
为“来电号码”输入框绑定离焦事件
- <td>来电号码:</td>
- <td><input type="text" class="easyui-validatebox" name="telephone"
- required="true" />
- <script>
- $(function(){
- //为“来电号码”绑定离焦事件
- $("input[name=telephone]").blur(function(){
- //发送ajax请求,请求Action,在action中调用代理对象,通过代理对象远程调用crm
- var url = "${pageContext.request.contextPath}/noticebillAction_findCustomerByPhone.action";
- $.post(url,{"telephone":this.value},function(data){
- if(data != null){
- //将客户信息回显到相应的输入框中
- var id = data.id;
- var name = data.name;
- var address = data.address;
- $("input[name=customerId]").val(id);
- $("input[name=customerName]").val(name);
- $("input[name=delegater]").val(name);
- $("input[name=pickaddress]").val(address);
- }else{
- $("input[name=customerId]").val("");
- $("input[name=customerName]").val("");
- $("input[name=delegater]").val("");
- $("input[name=pickaddress]").val("");
- }
- });
- });
- });
- </script>
创建一个NoticebillAction,注入Customerservice代理对象,提供方法findCustomerByPhone
- //注入代理对象,调用crm服务
- @Resource
- private CustomerService customerService;
- /**
- * 根据手机号查询客户信息
- */
- public String findCustomerByPhone(){
- //调用crm服务
- Customer customer = customerService.findCustomerByPhone(model.getTelephone());
- this.writeObjectBean2Json(customer, new String[]{});
- return NONE;
- }
配置struts.xml
提交表单
- <script type="text/javascript">
- $(function(){
- $("body").css({visibility:"visible"});
- // 对save按钮条件 点击事件
- $('#save').click(function(){
- // 对form 进行校验
- if($('#noticebillForm').form('validate')){
- $('#noticebillForm').submit();
- }
- });
- });
- </script>
在action中接受参数,保存业务通知单
保存业务通知单:通过判断用户所关联的定区id 来进行自动分单或手动分单
- /**
- * 保存业务通知单
- */
- public String add(){
- noticebillService.save(model);
- return "toAddUI";
- }
Service代码:
- @Service
- @Transactional
- public class NoticebillServiceImpl implements INoticebillService{
- @Resource
- private INoticebillDao noticebillDao;
- //注入代理对象
- @Resource
- private CustomerService customerService;
- @Resource
- private IDecidedzoneDao decidedzoneDao;
- @Resource
- private IWorkbillDao workbillDao;
- public void save(Noticebill model) {
- User user = BOSContext.getLoginUser();
- model.setUser(user);//当前登录用户
- noticebillDao.save(model);//持久对象
- //自动分单----为当前客户找到一个取派员,取件
- //取件地址
- String pickaddress = model.getPickaddress();
- //根据取件地址获取定区ID
- String decidedzoneId = customerService.findDecidedzoneidByPickAddress(pickaddress);
- if(decidedzoneId != null){
- model.setOrdertype("自动");
- //匹配成功,可以自动分单
- Decidedzone decidedzone = decidedzoneDao.findById(decidedzoneId);
- Staff staff = decidedzone.getStaff();//获得定区的负责人
- model.setStaff(staff);//建立业务通知单和取派员关系
- //为当前匹配到取派员产生一个工单
- Workbill workbill = new Workbill();
- workbill.setNoticebill(model);//关联业务通知单
- workbill.setStaff(staff);//关联取派员
- workbill.setType("新");//类型
- workbill.setPickstate("未取件");//取件状态
- workbill.setBuildtime(new Timestamp(System.currentTimeMillis()));//系统时间
- workbill.setAttachbilltimes(0);//追单次数
- workbill.setRemark(model.getRemark());//备注
- //保存工单
- workbillDao.save(workbill);
- //调用短信接口向取派员发送短信
- }else{
- //匹配失败,转入人工分单
- model.setOrdertype("人工");
- }
- }
- }
4. 数据表格编辑功能使用
使用datagrid的[列属性]开启编辑功能
editor
属性值类型:string,object
详情:
指明编辑类型。当字符串指明编辑类型的时候,对象包含2个属性:
type:字符串,该编辑类型可以使用的类型有:text,textarea,checkbox,numberbox,validatebox,datebox,combobox,combotree。
options:对象,object, 该编辑器属性对应于编辑类型。
开始编辑和结束编辑[方法]
beginEdit 参数:index 开始编辑行。
endEdit 参数:index 结束编辑行。
插入一行数据
insertRow
详情:
插入一个新行,参数包括一下属性:
index:要插入的行索引,如果该索引值未定义,则追加新行。
row:行数据。
获得行索引
getRowIndex
参数row
返回指定行的索引号,该行的参数可以是一行记录或一个ID字段值。
删除行
deleteRow index 删除行。
结束编辑状态时触发的[事件]
onAfterEdit
参数:rowIndex,rowData, changes
详情:
在用户完成编辑一行的时候触发,参数包括:
rowIndex:编辑行的索引,索引从0开始。
rowData:对应于完成编辑的行的记录。
changes:更改后的字段(键)/值对。
示例
- <script type="text/javascript">
- $(function() {
- var index = -1;
- $("#grid").datagrid({
- columns : [ [ {
- field : 'id',
- checkbox : true,
- }, {
- field : 'name',
- title : '姓名',
- width : 120,
- align : 'center',
- editor : {
- type : 'validatebox',
- options : {
- required : true
- }
- }
- }, {
- field : 'telephone',
- title : '手机号',
- width : 120,
- align : 'center',
- editor : {
- type : 'validatebox',
- options : {
- required : true
- }
- }
- } ] ],
- //事件:结束编辑状态时触发
- onAfterEdit:function(rowIndex, rowData, changes){
- //发送ajax请求,将数据提交到服务端修改数据库
- },
- url : '${pageContext.request.contextPath}/json/staff.json',
- toolbar : [ {
- id : 'button-add',
- text : '增加一行',
- iconCls : 'icon-add',
- handler : function(){
- $("#grid").datagrid("insertRow",{//插入一行
- index:0,//在第一行插入
- row:{}//空行
- });
- index = 0;
- //开启第一行的编辑状态
- $("#grid").datagrid("beginEdit",index);//开启第一行编辑状态
- }
- }, //按钮
- {
- id : 'button-save',
- text : '保存',
- iconCls : 'icon-save',
- handler : function(){
- //结束编辑状态
- $("#grid").datagrid("endEdit",index);//开启第一行编辑状态
- }
- },
- {
- id : 'button-eidt',
- text : '编辑',
- iconCls : 'icon-save',
- handler : function(){
- var rows = $("#grid").datagrid("getSelections");
- if(rows.length == 1){
- //获得当前选中行的索引
- index = $("#grid").datagrid("getRowIndex",rows[0]);
- $("#grid").datagrid("beginEdit",index);
- }
- }
- }
- ]
- });
- });
- </script>
- </head>
- <body>
- <table id="grid"></table>
- </body>
5. 实现工作单快速录入功能(基于datagrid编辑)
页面:

按钮
- //行数全局变量
- var editIndex ;
- //添加按钮
- function doAdd(){
- //当填完一行数据(一个工作单)后不点保存直接点击下增加一行
- if(editIndex != undefined){
- //根据全局变量完成上次的编辑
- $("#grid").datagrid('endEdit',editIndex);
- }
- //新增一行
- if(editIndex==undefined){
- //alert("快速添加电子单...");
- $("#grid").datagrid('insertRow',{
- index : 0,//第一行
- row : {}//添加一排空行
- });
- //开启新增行的编辑
- $("#grid").datagrid('beginEdit',0);
- editIndex = 0;
- }
- }
- //保存按钮
- function doSave(){
- //结束编辑
- $("#grid").datagrid('endEdit',editIndex );
- }
- function doCancel(){
- if(editIndex!=undefined){
- $("#grid").datagrid('cancelEdit',editIndex);
- if($('#grid').datagrid('getRows')[editIndex].id == undefined){
- $("#grid").datagrid('deleteRow',editIndex);
- }
- editIndex = undefined;
- }
- }
修改datagrid的事件onAfterEdit
- // 收派标准数据表格
- $('#grid').datagrid( {
- iconCls : 'icon-forward',
- fit : true,
- border : true,
- rownumbers : true,
- striped : true,
- pageList: [30,50,100],
- pagination : true,
- toolbar : toolbar,
- url : "",
- idField : 'id',
- columns : columns,
- onDblClickRow : doDblClickRow,
- onAfterEdit : function(rowIndex, rowData, changes){
- console.info(rowData);
- editIndex = undefined;
- //发送ajax请求保存工作单
- var url="${pageContext.request.contextPath}/workordermanageAction_quickAdd";
- $.post(url,rowData,function(data){
- //alert(data);
- if(data=='1'){
- $.messager.alert("提示","添加成功","info");
- }else{
- $.messager.alert("错误提示","添加失败","warning");
- }
- });
- }
- });
创建WorkordermanageAction
- /**
- * ajax 工作单快速添加
- * @return
- * @throws IOException
- */
- public String quickAdd() throws IOException{
- // 添加更新时间
- this.getModel().setUpdatetime(new Date());
- String flag="0";
- try {
- workordermanageService.quickAdd(this.getModel());
- } catch (Exception e) {
- flag= "1";
- e.printStackTrace();
- }
- //相应通知
- ServletActionContext.getResponse().setContentType("text/html;charset=utf-8");
- ServletActionContext.getResponse().getWriter().print(flag);
- return NONE;
- }
配置struts.xml
1. 业务受理部分需求分析
整个BOS项目分为:基础设置、取派、中转、路由、报表。
受理功能为整个取派的一部分
受理环节,是物流业务的开始,作为服务前端,客户通过电话、网络等多种方式进行委托,业务受理员通过与客户交流,获取客户的服务需求和具体委托信息,将服务指令输入我司服务系统。
业务通知单:客户通过打电话方式进行物流委托,物流公司业务人员将委托信息录入到bos系统中------业务通知单
工单:业务人员将业务通知单信息录入到系统后,BOS系统会尝试根据客户的取件地址自动找到取派员,为取派员产生一个取货的任务-----工单
工作单:取派员将货物从客户住处取回物流公司,将货物的相关信息(寄件人信息、收件人信息)录入到bos系统中------工作单
2. 根据pdm导出sql脚本文件
3. 业务受理功能实现
3.1 在crm系统中扩展方法---根据手机号查询客户信息
注意:需要将CustomerService接口中扩展的方法复制到bos接口中
3.2 在业务受理页面调整
业务受理页面:
目的:通过电话号码字段触发丢失焦点发送ajax查询此手机号的相关用户信息回显到当前表单
为“来电号码”输入框绑定离焦事件
- <td>来电号码:</td>
- <td><input type="text" class="easyui-validatebox" name="telephone"
- required="true" />
- <script>
- $(function(){
- //为“来电号码”绑定离焦事件
- $("input[name=telephone]").blur(function(){
- //发送ajax请求,请求Action,在action中调用代理对象,通过代理对象远程调用crm
- var url = "${pageContext.request.contextPath}/noticebillAction_findCustomerByPhone.action";
- $.post(url,{"telephone":this.value},function(data){
- if(data != null){
- //将客户信息回显到相应的输入框中
- var id = data.id;
- var name = data.name;
- var address = data.address;
- $("input[name=customerId]").val(id);
- $("input[name=customerName]").val(name);
- $("input[name=delegater]").val(name);
- $("input[name=pickaddress]").val(address);
- }else{
- $("input[name=customerId]").val("");
- $("input[name=customerName]").val("");
- $("input[name=delegater]").val("");
- $("input[name=pickaddress]").val("");
- }
- });
- });
- });
- </script>
创建一个NoticebillAction,注入Customerservice代理对象,提供方法findCustomerByPhone
- //注入代理对象,调用crm服务
- @Resource
- private CustomerService customerService;
- /**
- * 根据手机号查询客户信息
- */
- public String findCustomerByPhone(){
- //调用crm服务
- Customer customer = customerService.findCustomerByPhone(model.getTelephone());
- this.writeObjectBean2Json(customer, new String[]{});
- return NONE;
- }
配置struts.xml
提交表单
- <script type="text/javascript">
- $(function(){
- $("body").css({visibility:"visible"});
- // 对save按钮条件 点击事件
- $('#save').click(function(){
- // 对form 进行校验
- if($('#noticebillForm').form('validate')){
- $('#noticebillForm').submit();
- }
- });
- });
- </script>
在action中接受参数,保存业务通知单
保存业务通知单:通过判断用户所关联的定区id 来进行自动分单或手动分单
- /**
- * 保存业务通知单
- */
- public String add(){
- noticebillService.save(model);
- return "toAddUI";
- }
Service代码:
- @Service
- @Transactional
- public class NoticebillServiceImpl implements INoticebillService{
- @Resource
- private INoticebillDao noticebillDao;
- //注入代理对象
- @Resource
- private CustomerService customerService;
- @Resource
- private IDecidedzoneDao decidedzoneDao;
- @Resource
- private IWorkbillDao workbillDao;
- public void save(Noticebill model) {
- User user = BOSContext.getLoginUser();
- model.setUser(user);//当前登录用户
- noticebillDao.save(model);//持久对象
- //自动分单----为当前客户找到一个取派员,取件
- //取件地址
- String pickaddress = model.getPickaddress();
- //根据取件地址获取定区ID
- String decidedzoneId = customerService.findDecidedzoneidByPickAddress(pickaddress);
- if(decidedzoneId != null){
- model.setOrdertype("自动");
- //匹配成功,可以自动分单
- Decidedzone decidedzone = decidedzoneDao.findById(decidedzoneId);
- Staff staff = decidedzone.getStaff();//获得定区的负责人
- model.setStaff(staff);//建立业务通知单和取派员关系
- //为当前匹配到取派员产生一个工单
- Workbill workbill = new Workbill();
- workbill.setNoticebill(model);//关联业务通知单
- workbill.setStaff(staff);//关联取派员
- workbill.setType("新");//类型
- workbill.setPickstate("未取件");//取件状态
- workbill.setBuildtime(new Timestamp(System.currentTimeMillis()));//系统时间
- workbill.setAttachbilltimes(0);//追单次数
- workbill.setRemark(model.getRemark());//备注
- //保存工单
- workbillDao.save(workbill);
- //调用短信接口向取派员发送短信
- }else{
- //匹配失败,转入人工分单
- model.setOrdertype("人工");
- }
- }
- }
4. 数据表格编辑功能使用
使用datagrid的[列属性]开启编辑功能
editor
属性值类型:string,object
详情:
指明编辑类型。当字符串指明编辑类型的时候,对象包含2个属性:
type:字符串,该编辑类型可以使用的类型有:text,textarea,checkbox,numberbox,validatebox,datebox,combobox,combotree。
options:对象,object, 该编辑器属性对应于编辑类型。
开始编辑和结束编辑[方法]
beginEdit 参数:index 开始编辑行。
endEdit 参数:index 结束编辑行。
插入一行数据
insertRow
详情:
插入一个新行,参数包括一下属性:
index:要插入的行索引,如果该索引值未定义,则追加新行。
row:行数据。
获得行索引
getRowIndex
参数row
返回指定行的索引号,该行的参数可以是一行记录或一个ID字段值。
删除行
deleteRow index 删除行。
结束编辑状态时触发的[事件]
onAfterEdit
参数:rowIndex,rowData, changes
详情:
在用户完成编辑一行的时候触发,参数包括:
rowIndex:编辑行的索引,索引从0开始。
rowData:对应于完成编辑的行的记录。
changes:更改后的字段(键)/值对。
示例
- <script type="text/javascript">
- $(function() {
- var index = -1;
- $("#grid").datagrid({
- columns : [ [ {
- field : 'id',
- checkbox : true,
- }, {
- field : 'name',
- title : '姓名',
- width : 120,
- align : 'center',
- editor : {
- type : 'validatebox',
- options : {
- required : true
- }
- }
- }, {
- field : 'telephone',
- title : '手机号',
- width : 120,
- align : 'center',
- editor : {
- type : 'validatebox',
- options : {
- required : true
- }
- }
- } ] ],
- //事件:结束编辑状态时触发
- onAfterEdit:function(rowIndex, rowData, changes){
- //发送ajax请求,将数据提交到服务端修改数据库
- },
- url : '${pageContext.request.contextPath}/json/staff.json',
- toolbar : [ {
- id : 'button-add',
- text : '增加一行',
- iconCls : 'icon-add',
- handler : function(){
- $("#grid").datagrid("insertRow",{//插入一行
- index:0,//在第一行插入
- row:{}//空行
- });
- index = 0;
- //开启第一行的编辑状态
- $("#grid").datagrid("beginEdit",index);//开启第一行编辑状态
- }
- }, //按钮
- {
- id : 'button-save',
- text : '保存',
- iconCls : 'icon-save',
- handler : function(){
- //结束编辑状态
- $("#grid").datagrid("endEdit",index);//开启第一行编辑状态
- }
- },
- {
- id : 'button-eidt',
- text : '编辑',
- iconCls : 'icon-save',
- handler : function(){
- var rows = $("#grid").datagrid("getSelections");
- if(rows.length == 1){
- //获得当前选中行的索引
- index = $("#grid").datagrid("getRowIndex",rows[0]);
- $("#grid").datagrid("beginEdit",index);
- }
- }
- }
- ]
- });
- });
- </script>
- </head>
- <body>
- <table id="grid"></table>
- </body>
5. 实现工作单快速录入功能(基于datagrid编辑)
页面:
按钮
- //行数全局变量
- var editIndex ;
- //添加按钮
- function doAdd(){
- //当填完一行数据(一个工作单)后不点保存直接点击下增加一行
- if(editIndex != undefined){
- //根据全局变量完成上次的编辑
- $("#grid").datagrid('endEdit',editIndex);
- }
- //新增一行
- if(editIndex==undefined){
- //alert("快速添加电子单...");
- $("#grid").datagrid('insertRow',{
- index : 0,//第一行
- row : {}//添加一排空行
- });
- //开启新增行的编辑
- $("#grid").datagrid('beginEdit',0);
- editIndex = 0;
- }
- }
- //保存按钮
- function doSave(){
- //结束编辑
- $("#grid").datagrid('endEdit',editIndex );
- }
- function doCancel(){
- if(editIndex!=undefined){
- $("#grid").datagrid('cancelEdit',editIndex);
- if($('#grid').datagrid('getRows')[editIndex].id == undefined){
- $("#grid").datagrid('deleteRow',editIndex);
- }
- editIndex = undefined;
- }
- }
修改datagrid的事件onAfterEdit
- // 收派标准数据表格
- $('#grid').datagrid( {
- iconCls : 'icon-forward',
- fit : true,
- border : true,
- rownumbers : true,
- striped : true,
- pageList: [30,50,100],
- pagination : true,
- toolbar : toolbar,
- url : "",
- idField : 'id',
- columns : columns,
- onDblClickRow : doDblClickRow,
- onAfterEdit : function(rowIndex, rowData, changes){
- console.info(rowData);
- editIndex = undefined;
- //发送ajax请求保存工作单
- var url="${pageContext.request.contextPath}/workordermanageAction_quickAdd";
- $.post(url,rowData,function(data){
- //alert(data);
- if(data=='1'){
- $.messager.alert("提示","添加成功","info");
- }else{
- $.messager.alert("错误提示","添加失败","warning");
- }
- });
- }
- });
创建WorkordermanageAction
- /**
- * ajax 工作单快速添加
- * @return
- * @throws IOException
- */
- public String quickAdd() throws IOException{
- // 添加更新时间
- this.getModel().setUpdatetime(new Date());
- String flag="0";
- try {
- workordermanageService.quickAdd(this.getModel());
- } catch (Exception e) {
- flag= "1";
- e.printStackTrace();
- }
- //相应通知
- ServletActionContext.getResponse().setContentType("text/html;charset=utf-8");
- ServletActionContext.getResponse().getWriter().print(flag);
- return NONE;
- }
配置struts.xml


 1797
1797


 被折叠的 条评论
为什么被折叠?
被折叠的 条评论
为什么被折叠?
 到【灌水乐园】发言


