


解决办法:
执行:yum upgrade device-mapper-libs
yum -y install avahi
/etc/init.d/messagebus restart
/etc/init.d/avahi-daemon restart
/etc/init.d/libvirtd restart
QEMU是一款高效而实用的模拟器及虚拟机监管器,本系列博客试图从最基本的安装使用开始,逐层深入地介绍QEMU。本篇文章从QEMU最基础的知识讲起,介绍了QEMU的安装使用、系统模拟的基本原理以及如何利用QEMU来创建和管理虚拟机。
一、QEMU简介
QEMU是一款开源的模拟器及虚拟机监管器(Virtual Machine Monitor, VMM)。QEMU主要提供两种功能给用户使用。一是作为用户态模拟器,利用动态代码翻译机制来执行不同于主机架构的代码。二是作为虚拟机监管器,模拟全系统,利用其他VMM(Xen, KVM, etc)来使用硬件提供的虚拟化支持,创建接近于主机性能的虚拟机。
用户可以通过不同Linux发行版所带有的软件包管理器来安装QEMU。如在Debian系列的发行版上可以使用下面的命令来安装:
sudo apt-get install qemu
或者在红帽系列的发行版上使用如下命令安装:
sudo yum install qemu -y
除此之外,也可以选择从源码安装。
获取QEMU源码
可以从QEMU官网上下载QEMU源码的tar包,以命令行下载2.0版本的QEMU为例:
-
$wget http://wiki.qemu-project.org/download/qemu-2.0.0.tar.bz2 -
$tar xjvf qemu-2.0.0.tar.bz2
如果需要参与到QEMU的开发中,最好使用Git获取源码:
$git clone git://git.qemu-project.org/qemu.git
编译及安装
获取源码后,可以根据需求来配置和编译QEMU。
-
$cd qemu-2.0.0 //如果使用的是git下载的源码,执行cd qemu -
$./configure --enable-kvm --enable-debug --enable-vnc --enable-werror --target-list="x86_64-softmmu" -
$make -j8 -
$sudo make install
configure脚本用于生成Makefile,其选项可以用./configure --help查看。这里使用到的选项含义如下:
-
--enable-kvm:编译KVM模块,使QEMU可以利用KVM来访问硬件提供的虚拟化服务。 -
--enable-vnc:启用VNC。 -
--enalbe-werror:编译时,将所有的警告当作错误处理。 -
--target-list:选择目标机器的架构。默认是将所有的架构都编译,但为了更快的完成编译,指定需要的架构即可。
二、基本原理
QEMU作为系统模拟器时,会模拟出一台能够独立运行操作系统的虚拟机。如下图所示,每个虚拟机对应主机(Host)中的一个QEMU进程,而虚拟机的vCPU对应QEMU进程的一个线程。
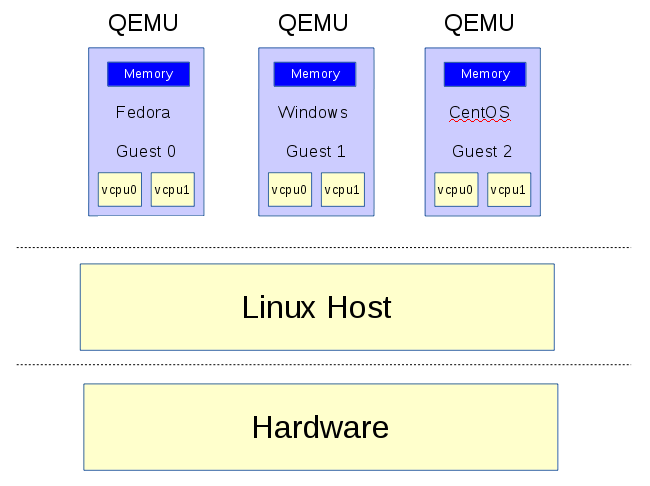
系统虚拟化最主要是虚拟出CPU、内存及I/O设备。虚拟出的CPU称之为vCPU,QEMU为了提升效率,借用KVM、XEN等虚拟化技术,直接利用硬件对虚拟化的支持,在主机上安全地运行虚拟机代码(需要硬件支持)。虚拟机vCPU调用KVM的接口来执行任务的流程如下(代码源自QEMU开发者Stefan的技术博客):
-
open("/dev/kvm") -
ioctl(KVM_CREATE_VM) -
ioctl(KVM_CREATE_VCPU) -
for (;;) { -
ioctl(KVM_RUN) -
switch (exit_reason) { -
case KVM_EXIT_IO: /* ... */ -
case KVM_EXIT_HLT: /* ... */ -
} -
}
QEMU发起ioctrl来调用KVM接口,KVM则利用硬件扩展直接将虚拟机代码运行于主机之上,一旦vCPU需要操作设备寄存器,vCPU将会停止并退回到QEMU,QEMU去模拟出操作结果。
虚拟机内存会被映射到QEMU的进程地址空间,在启动时分配。在虚拟机看来,QEMU所分配的主机上的虚拟地址空间为虚拟机的物理地址空间。
QEMU在主机用户态模拟虚拟机的硬件设备,vCPU对硬件的操作结果会在用户态进行模拟,如虚拟机需要将数据写入硬盘,实际结果是将数据写入到了主机中的一个镜像文件中。
三、创建及使用虚拟机
命令行创建及启动虚拟机
成功安装QEMU之后便可创建自己的虚拟机。具体步骤如下:
1, 使用qemu-img创建虚拟机镜像。虚拟机镜像用来模拟虚拟机的硬盘,在启动虚拟机之前需要创建镜像文件。
-
[kelvin@kelvin tmp]$ qemu-img create -f qcow2 fedora.img 10G -
Formatting 'fedora.img', fmt=qcow2 size=10737418240 encryption=off cluster_size=65536 lazy_refcounts=off -
[kelvin@kelvin tmp]$ ls -
fedora.img
-f选项用于指定镜像的格式,qcow2格式是QEMU最常用的镜像格式,采用写时复制技术来优化性能。fedora.img是镜像文件的名字,10G是镜像文件大小。镜像文件创建完成后,可使用qemu-system-x86来启动x86架构的虚拟机:
qemu-system-x86_64 fedora.img
此时会弹出一个窗口来作为虚拟机的显示器,显示内容如下:

因为fedora.img中并未给虚拟机安装操作系统,所以会提示“No bootable device”,无可启动设备。
2, 准备操作系统镜像。
可以从不同Linux发行版的官方网站上获取安装镜像,以fedora20为例:
[kelvin@kelvin tmp]$ wget http://ftp6.sjtu.edu.cn/fedora/linux/releases/20/Live/x86_64/Fedora-Live-Desktop-x86_64-20-1.iso
3, 检查KVM是否可用。
QEMU使用KVM来提升虚拟机性能,如果不启用KVM会导致性能损失。要使用KVM,首先要检查硬件是否有虚拟化支持:
[kelvin@kelvin ~]$ grep -E 'vmx|svm' /proc/cpuinfo
如果有输出则表示硬件有虚拟化支持。其次要检查kvm模块是否已经加载:
-
[kelvin@kelvin ~]$ lsmod | grep kvm -
kvm_intel 142999 0 -
kvm 444314 1 kvm_intel
如果kvm_intel/kvm_amd、kvm模块被显示出来,则kvm模块已经加载。最后要确保qemu在编译的时候使能了KVM,即在执行configure脚本的时候加入了–enable-kvm选项。
4, 启动虚拟机安装操作系统。
执行下面的命令启动带有cdrom的虚拟机:
[kelvin@kelvin tmp]$ qemu-system-x86_64 -m 2048 -enable-kvm fedora.img -cdrom ./Fedora-Live-Desktop-x86_64-20-1.iso
-m 指定虚拟机内存大小,默认单位是MB, -enable-kvm使用KVM进行加速,-cdrom添加fedora的安装镜像。可在弹出的窗口中操作虚拟机,安装操作系统,安装完成后重起虚拟机便会从硬盘(fedora.img)启动。之后再启动虚拟机只需要执行:
[kelvin@kelvin tmp]$ qemu-system-x86_64 -m 2048 -enable-kvm fedora.img
即可。
图形界面创建及启动虚拟机
命令行启动虚拟机比较繁琐,适合开发者,但对于普通用户来说,采用图形界面管理虚拟机则更为方便。采用图形界面管理QEMU虚拟机需要安装virt-manager,红帽系列的发行版只需要执行命令:
$sudo yum install virt-manager -y
安装完成后用root用户启动virt-manager:
-
$su - -
#virt-manager
启动后的界面如下图所示:

点击左上角电脑图标即可创建虚拟机。按照步骤操作即可完成对虚拟机的创建。
Failed to connect to the hypervisor
Contents
[hide]
Failed to connect to the hypervisor
There are lots of errors that can occur while connecting to the server (when running virsh for example)
No connection driver available
Symptom
When running a command, the following error (or similar) appears:
$ virsh -c <uri> list
error: no connection driver available for No connection for URI <uri>
error: failed to connect to the hypervisor
Cause
This can happen when libvirt is compiled from sources. The error means there is no driver to use with the specified URI (e.g. "Xen" for "xen://server/")
Investigation
Check the last part of configure ('./configure' or './autogen') output, you should see something like this:
configure: Drivers
configure:
configure: <driver>: yes
For example talking about Xen:
configure: Drivers
configure:
configure:     Xen: yes
If however you see "<driver>: no" (e.g. "Xen:no"), that means configure failed to find all the tools/libraries necessary to implement this support or there was "--without-<driver>" parameter specified on the command line.
Solution
Do not specify "--without-<driver>" on the command line of the configuration script and make sure there are all development libraries installed as well, then configure the sources again.
Cannot read CA certificate
Symptom
When running a command, the following error (or similar) appears:
$ virsh -c <uri> list
error: Cannot read CA certificate '/etc/pki/CA/cacert.pem': No such file or directory
error: failed to connect to the hypervisor
Investigation
This error can be caused by various things, for some of them, the error message is little misleading:
- specified URI is wrong (missing one '/' -- e.g. 'qemu://system')
- connection is not configured
Solution
specified URI is wrong
In the case of specifying 'qemu://system' or 'qemu://session' as a connection URI, virsh is trying to connect to hostname 'system' or 'session' respectively because when hostname is specified, the transport for qemu defaults to 'tls' and thus the need for a certificates. Use three slashes in this case.
connection is not configured
You specified correct URI (e.g. 'qemu[+tls]://server/system') but the certificates were not set up properly on your machine. There is a great In depth guide to configuring TLS. The solution is most probably there.
Permission denied
Symptom
When running a command, the following error (or similar) appears:
$ virsh -c qemu:///system list
error: Failed to connect socket to '/var/run/libvirt/libvirt-sock': Permission denied
error: failed to connect to the hypervisor
Investigation
You are trying to connect using unix socket. The connection to "qemu" without any hostname specified is by default using unix sockets. If there is no error running this command as root it's probably just misconfigured.
Solution
If you want to be able to connect as non-root user using unix sockets, configure following options in '/etc/libvirt/libvirtd.conf' accordingly:
unix_sock_group = <group>
unix_sock_ro_perms = <perms>
unix_sock_rw_perms = <perms>
Other errors
These other errors are even simpler to solve than those mentioned before, so here is a list of error/solutions:
unable to connect to server at 'server:port': Connection refused
The daemon is not running on the server or it's configured not to listen (configuration option 'listen_tcp' or 'listen_tls').
End of file while reading data: nc: using stream socket: Input/output error
If you specified 'ssh' transport, the daemon is probably not running on the server.
End of file while reading data: : Input/output error
If you are using ssh transport, for example, by executing
virsh --connect qemu+ssh://username@remove.host.com/system list
Probably the user you are using to access the server does not belong to the proper group, such as 'libvirtd' for Ubuntu servers. Try adding the user to the proper group on server and connect again. For example, below is to be run on Ubuntu servers.
sudo usermod -G libvirtd -a username
Refer to SSHSetup for setup about other distributions.
4.配置安全策略,关闭apparmor
-
sudo /etc/init.d/apparmor teardown -
sudo update-rc.d -f apparmor remove
Libvirt在做某些事情的时候会被Apparmor阻挡,因此为了确保Libvirt始终有必须的权限,必须禁用apparmor。(但从网络安全角度是不建议这么做)
使用之前6里的方法发现vnc连不上了,检查配置没问题,对比安装的软件包,发现6上多装了这两个软件包:
gtk-vnc-0.3.10-3.el6.x86_64
gtk-vnc-python-0.3.10-3.el6.x86_64
但是安装后依旧连不上,要么连不上要么断开,提示协议错误,应该不是软件包的问题
因为是用virt-manager创建的虚机,就打开vm对比,執行以下步驟:
1.virt-manager中的edit--》preference--》New VM--》Graphics type選擇VNC
2.发现video vga里变成了qxl,调回vga,再次连接,ok,问题解决。


 1802
1802

 被折叠的 条评论
为什么被折叠?
被折叠的 条评论
为什么被折叠?
 到【灌水乐园】发言


