


1. ElasticSearch
1.1. 基本概述
ElasticSearch是一个基于Lucene的搜索服务器。它提供了一个分布式多用户能力的全文搜索引擎,基于RESTful web接口。Elasticsearch是用Java开发的,并作为Apache许可条款下的开放源码发布,是当前流行的企业级搜索引擎。设计用于云计算中,能够达到实时搜索,稳定,可靠,快速,安装使用方便。
下载地址:https://www.elastic.co/downloads/
参考文档:
https://www.elastic.co/guide/cn/elasticsearch/guide/current/cluster-health.html
http://blog.csdn.net/gamay/article/details/72914190
https://es.yemengying.com/4/4.4/4.4.2.html
Elasticsearch基本术语
1.1 文档(Document)、索引(Index)、类型(Type)文档三要素
文档(Document)
文档,在面向对象观念就是一个对象。在 ES 里面,是一个大 JSON 对象,是指定了唯一 ID 的最底层或者根对象。文档的位置由 _index、_type 和 _id 唯一标识。
索引(Index)
索引,用于区分文档成组,即分到一组的文档集合。索引,用于存储文档和使文档可被搜索。比如项目存索引 project 里面,交易存索引 sales 等。
类型(Type)
类型,用于区分索引中的文档,即在索引中对数据逻辑分区。比如索引 project 的项目数据,根据项目类型 ui 项目、插画项目等进行区分。
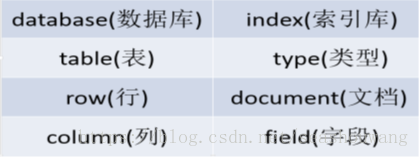
和关系型数据库 MySQL 做个类比:
Document 类似于 Record
Type 类似于 Table
Index 类似于 Database
Elasticsearch的优点
Ø Elasticsearch是分布式的。不需要其他组件,分发是实时的,被叫做”Push replication”。
Ø Elasticsearch 完全支持 Apache Lucene 的接近实时的搜索。
Ø 处理多租户(multitenancy)不需要特殊配置,而Solr则需要更多的高级设置。
Ø Elasticsearch 采用 Gateway 的概念,使得完备份更加简单。
Ø 各节点组成对等的网络结构,某些节点出现故障时会自动分配其他节点代替其进行工作。
缺点
Ø 只有一名开发者(当前ElasticsearchGitHub组织已经不只如此,已经有了相当活跃的维护者)
Ø 还不够自动(不适合当前新的IndexWarmup API)
Rest操作
Ø •REST的操作分为以下几种
Ø –GET:获取对象的当前状态;
Ø –PUT:改变对象的状态;
Ø –POST:创建对象;
Ø –DELETE:删除对象;
Ø –HEAD:获取头信息。
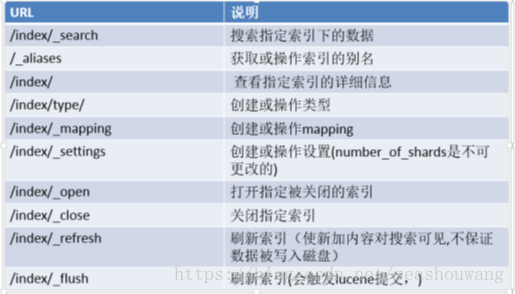
ES内置的REST接口
ES和关系型数据库的数据对比
ES配置
Ø 零配置,开箱即用
Ø 没有繁琐的安装配置
Ø java版本要求:最低1.7
Ø 下载地址:https://www.elastic.co/downloads/
Ø 启动
./bin/elasticsearch
bin/elasticsearch -d(后台运行)
Elasticsearch启动插件
Ø 下载地址: https://github.com/elastic/elasticsearch-servicewrapper
Ø 安装:把server目录拷贝到ES_HOME/bin/目录下面
ES访问请求
Ø Elasticsearch安装后访问
Ø http://localhost:9200注意这里最好用火狐或者chrome浏览器
Solr的优缺点
优点
Ø Solr有一个更大、更成熟的用户、开发和贡献者社区。
Ø 支持添加多种格式的索引,如:HTML、PDF、微软 Office 系列软件格式以及 JSON、XML、CSV 等纯文本格式。
Ø Solr比较成熟、稳定。
Ø 不考虑建索引的同时进行搜索,速度更快。
缺点
Ø 建立索引时,搜索效率下降,实时索引搜索效率不高。
Elasticsearch与Solr的比较
参考文档:
http://blog.csdn.net/jameshadoop/article/details/44905643
•ESVS SOLR
–接口
•类似webservice的接口
•REST风格的访问接口
–分布式存储
•solrCloud solr4.x才支持
•es是为分布式而生的
–支持的格式
•solr xml json
•es json
–近实时搜索
Elasticsearch与Solr的性能比较
当单纯的对已有数据进行搜索时,Solr更快。
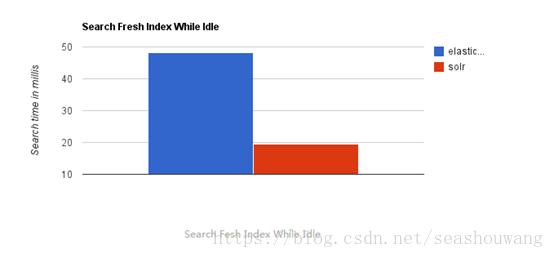
当实时建立索引时, Solr会产生io阻塞,查询性能较差, Elasticsearch具有明显的优势。
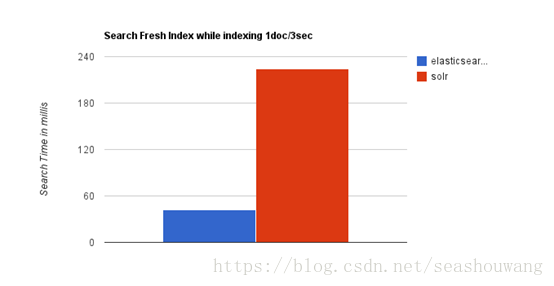
随着数据量的增加,Solr的搜索效率会变得更低,而Elasticsearch却没有明显的变化。

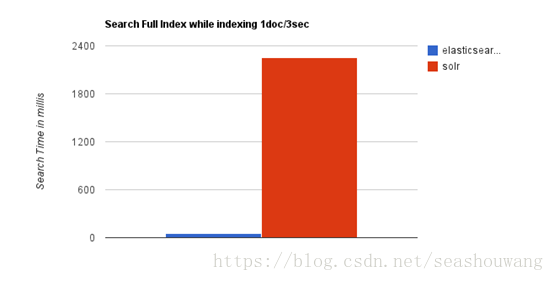
综上所述,Solr的架构不适合实时搜索的应用。
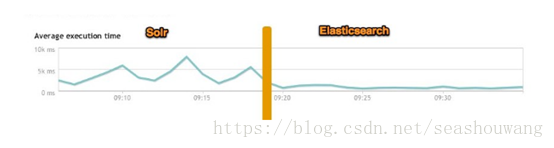
下图为将搜索引擎从Solr转到Elasticsearch以后的平均查询速度有了50倍的提升。
1.2. windows安装elasticsearch
安装es
1、下载es
http://www.elastic.co/cn/products/elasticsearch
2、解压缩下载的zip文件
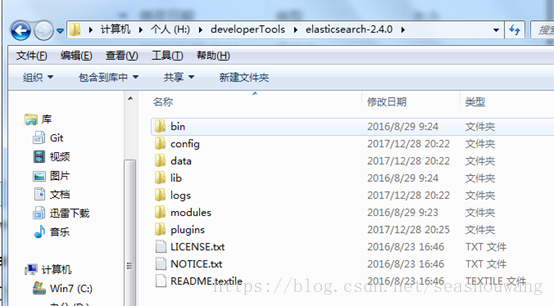
bin 存放elasticSearch运行命令
config 存放配置文件
lib 存放elasticSearch运行依赖jar包
modules 存放elasticSearch 模块
plugins 存放插件
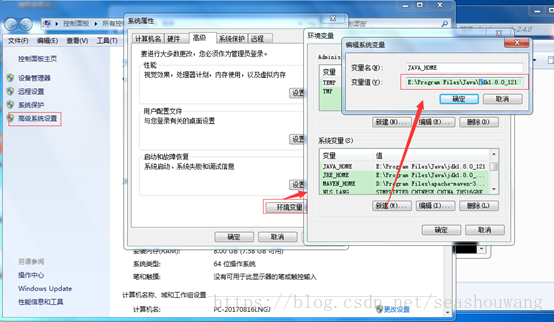
3、es运行是需要java支持,配置java环境变量
4、运行es
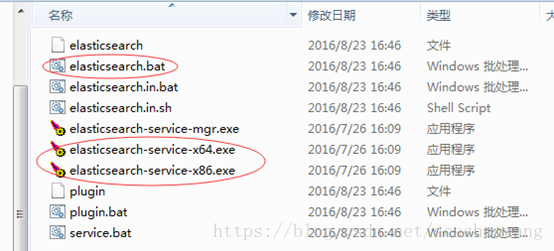
进入到解析缩目录中的bin目录,点击elasticsearh.bat或者elastic*.exe文件都可以。
启动后如下
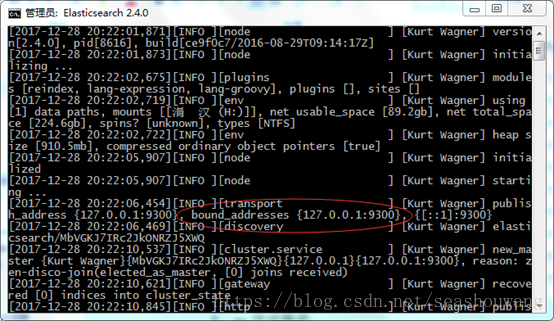
5、es访问路径:
启动后,通过http://localhost:9200访问
安装head插件
C:\Users\Administrator>cdH:\developerTools\elasticsearch-2.4.0\bin
C:\Users\Administrator>h:
H:\developerTools\elasticsearch-2.4.0\bin>
H:\developerTools\elasticsearch-2.4.0\bin>
H:\developerTools\elasticsearch-2.4.0\bin>plugin.bat install mobz/elasticsearch-
head
访问方式:
http://localhost:9200/_plugin/head/
1.3. ElasticSearch2.4集群
Elasticsearch Kibana 的下载地址:https://www.elastic.co/downloads/
问题排查论坛:https://discuss.elastic.co/c
准备环境:
Jdk_1.7+
elasticsearch-2.4.2.tar.gz
注意:elasticsearch-6.x需要jdk 1.8,linux内核在3.x以上
1.3.1. 下载elasticsearch,解压缩
下载,执行tar -zxvf elasticsearch-2.4.2.tar.gz解压
[root@server63download]# ls
apache-hive-2.1.1-bin.tar.gz jdk-7u15-linux-x64.gz
apache-kylin-1.6.0-hbase1.x-bin.tar.gz redis-3.2.8.tar.gz
apache-tomcat-7.0.70.tar.gz scala-2.11.8.tgz
elasticsearch-2.4.2.tar.gz sqoop-1.4.6.bin__hadoop-2.0.4-alpha.tar.gz
hbase-1.3.1-bin.tar.gz zookeeper-3.4.6.tar.gz
[root@server63download]# tar -zxf elasticsearch-2.4.2.tar.gz -C/usr/local/
[root@server63download]# cd !$
cd /usr/local/
[root@server63local]#
[root@server63local]# ls
apache-hive-2.1.1-bin redis-3.2.8
apache-kylin-1.6.0-hbase1.x-bin sbin
bin scala-2.11.8
elasticsearch-2.4.2 share
etc sqoop-1.4.6.bin__hadoop-2.0.4-alpha
fail2ban-0.8.14 src
games tomcat7
hadoop-2.6.2 ucenter1.5
hbase-1.3.1 ucenter_home2.0
include VMwareTools-9.6.2-1688356.tar.gz
lib vmware-tools-distrib
lib64 zookeeper-3.4.6
libexec
[root@server63local]# cd elasticsearch-2.4.2/
[root@server63 elasticsearch-2.4.2]#ls
bin config lib LICENSE.txt modules NOTICE.txt README.textile
[root@server63 elasticsearch-2.4.2]#
1.3.2. 设置环境变量
[root@server63 elasticsearch-2.4.2]#
[root@server63 elasticsearch-2.4.2]# vim /etc/profile
# /etc/profile
export JAVA_HOME=/usr/java/jdk1.7.0_15
export JRE_HOME=/usr/java/jdk1.7.0_15/jre
exportCLASSPATH=$JAVA_HOME/lib:$JRE_HOME/lib:$CLASSPATH
exportPATH=$JAVA_HOME/bin:$JRE_HOME/bin:$PATH
export HADOOP_HOME=/usr/local/hadoop-2.6.2
exportPATH=$HADOOP_HOME/bin:$HADOOP_HOME/sbin:$PATH
exportZOOKEEPER_HOME=/usr/local/zookeeper-3.4.6
export PATH=$ZOOKEEPER_HOME/bin:$PATH
export HBASE_HOME=/usr/local/hbase-1.3.1
export PATH=$HBASE_HOME/bin:$PATH
exportHIVE_HOME=/usr/local/apache-hive-2.1.1-bin
export HCAT_HOME=$HIVE_HOME/hcatalog
export hive_dependency=$HIVE_CONF:$HIVE_HOME/lib/*:$HIVE_HOME/hcatalog/share/hcatalog/hive-hcatalog-core-2.1.1.jar
export PATH=$HIVE_HOME/bin:$HCAT_HOME:$PATH
export SCALA_HOME=/usr/local/scala-2.11.8
export PATH=$SCALA_HOME/bin:$PATH
export SOOP_HOME=/usr/local/sqoop-1.4.6.bin__hadoop-2.0.4-alpha
export PATH=$SOOP_HOME/bin:$PATH
exportKYLIN_HOME=/usr/local/apache-kylin-1.6.0-hbase1.x-bin
export KYLIN_CONF=$KYLIN_HOME/conf
exportPATH=$KYLIN_HOME/bin:$KYLIN_CONF:$PATH
exportES_HOME=/usr/local/elasticsearch-2.4.2
exportPATH=$ES_HOME/bin:$PATH
[root@server63 elasticsearch-2.4.2]#
[root@server63 elasticsearch-2.4.2]#
[root@server63 elasticsearch-2.4.2]# source /etc/profile
[root@server63 elasticsearch-2.4.2]#
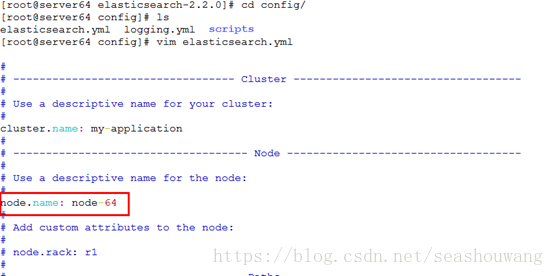
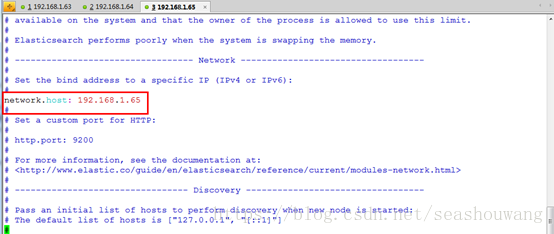
1.3.3. 修改elasticsearch.yml配置文件
修改配置文件config/elasticsearch.yml
[root@server63 config]#
[root@server63 config]# ls
elasticsearch.yml logging.yml
[root@server63 config]# vim elasticsearch.yml
添加一下内容:
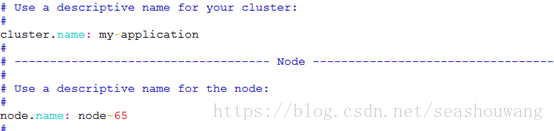
# Use a descriptive name for your cluster:
#
cluster.name:my-application
#
# ------------------------------------ Node------------------------------------
#
# Use a descriptive name for the node:
#
node.name: node-63
#
# Add custom attributes to the node:
#
# node.rack: r1
# Set the bind address to a specific IP(IPv4 or IPv6):
#
network.host: 192.168.1.1
#
# Set a custom port for HTTP:
#
# http.port: 9200
#添加防脑裂配置
discovery.zen.ping.multicast.enabled:false
discovery.zen.ping_timeout:120s
client.transport.ping_timeout:60s
discovery.zen.ping.unicast.hosts:["192.168.1.63","192.168.1.64", "192.168.1.65"]
[root@server63 config]#
[root@server63 config]#
注意:1、如果要配置集群,则elasticsearch配置的cluster.name都要相同,都启动可以自动组成集群,这里如果不改cluster.name则默认是cluster.name=elasticsearch,nodename随意取但是集群内的各节点不能相同,同时启动可以组成集群
1.3.4. elasticsearch配置文件详解
elasticsearch的config文件夹里面有两个配置文件:elasticsearch.yml和logging.yml,第一个是es的基本配置文件,第二个是日志配置文件,es也是使用log4j来记录日志的,所以logging.yml里的设置按普通log4j配置文件来设置就行了。下面主要讲解下elasticsearch.yml这个文件中可配置的东西。
cluster.name:elasticsearch配置es的集群名称,默认是elasticsearch,es会自动发现在同一网段下的es,如果在同一网段下有多个集群,就可以用这个属性来区分不同的集群。
ode.name:"FranzKafka"节点名,默认随机指定一个name列表中名字,该列表在es的jar包中config文件夹里name.txt文件中,其中有很多作者添加的有趣名字。
ode.master:true指定该节点是否有资格被选举成为node,默认是true,es是默认集群中的第一台机器为master,如果这台机挂了就会重新选举master。
ode.data:true指定该节点是否存储索引数据,默认为true。
index.number_of_shards:5设置默认索引分片个数,默认为5片。
index.number_of_replicas:1设置默认索引副本个数,默认为1个副本。
ath.conf:/path/to/conf设置配置文件的存储路径,默认是es根目录下的config文件夹。
ath.data:/path/to/data设置索引数据的存储路径,默认是es根目录下的data文件夹,可以设置多个存储路径,用逗号隔开,例:path.data:/path/to/data1,/path/to/data2
ath.work:/path/to/work设置临时文件的存储路径,默认是es根目录下的work文件夹。
ath.logs:/path/to/logs设置日志文件的存储路径,默认是es根目录下的logs文件夹
ath.plugins:/path/to/plugins设置插件的存放路径,默认是es根目录下的plugins文件夹
ootstrap.mlockall:true设置为true来锁住内存。因为当jvm开始swapping时es的效率会降低,所以要保证它不swap,可以把ES_MIN_MEM和ES_MAX_MEM两个环境变量设置成同一个值,并且保证机器有足够的内存分配给es。同时也要允许elasticsearch的进程可以锁住内存,Linux下可以通过`ulimit-l unlimited`命令。
etwork.bind_host:192.168.0.1设置绑定的ip地址,可以是ipv4或ipv6的,默认为0.0.0.0。
etwork.publish_host:192.168.0.1设置其它节点和该节点交互的ip地址,如果不设置它会自动判断,值必须是个真实的ip地址。
etwork.host:192.168.0.1这个参数是用来同时设置bind_host和publish_host上面两个参数。
transport.tcp.port:9300设置节点间交互的tcp端口,默认是9300。
transport.tcp.compress:true设置是否压缩tcp传输时的数据,默认为false,不压缩。
http.port:9200设置对外服务的http端口,默认为9200。
http.max_content_length:100mb设置内容的最大容量,默认100m
http.enabled:false是否使用http协议对外提供服务,默认为true,开启。
gateway.type:localgateway的类型,默认为local即为本地文件系统,可以设置为本地文件系统,分布式文件系统,Hadoop的HDFS,和amazon的s3服务器,其它文件系统的设置方法下次再详细说。
gateway.recover_after_nodes:1设置集群中N个节点启动时进行数据恢复,默认为1。
gateway.recover_after_time:5m设置初始化数据恢复进程的超时时间,默认是5分钟。
gateway.expected_nodes:2设置这个集群中节点的数量,默认为2,一旦这N个节点启动,就会立即进行数据恢复。
cluster.routing.allocation.node_initial_primaries_recoveries:4初始化数据恢复时,并发恢复线程的个数,默认为4。
cluster.routing.allocation.node_concurrent_recoveries:2添加删除节点或负载均衡时并发恢复线程的个数,默认为4。
indices.recovery.max_size_per_sec:0设置数据恢复时限制的带宽,如入100mb,默认为0,即无限制。
indices.recovery.concurrent_streams:5设置这个参数来限制从其它分片恢复数据时最大同时打开并发流的个数,默认为5。
discovery.zen.minimum_master_nodes:1设置这个参数来保证集群中的节点可以知道其它N个有master资格的节点。默认为1,对于大的集群来说,可以设置大一点的值(2-4)
discovery.zen.ping.timeout:3s设置集群中自动发现其它节点时ping连接超时时间,默认为3秒,对于比较差的网络环境可以高点的值来防止自动发现时出错。
discovery.zen.ping.multicast.enabled:false设置是否打开多播发现节点,默认是true。
discovery.zen.ping.unicast.hosts:["host1","host2:port","host3[portX-portY]"]设置集群中master节点的初始列表,可以通过这些节点来自动发现新加入集群的节点
1.3.5. 将elasticsearch拷贝到启动机器
[root@server63 local]#
[root@server63 local]# scp -r elasticsearch-2.4.2 server64:/usr/local/
[root@server63 local]# scp -r elasticsearch-2.4.2 server65:/usr/local/
[root@server63 local]#
拷贝环境变量:
[root@server63 local]# scp -r /etc/profile server64:/etc/
[root@server63 local]# scp -r /etc/profile server65:/etc/
[root@server63 local]#
注意:
在拷贝到其他机器上时,需要将network.host地址修改为各自服务器ip地址,node.name修改为其他名称,同时需要给elasticsearch目录授权为普通用户
server64配置:
server65配置:

1.3.6. 授权elasticsearch目录为普通用户权限
由于es在运行时必须使用普通用户才可以启动,所以这里要将es权限修改为普通用户。
先创建一个用户useradd es ,然后在授权。
创建用户:
每个机器上都创建一个用户。
[root@server63 local]# useradd es
授权:
server63授权为普通用户:
[root@server63 local]#
[root@server63 local]# chown -R es:es elasticsearch-2.4.2/
[root@server63 local]#
server64授权为普通用户:
[root@server64 local]# chown -R es:es elasticsearch-2.4.2/
[root@server64 local]#
server65授权为普通用户:
[root@server65 local]# chown -R es:es elasticsearch-2.4.2/
[root@server65 local]#
1.3.7. Elasticsearch异常
1、注意:es启动的时候不能用root用户,需要一个普通用户才能启动。
[root@server63 elasticsearch-2.4.2]# ls
bin config lib LICENSE.txt modules NOTICE.txt README.textile
[root@server63 elasticsearch-2.4.2]#bin/elasticsearch
Exception in thread"main" java.lang.RuntimeException: don't run elasticsearch as root.
atorg.elasticsearch.bootstrap.Bootstrap.initializeNatives(Bootstrap.java:93)
atorg.elasticsearch.bootstrap.Bootstrap.setup(Bootstrap.java:144)
atorg.elasticsearch.bootstrap.Bootstrap.init(Bootstrap.java:285)
atorg.elasticsearch.bootstrap.Elasticsearch.main(Elasticsearch.java:35)
Refer to the log for complete errordetails.
[root@server63 elasticsearch-2.4.2]#
2、异常是由于没有给目录授权。
Exception in thread "main"java.lang.IllegalStateException: Failed to created node environment
Likely root cause:java.nio.file.AccessDeniedException: /usr/local/elasticsearch-2.4.2/data/my-application/nodes/1
atsun.nio.fs.UnixException.translateToIOException(UnixException.java:84)
atsun.nio.fs.UnixException.rethrowAsIOException(UnixException.java:102)
atsun.nio.fs.UnixException.rethrowAsIOException(UnixException.java:107)
atsun.nio.fs.UnixFileSystemProvider.createDirectory(UnixFileSystemProvider.java:382)
atjava.nio.file.Files.createDirectory(Files.java:628)
atjava.nio.file.Files.createAndCheckIsDirectory(Files.java:732)
atjava.nio.file.Files.createDirectories(Files.java:718)
atorg.elasticsearch.env.NodeEnvironment.<init>(NodeEnvironment.java:168)
atorg.elasticsearch.node.Node.<init>(Node.java:153)
atorg.elasticsearch.node.Node.<init>(Node.java:128)
atorg.elasticsearch.node.NodeBuilder.build(NodeBuilder.java:145)
atorg.elasticsearch.bootstrap.Bootstrap.setup(Bootstrap.java:178)
atorg.elasticsearch.bootstrap.Bootstrap.init(Bootstrap.java:285)
atorg.elasticsearch.bootstrap.Elasticsearch.main(Elasticsearch.java:35)
Refer to the log for complete errordetails.
解决办法:授权es安装目录即可。chown –R es:es /usr/local/es安装目录
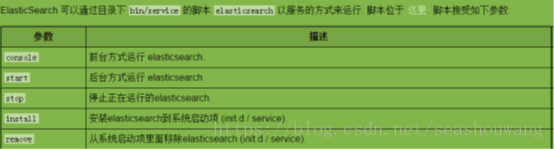
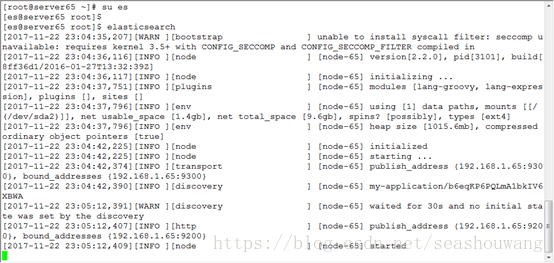
1.3.8. 启动/关闭服务
注意:es启动的时候不能用root用户,需要一个普通用户才能启动。
启动服务切换到普通用户:
[root@server63 elasticsearch-2.4.2]#
[root@server63 elasticsearch-2.4.2]# su es
[es@server63 elasticsearch-2.4.2]$
[es@server63 elasticsearch-2.4.2]$ elasticsearch
[2017-11-12 23:10:38,828][WARN][bootstrap ] unable toinstall syscall filter: seccomp unavailable: requires kernel 3.5+ withCONFIG_SECCOMP and CONFIG_SECCOMP_FILTER compiled in
[2017-11-12 23:10:39,993][INFO ][node ] [node-1] version[2.2.0],pid[30688], build[8ff36d1/2016-01-27T13:32:39Z]
[2017-11-12 23:10:39,993][INFO ][node ] [node-1] initializing...
[2017-11-12 23:10:41,922][INFO][plugins ] [node-1]modules [lang-groovy, lang-expression], plugins [], sites []
[2017-11-12 23:10:41,956][INFO ][env ] [node-1] using [1] datapaths, mounts [[/ (/dev/sda2)]], net usable_space [1.8gb], net total_space[9.6gb], spins? [possibly], types [ext4]
[2017-11-12 23:10:41,957][INFO ][env ] [node-1] heap size[1015.6mb], compressed ordinary object pointers [true]
[2017-11-12 23:10:47,343][INFO ][node ] [node-1] initialized
[2017-11-12 23:10:47,343][INFO ][node ] [node-1] starting ...
[2017-11-12 23:10:47,514][INFO][transport ] [node-1]publish_address {192.168.1.63:9300}, bound_addresses {192.168.1.63:9300}
[2017-11-12 23:10:47,537][INFO][discovery ] [node-1] my-application/NCePBUEtTeCigPXSIJ2-vQ
注意:启动时,其他服务器上也都启动elasticsearch服务才能组成一个集群。
1.3.9. 浏览器测试
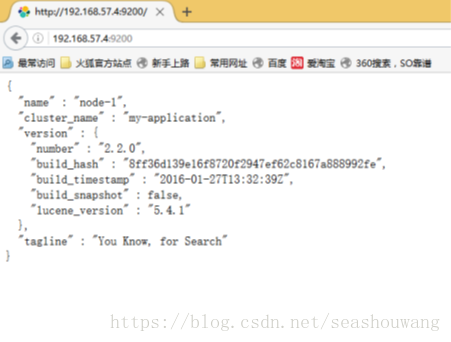
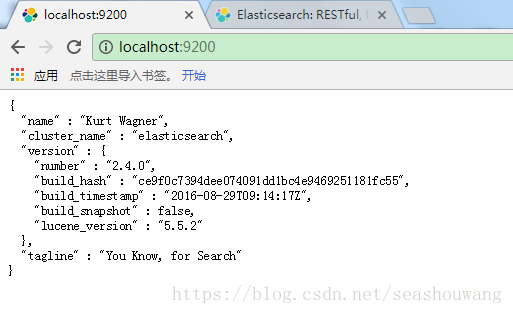
浏览器输入:http://192.168.1.63:9200/

以上表示服务启动成功!
结果解析:
·name———Elasticsearch实例的名字,默认情况下它将从名字列表中随机选择一个,其设置是在config/elasticsearch.yml文件中;
·version———版本号,以json格式表示了一组信息,其中:
number字段代表了当前运行Elasticserch的版本号;
build_snashot字段代表了当前版本是否是从源代码构建而来;
lucene_version表示Elasticsearch所基于的Lucene的版本;
·tagline———包含了Elasticsearch的第一个tagline:"YouKnow, for Search"。
浏览器输入:http://192.168.1.64:9200/
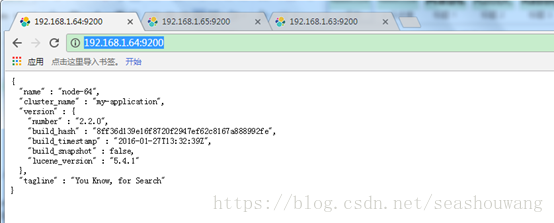
浏览器输入:http://192.168.1.65:9200/
1.4. elasticsearch问题
1.4.1. Elasticsearch is stillinitializing the kibana index.
kibana启动后,登陆页面提示错误: Elasticsearch is still initializing the kibana index

解决办法
1. /_plugin/gui/ 使用gui删除.kibana的索引
2. curl -XDELETEhttp://localhost:9200/.kibana
这就说明logstash没有把日志写入到elasticsearch。
检查logstash与elasticsearch之间的通讯是否有问题,一般问题就在这。
解决的方法:
将配置文件kibana.yml中下面一项的配置放开(#注释符去掉)即可:
kibana.index: ".kibana"
1.4.2. Marvel version 2.4.6 is notsupported with Kibana 4.4.1. Kibana version 4.6.x is expected.
Marvel version 2.4.6 不支持Kibana4.4.1.,必须是4.6.x 以上才可以,替换更高版本即可。
1.5. 安装es-servicewrapper插件
1.5.1. 下载elasticsearch-servicewrapper
git clone https://github.com/elasticsearch/elasticsearch-servicewrapper
,然后将目录下的service目录拷贝至ES_HOME/bin目录下。
1.5.2. 上传文件,解压缩elasticsearch-servicewrapper
[root@server63 download]#
[root@server63 download]# ls
apache-hive-2.1.1-bin.tar.gz jdk-7u15-linux-x64.gz
apache-kylin-1.6.0-hbase1.x-bin.tar.gz kibana-6.0.0-linux-x86_64.tar.gz
apache-tomcat-7.0.70.tar.gz redis-3.2.8.tar.gz
elasticsearch-2.4.2.tar.gz scala-2.11.8.tgz
elasticsearch-servicewrapper-master.zip sqoop-1.4.6.bin__hadoop-2.0.4-alpha.tar.gz
hbase-1.3.1-bin.tar.gz zookeeper-3.4.6.tar.gz
[root@server63 download]# unzipelasticsearch-servicewrapper-master.zip
Archive: elasticsearch-servicewrapper-master.zip
a27c25768e8ad982165340e1599b5dcb561b76f4
creating: elasticsearch-servicewrapper-master/
extracting:elasticsearch-servicewrapper-master/.gitignore
inflating: elasticsearch-servicewrapper-master/README.md
creating: elasticsearch-servicewrapper-master/service/
……………
[root@server63 download]#
[root@server63 download]# ls
apache-hive-2.1.1-bin.tar.gz jdk-7u15-linux-x64.gz
apache-kylin-1.6.0-hbase1.x-bin.tar.gz kibana-6.0.0-linux-x86_64.tar.gz
apache-tomcat-7.0.70.tar.gz redis-3.2.8.tar.gz
elasticsearch-2.4.2.tar.gz scala-2.11.8.tgz
elasticsearch-servicewrapper-master sqoop-1.4.6.bin__hadoop-2.0.4-alpha.tar.gz
elasticsearch-servicewrapper-master.zip zookeeper-3.4.6.tar.gz
hbase-1.3.1-bin.tar.gz
[root@server63 download]#
1.5.3. 将解压缩后的文件中service目录拷贝到/usr/local/elasticsearch-2.4.2/bin/目录下
[root@server63 bin]#
[root@server63 bin]# cp -r/root/download/elasticsearch-servicewrapper-master/service/ .
[root@server63 bin]# ls
elasticsearch elasticsearch.in.sh elasticsearch-service-x86.exe service
elasticsearch.bat elasticsearch-service-mgr.exe plugin service.bat
elasticsearch.in.bat elasticsearch-service-x64.exe plugin.bat
[root@server63 bin]#
[root@server63 bin]# cd service
[root@server63 service]# ls
elasticsearch elasticsearch32 elasticsearch64 elasticsearch.bat elasticsearch.conf exec lib
[root@server63 service]# pwd
/usr/local/elasticsearch-2.4.2/bin/service
1.5.4. 修改elasticsearch.conf配置文件
[root@server63 service]#
[root@server63 service]# vim elasticsearch.conf
#添加以下内容,设置es_home,jvm内存
set.default.ES_HOME=/usr/local/elasticsearch-2.4.2
set.default.ES_HEAP_SIZE=1024
[root@server63 service]#
1.5.5. 安装启动服务
执行命令:ES_HOME/bin/service/elasticsearch install
[root@server63 service]# ll
总用量 84
-rwxr-xr-x 1 root root 55710 12月 2 16:15 elasticsearch
-rwxr-xr-x 1 root root 64 12月 2 16:15 elasticsearch32
-rwxr-xr-x 1 root root 64 12月 2 16:15 elasticsearch64
-rw-r--r-- 1 root root 2610 12月 2 16:15 elasticsearch.bat
-rw-r--r-- 1 root root 4756 12月 2 16:18 elasticsearch.conf
drwxr-xr-x 2 root root 4096 12月 2 16:15 exec
drwxr-xr-x 2 root root 4096 12月 2 16:15 lib
[root@server63 service]#chmod u+x elasticsearch
[root@server63 service]# ./elasticsearch install
Detected RHEL or Fedora:
Installing the Elasticsearch daemon..
[root@server63 service]#
1.5.6. 启动/停止/重启服务
执行命令:$ES_HOME/bin/service/elasticsearchstart/stop/restart
注意:因为elasticsearch有远程执行脚本的功能所以容易中木马病毒,所以不允许用root用户启动,root用户是起不来的,赋权限,用一般的用户启动
要配置network.host和network.publish_host和network.bind_host才能别的机器或者网卡访问,否则只能是127.0.0.1或者localhost访问
注意配置yml结尾的配置文件都需要冒号后面加空格才行
1.6. es-head插件安装
elasticsearch-head:是一个与Elastic集群(Cluster)相交互的Web前台, 用来监控Elasticsearch状态的客户端插件.
下载地址:
https://github.com/mobz/elasticsearch-head
http://mobz.github.io/elasticsearch-head/
参考文档:
http://blog.csdn.net/phachon/article/details/52621420
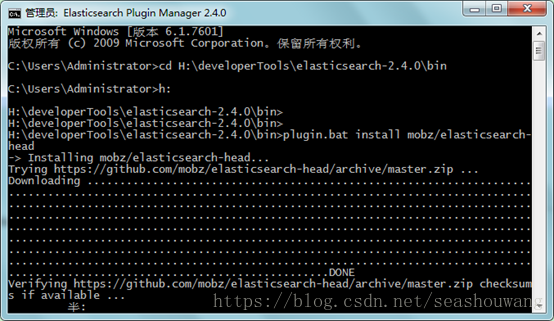
进入到es安装目录的bin目录中,执行./plugin install mobz/elasticsearch-head 即可。
[root@server63 bin]# ls
elasticsearch elasticsearch.in.sh elasticsearch-service-x86.exe service.bat
elasticsearch.bat elasticsearch-service-mgr.exe plugin
elasticsearch.in.bat elasticsearch-service-x64.exe plugin.bat
[root@server63 bin]#
[root@server63 bin]# ./plugin install mobz/elasticsearch-head
-> Installing mobz/elasticsearch-head...
Tryinghttps://github.com/mobz/elasticsearch-head/archive/master.zip ...
Downloading.....................................................................................................................................................................................................................................................................................................................................................................................................................................................................................................................................................................................................................................................................................................DONE
Verifyinghttps://github.com/mobz/elasticsearch-head/archive/master.zip checksums ifavailable ...
NOTE: Unable to verify checksum fordownloaded plugin (unable to find .sha1 or .md5 file to verify)
Installed head into /usr/local/elasticsearch-2.4.2/plugins/head
[root@server63 bin]#
登陆查看head:
http://192.168.1.63:9200/_plugin/head/
1.7. 安装logstash-2.4插件
1.7.1. 下载地址:
https://www.elastic.co/downloads,选择相应的版本,下载logstash-2.4.1.tar.gz
1.7.2. 上传,解压缩
[root@server63 download]# ls
apache-hive-2.1.1-bin.tar.gz kibana-4.4.1-linux-x64.tar.gz
apache-kylin-1.6.0-hbase1.x-bin.tar.gz kibana-4.5.0-linux-x64.tar.gz
apache-tomcat-7.0.70.tar.gz kibana-6.0.0-linux-x86_64.tar.gz
elasticsearch-2.2.0.tar.gz logstash-2.4.1.tar.gz
elasticsearch-2.4.2.tar.gz redis-3.2.8.tar.gz
elasticsearch-servicewrapper-master scala-2.11.8.tgz
elasticsearch-servicewrapper-master.zip sqoop-1.4.6.bin__hadoop-2.0.4-alpha.tar.gz
hbase-1.3.1-bin.tar.gz zookeeper-3.4.6.tar.gz
jdk-7u15-linux-x64.gz
[root@server63 download]# tar -zxf logstash-2.4.1.tar.gz -C /usr/local/
[root@server63 download]#
1.7.3. 配置logstash.conf文件
[root@server63 local]#
[root@server63 local]# cd logstash-2.4.1/
[root@server63 logstash-2.4.1]# pwd
/usr/local/logstash-2.4.1
[root@server63 logstash-2.4.1]#
[root@server63 logstash-2.4.1]# ls
bin CHANGELOG.md CONTRIBUTORS Gemfile Gemfile.jruby-1.9.lock lib LICENSE NOTICE.TXT vendor
[root@server63 logstash-2.4.1]#
创建一个logstash.conf配置文件,内容如下:
input { stdin { } }
filter {
grok {
match => { "message" => "%{COMBINEDAPACHELOG}" }
}
date {
match => [ "timestamp" , "dd/MMM/yyyy:HH:mm:ss Z" ]
}
}
output {
elasticsearch { hosts => ["localhost:9200"] }
stdout { codec => rubydebug }
}
[root@server63 logstash-2.4.1]# ls
bin CONTRIBUTORS Gemfile.jruby-1.9.lock LICENSE NOTICE.TXT
CHANGELOG.md Gemfile lib logstash-simple.conf vendor
[root@server63 logstash-2.4.1]#
注:这里因为为了简单来显示一下数据,我这里将 apache 的日志作为数据源,也就是 logstash 的 input,直接输出到 elstaticseach 里,即 ouput。
测试脚本是否正常:
[root@server63 logstash-2.4.1]# ls
bin CONTRIBUTORS Gemfile.jruby-1.9.lock LICENSE NOTICE.TXT
CHANGELOG.md Gemfile lib logstash-simple.conf vendor
[root@server63 logstash-2.4.1]# ./bin/logstash --configtest -f logstash-simple.conf
Configuration OK
[root@server63 logstash-2.4.1]#
1.7.4. 启动logstash服务
执行命令:./bin/logstash -f logstash-simple.conf
启动 logstash 来收集日志,logstash 可以开始收集日志了,当日志文件有变化时,会动态的写入到 elastaticseach 中,打开我们的 elasticseach 的 web 页面http://192.168.1.63:9200/_plugin/head/
[root@server63 logstash-2.4.1]#
[root@server63 logstash-2.4.1]# ./bin/logstash -f logstash-simple.conf
Settings: Default pipeline workers: 1
Pipeline main started
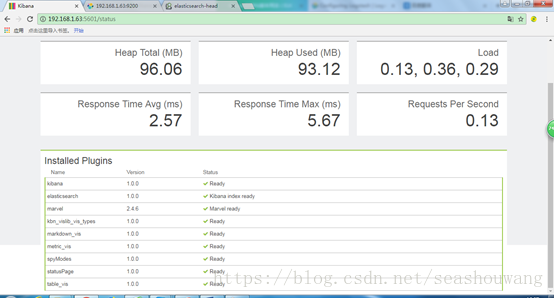
1.8. 安装Kibana-4.6插件
Kibana 是一个为 Logstash 和 ElasticSearch 提供的日志分析的 Web 接口。可使用它对日志进行高效的搜索、可视化、分析等各种操作。
Kibana是一个开源的分析与可视化平台,设计出来用于和Elasticsearch一起使用的。你可以用kibana搜索、查看、交互存放在Elasticsearch索引里的数据,使用各种不同的图表、表格、地图等kibana能够很轻易地展示高级数据分析与可视化。
Kibana让我们理解大量数据变得很容易。它简单、基于浏览器的接口使你能快速创建和分享实时展现Elasticsearch查询变化的动态仪表盘。安装Kibana非常快,你可以在几分钟之内安装和开始探索你的Elasticsearch索引数据—-—-不需要写任何代码,没有其他基础软件依赖
1.8.1. 下载kibana插件
下载地址:https://www.elastic.co/downloads/
本次下载kibana-4.6.2-linux-x64.tar.gz
1.8.2. 解压安装
[root@server63 download]#
[root@server63 download]# ls
apache-hive-2.1.1-bin.tar.gz jdk-7u15-linux-x64.gz
apache-kylin-1.6.0-hbase1.x-bin.tar.gz kibana-4.6.2-linux-x64.tar.gz
apache-tomcat-7.0.70.tar.gz redis-3.2.8.tar.gz
elasticsearch-2.4.2.tar.gz scala-2.11.8.tgz
elasticsearch-servicewrapper-master sqoop-1.4.6.bin__hadoop-2.0.4-alpha.tar.gz
elasticsearch-servicewrapper-master.zip zookeeper-3.4.6.tar.gz
hbase-1.3.1-bin.tar.gz
[root@server63 download]#
[root@server63 download]# tar -zxf kibana-4.6.2-linux-x64.tar.gz -C /usr/local/
[root@server63 download]# cd !$
cd /usr/local/
[root@server63 local]# ls
apache-hive-2.1.1-bin include sqoop-1.4.6.bin__hadoop-2.0.4-alpha
apache-kylin-1.6.0-hbase1.x-bin kibana-4.6.2-linux-x64 src
bin lib tomcat7
elasticsearch-2.4.2 lib64 ucenter1.5
etc libexec ucenter_home2.0
fail2ban-0.8.14 redis-3.2.8 VMwareTools-9.6.2-1688356.tar.gz
games sbin vmware-tools-distrib
hadoop-2.6.2 scala-2.11.8 zookeeper-3.4.6
hbase-1.3.1 share
[root@server63 local]#
1.8.3. 修改配置文件config/kibana.yml
修改配置文件vi config/kibana.yml的elasticsearch.url属性即可
添加elasticsearch.url: http://192.168.1.63:9200 #es安装服务地址,
[root@server63 kibana-4.6.2-linux-x64]# ls
bin installedPlugins node optimize README.txt webpackShims
config LICENSE.txt node_modules package.json src
[root@server63 kibana-4.6.2-linux-x64]#
[root@server63 kibana-4.6.2-linux-x64]# cdconfig/
[root@server63 config]# ls
kibana.yml
[root@server63 config]#
[root@server63 config]# vim kibana.yml
添加以下内容:
[root@server63 config]# vim kibana.yml
# Optional setting to validate that yourElasticsearch backend uses the same key files (PEM formatted)
# elasticsearch.ssl.cert:/path/to/your/client.crt
# elasticsearch.ssl.key:/path/to/your/client.key
# If you need to provide a CA certificatefor your Elasticsearch instance, put
# the path of the pem file here.
# elasticsearch.ssl.ca:/path/to/your/CA.pem
# Set to false to have a complete disregardfor the validity of the SSL
# certificate.
# elasticsearch.ssl.verify: true
# Time in milliseconds to wait forelasticsearch to respond to pings, defaults to
# request_timeout setting
# elasticsearch.pingTimeout: 1500
# Kibana is served by a back end server.This controls which port to use.
# server.port: 5601
# The host to bind the server to.
# server.host: "0.0.0.0"
server.host:"server63"
# If you are running kibana behind a proxy,and want to mount it at a path,
# specify that path here. The basePathcan't end in a slash.
# server.basePath: ""
# The maximum payload size in bytes onincoming server requests.
# server.maxPayloadBytes: 1048576
# The Elasticsearch instance to use for allyour queries.
elasticsearch.url:"http://server63:9200"
# preserve_elasticsearch_host true willsend the hostname specified in `elasticsearch`. If you set it to false,
# then the host you use to connect to*this* Kibana instance will be sent.
# elasticsearch.preserveHost: true
# Kibana uses an index in Elasticsearch tostore saved searches, visualizations
# and dashboards. It will create a newindex if it doesn't already exist.
kibana.index:".kibana"
# The default application to load.
# kibana.defaultAppId: "discover"
# If your Elasticsearch is protected withbasic auth, these are the user credentials
# used by the Kibana server to performmaintenance on the kibana_index at startup. Your Kibana
# users will still need to authenticatewith Elasticsearch (which is proxied through
# the Kibana server)
# elasticsearch.username: "user"
# elasticsearch.password: "pass"
# SSL for outgoing requests from the KibanaServer to the browser (PEM formatted)
# server.ssl.cert: /path/to/your/server.crt
# server.ssl.key: /path/to/your/server.key
# Optional setting to validate that yourElasticsearch backend uses the same key files (PEM formatted)
# elasticsearch.ssl.cert:/path/to/your/client.crt
# elasticsearch.ssl.key:/path/to/your/client.key
# If you need to provide a CA certificatefor your Elasticsearch instance, put
# the path of the pem file here.
# elasticsearch.ssl.ca: /path/to/your/CA.pem
# Set to false to have a complete disregardfor the validity of the SSL
# certificate.
# elasticsearch.ssl.verify: true
# Time in milliseconds to wait forelasticsearch to respond to pings, defaults to
# request_timeout setting
# elasticsearch.pingTimeout: 1500
# Time in milliseconds to wait forresponses from the back end or elasticsearch.
# This must be > 0
elasticsearch.requestTimeout: 30000
# Header names and values that are sent toElasticsearch. Any custom headers cannot be overwritten
# by client-side headers.
# elasticsearch.customHeaders: {}
# Time in milliseconds for Elasticsearch towait for responses from shards.
# Set to 0 to disable.
# elasticsearch.shardTimeout: 0
# Time in milliseconds to wait forElasticsearch at Kibana startup before retrying
elasticsearch.startupTimeout: 5000
# Set the path to where you would like theprocess id file to be created.
# pid.file: /var/run/kibana.pid
# If you would like to send the log outputto a file you can set the path below.
# logging.dest: stdout
# Set this to true to suppress all loggingoutput.
# logging.silent: false
# Set this to true to suppress all loggingoutput except for error messages.
# logging.quiet: false
# Set this to true to log all events,including system usage information and all requests.
# logging.verbose: false
[root@server63 config]#
1.8.4. 配置环境变量
[root@server63 kibana-4.6.2-linux-x64]#
[root@server63 kibana-4.6.2-linux-x64]# vim /etc/profile
exportKIBANA_HOME=/usr/local/kibana-4.6.2-linux-x64
export PATH=$KIBANA_HOME/bin:$PATH
[root@server63 kibana-4.6.2-linux-x64]#
1.8.5. 运行kibana
Run bin/kibana (or bin\kibana.bat onWindows)
通过 ./bin/kibana启动服务,默认占用5601端口,可通过http://[ip]:5601在浏览器访问
[root@server63 kibana-4.6.2-linux-x64]# ls
bin installedPlugins node optimize README.txt webpackShims
config LICENSE.txt node_modules package.json src
[root@server63 kibana-4.6.2-linux-x64]# ./bin/kibana
log [19:57:28.361][info][status][plugin:kibana] Status changed from uninitialized to green -Ready
log [19:57:28.424][info][status][plugin:elasticsearch] Status changed from uninitialized toyellow - Waiting for Elasticsearch
log [19:57:28.448][info][status][plugin:kbn_vislib_vis_types] Status changed from uninitializedto green - Ready
log [19:57:28.458][error][elasticsearch] Request error, retrying -- connect ECONNREFUSED
log [19:57:28.466][info][status][plugin:markdown_vis] Status changed from uninitialized to green- Ready
log [19:57:28.474][info][status][plugin:metric_vis] Status changed from uninitialized to green -Ready
log [19:57:28.488][warning][elasticsearch] Unable to revive connection: http://server63:9200/
1.8.6. 登陆测试
浏览器输入:http://192.168.1.63:5601/
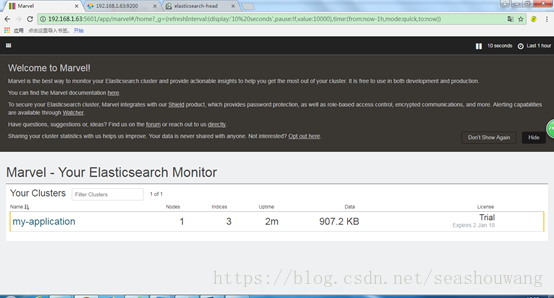
1.9. 安装Marvel插件
Marvel是Elasticsearch的图形化管理和监控工具客户端,可以用来查看当前的各项状态,在开发环境下免费使用。它包含了一个叫做Sense的交互式控制台,使用户方便的通过浏览器直接与Elasticsearch进行交互。
参考文档:
http://www.cnblogs.com/jiu0821/p/5697961.html
http://blog.csdn.net/phachon/article/details/52621420
下载地址:
https://download.elastic.co/elasticsearch/marvel/marvel-latest.tar.gz
1.9.1. 在es上安装marvel
安装步骤:
Step 1: Install Marvel into Elasticsearch:
bin/plugin install license
bin/plugin install marvel-agent
[root@server63 elasticsearch-2.4.2]#
[root@server63 elasticsearch-2.4.2]# ls
bin config data lib LICENSE.txt logs modules NOTICE.txt plugins README.textile
[root@server63 elasticsearch-2.4.2]#
[root@server63 elasticsearch-2.4.2]# bin/plugin install license
-> Installing license...
Tryinghttps://download.elastic.co/elasticsearch/release/org/elasticsearch/plugin/license/2.2.0/license-2.2.0.zip...
Downloading .......DONE
Verifyinghttps://download.elastic.co/elasticsearch/release/org/elasticsearch/plugin/license/2.2.0/license-2.2.0.zipchecksums if available ...
Downloading .DONE
Installed license into /usr/local/elasticsearch-2.4.2/plugins/license
[root@server63 elasticsearch-2.4.2]# bin/plugin install marvel-agent
-> Installing marvel-agent...
Tryinghttps://download.elastic.co/elasticsearch/release/org/elasticsearch/plugin/marvel-agent/2.2.0/marvel-agent-2.2.0.zip...
Downloading ..........DONE
Verifyinghttps://download.elastic.co/elasticsearch/release/org/elasticsearch/plugin/marvel-agent/2.2.0/marvel-agent-2.2.0.zipchecksums if available ...
Downloading .DONE
Installed marvel-agent into /usr/local/elasticsearch-2.4.2/plugins/marvel-agent
[root@server63 elasticsearch-2.4.2]#
1.9.2. 在kibana上安装marvel
Step 2: Install Marvel into Kibana:在kibana上安装marvel
bin/kibana plugin --install elasticsearch/marvel/latest
[root@server63 kibana-4.6.2-linux-x64]#
[root@server63 kibana-4.6.2-linux-x64]# bin/kibana plugin --install elasticsearch/marvel/latest
Installing marvel
Attempting to transfer from https://download.elastic.co/elasticsearch/marvel/marvel-latest.tar.gz
Transferring 2400332bytes....................
Transfer complete
Extracting plugin archive
Extraction complete
Optimizing and caching browser bundles...
Plugin installation complete
[root@server63 kibana-4.6.2-linux-x64]#
1.9.3. 启动es和kibana服务
Step 3: Start Elasticsearch and Kibana
bin/elasticsearch
bin/kibana
1.9.4. 登陆marvel测试
Step 4: Navigate to
http://localhost:5601/app/marvel
三、插件介绍及安装
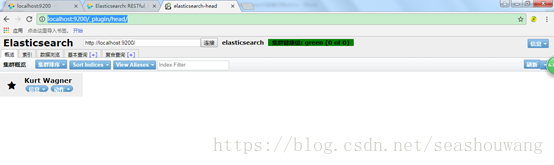
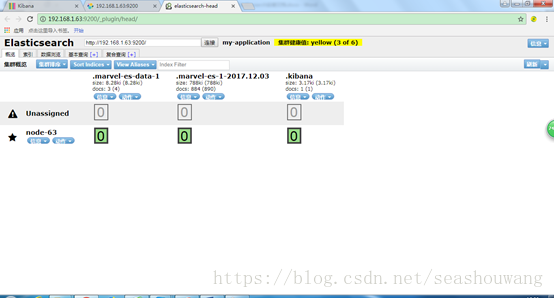
Head是一个用来监控Elasticsearch状态的客户端插件。
安装:到bin目录下 plugin install mobz/elasticsearch-head
安装后再浏览器中输入: http://localhost:9200/_plugin/head/ ,会打开如下界面:
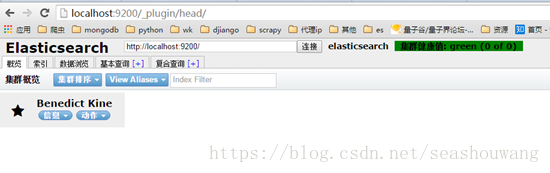
图中显示了一个节点Benedict Kine,每个节点拥有不同index的数据,Head提供了HTTP客户端。
Marvel是Elasticsearch的图形化监控客户端,可以用来查看当前的各项状态。
安装:
marvel 是以 elasticsearch 的插件形式存在的,可以直接通过插件安装:
# ./bin/plugin -i elasticsearch/marvel/latest
如果你是从官网下载的安装包,则运行:
# ./bin/plugin -i marvel file:///path/to/marvel-latest.zip
运行:
在浏览器中输入:http://localhost:9200/_plugin/marvel/ ,会打开如下界面:

参考:
https://www.elastic.co/downloads/marvel
1.10. 安装ik分词器
下载elasticsearch中文分词器:
https://github.com/medcl/elasticsearch-analysis-ik
https://github.com/medcl/elasticsearch-analysis-ik/tree/2.x
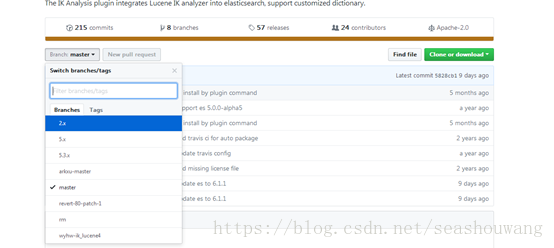
这里默认的是master的,但是master的项目需要用gradle编译,这里选择2.x版本。
1、下载开源项目

2、打包ik分词器
下载后的压缩包解压后进去发现是pom工程, 这里是用maven对此工程进行编译,前提要安装maven.
分别执行如下命令:
mvn clean
mvn compile
mvn package
3、打包完成后,进入target/release目录,将下列文件,拷贝到es安装目录中/plugins/analysis-ik目录下
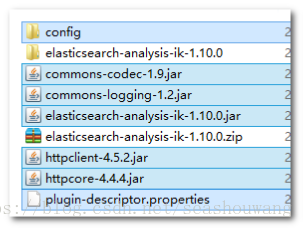
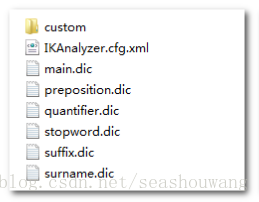
4、进入target/release/config目录,将所有配置文件,复制%es%/config 目录下。
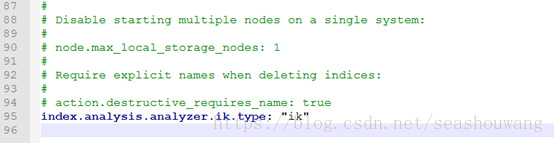
5、配置elasticsearch.yml
添加index.analysis.analyzer.ik.type: "ik"配置给ik解析器添加一个标示
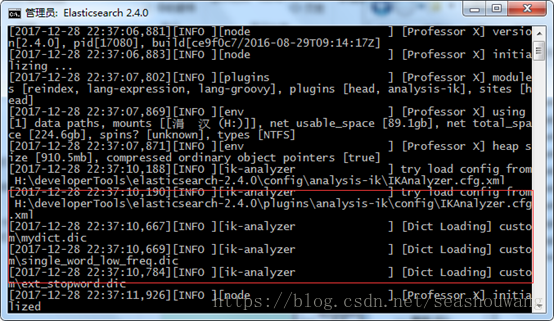
6、重启es
通过日志可以查询到,ik分词器已经启动。
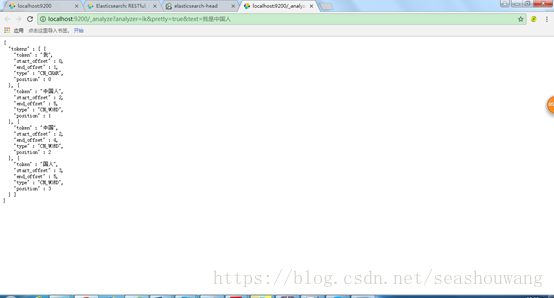
7、访问测试:
http://localhost:9200/_analyze?analyzer=ik&pretty=true&text=我是中国人
1.11. java操作es
es基本操作项目:
https://gitee.com/com_1057718341/esdemo
1.11.1. es基本操作1
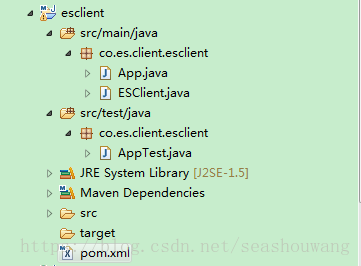
1、 创建maven项目
2、 导入es依赖jar包
<!--https://mvnrepository.com/artifact/org.elasticsearch/elasticsearch -->
<dependency>
<groupId>org.elasticsearch</groupId>
<artifactId>elasticsearch</artifactId>
<version>2.4.0</version>
</dependency>
3、 编写代码测试
import java.net.InetAddress;
import org.elasticsearch.action.search.SearchRequestBuilder;
import org.elasticsearch.action.search.SearchResponse;
import org.elasticsearch.client.transport.TransportClient;
import org.elasticsearch.common.transport.InetSocketTransportAddress;
import org.elasticsearch.common.xcontent.XContentBuilder;
import org.elasticsearch.common.xcontent.XContentFactory;
import org.elasticsearch.index.query.QueryBuilders;
import org.elasticsearch.search.SearchHit;
import org.elasticsearch.search.SearchHits;
import org.junit.Test;
publicclassESClient {
publicstaticvoid main(String[] args) throws Exception {
testadd();
// testQuery();
testQuery2();
//
testQuery3();
}
//添加
publicstaticvoid testadd() throws Exception {
TransportClientclient = TransportClient.builder().build()
.addTransportAddress(newInetSocketTransportAddress(InetAddress.getByName("127.0.0.1"),9300));
// client.addTransportAddress(new InetSocketTransportAddress(new
// InetSocketAddress("",9300)));
XContentBuilderobject = XContentFactory.jsonBuilder().startObject();
object.field("id", 1);
object.field("name", "tom");
object.field("content","ElasticSearch是一个基于Lucene的搜索服务器。它提供了一个分布式多用户能力的全文搜索引擎,基于RESTful web接口");
object.endObject();
client.prepareIndex("blog1","article","1").setSource(object).get();
client.close();
}
}
4、 查询测试
查询数据主要依赖QueryBuilder对象,可以通过QueryBuilders获取
boolQuery()布尔查询,可以用来组合多个查询条件
fuzzyQuery()相似度查询
matchAllQuery()查询所有数据
regexpQuery()正则表达式查询
termQuery()词条查询
wildcardQuery()模糊查询
publicstaticvoid testQuery() throws Exception {
TransportClientclient = TransportClient.builder().build()
.addTransportAddress(newInetSocketTransportAddress(InetAddress.getByName("127.0.0.1"),9300));
// client.addTransportAddress(newInetSocketTransportAddress(new
// InetSocketAddress("",9300)));
SearchRequestBuildersetQuery = client.prepareSearch("blog1").setTypes("article")
.setQuery(QueryBuilders.matchAllQuery());
SearchResponsesearchResponse = setQuery.get();
int totalShards =searchResponse.getTotalShards();
System.out.println("totalShards = "+ totalShards);
SearchHitshits = searchResponse.getHits();
for (SearchHit searchHit :hits) {
System.out.println(searchHit.getIndex());
System.out.println(searchHit.getSourceAsString());
System.out.println(searchHit.getFields().toString());
}
long totalHits =hits.getTotalHits();
System.out.println("totalHits = "+ totalHits);
client.close();
}
5、 查询Query对象的使用
ElasticSearch支持所有Lucene查询,并对其进行简化封装
TermQuery词条查询
WildcardQuery模糊查询
FuzzyQuery相似度查询
BooleanQuery布尔查询
publicstaticvoid testQuery2() throws Exception {
TransportClientclient = TransportClient.builder().build()
.addTransportAddress(newInetSocketTransportAddress(InetAddress.getByName("127.0.0.1"),9300));
// client.addTransportAddress(newInetSocketTransportAddress(new
// InetSocketAddress("",9300)));
// 模糊查询
// 1、ElasticSearch提供QueryBuileders.queryStringQuery(搜索内容)
// 查询方法,对所有字段进行分词查询
// SearchRequestBuilder setQuery=client.prepareSearch("blog1").setTypes("article")
// .setQuery(QueryBuilders.queryStringQuery("搜"));
// SearchResponse searchResponse = setQuery.get();
// 2、查询content里包含全文,使用wildcardQuery磨合查询*任意字符串?任意单个字符
// SearchRequestBuildersetQuery =client.prepareSearch("blog1").setTypes("article")
// .setQuery(QueryBuilders.wildcardQuery("content","*搜索*"));
// SearchResponsesearchResponse = setQuery.get();
// 3、查询content词条为“搜索”内容,使用TermQuery
SearchRequestBuildersetQuery = client.prepareSearch("blog1").setTypes("article")
.setQuery(QueryBuilders.termQuery("content","*搜索*"));
SearchResponsesearchResponse = setQuery.get();
int totalShards =searchResponse.getTotalShards();
System.out.println("totalShards = "+ totalShards);
SearchHitshits = searchResponse.getHits();
for (SearchHit searchHit :hits) {
System.out.println(searchHit.getIndex());
System.out.println(searchHit.getSourceAsString());
System.out.println(searchHit.getFields().toString());
}
long totalHits =hits.getTotalHits();
System.out.println("totalHits = "+ totalHits);
client.close();
}
1.11.2. es基本操作2
1、创建索引
import java.net.InetAddress;
import org.elasticsearch.action.search.SearchRequestBuilder;
import org.elasticsearch.action.search.SearchResponse;
import org.elasticsearch.client.transport.TransportClient;
import org.elasticsearch.common.transport.InetSocketTransportAddress;
import org.elasticsearch.common.xcontent.XContentBuilder;
import org.elasticsearch.common.xcontent.XContentFactory;
import org.elasticsearch.index.query.QueryBuilders;
import org.elasticsearch.search.SearchHit;
import org.elasticsearch.search.SearchHits;
import org.junit.Test;
publicclassESClient {
@Test
// 索引操作
publicvoid demo4() throws IOException {
// 创建连接搜索服务器对象
Clientclient = TransportClient.builder().build()
.addTransportAddress(newInetSocketTransportAddress(InetAddress.getByName("127.0.0.1"),9300));
// 创建索引
client.admin().indices().prepareCreate("blog2").get();
// 删除索引
client.admin().indices().prepareDelete("blog2").get();
// 关闭连接
client.close();
}
@Test
// 映射操作
publicvoid demo5() throws IOException,InterruptedException, ExecutionException {
// 创建连接搜索服务器对象
Clientclient = TransportClient.builder().build()
.addTransportAddress(newInetSocketTransportAddress(InetAddress.getByName("127.0.0.1"),9300));
// 添加映射
XContentBuilderbuilder = XContentFactory.jsonBuilder().startObject()
// zz
.startObject("article").startObject("properties")
//
.startObject("id").field("type", "integer").field("store","yes").endObject()
//
.startObject("title").field("type", "string").field("store","yes").field("analyzer","ik").endObject()
//
.startObject("content").field("type", "string").field("store","yes").field("analyzer","ik")
.endObject()//
.endObject().endObject().endObject();
PutMappingRequestmapping = Requests.putMappingRequest("blog2").type("article").source(builder);
client.admin().indices().putMapping(mapping).get();
// 关闭连接
client.close();
}
@Test
// 文档相关操作
publicvoid demo6() throws IOException,InterruptedException, ExecutionException {
// 创建连接搜索服务器对象
Clientclient = TransportClient.builder().build()
.addTransportAddress(newInetSocketTransportAddress(InetAddress.getByName("127.0.0.1"),9300));
// 描述json数据
/*
* {id:xxx, title:xxx, content:xxx}
*/
Articlearticle = newArticle();
article.setId(2);
article.setTitle("搜索工作其实很快乐");
article.setContent("我们希望我们的搜索解决方案要快,我们希望有一个零配置和一个完全免费的搜索模式,我们希望能够简单地使用JSON通过HTTP的索引数据,我们希望我们的搜索服务器始终可用,我们希望能够一台开始并扩展到数百,我们要实时搜索,我们要简单的多租户,我们希望建立一个云的解决方案。Elasticsearch旨在解决所有这些问题和更多的问题。");
ObjectMapperobjectMapper = new ObjectMapper();
// 建立文档
// client.prepareIndex("blog2","article", article.getId().toString())
//.setSource(objectMapper.writeValueAsString(article)).get();
// 修改文档
// client.prepareUpdate("blog2","article", article.getId().toString())
//.setDoc(objectMapper.writeValueAsString(article)).get();
// 修改文档
// client.update(
// new UpdateRequest("blog2","article", article.getId()
// .toString()).doc(objectMapper
// .writeValueAsString(article))).get();
// 删除文档
// client.prepareDelete("blog2","article", article.getId().toString())
// .get();
// 删除文档
client.delete(new DeleteRequest("blog2","article",article.getId().toString())).get();
// 关闭连接
client.close();
}
@Test
// 批量查询100条记录
publicvoid demo7() throws IOException,InterruptedException, ExecutionException {
// 创建连接搜索服务器对象
Clientclient = TransportClient.builder().build()
.addTransportAddress(newInetSocketTransportAddress(InetAddress.getByName("127.0.0.1"),9300));
ObjectMapperobjectMapper = newObjectMapper();
for (int i = 1; i <= 100;i++) {
// 描述json数据
Articlearticle = newArticle();
article.setId(i);
article.setTitle(i+ "搜索工作其实很快乐");
article.setContent(i
+"我们希望我们的搜索解决方案要快,我们希望有一个零配置和一个完全免费的搜索模式,我们希望能够简单地使用JSON通过HTTP的索引数据,我们希望我们的搜索服务器始终可用,我们希望能够一台开始并扩展到数百,我们要实时搜索,我们要简单的多租户,我们希望建立一个云的解决方案。Elasticsearch旨在解决所有这些问题和更多的问题。");
// 建立文档
client.prepareIndex("blog2","article",article.getId().toString())
.setSource(objectMapper.writeValueAsString(article)).get();
}
// 关闭连接
client.close();
}
@Test
// 分页搜索
publicvoid demo8() throws IOException {
// 创建连接搜索服务器对象
Clientclient = TransportClient.builder().build()
.addTransportAddress(newInetSocketTransportAddress(InetAddress.getByName("127.0.0.1"),9300));
// 搜索数据
// get() === execute().actionGet()
SearchRequestBuildersearchRequestBuilder = client.prepareSearch("blog2").setTypes("article")
.setQuery(QueryBuilders.matchAllQuery());
// 查询第2页数据,每页20条
searchRequestBuilder.setFrom(20).setSize(20);
SearchResponsesearchResponse = searchRequestBuilder.get();
printSearchResponse(searchResponse);
// 关闭连接
client.close();
}
@Test
// 高亮查询结果处理搜索
publicvoid demo9() throws IOException {
// 创建连接搜索服务器对象
Clientclient = TransportClient.builder().build()
.addTransportAddress(newInetSocketTransportAddress(InetAddress.getByName("127.0.0.1"),9300));
ObjectMapperobjectMapper = newObjectMapper();
// 搜索数据
SearchRequestBuildersearchRequestBuilder = client.prepareSearch("blog2").setTypes("article")
.setQuery(QueryBuilders.termQuery("title","搜索"));
// 高亮定义
searchRequestBuilder.addHighlightedField("title");// 对title字段进行高亮
searchRequestBuilder.setHighlighterPreTags("<em>");// 前置元素
searchRequestBuilder.setHighlighterPostTags("</em>");// 后置元素
SearchResponsesearchResponse = searchRequestBuilder.get();
SearchHitshits = searchResponse.getHits(); // 获取命中次数,查询结果有多少对象
System.out.println("查询结果有:" + hits.getTotalHits() + "条");
Iterator<SearchHit>iterator = hits.iterator();
while (iterator.hasNext()) {
SearchHitsearchHit = iterator.next(); // 每个查询对象
// 将高亮处理后内容,替换原有内容(原有内容,可能会出现显示不全)
Map<String,HighlightField> highlightFields = searchHit.getHighlightFields();
HighlightFieldtitleField = highlightFields.get("title");
// 获取到原有内容中每个高亮显示集中位置 fragment 就是高亮片段
Text[]fragments = titleField.fragments();
Stringtitle = "";
for (Text text : fragments){
title+= text;
}
// 将查询结果转换为对象
Articlearticle = objectMapper.readValue(searchHit.getSourceAsString(), Article.class);
// 用高亮后内容,替换原有内容
article.setTitle(title);
System.out.println(article);
}
// 关闭连接
client.close();
}
}
1.11.3. spring-data-es操作
参考文档:
https://es.yemengying.com/4/4.4/4.4.1.html
http://blog.csdn.net/gamay/article/details/72914190
1、 创建项目
2、 导入依赖包
<dependencies>
<dependency>
<groupId>org.elasticsearch</groupId>
<artifactId>elasticsearch</artifactId>
<version>2.4.0</version>
</dependency>
<dependency>
<groupId>org.springframework.data</groupId>
<artifactId>spring-data-elasticsearch</artifactId>
<version>2.0.4.RELEASE</version>
</dependency>
<dependency>
<groupId>org.springframework</groupId>
<artifactId>spring-test</artifactId>
<version>4.2.8.RELEASE</version>
</dependency>
<dependency>
<groupId>org.slf4j</groupId>
<artifactId>slf4j-log4j12</artifactId>
<version>1.7.12</version>
</dependency>
<dependency>
<groupId>junit</groupId>
<artifactId>junit</artifactId>
<version>4.12</version>
</dependency>
</dependencies>
3、 配置applicationContext.xml文件
<?xml version="1.0"encoding="UTF-8"?>
<beans xmlns="http://www.springframework.org/schema/beans"
xmlns:xsi="http://www.w3.org/2001/XMLSchema-instance"
xmlns:context="http://www.springframework.org/schema/context"
xmlns:elasticsearch="http://www.springframework.org/schema/data/elasticsearch"
xsi:schemaLocation="
http://www.springframework.org/schema/beans
http://www.springframework.org/schema/beans/spring-beans.xsd
http://www.springframework.org/schema/context
http://www.springframework.org/schema/context/spring-context.xsd
http://www.springframework.org/schema/data/elasticsearch
http://www.springframework.org/schema/data/elasticsearch/spring-elasticsearch-1.0.xsd">
<!-- 扫描DAO包自动创建实现 -->
<elasticsearch:repositories base-package="co.elsatic.client.dao" />
<!-- 扫描Service包 -->
<context:component-scan base-package="co.elsatic.client.service" />
<!-- 配置elasticsearch连接 -->
<elasticsearch:transport-client id="client" cluster-nodes="localhost:9300"/>
<!-- spring data elasticsearch DAO 必须依赖 elasticsearchTemplate -->
<bean id="elasticsearchTemplate"
class="org.springframework.data.elasticsearch.core.ElasticsearchTemplate">
<constructor-arg name="client" ref="client"/>
</bean>
</beans>
4、 配置log4j.properties文件
### direct log messages to stdout###
log4j.appender.stdout=org.apache.log4j.ConsoleAppender
log4j.appender.stdout.Target=System.out
log4j.appender.stdout.layout=org.apache.log4j.PatternLayout
log4j.appender.stdout.layout.ConversionPattern=%d{ABSOLUTE}%5p%c{1}:%L-%m%n
### direct messages to filemylog.log ###
log4j.appender.file=org.apache.log4j.FileAppender
log4j.appender.file.File=c:/mylog.log
log4j.appender.file.layout=org.apache.log4j.PatternLayout
log4j.appender.file.layout.ConversionPattern=%d{ABSOLUTE}%5p%c{1}:%L-%m%n
### set log levels - for moreverbose logging change 'info' to 'debug' ###
log4j.rootLogger=info,stdout
5、 编写代码
定义实体类:通过注解标示索引,存储,分词等
import org.springframework.data.annotation.Id;
import org.springframework.data.elasticsearch.annotations.Document;
import org.springframework.data.elasticsearch.annotations.Field;
import org.springframework.data.elasticsearch.annotations.FieldIndex;
import org.springframework.data.elasticsearch.annotations.FieldType;
@Document(indexName= "blog3",type = "article")
publicclassArticle {
@Id
@Field(index = FieldIndex.not_analyzed, store = true, type = FieldType.Integer)
private Integer id;
@Field(index = FieldIndex.analyzed, analyzer = "ik", store = true, searchAnalyzer = "ik", type =FieldType.String)
private String title;
@Field(index = FieldIndex.analyzed, analyzer = "ik", store = true, searchAnalyzer = "ik", type =FieldType.String)
private String content;
public Integer getId() {
returnid;
}
publicvoid setId(Integer id) {
this.id = id;
}
public String getTitle() {
returntitle;
}
publicvoid setTitle(String title){
this.title = title;
}
public String getContent() {
returncontent;
}
publicvoid setContent(Stringcontent) {
this.content = content;
}
@Override
public String toString() {
return"Article [id="+ id + ", title="+ title+ ", content="
+content+ "]";
}
}
定义dao接口:通过继承ElasticsearchRepository接口
import java.util.List;
import org.springframework.data.domain.Page;
import org.springframework.data.domain.Pageable;
importorg.springframework.data.elasticsearch.repository.ElasticsearchRepository;
publicinterfaceArticleRepository extends
ElasticsearchRepository<Article,Integer> {
List<Article>findByTitle(String title);
Page<Article>findByTitle(String title, Pageable pageable);
}
编写service接口:
import java.util.List;
import org.springframework.data.domain.Page;
import org.springframework.data.domain.Pageable;
import co.elsatic.client.Article;
publicinterfaceArticleService {
publicvoid save(Article article);
publicvoid delete(Articlearticle);
public Article findOne(Integerid);
public Iterable<Article>findAll();
public Page<Article>findAll(Pageable pageable);
public List<Article>findByTitle(String title);
public Page<Article>findByTitle(String title, Pageable pageable);
}
编写service接口实现类:
import java.util.List;
import org.springframework.beans.factory.annotation.Autowired;
import org.springframework.data.domain.Page;
import org.springframework.data.domain.Pageable;
import org.springframework.data.domain.Sort;
import org.springframework.stereotype.Service;
import co.elsatic.client.Article;
import co.elsatic.client.ArticleRepository;
@Service
publicclassArticleServiceImpl implements ArticleService {
@Autowired
private ArticleRepository articleRepository;
publicvoid save(Article article) {
articleRepository.save(article);
}
publicvoid delete(Article article){
articleRepository.delete(article);
}
public Article findOne(Integerid) {
returnarticleRepository.findOne(id);
}
public Iterable<Article>findAll() {
returnarticleRepository.findAll(newSort(newSort.Order(
Sort.Direction.ASC, "id")));
}
public Page<Article>findAll(Pageable pageable) {
returnarticleRepository.findAll(pageable);
}
public List<Article>findByTitle(String title) {
returnarticleRepository.findByTitle(title);
}
public Page<Article>findByTitle(String title, Pageable pageable) {
returnarticleRepository.findByTitle(title, pageable);
}
}
测试类:
import org.elasticsearch.client.Client;
import org.junit.Test;
import org.junit.runner.RunWith;
import org.springframework.beans.factory.annotation.Autowired;
import org.springframework.data.domain.Page;
import org.springframework.data.domain.PageRequest;
import org.springframework.data.domain.Pageable;
import org.springframework.data.elasticsearch.core.ElasticsearchTemplate;
import org.springframework.test.context.ContextConfiguration;
import org.springframework.test.context.junit4.SpringJUnit4ClassRunner;
import co.elsatic.client.Article;
import co.elsatic.client.service.ArticleService;
@RunWith(SpringJUnit4ClassRunner.class)
@ContextConfiguration(locations = "classpath:applicationContext.xml")
publicclassArticleServiceTest {
@Autowired
private ArticleService articleService;
@Autowired
private Client client; // 基于原生API
@Autowired
private ElasticsearchTemplate elasticsearchTemplate;
@Test
publicvoid createIndex() {
elasticsearchTemplate.createIndex(Article.class);
elasticsearchTemplate.putMapping(Article.class);
}
@Test
publicvoid testSave() {
Articlearticle = newArticle();
article.setId(1001);
article.setTitle("Spring Data Elasticsearch 1.3.1 昨天发布");
article.setContent("DATAES-171 - 添加失效查询关键字支持 DATAES-194 - 测试可以清理 data 目录 DATAES-179 - 支持 Attachment 字段类型 DATAES-94 - 更新到最新版本的 elasticsearch 1.7.3 驱动器");
articleService.save(article);
}
@Test
publicvoid testDelete() {
Articlearticle = newArticle();
article.setId(1001);
articleService.delete(article);
}
@Test
publicvoid testFindOne() {
System.out.println(articleService.findOne(1001));
}
@Test
publicvoid testSaveBatch() {
for (int i = 1; i <= 100;i++) {
Articlearticle = newArticle();
article.setId(i);
article.setTitle(i+ "Spring Data Elasticsearch 1.3.1 昨天发布");
article.setContent(i
+"DATAES-171 - 添加失效查询关键字支持 DATAES-194 - 测试可以清理 data 目录 DATAES-179 - 支持 Attachment 字段类型 DATAES-94 - 更新到最新版本的 elasticsearch 1.7.3 驱动器");
articleService.save(article);
}
}
@Test
// 排序分页查询
publicvoid testSortAndPaging() {
Iterable<Article>articles = articleService.findAll();
for (Article article :articles) {
System.out.println(article);
}
Pageablepageable = newPageRequest(0, 10);
Page<Article>pageData = articleService.findAll(pageable);
for (Article article :pageData.getContent()) {
System.out.println(article);
}
}
@Test
// 条件查询
publicvoid testConditionQuery() {
// 查询标题中含有 “昨天”
// List<Article> articles =articleService.findByTitle("昨天");
// for (Article article : articles) {
// System.out.println(article);
// }
// 查询标题中含有 “昨天” 1-10条
Pageablepageable = newPageRequest(0, 10);
Page<Article>pageData = articleService.findByTitle("昨天", pageable);
System.out.println("总记录数:" + pageData.getTotalElements());
for (Article article :pageData.getContent()) {
System.out.println(article);
}
}
}
2. Docker
centos7下载地址:
http://101.96.8.146/isoredirect.centos.org/centos/7/isos/x86_64/CentOS-7-x86_64-DVD-1708.iso
2.1. docker安装
安装Docker环境
OS : RHEL7.2 64位
参考文档:
https://www.cnblogs.com/zlslch/p/7610572.html
http://blog.csdn.net/liumiaocn/article/details/52130852
http://blog.csdn.net/u010472499/article/details/51145265
http://www.cnblogs.com/fansik/p/5526938.html
yum源:
wget -O /etc/yum.repos.d/CentOS-Base.repo http://mirrors.aliyun.com/repo/Centos-6.repo
wget -O /etc/yum.repos.d/CentOS-Base.repo http://mirrors.aliyun.com/repo/Centos-7.repo
# wget -O /etc/yum.repos.d/CentOS-Base.repo http://mirrors.aliyun.com/repo/Centos-7.repo
# sed -i 's/$releasever/7/g'/etc/yum.repos.d/CentOS-Base.repo
# yum clean all
# yum list
# yum -y install docker
# systemctl start docker
2.1.1. 修改yum源
修改yum源
[root@node90 ~]#
[root@node90 ~]# cd /etc/yum.repos.d/
[root@node90 yum.repos.d]# ls
docker.repo redhat.repo rhel7.repo
[root@node90 yum.repos.d]#
[root@node90 yum.repos.d]# cat docker.repo
[docker-source]
name=Docker Repository
baseurl=http://yum.dockerproject.org/repo/main/centos/7/
enabled=1
gpgcheck=0
[root@node90 yum.repos.d]#
2.1.2. 开启路由转发功能
开启路由转发功能,否则容器中的无法上网
[root@node90 ~]# echo1 > /proc/sys/net/ipv4/ip_forward
[root@node90 ~]#
2.1.3. 安装Docker引擎
安装Docker引擎
yum install -y yum-utils
yum-config-manager \
--add-repo \
https://docs.docker.com/engine/installation/linux/repo_files/centos/docker.repo
yum makecache fast
yum install docker-engine-y #到官网下载即可
4) 启动Docker服务
ystemctl start docker
ystemctl enable docker #开机启动
5) 检查是否安装成功
docker version #可查看docker版本信息则安装成功。
6) dockerinfo #查看Docker 中容器总体状况。
二、ubuntu安装Docker
wget -qO- https://get.docker.com/ | sh
2.2. docker安装
2.2.1. 下载编译


 1541
1541


 被折叠的 条评论
为什么被折叠?
被折叠的 条评论
为什么被折叠?
 到【灌水乐园】发言


