


安装前的准备:
1. 我现在已经安装了icinga,并且使用了mysql. check_mk要求事先安装了全功能的nagios, 似乎我的已经算是全功能了。现在运行icinga也正常。
2. 检查external command是否正常。打开网页,登录后勾选localhost的ping服务, 然后点击右上的下拉框:
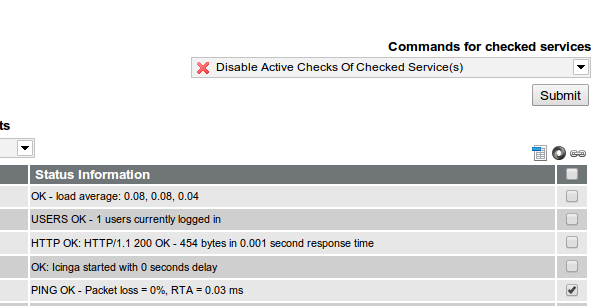
点击Submit按钮后,接着做一些后续操作。然后回到页面发现Ping服务被禁止了。

所以external command工作正常。
3. 检查python, UBuntu server已经安装好了,刚好是2.x版本。
python --version
Python 2.7.3
4. xinetd 在之前安装NSCA的时候就装过了。
开始安装:
1. 下载
root@icinga:/opt# wget http://mathias-kettner.com/download/check_mk-1.2.2p1.tar.gz2. 解压:
tar zxvf check_mk-1.2.2p1.tar.gz3. 运行./setup.sh 程序,进入交互式安装过程,一般都用默认值。下面是我的默认选择:
You have chosen the following directories:

 Executable programs             /usr/bin
 Check_MK configuration          /etc/check_mk
 Check_MK software               /usr/share/check_mk
 documentation                   /usr/share/doc/check_mk
 check manuals                   /usr/share/doc/check_mk/checks
 working directory of check_mk   /var/lib/check_mk
 extensions for agents           /usr/lib/check_mk_agent
 configuration dir for agents    /etc/check_mk
 Name of Nagios user             icinga
 User of Apache process          www-data
 Common group of Nagios+Apache   icinga-cmd
 Nagios binary                   /usr/local/icinga/bin/icinga
 Nagios main configuration file  /usr/local/icinga/etc/icinga.cfg
 Nagios object directory         /usr/local/icinga/etc/conf.d
 Nagios startskript              /etc/init.d/icinga
 Nagios command pipe             /usr/local/icinga/var/rw/icinga.cmd
 Check results directory         /usr/local/icinga/var/spool/checkresults
 Nagios status file              /usr/local/icinga/var/status.dat
 Path to check_icmp              /usr/lib/nagios/plugins/check_icmp
 URL Prefix for Web addons       /
 Apache config dir               /etc/apache2/conf.d
 HTTP authentication file        /usr/local/icinga/etc/htpasswd.users
 HTTP AuthName                   Icinga Access
 PNP4Nagios templates            /usr/share/check_mk/pnp-templates
 compile livestatus module       yes
 check_mk's binary modules       /usr/lib/check_mk
 Unix socket for Livestatus      /usr/local/icinga/var/rw/live
 Backends for other systems      /usr/share/check_mk/livestatus
 Install Event Console           no
这些信息都存在了~/.check_mk_setup.conf文件里面。下次如果想重新安装,可以先删除这个文件。
4. 重新启动apache2和icinga服务后,打开网页:http://10.112.18.111/check_mk
看到错误信息:
Check_mk: Incomplete Apache2 Installation

You need mod_python in order to run the web interface of check_mk.
Please install mod_python and restart Apache.
现在来安装Apache2的模块mod_python.
apt-get install libapache2-mod-python现在看到页面了,但是有两个错误:


5. 先不管上面的错误,安装一下本机监控用的agent。
wget http://mathias-kettner.com/download/check-mk-agent_1.2.2p1-2_all.debdpkg -i check-mk-agent_1.2.2p1-2_all.deb
Selecting previously unselected package check-mk-agent.
(Reading database ... 65470 files and directories currently installed.)
Unpacking check-mk-agent (from check-mk-agent_1.2.2p1-2_all.deb) ...
Setting up check-mk-agent (1.2.2p1-2) ...
Reloading xinetd...
6. 修改监控的host列表, 编辑/etc/check_mk/main.mk文件,内容如下:
# Put your host names here
all_hosts = [ 'localhost' ]cmk -I
cpu.loads 1 new checks
cpu.threads 1 new checks
df 2 new checks
diskstat 1 new checks
kernel 3 new checks
kernel.util 1 new checks
lnx_if 1 new checks
mem.used 1 new checks
mounts 2 new checks
tcp_conn_stats 1 new checks
uptime 1 new checks8. 然后用check_mk -O 来自动修改icinga的配置文件:
check_mk -O
Generating Nagios configuration...OK
Validating Nagios configuration...ERROR:

Icinga 1.9.0
Copyright (c) 2009-2013 Icinga Development Team (http://www.icinga.org)
Copyright (c) 2009-2013 Nagios Core Development Team and Community Contributors
Copyright (c) 1999-2009 Ethan Galstad
Last Modified: 05-07-2013
License: GPL

Reading configuration data...
   Read main config file okay...
Processing object config directory '/usr/local/icinga/etc/conf.d'...
Processing object config file '/usr/local/icinga/etc/conf.d/check_mk_objects.cfg'...
Processing object config file '/usr/local/icinga/etc/conf.d/check_mk_templates.cfg'...
Processing object config file '/usr/local/icinga/etc/objects/commands.cfg'...
Processing object config file '/usr/local/icinga/etc/objects/contacts.cfg'...
Processing object config file '/usr/local/icinga/etc/objects/timeperiods.cfg'...
Processing object config file '/usr/local/icinga/etc/objects/templates.cfg'...
Processing object config file '/usr/local/icinga/etc/objects/localhost.cfg'...
Warning: Duplicate definition found for host 'localhost' (config file '/usr/local/icinga/etc/objects/localhost.cfg', starting on line 23)
Error: Could not add object property in file '/usr/local/icinga/etc/objects/localhost.cfg' on line 27.
   Error processing object config files!


***> One or more problems was encountered while processing the config files...

     Check your configuration file(s) to ensure that they contain valid
     directives and data definitions.  If you are upgrading from a previous
     version of Icinga, you should be aware that some variables/definitions
     may have been removed or modified in this version.  Make sure to read
     the HTML documentation regarding the config files, as well as the
     'Whats New' section and the Changelog CHANGES section as well to find
     out what has changed.

Nagios configuration is invalid. Rolling back.
报错了。因为icinga默认有localhost配置。最简单的解决方法是把下面的文件里面的localhost的host定义注释掉
/usr/local/icinga/etc/objects/localhost.cfg#define host{
# use linux-server ; Name of host template to use
# ; This host definition will inherit all variables that are defined
# ; in (or inherited by) the linux-server host template definition.
# host_name localhost
# alias localhost
# address 127.0.0.1
# } 再次运行check_mk -O ,成功。
root@icinga:/etc/check_mk# check_mk -O
Generating Nagios configuration...OK
Validating Nagios configuration...OK
Precompiling host checks...OK
Reloading Nagios...OK


 3484
3484


 被折叠的 条评论
为什么被折叠?
被折叠的 条评论
为什么被折叠?
 到【灌水乐园】发言


