


1. Idea自身打包方式
1.1 创建Artifacts
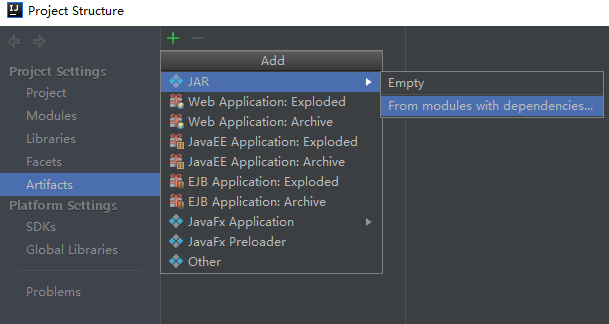
快捷键(Ctrl+Alt+Shift+S)打开项目的Project Structure。在Artifacts创建
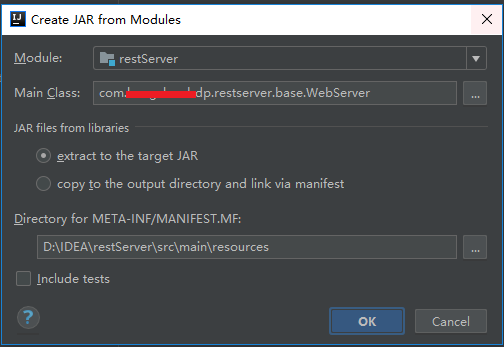
接着,指定main class,如下:
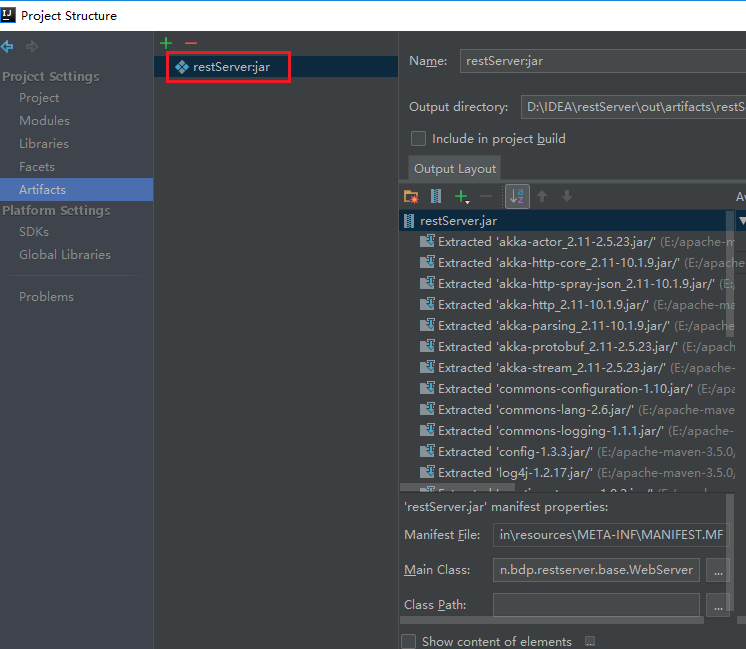
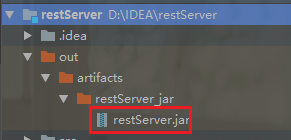
最后,得到创建得到的artifacts
1.2 打包Artifacts
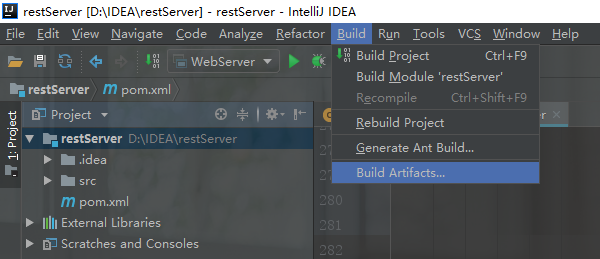
在菜单栏目选Build,最后一栏Build Artifacts
最后,在出现的窗口创建

得到打包结果:
2. maven打包方式
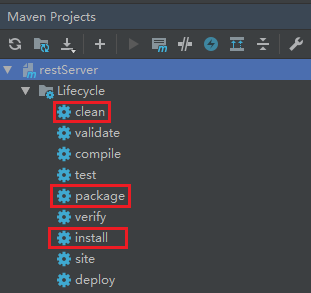
maven打包的步骤:
- 先mvn clean,再 package即可
- 如需把项目编译成jar包,打进maven仓库里面,可以运行install命令
2.1 maven-jar-plugins 无依赖第三方jar的打包
pom.xml配置如下:
<!--①无依赖其他任何jar打包-->
    <build>
        <resources>
            <resource>
                <targetPath>${project.build.directory}/classes</targetPath>
                <directory>src/main/resources</directory>
                <filtering>true</filtering>
                <includes>
                    <include>**/*.xml</include>
                    <include>**/*.conf</include>
                </includes>
            </resource>
        </resources>

        <plugins>
            <!--scala打包插件-->
            <plugin>
                <groupId>net.alchim31.maven</groupId>
                <artifactId>scala-maven-plugin</artifactId>
                <version>3.2.1</version>
                <executions>
                    <execution>
                        <id>scala-compile-first</id>
                        <phase>process-resources</phase>
                        <goals>
                            <goal>add-source</goal>
                            <goal>compile</goal>
                        </goals>
                    </execution>
                </executions>
            </plugin>

            <!--java打包插件-->
            <plugin>
                <groupId>org.apache.maven.plugins</groupId>
                <artifactId>maven-compiler-plugin</artifactId>
                <version>3.1</version>
                <configuration>
                    <source>1.8</source>
                    <target>1.8</target>
                    <encoding>UTF-8</encoding>
                </configuration>
                <executions>
                    <execution>
                        <phase>compile</phase>
                        <goals>
                            <goal>compile</goal>
                        </goals>
                    </execution>
                </executions>
            </plugin>

            <plugin>
                <groupId>org.apache.maven.plugins</groupId>
                <artifactId>maven-jar-plugin</artifactId>
                <version>2.4</version>
                <configuration>
                    <archive>
                        <manifest>
                            <addClasspath>true</addClasspath>
                            <classpathPrefix>lib/</classpathPrefix>
                            <mainClass>com.swordfall.restserver.base.WebServer</mainClass>
                        </manifest>
                    </archive>
                </configuration>
            </plugin>
        </plugins>
    </build>
运行:在target中找到打包出来的xxx.jar包,运行java -jar xxx.jar即可,但是如果程序有依赖其他包,比如程序依赖jdbc去查询db,这时候再执行就会出现找不到jdbc依赖,因为我们并没有将依赖包打进去。
2.2 maven-assembly-plugins 解决依赖第三方jar包,并可执行jar的打包
以下方式用的比较少,因为我们依赖的jar,也会打进到我们最终生成的jar中,会导致一个jar文件过大,而且如果要给第三方使用,最好给一个纯净的。
pom.xml配置如下:
<!--②解决依赖第三方,可执行jar的打包,全量打包-->
    <build>
        <resources>
            <resource>
                <targetPath>${project.build.directory}/classes</targetPath>
                <directory>src/main/resources</directory>
                <filtering>true</filtering>
                <includes>
                    <include>**/*.xml</include>
                    <include>**/*.conf</include>
                </includes>
            </resource>
        </resources>

        <plugins>
            <!--scala打包插件-->
            <plugin>
                <groupId>net.alchim31.maven</groupId>
                <artifactId>scala-maven-plugin</artifactId>
                <version>3.2.1</version>
                <executions>
                    <execution>
                        <id>scala-compile-first</id>
                        <phase>process-resources</phase>
                        <goals>
                            <goal>add-source</goal>
                            <goal>compile</goal>
                        </goals>
                    </execution>
                </executions>
            </plugin>

            <!--java打包插件-->
            <plugin>
                <groupId>org.apache.maven.plugins</groupId>
                <artifactId>maven-compiler-plugin</artifactId>
                <version>3.1</version>
                <configuration>
                    <source>1.8</source>
                    <target>1.8</target>
                    <encoding>UTF-8</encoding>
                </configuration>
                <executions>
                    <execution>
                        <phase>compile</phase>
                        <goals>
                            <goal>compile</goal>
                        </goals>
                    </execution>
                </executions>
            </plugin>

            <plugin>
                <groupId>org.apache.maven.plugins</groupId>
                <artifactId>maven-assembly-plugin</artifactId>
                <version>2.3</version>
                <configuration>
                    <appendAssemblyId>false</appendAssemblyId>
                    <descriptorRefs>
                        <descriptorRef>jar-with-dependencies</descriptorRef>
                    </descriptorRefs>
                    <archive>
                        <manifest>
                            <mainClass>com.swordfall.restserver.base.WebServer</mainClass>
                        </manifest>
                    </archive>
                </configuration>
                <executions>
                    <execution>
                        <id>make-assembly</id>
                        <phase>package</phase>
                        <goals>
                            <goal>assembly</goal>
                        </goals>
                    </execution>
                </executions>
            </plugin>
        </plugins>
    </build>
2.3 maven-assembly-plugins zip打包
在2.2基础上,我们还可以利用assembly,将我们依赖的jar归类,打包成一个zip。发布项目的时候,将zip包copy到服务器上,直接unzip xxx.zip,里面包含要运行的jar以及依赖的lib,还有配置的config文件,还可以包括执行脚本,可以直接启动服务。
<!-- ③maven-assembly-plugin -->
    <build>
         <resources>
             <resource>
                 <directory>src/main/resources</directory>
                 <includes>
                     <include>**/*.properties</include>
                     <include>**/*.xml</include>
                 </includes>
                 <!-- 排除外置的配置文件(运行时注释上,使IDE能读到配置文件;打包时放开注释让配置文件外置,方便修改)可以不配置,maven-jar-plugin下面已配置 -->
                 <!--<excludes>
                     <exclude>config.properties</exclude>
                 </excludes>-->
             </resource>
             <!-- 配置文件外置的资源(存放到conf目录,也是classpath路径,下面会配置)-->
             <!--<resource>
                 <directory>src/main/resources</directory>
                 <includes>
                     <include>config.properties</include>
                 </includes>
                 <targetPath>${project.build.directory}/conf</targetPath>
             </resource>-->
         </resources>

        <plugins>
            <!--scala打包插件-->
            <plugin>
                <groupId>net.alchim31.maven</groupId>
                <artifactId>scala-maven-plugin</artifactId>
                <version>3.2.1</version>
                <executions>
                    <execution>
                        <id>scala-compile-first</id>
                        <phase>process-resources</phase>
                        <goals>
                            <goal>add-source</goal>
                            <goal>compile</goal>
                        </goals>
                    </execution>
                </executions>
            </plugin>

            <!--java打包插件-->
            <plugin>
                <groupId>org.apache.maven.plugins</groupId>
                <artifactId>maven-compiler-plugin</artifactId>
                <version>3.1</version>
                <configuration>
                    <source>1.8</source>
                    <target>1.8</target>
                    <encoding>UTF-8</encoding>
                </configuration>
                <executions>
                    <execution>
                        <phase>compile</phase>
                        <goals>
                            <goal>compile</goal>
                        </goals>
                    </execution>
                </executions>
            </plugin>

            <!--
                ③打成一个zip包,发布项目的时候,将zip包copy到服务器上,直接unzip xxx.zip,里面包含要运行到的jar以及依赖的lib,还有配置的config文件,即可直接启动服务
            -->

            <!--The configuration of maven-jar-plugin-->
             <plugin>
                 <groupId>org.apache.maven.plugins</groupId>
                 <artifactId>maven-jar-plugin</artifactId>
                 <version>2.4</version>
                 <!--The configuration of the plugin-->
                 <configuration>
                     <!-- 不打包资源文件(配置文件和依赖包分开) -->
                     <excludes>
                         <exclude>*.properties</exclude>
                         <exclude>*.xml</exclude>
                         <exclude>*.txt</exclude>
                     </excludes>
                     <!--Configuration of the archiver-->
                     <archive>
                         <!--生成的jar中,不要包含pom.xml和pom.properties这两个文件-->
                         <addMavenDescriptor>false</addMavenDescriptor>
                         <!--Manifest specific configuration-->
                         <manifest>
                             <!--是否把第三方jar放到manifest的classpath中-->
                             <addClasspath>true</addClasspath>
                             <!--生成的manifest中classpath的前缀,因为要把第三方jar放到lib目录下,所以classpath的前缀是lib/-->
                             <classpathPrefix>lib/</classpathPrefix>
                             <!--应用的main class-->
                             <mainClass>com.swordfall.restserver.base.WebServer</mainClass>
                         </manifest>
                         <!-- 给清单文件添加键值对,增加classpath路径,这里将conf目录也设置为classpath路径 -->
                         <manifestEntries>
                             <Class-Path>conf/</Class-Path>
                         </manifestEntries>
                     </archive>
                     <!--过滤掉不希望包含在jar中的文件-->
                    <!-- <excludes>
                         <exclude>${project.basedir}/xml/*</exclude>
                     </excludes>-->
                 </configuration>
             </plugin>

             <!--The configuration of maven-assembly-plugin-->
             <plugin>
                 <groupId>org.apache.maven.plugins</groupId>
                 <artifactId>maven-assembly-plugin</artifactId>
                 <version>2.4</version>
                 <!--The configuration of the plugin-->
                 <configuration>
                     <!--Specifies the configuration file of the assembly plugin-->
                     <descriptors>
                         <descriptor>src/main/assembly/assembly.xml</descriptor>
                     </descriptors>
                 </configuration>
                 <executions>
                     <execution>
                         <id>make-assembly</id>
                         <phase>package</phase>
                         <goals>
                             <goal>single</goal>
                         </goals>
                     </execution>
                 </executions>
             </plugin>
        </plugins>
    </build>
  maven-assembly-plugin还需要配置一个assembly.xml文件,用于过滤不必要的第三方jar包文件,或者确定自己编译的项目文件路径、项目的启动脚本文件目录,打包的类型格式zip或者tar.gz等。
  assembly.xml文件内容为:
<assembly>
    <id>bin</id>
    <includeBaseDirectory>false</includeBaseDirectory>
    <!-- 最终打包成一个用于发布的zip文件 -->
    <formats>
        <format>zip</format>
    </formats>

    <!-- Adds dependencies to zip package under lib directory -->
    <dependencySets>
        <dependencySet>
            <!-- 不使用项目的artifact,第三方jar不要解压,打包进zip文件的lib目录 -->
            <useProjectArtifact>false</useProjectArtifact>
            <outputDirectory>lib</outputDirectory>
            <unpack>false</unpack>
        </dependencySet>
    </dependencySets>

    <fileSets>
        <!-- 把项目相关的说明文件,打包进zip文件的根目录 -->
        <!--<fileSet>
            <directory>${project.basedir}</directory>
            <outputDirectory>/</outputDirectory>
        </fileSet>-->

        <!-- 把项目的配置文件,打包进zip文件的config目录 -->
        <!--<fileSet>-->
            <!--<directory>${project.basedir}/src/main/resources</directory>-->
            <!--<outputDirectory>/conf</outputDirectory>-->
            <!--<includes>-->
                <!--<include>*.xml</include>-->
                <!--<include>*.properties</include>-->
            <!--</includes>-->
        <!--</fileSet>-->

        <!-- 把项目自己编译出来的jar文件,打包进zip文件的根目录 -->
        <fileSet>
            <directory>${project.build.directory}</directory>
            <outputDirectory></outputDirectory>
            <includes>
                <include>*.jar</include>
            </includes>
        </fileSet>

        <!-- 把项目的脚本文件目录(src/main/scripts)中的启动脚本,打包进zip文件的根目录 -->
        <fileSet>
            <directory>${project.basedir}/src/main/scripts</directory>
            <outputDirectory>bin</outputDirectory>
            <includes>
                <include>startup.*</include>
            </includes>
        </fileSet>
    </fileSets>
</assembly>
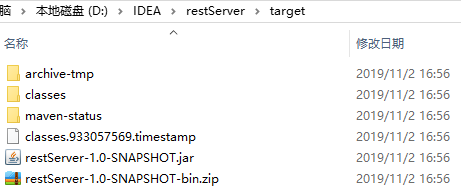
打包结果为:
2.4 maven-shade-plugin 打包
使用这种方式打出来的是揉合在一起,成为一个jar文件。这种打包方式的优点是可以利用transformer把第三方jar相同的配置文件组合成一个文件,如reference.conf文件等等。
pom.xml配置如下:
<!--④ maven-shade-plugin-->
    <build>
         <resources>
             <resource>
                 <targetPath>${project.build.directory}/classes</targetPath>
                 <directory>src/main/resources</directory>
                 <filtering>true</filtering>
                 <includes>
                     <include>**/*.xml</include>
                     <include>**/*.conf</include>
                 </includes>
             </resource>
         </resources>

         <plugins>
             <!--scala打包插件-->
             <plugin>
                 <groupId>net.alchim31.maven</groupId>
                 <artifactId>scala-maven-plugin</artifactId>
                 <version>3.2.1</version>
                 <executions>
                     <execution>
                         <id>scala-compile-first</id>
                         <phase>process-resources</phase>
                         <goals>
                             <goal>add-source</goal>
                             <goal>compile</goal>
                         </goals>
                     </execution>
                 </executions>
             </plugin>

             <!--java打包插件-->
             <plugin>
                 <groupId>org.apache.maven.plugins</groupId>
                 <artifactId>maven-compiler-plugin</artifactId>
                 <version>3.1</version>
                 <configuration>
                     <source>1.8</source>
                     <target>1.8</target>
                     <encoding>UTF-8</encoding>
                 </configuration>
                 <executions>
                     <execution>
                         <phase>compile</phase>
                         <goals>
                             <goal>compile</goal>
                         </goals>
                     </execution>
                 </executions>
             </plugin>

             <!-- ④ maven-shade-plugin -->
             <plugin>
                 <groupId>org.apache.maven.plugins</groupId>
                 <artifactId>maven-shade-plugin</artifactId>
                 <version>2.4.3</version>
                 <executions>
                     <execution>
                         <phase>package</phase>
                         <goals>
                             <goal>shade</goal>
                         </goals>
                         <configuration>
                             <transformers>
                                 <transformer implementation="org.apache.maven.plugins.shade.resource.ManifestResourceTransformer">
                                     <mainClass>com.hongshan.bdp.restserver.base.WebServer</mainClass>
                                 </transformer>
                                 <transformer implementation="org.apache.maven.plugins.shade.resource.AppendingTransformer">
                                     <resource>reference.conf</resource>
                                 </transformer>
                                 <transformer implementation="org.apache.maven.plugins.shade.resource.AppendingTransformer">
                                     <resource>version.conf</resource>
                                 </transformer>
                                 <transformer implementation="org.apache.maven.plugins.shade.resource.AppendingTransformer">
                                     <resource>akka-http-version.conf</resource>
                                 </transformer>
                             </transformers>
                             <shadedArtifactAttached>true</shadedArtifactAttached>
                             <shadedClassifierName>jar-with-dependencies</shadedClassifierName>

                             <!--过滤不需要的jar包-->
                             <artifactSet>
                                 <excludes>
                                     <exclude>io.spray:spray-json_2.11:jar:</exclude>
                                     <exclude>org.slf4j:slf4j-api:jar:</exclude>
                                     <exclude>org.slf4j:slf4j-log4j12:jar:</exclude>
                                     <exclude>log4j:log4j:jar:</exclude>
                                     <exclude>commons-logging:commons-logging:jar:</exclude>
                                     <exclude>commons-lang:commons-lang:jar:</exclude>
                                 </excludes>
                             </artifactSet>
                             <minimizeJar>true</minimizeJar>
                         </configuration>
                     </execution>
                 </executions>
             </plugin>
         </plugins>
     </build>
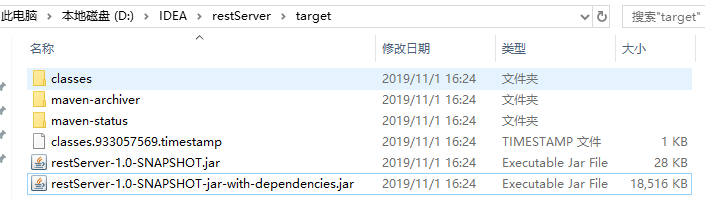
打包结果:
总结
【github地址】
https://github.com/SwordfallYeung/MavenPackage
【参考资料】
https://blog.csdn.net/qq_16055765/article/details/79481258
https://www.cnblogs.com/Andrew520/p/8857603.html
https://blog.csdn.net/zzm3280/article/details/84953070
https://blog.csdn.net/hxpjava1/article/details/79711710
https://blog.csdn.net/u012834750/article/details/80937747 scala打包插件配置①
https://blog.csdn.net/tf461991046/article/details/80834685 scala打包插件配置②
https://blog.csdn.net/u013019338/article/details/83377070 spring-boot配置读取外部配置文件
https://www.cnblogs.com/hdwang/p/6627912.html 普通jar包如何读取外部的配置文件
https://www.cnblogs.com/wangfajun/p/9585530.html linux shell脚本启动或停止jar
https://blog.csdn.net/qq_18300109/article/details/80798334 IDEA如何打包可运行jar,外部引用jar包版
https://blog.csdn.net/qingfengmuzhu1993/article/details/80284739 IDEA自身打包方式


 1109
1109


 被折叠的 条评论
为什么被折叠?
被折叠的 条评论
为什么被折叠?
 到【灌水乐园】发言


