


简介
EventBus是一个很棒的事件订阅与发布的框架,项目地址:https://github.com/greenrobot/EventBus。
作用
Android各个组件间的以接口的方式进行的通信问题:
1 增加了组件间的耦合,某个组件的修改可能会引起另一个组件的修改,因此灵活度不高。
2 充斥着大量样板话的代码:
定义接口和回调
管理监听器
在各个层之间传递调用链
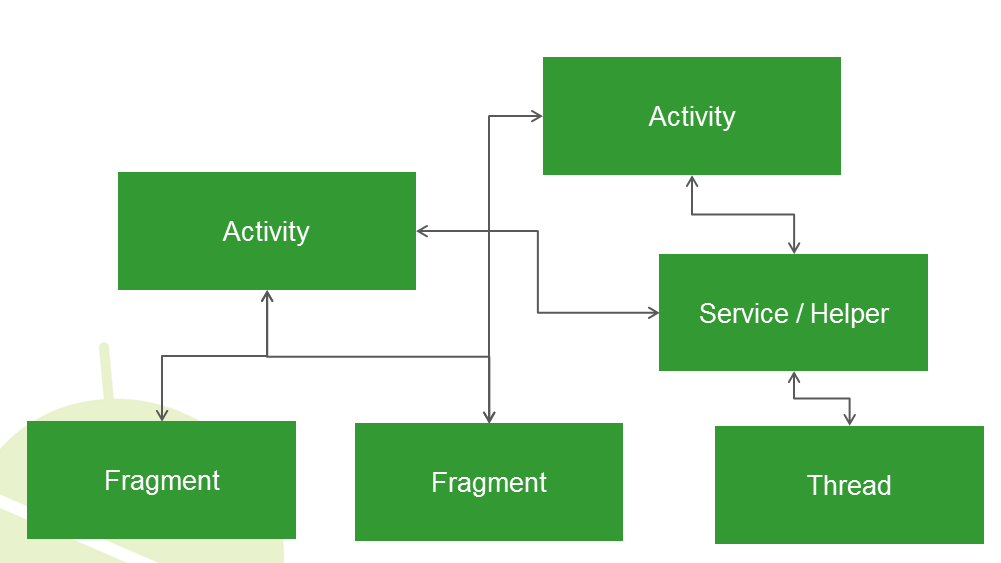
Android中,常见组件间的交互关系如下图所示:
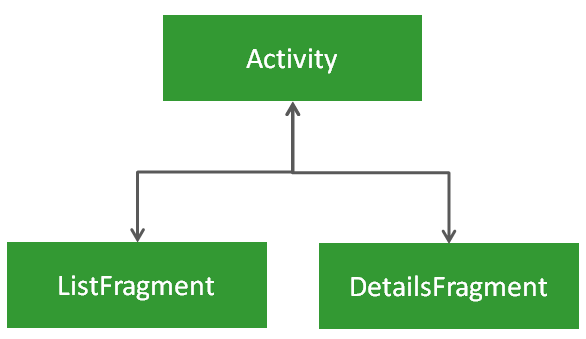
下面以list/details场景来说明组件间的通信问题。我们开发的app中有时会有这样一个需求:点击ListFragment中的某一项,DetailFragment展示对应的数据,组件间的关系如下图所示:
实现上述需求对应的代码如下:
DetailFragment中定义函数:
<code class="language-java hljs  has-numbering" abp="303"><span class="hljs-comment" abp="304">//函数定义好了,如何被调用?</span>
<span class="hljs-keyword" abp="305">public</span> <span class="hljs-keyword" abp="306">void</span> <span class="hljs-title" abp="307">loadDetails</span>(Item items) {
    ...
}</code><ul class="pre-numbering" style="display: block;" abp="925"><li abp="926">1</li><li abp="927">2</li><li abp="928">3</li><li abp="929">4</li></ul>
ListFragment中定义接口:
<code class="language-java hljs  has-numbering" abp="310">interface Contract {
    <span class="hljs-keyword" abp="311">void</span> onItemSelected(Item item);
}

<span class="hljs-comment" abp="312">//传递到Activity中</span>
((Contract)getActivity)).onItemSelected(item);</code><ul class="pre-numbering" style="display: block;" abp="930"><li abp="931">1</li><li abp="932">2</li><li abp="933">3</li><li abp="934">4</li><li abp="935">5</li><li abp="936">6</li></ul>
Activity实现接口:
<code class="language-java hljs  has-numbering" abp="315"><span class="hljs-keyword" abp="316">public</span> <span class="hljs-class" abp="317"><span class="hljs-keyword" abp="318">class</span> <span class="hljs-title" abp="319">MyActivity</span> <span class="hljs-keyword" abp="320">implements</span> <span class="hljs-title" abp="321">ListFragment</span>.<span class="hljs-title" abp="322">Contract</span> {</span>
    <span class="hljs-keyword" abp="323">public</span> <span class="hljs-keyword" abp="324">void</span> <span class="hljs-title" abp="325">onItemSelected</span>(Item item) {
        DetailFragment detailFragment = (DetailFragment)getFragmentManager().
        findFragmentBy...;
        detailFrasgment.loadDetails(item);
    }
}</code><ul class="pre-numbering" style="display: block;" abp="937"><li abp="938">1</li><li abp="939">2</li><li abp="940">3</li><li abp="941">4</li><li abp="942">5</li><li abp="943">6</li><li abp="944">7</li></ul>
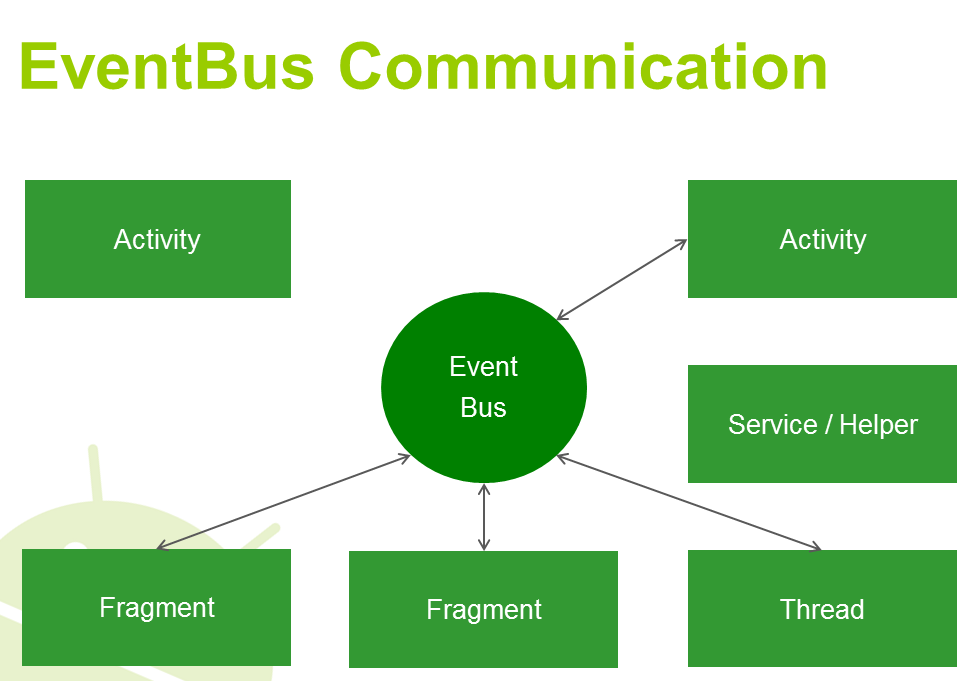
EventBus使组件间的通信变的更加简单,组件间通信如下图所示:
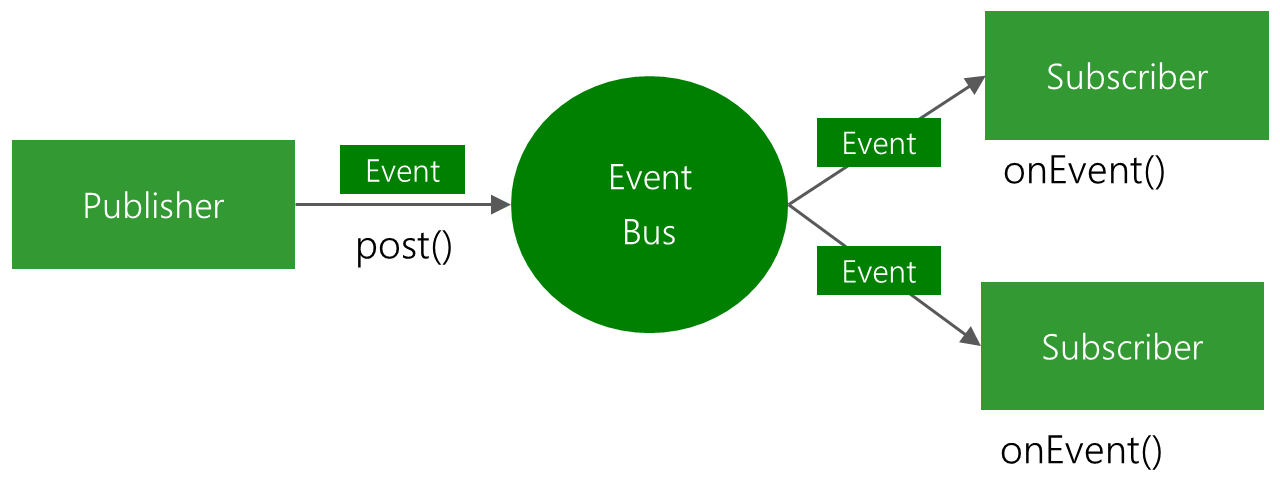
EventBus由4个基本成分组成:发布者,订阅者,事件和总线。4者的关系如下图所示:
基本用法
1 定义Event
public class MyEvent {}
2 订阅者注册
EventBus.getDefault().register(this);
3 发布事件
EventBus.getDefault().post(event);
4 接收事件
public void onEvent(MyEvent event);
EventBus的事件处理方法:onEvent
1 在注册订阅者时,EventBus扫描订阅者中的事件处理函数
2 命名约定:以onEvent开头,public, 无返回值,只有一个参数
当某个事件被发布,EventBus是通过参数类型来确定哪个订阅者响应事件的.
使用EventBus实现list/details场景
Step 1: 定义Event Class
<code class="language-java hljs  has-numbering" abp="353"><span class="hljs-keyword" abp="354">public</span> <span class="hljs-class" abp="355"><span class="hljs-keyword" abp="356">class</span> <span class="hljs-title" abp="357">ItemSelectedEvent</span> {</span>
  <span class="hljs-keyword" abp="358">public</span> <span class="hljs-keyword" abp="359">final</span> Item item;

  <span class="hljs-keyword" abp="360">public</span> <span class="hljs-title" abp="361">ItemSelectedEvent</span>(Item item) {
    <span class="hljs-keyword" abp="362">this</span>.item = item;
  }
}</code><ul class="pre-numbering" style="display: block;" abp="946"><li abp="947">1</li><li abp="948">2</li><li abp="949">3</li><li abp="950">4</li><li abp="951">5</li><li abp="952">6</li><li abp="953">7</li></ul>
Step 2: ListFragment中发送事件
<code class="language-java hljs has-numbering" abp="366">EventBus.getDefault().post(<span class="hljs-keyword" abp="367">new</span> ItemSelectedEvent(item));</code><ul class="pre-numbering" style="display: block;" abp="954"><li abp="955">1</li></ul>
Step 3: DetailFragment中处理事件
<code class="language-java hljs  has-numbering" abp="371"><span class="hljs-keyword" abp="372">public</span> <span class="hljs-keyword" abp="373">void</span> <span class="hljs-title" abp="374">onEvent</span>(ItemSelectedEvent event) {
    ...
}</code><ul class="pre-numbering" style="display: block;" abp="956"><li abp="957">1</li><li abp="958">2</li><li abp="959">3</li></ul>
[点击下载源码](http://download.csdn.net/detail/lmj623565791/8126089)
EventBus的线程模型
为何要定义事件模型?因为在Android的中线程的使用有以下的限制:
1 主线程不能被阻塞,UI的更新位于主线程,耗时操作如网络处理在后台线程
2 事件的发送和处理可能会位于不同线程
通过使用EvenBus的线程模型,我们可以定义处理事件的线程类型。EventBus中有四种线程模型:PostThread,MainThread,BackgroundThread,Async,下面分别介绍之。
PostThread
默认的线程模型,事件发布和接收在相同的线程,适合用于完成时间非常短的任务,以免阻塞UI。例:
<code class="language-java hljs  has-numbering" abp="387"><span class="hljs-comment" abp="388">// Called in the same thread (default)</span>
<span class="hljs-keyword" abp="389">public</span> <span class="hljs-keyword" abp="390">void</span> <span class="hljs-title" abp="391">onEvent</span>(MessageEvent event) {
    log(event.message);
}</code><ul class="pre-numbering" style="display: block;" abp="961"><li abp="962">1</li><li abp="963">2</li><li abp="964">3</li><li abp="965">4</li></ul>
MainThread
订阅者的事件处理方法在主线程被调用,适合处理开销小的事件,以免阻塞主线程。例:
<code class="language-java hljs  has-numbering" abp="396"><span class="hljs-comment" abp="397">// Called in Android UI's main thread</span>
<span class="hljs-keyword" abp="398">public</span> <span class="hljs-keyword" abp="399">void</span> <span class="hljs-title" abp="400">onEventMainThread</span>(MessageEvent event) {
    textField.setText(event.message);
}</code><ul class="pre-numbering" style="display: block;" abp="966"><li abp="967">1</li><li abp="968">2</li><li abp="969">3</li><li abp="970">4</li></ul>
BackgroundThread
订阅者的事件处理在后台被调用。若事件发送线程位于主线程,EventBus将使用一个后台线程来逐个发送事件。
<code class="language-java hljs  has-numbering" abp="405"><span class="hljs-comment" abp="406">// Called in the background thread</span>
<span class="hljs-keyword" abp="407">public</span> <span class="hljs-keyword" abp="408">void</span> <span class="hljs-title" abp="409">onEventBackgroundThread</span>(MessageEvent event){
    saveToDisk(event.message);
}</code><ul class="pre-numbering" style="display: block;" abp="971"><li abp="972">1</li><li abp="973">2</li><li abp="974">3</li><li abp="975">4</li></ul>
Async
事件处理位于一个单独的线程,该线程往往既不是发送事件的线程,也不是主线程。使用这个模型适用于事件发送无需等待事件处理后才返回,适合处理耗时操作,如请求网络。EventBus内部使用线程池来管理多个线程。例:
<code class="language-java hljs  has-numbering" abp="414"><span class="hljs-comment" abp="415">// Called in a separate thread</span>
<span class="hljs-keyword" abp="416">public</span> <span class="hljs-keyword" abp="417">void</span> <span class="hljs-title" abp="418">onEventAsync</span>(MessageEvent event){
    backend.send(event.message);
}</code><ul class="pre-numbering" style="display: block;" abp="976"><li abp="977">1</li><li abp="978">2</li><li abp="979">3</li><li abp="980">4</li></ul>
小结:
本文介绍了EventBus的功能和用法,在接下来一篇文章EventBus for Android 源码分析中,我将介绍EventBus的实现原理和内部数据结构。


 2518
2518

 被折叠的 条评论
为什么被折叠?
被折叠的 条评论
为什么被折叠?
 到【灌水乐园】发言


