


参考博客https://www.cnblogs.com/hushaojun/p/6016709.html
1.安装
下载地址:http://activemq.apache.org/download.html
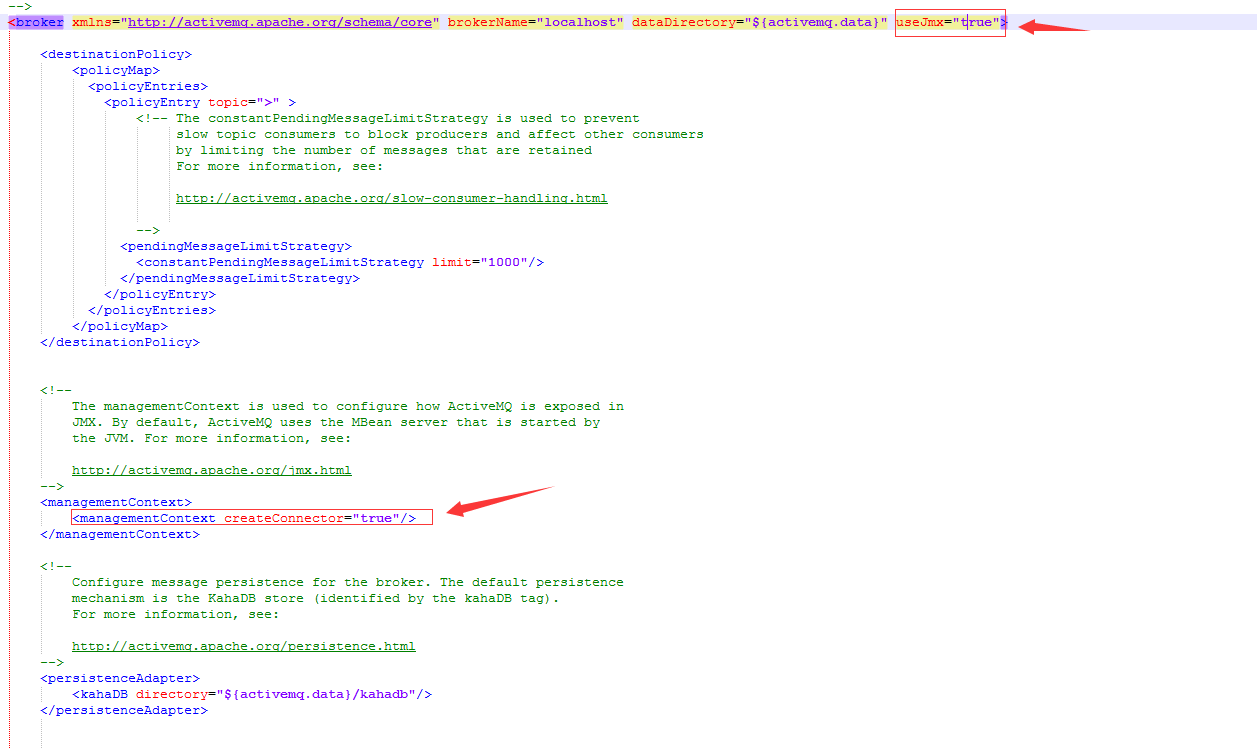
2.配置(conf目录下)
1)开启jms监控,activemq.xml中进行如下修改(注:这里的配置不是必须,根据需要自行配置 )
3、启动
直接运行bin目录下:activemq.bat

4、可视化界面
浏览器中:http://localhost:8161/admin/index.jsp
用户名,密码在:jetty-realm.properties中设置

备注:
第一个为用户名 第二个是密码 第三个是角色
5.与项目整合
5.1实战版

重启一下服务或往任意队列发送一下消息(两者都做了,不知道哪个发挥了作用)
就可以看到 项目中的队列出现在本地mq中(如下图)

5.2测试版
消息生产者
import javax.jms.Connection;
import javax.jms.ConnectionFactory;
import javax.jms.Destination; import javax.jms.JMSException; import javax.jms.MessageProducer; import javax.jms.Session; import javax.jms.TextMessage; import org.apache.activemq.ActiveMQConnectionFactory; public class QueueProducer { public static void main(String[] args) { //连接信息设置 String username = "system"; String password = "manager"; String brokerURL = "failover://tcp://localhost:61616"; //连接工厂 ConnectionFactory connectionFactory = null; //连接 Connection connection = null; //会话 接受或者发送消息的线程 Session session = null; //消息的目的地 Destination destination = null; //消息生产者 MessageProducer messageProducer = null; //实例化连接工厂 connectionFactory = new ActiveMQConnectionFactory(username, password, brokerURL); try { //通过连接工厂获取连接 connection = connectionFactory.createConnection(); //启动连接 connection.start(); //创建session session = connection.createSession(true, Session.AUTO_ACKNOWLEDGE); //创建一个名称为QueueTest的消息队列 destination = session.createQueue("QueueTest"); //创建消息生产者 messageProducer = session.createProducer(destination); //发送消息 TextMessage message = null; for (int i=0; i<10; i++) { //创建要发送的文本信息 message = session.createTextMessage("Queue消息测试" +(i+1)); //通过消息生产者发出消息 messageProducer.send(message); System.out.println("发送成功:" + message.getText()); } session.commit(); } catch (Exception e) { e.printStackTrace(); }finally{ if(null != connection){ try { connection.close(); } catch (JMSException e) { e.printStackTrace(); } } } } }
消息消费者
import javax.jms.Connection;
import javax.jms.ConnectionFactory;
import javax.jms.Destination; import javax.jms.JMSException; import javax.jms.MessageConsumer; import javax.jms.Session; import javax.jms.TextMessage; import org.apache.activemq.ActiveMQConnectionFactory; public class QueueConsumer { public static void main(String[] args) { //连接信息设置 String username = "system"; String password = "manager"; String brokerURL = "failover://tcp://localhost:61616"; //连接工厂 ConnectionFactory connectionFactory = null; //连接 Connection connection = null; //会话 接受或者发送消息的线程 Session session = null; //消息的目的地 Destination destination = null; //消息消费者 MessageConsumer messageConsumer = null; //实例化连接工厂 connectionFactory = new ActiveMQConnectionFactory(username, password, brokerURL); try { //通过连接工厂获取连接 connection = connectionFactory.createConnection(); //启动连接 connection.start(); //创建session session = connection.createSession(false, Session.AUTO_ACKNOWLEDGE); //创建一个连接QueueTest的消息队列 destination = session.createQueue("QueueTest"); //创建消息消费者 messageConsumer = session.createConsumer(destination); while (true) { TextMessage textMessage = (TextMessage) messageConsumer.receive(100000); if(textMessage != null){ System.out.println("成功接收消息:" + textMessage.getText()); }else { break; } } } catch (JMSException e) { e.printStackTrace(); } }


 6446
6446

 被折叠的 条评论
为什么被折叠?
被折叠的 条评论
为什么被折叠?
 到【灌水乐园】发言


