


http://www.codeproject.com/KB/GDI-plus/startinggdiplus.aspx
绪论
我现在已经使用GDI+大概一周了,并且我不得不说GDI+是一个受欢迎的改良产品。我在写一个画图程序,很多我考虑的事情我都必须得自己写下来确认,这就意味着我可以“免费”得到它们。 很多我考虑过的事情,我都要确认自己写下来了,这就意味着我可以“免费”得到它们。我猜这样来来去去之后,我想让我的程序做的事情会相对容易实现,这使不仅使我,而且任何人写类似的程序都要容易些。
在我开始之前,请让我感谢所有帮助我的人,他们让我知道GDI+存在并且怎样使用它。这里给出的大部分信息都是在CodeProject的lounge板块讨论过的的事情。当然,所有酷事都是我写的。:0)
最一开始要做的事情是你必须在使用GDI+之前安装好GDI+。你可以在2001年2月 Microsoft Platform SDK上找到。如果你不下载SDK(或者从CD上得到),那么你要感觉惭愧了。每一个SDK发行版本都包含最新最酷的材料,比如WTL的更新。无论如何,如果你现在去ftp.microsoft.com下载的话,我会原谅你的。如果你所有需要的仅仅是GDI+的话,这些文件在psdk-common.11.cab中(据我所知这个文件是至少要的,我下了所有文件)。
你需要以下文件:
- 动态链接库: gdiplus.dll
- 库文件 : gdiplus.lib
- 头文件: gdiplus*.h
- 帮助文档: gdicpp.chm & gdicpp.chi
别忘记了确保你安装的Visual C++的inlcudes目录中指向这些.h文件和.lib文件。并且通过选择Project/Settings/Link选项将gdiplus.lib放进object/library模块中。在Tools/Options/Directories选项设置你的include和library目录。
为了让你有GDI+的应用程序运行,你应当按以下步骤来:
- 在 stdafx.h中添加:
#include <gdiplus.h>
(在 #endif 上面一行添加)
- 在你应用程序类中添加以下成员:
ULONG_PTR m_gdiplusToken;
ULONG_PTR 作为unsigned __int64的一种重定义(typedef)。我经常不喜欢使用重定义(typedef),但是这种情况是个例外。
InitInstance中添加:
// Initialize GDI+
Gdiplus::GdiplusStartupInput gdiplusStartupInput;
Gdiplus::GdiplusStartup(&m_gdiplusToken, &gdiplusStartupInput, NULL);
我十分想告诉你这个怎么运行的,但是恐怕微软通常不会公布源码,仅仅提供头文件和动态连接库(DLL)。
ExitInstance中添加:
Gdiplus::GdiplusShutdown(m_gdiplusToken);
我将谈到这点,你可以选择GdiPlus::作为所有命令的前缀,或者你可以简单输入以下句子
using namespace GdiPlus;
在你代码的的开头。接下来在我的例子中我将假设你已经包含了这条命令,将不会使用这条命令作为前缀了。现在我们有了一个初始化的GDI+程序,这可能是一个讨论GDI+实质上怎样工作的好地方。同样的,应当警惕,GDI是作为设备文本的概念工作的。典型来说,你可以这样用GDI画一个箱子:
(在你OnPaint句柄中)
CPaintDC dc(this); // 为设备环境创建客户区,也是将被擦除的的区域
CPen MyPen, * pOldPen;
CBrush MyBrush, * pOldBrush;
// 红笔,一个像素宽
MyPen.Create(1, PS_SOLID, RGB(255,0,0));
// Selecting an object returns the old one
// we need to catch and return it to avoid memory leaks
pOldPen = dc.SelectObject(&MyPen);
// A Blue brush
MyBrush.CreateSolidBrush(RGB(0, 0, 255));
pOldBrush = dc.SelectObject(&MyBrush);
// Finally, we have our device context set up with our pen and brush and can
// use them to draw.
//Draws a rectangle that is red on the outside, filled in blue
dc.Rectangle(0, 0, 200, 200);
dc.SelectObject(pOldPen);
dc.SelectObject(pOldBrush);
这里主要理解的事情是我选择了画笔或者画刷,它将一直保留直到我选择另外的画笔或画刷,这事在很多时候会造成内存泄露,并且不能容易的准确调试出。与之相比较,GDI+模块周到地考虑到创建一个graphics对象,就像这样:
CPaintDC dc(this);
Graphics graphics(dc.hdc);
在这个对象被我们的DC所有直到我们销毁或者释放它,我们用这个对象操作设备环境。所有画笔或者画刷实现的功能都不会有内存泄露,并且用代码很容易画出多种颜色。在给出实例之前,让我指出一些GDI+令人兴奋的事情。在GDI中我们使用COLORREF作为颜色变量。COLORREF是DWORD类型的一个定义,并且COLORREF是用RGB宏构造的。用GetRValue, GetGValue和GetBValue可以重新得到颜色。相比而言,GDI+使用在构造函数中有四个变量的COLOR类作为透明度。如果你对alpha透明度的概念不大熟悉,想象你正在看透一个玷污玻璃的窗户。玻璃的色彩影响你看到玻璃后面的东西,但是它们使你视力模糊的程度取决于玻璃的厚度。Alpha透明度类似地混合你在画布下面使用的颜色。GDI+中的颜色是ARGB,alpha指是指定的第一个。画一条这样的线,我们可以接下来这么做:
Pen MyPen(Color(255, 0, 255, )); // A green pen, with full alpha
graphics.DrawLine(&pen, 0, 0, 200, 100);
GDI+也分配当前位置的思想:在GDI中我们使用MoveTo(point)接下来使用LineTo(point)。现在我们一次指定两个点。
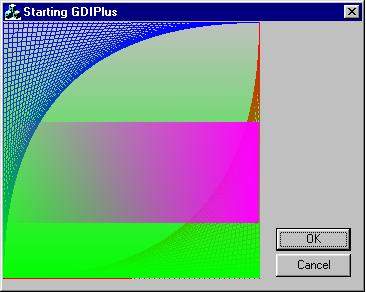
我提供了一个设计成让你更容易理解这个实验的示例程序,给出了你必备的框架写代码,你可以运行这个程序,如果你之前没有看过,你可看看alpha怎样工作的。这画图代码用红色和蓝色创建了一个样品,再在上面用绿色画,然后是红紫色,之后透明值首先从上到下,然后从左到右减弱。
这个程序的OnPaint方法看起来像下面这样:
using namespace Gdiplus;
CPaintDC dc(this);
Graphics graphics(dc.m_hDC);
// Pen can also be constructed using a brush or another
//pen. There is a second parameter - a width which defaults to 1.0f
Pen blue (Color(255, 0, 0, 255));
Pen red (Color(255, 255, 0, 0));
int y = 256;
for (int x = 0; x < 256; x += 5)
{
graphics.DrawLine(&blue, 0, y, x, 0);
graphics.DrawLine(&red, 256, x, y, 256);
y -= 5;
}
for (y = 0; y < 256; y++)
{
Pen pen(Color(y, 0, 255,0));
// A green pen with shifting alpha
graphics.DrawLine(&pen, 0, y, 256, y);
// The sleep is to slow it down so you can watch the effect
Sleep(20);
}
for (x = 0; x < 256; x++)
{
Pen pen(Color(x, 255, 0, 255));
// A green pen with shifting alpha
graphics.DrawLine(&pen, x, 100, x, 200);
// The sleep is to slow it down so you can watch the effect
Sleep(20);
}
此处作为我第一个GDI+指南的结束。我的目的很简单,就是为了让你行动起来,为了说明怎么建立一个使用GDI+的程序,解释一些关于用这个方法创建的基本概念。我接下来的指南将是使用画刷,使用GDI+你可以构造一把画刷显示渐近度,甚至位图纹理。别出声,真正令人兴奋的是关于起步。。。
Introduction
I've been using GDI+ for about a week now, and I must say it is a welcome upgrade. I am working on a paint program, and a lot of things I thought I would have to write myself are now built in, meaning I get them "for free". The upside and the downside are, I guess, the same - things I want my program to do are now a lot easier to accomplish, making it easier both for me, and anyone else wanting to write something similar.
Before I get started, let me thank all the people who helped me get started with GDI+ by letting me know it existed, and where to get it. Parts of the information given here are taken verbatim from the thread where these things were discussed on the CodeProject lounge. Of course, all the cool things are written by me :0)
First things first. You need to get GDI+ installed before you can use it. It is found in the Feb 2001 Microsoft Platform SDK. If you don't download the SDK (or get it on CD) then shame on you. Every release of the SDK includes cool new stuff, such as updates to the WTL. Anyhow, I forgive you if you go to ftp.microsoft.com, and download it NOW. If all you want is GDI+, the files are in psdk-common.11.cab (at least that's what I was told, I downloaded the whole thing).
The files you need are:
- the dll : gdiplus.dll
- the library : gdiplus.lib
- the header files : gdiplus*.h
- the help files: gdicpp.chm & gdicpp.chi
Don't forget to make sure you set Visual C++ to point to the .h files in the includes, and the .lib file in the directories. Also put gdiplus.lib in your list of libraries by choosing Project/Settings/Link and entering it into the object/library modules area. To set your include and library directories, go to Tools/Options/Directories
To get your application to work with GDI+, do the following:
- in stdafx.h, add:
Collapse Copy Code
#include <gdiplus.h>
(at the bottom, before the #endif)
- in your application class, add the member:
Collapse Copy Code
ULONG_PTR m_gdiplusToken;
ULONG_PTR is a typedef for unsigned __int64. I usually don't like to use typedefs, but in this case I'll make an exception...
- in
InitInstance, add:
Collapse Copy Code
// Initialize GDI+
Gdiplus::GdiplusStartupInput gdiplusStartupInput;
Gdiplus::GdiplusStartup(&m_gdiplusToken, &gdiplusStartupInput, NULL);
I'd love to tell you how all this works, but I'm afraid Microsoft are not currently shipping the source, just headers and a dll.
- in
ExitInstance, add:
Collapse Copy Code
Gdiplus::GdiplusShutdown(m_gdiplusToken);
I'll mention at this point that you have the option of prefacing all your commands with GdiPlus::, or you can simply put
Collapse Copy Code
using namespace GdiPlus;
at the head of your code. The rest of my examples will assume you have included this command first, and will not preface commands as such. So now we have a program that initialises GDI+, this is probably a good place to discuss how GDI+ actually works. As you may be aware, GDI works with the concept of a device context. Typically you would draw a box using GDI like this:
(in your OnPaint handler)
Collapse Copy Code
CPaintDC dc(this); // Creates a device context for the client area, which
// also erases the area to be drawn.
CPen MyPen, * pOldPen;
CBrush MyBrush, * pOldBrush;
// A red pen, one pixel wide
MyPen.Create(1, PS_SOLID, RGB(255,0,0));
// Selecting an object returns the old one
// we need to catch and return it to avoid memory leaks
pOldPen = dc.SelectObject(&MyPen);
// A Blue brush
MyBrush.CreateSolidBrush(RGB(0, 0, 255));
pOldBrush = dc.SelectObject(&MyBrush);
// Finally, we have our device context set up with our pen and brush and can
// use them to draw.
//Draws a rectangle that is red on the outside, filled in blue
dc.Rectangle(0, 0, 200, 200);
dc.SelectObject(pOldPen);
dc.SelectObject(pOldBrush);
The main thing to understand is that I select a pen or brush and it remains there until I select another, and that the opportunities to leak memory are many, and not exactly easy to debug. In contrast the GDI+ model revolves around creating a graphics object, like so:
Collapse Copy Code
CPaintDC dc(this);
Graphics graphics(dc.hdc);
Now this object is holding our DC until we destroy or release it, and we use this object to manipulate our device context. All the functions take the pen or brush they use, meaning no memory leaks, and ease of writing code that draws in more than one colour. Before presenting an example, let me point out one more exciting thing about GDI+. In GDI we used COLORREF as a variable that held a colour. It was a typedef for a DWORD, and a COLORREF was built using the RGB macro. Colours could be retrieved using GetRValue, GetGValue and GetBValue. In contrast, GDI+ uses the COLOR class, which takes four values to contruct - the extra being alpha. If you are not familiar with the concept of alpha transparency, imagine you are looking through a stained glass window. The colours of the glass affect what you see behind the glass, but the degree to which they obscure your vision depends on how thick the glass is. Alpha transparency similarly blends the colour you use to draw with the colour of the canvas beneath it. Colors in GDI+ are ARGB, the alpha value is specified first. So to draw a line we can do the following:
Collapse Copy Code
Pen MyPen(Color(255, 0, 255, )); // A green pen, with full alpha
graphics.DrawLine(&pen, 0, 0, 200, 100);
GDI+ also dispenses with the idea of a current position: in GDI we used MoveTo(point), followed by LineTo(point). Now we specify both points at once.
I've provided an example program designed to facilitate experimentation by giving you the necessary framework to play with some code, and also to run and see how alpha works, if you've not seen this before. The drawing code creates a pattern in red and blue, then draws over with green, then magenta, and the alpha value fades first up and down, then from left to right.
The OnPaint method of the example program looks like this:
Collapse Copy Code
using namespace Gdiplus;
CPaintDC dc(this);
Graphics graphics(dc.m_hDC);
// Pen can also be constructed using a brush or another
//pen. There is a second parameter - a width which defaults to 1.0f
Pen blue (Color(255, 0, 0, 255));
Pen red (Color(255, 255, 0, 0));
int y = 256;
for (int x = 0; x < 256; x += 5)
{
graphics.DrawLine(&blue, 0, y, x, 0);
graphics.DrawLine(&red, 256, x, y, 256);
y -= 5;
}
for (y = 0; y < 256; y++)
{
Pen pen(Color(y, 0, 255,0));
// A green pen with shifting alpha
graphics.DrawLine(&pen, 0, y, 256, y);
// The sleep is to slow it down so you can watch the effect
Sleep(20);
}
for (x = 0; x < 256; x++)
{
Pen pen(Color(x, 255, 0, 255));
// A green pen with shifting alpha
graphics.DrawLine(&pen, x, 100, x, 200);
// The sleep is to slow it down so you can watch the effect
Sleep(20);
}
This marks the end of my first GDI+ tutorial. My aim was simply to get you up and running - to show you how to set up a program to use GDI+ and explain some basic concepts about the way it is set up. My next tutorial will be on using brushes - with GDI+ you can make a brush display a gradient, or even be textured with a bitmap. Stay tuned - the real coolness is about to begin...


 6790
6790

 被折叠的 条评论
为什么被折叠?
被折叠的 条评论
为什么被折叠?
 到【灌水乐园】发言


