


Building and Displaying a Pop-Up Message
You can use a Snackbar to display a brief message to the user. The message automatically goes away after a short period. A Snackbar is ideal for brief messages that the user doesn’t necessarily need to act on. For example, an email app could use a Snackbar to tell the user that the app successfully sent an email.
Use a CoordinatorLayout
A Snackbar is attached to a view. The Snackbar provides basic functionality if it is attached to any object derived from the View class, such as any of the common layout objects. However, if the Snackbar is attached to a CoordinatorLayout, the Snackbar gains additional features:
- 1 The user can dismiss the Snackbar by swiping it away.
- 2 The layout moves some other UI elements when the Snackbar appears. For example, if the layout has a FloatingActionButton, the layout moves the button up when it shows a Snackbar, instead of drawing the Snackbar on top of the button. You can see how this looks in Figure 1.
The CoordinatorLayout class provides a superset of the functionality of FrameLayout. If your app already uses a FrameLayout, you can just replace that layout with a CoordinatorLayout to enable the full Snackbar functionality. If your app uses other layout objects, the simplest thing to do is wrap your existing layout elements in a CoordinatorLayout, as in this example:
<android.support.design.widget.CoordinatorLayout
    android:id="@+id/myCoordinatorLayout"
    xmlns:android="http://schemas.android.com/apk/res/android"
    xmlns:app="http://schemas.android.com/apk/res-auto"
    android:layout_width="match_parent"
    android:layout_height="match_parent">

    <!-- Here are the existing layout elements, now wrapped in
         a CoordinatorLayout -->
    <LinearLayout
        android:layout_width="match_parent"
        android:layout_height="match_parent"
        android:orientation="vertical">

        <!-- …Toolbar, other layouts, other elements… -->

    </LinearLayout>

</android.support.design.widget.CoordinatorLayout>
Make sure to set an android:id tag for your CoordinatorLayout. You need the layout’s ID when you display the message.
Display a Message
There are two steps to displaying a message. First, you create a Snackbar object with the message text. Then, you call that object’s show() method to display the message to the user.
Creating a Snackbar object
Create a Snackbar object by calling the static Snackbar.make() method. When you create the Snackbar, you specify both the message it displays, and the length of time to show the message:
Snackbar mySnackbar = Snackbar.make(viewId, stringId, duration);viewId
The view to attach the Snackbar to. The method actually searches up the view hierarchy from the passed viewId until it reaches either a CoordinatorLayout, or the window decor’s content view. Ordinarily, it’s simplest to just pass the ID of the CoordinatorLayout enclosing your content.
stringId
The resource ID of the message you want to display. This can be formatted or unformatted text.
duration
The length of time to show the message. This can be either LENGTH_SHORT or LENGTH_LONG.
Showing the message to the user
Once you have created the Snackbar, call its show() method to display the Snackbar to the user:
mySnackbar.show();The system does not show multiple Snackbar objects at the same time, so if the view is currently displaying another Snackbar, the system queues your Snackbar and displays it after the current Snackbar expires or is dismissed.
If you just want to show a message to the user and won’t need to call any of the Snackbar object’s utility methods, you don’t need to keep the reference to the Snackbar after you call show(). For this reason, it’s common to use method chaining to create and show a Snackbar in one statement:
Snackbar.make(findViewById(R.id.myCoordinatorLayout), R.string.email_sent,
                        Snackbar.LENGTH_SHORT)
        .show();
Adding an Action to a Message
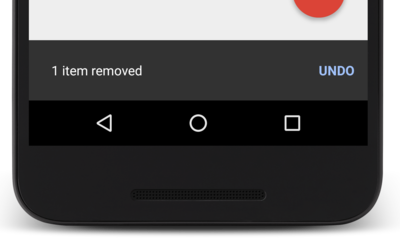
You can add an action to a Snackbar, allowing the user to respond to your message. If you add an action to a Snackbar, the Snackbar puts a button next to the message text. The user can trigger your action by pressing the button. For example, an email app might put an undo button on its “email archived” message; if the user clicks the undo button, the app takes the email back out of the archive.
To add an action to a Snackbar message, you need to define a listener object that implements the View.OnClickListener interface. The system calls your listener’s onClick() method if the user clicks on the message action. For example, this snippet shows a listener for an undo action:
public class MyUndoListener implements View.OnClickListener{

    &Override
    public void onClick(View v) {

        // Code to undo the user's last action
    }
}
Use one of the SetAction() methods to attach the listener to your Snackbar. Be sure to attach the listener before you call show(), as shown in this code sample:
Snackbar mySnackbar = Snackbar.make(findViewById(R.id.myCoordinatorLayout),
                                R.string.email_archived, Snackbar.LENGTH_SHORT);
mySnackbar.setAction(R.string.undo_string, new MyUndoListener());
mySnackbar.show();


 1586
1586

 被折叠的 条评论
为什么被折叠?
被折叠的 条评论
为什么被折叠?
 到【灌水乐园】发言


