


一、NIO三大核心原理关系:
Selector、Channel和Buffer之间的关系图(简单版):
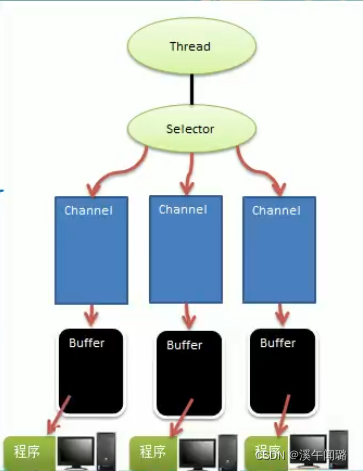
关系图说明:
- 每个channel都对应一个Buffer
- Selector对应一个线程,一个线程对应多个channel(连接)
- 上图反应了有三个channel注册到该Selector
- 程序切换到哪个channel,是由事件(Event)决定的
- Selector会根据不同的事件,在各个通道上切换
- Buffer本质上就是一个内存块,底层是一个数组
- 数据的读取或写入是通过Buffer进行的,这个特性和BIO有本质区别,BIO中要么是输入流,或者是输出流,不能双向。但是NIO的Buffer是可以读也可以写,只是需要flip()方法切换。
- channel是双向的,可以返回底层操作系统的情况。
二、缓冲区Buffer
缓冲区Buffer,缓冲区本质上是一个可以读写数据的内存块,可以理解为是一个容器对象(含数组),该对象提供一组方法,可以轻松的使用内存块。缓冲区对象内置了一些机制,能够跟踪和记录缓冲区的状态变化情况。Channel提供从文件、网络读取数据的通道 ,但是读取或写入数据都必须经由Buffer,如下图所示:

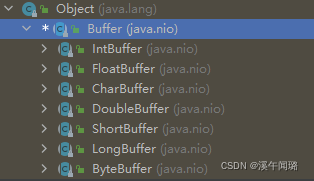
2.1 Buffer类及其子类
1. 在NIO中,Buffet是一个顶层父类,是一个抽象类,类的层级关系如下图所示,最常用的是ByteBuffer。
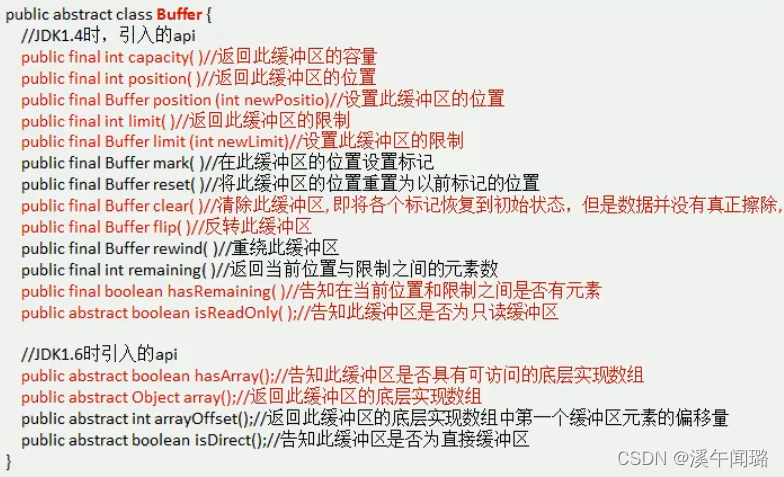
2. Buffer类定义了所有缓冲区都具有的四个属性,来提供关于其所包含的数据元素的信息:
// Invariants: mark <= position <= limit <= capacity
private int mark = -1;
private int position = 0;
private int limit;
private int capacity;
| 属性 | 描述 |
| capacity | 容量,即可以容纳的最大数据量,在缓冲区创建时被设定并且不能改变。 |
| limit | 表示缓冲区的当前终点,不能对缓冲区超过极限的位置进行读写操作。且极限是可以修改的。 |
| position | 位置,下一个要被读或写的元素的索引,每次读写缓冲区数据时都会改变值,为下次读写准备。 |
| mark | 标记 |
示意图如下:
我们使用 IntBuffer intBuffer = IntBuffer.allocate(5); 语句,创建一个Buffer对象,其本质是在内存中创建一个容量为5的空间,且buffer刚创建时,capacity属性为5,limit属性也为5,position位置指向0。
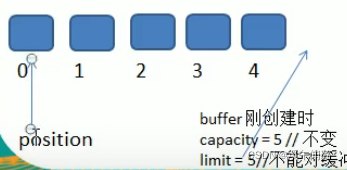
刚创建时,capacity为5是因为该buffer本身创建时容量是5,而limit为5,是因为接下来的操作,也就是向Buffer写入数据的操作,不能超出容量5。我们接着向Buffer中写入数据,每写入一个数据,position指针自动+1向后移动一位,直到position与limit的值相等,无法继续操作。
当我们要从Buffer中读取数据的时候,首先要使用flip()函数,将buffer转换,进行读写切换,flip()函数执行的操作如下所示:
public final Buffer flip(){

        //flip反转之后进行的操作不能超过上次的操作范围。如我们通过flip()函数,要读Buffer
        //中的数据,那么读取的边界就是之前写入数据的边界,之前数据写到哪里了呢
        //position指明了位置
        limit = position;

        position = 0;

        mark = -1;

        return this;
}
2.2 Buffer类相关方法:
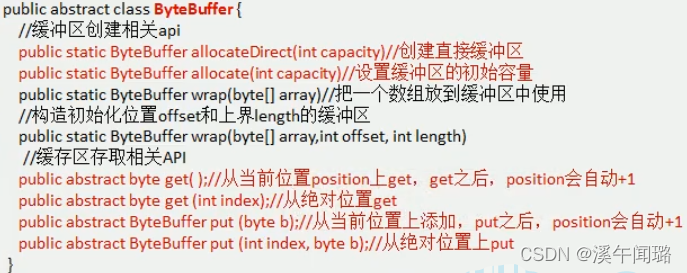
2.3 ByteBuffer
java的基本数据类型中,除了boolean之外,都有一个Buffer类型与之对应,但是,最常用的是ByteBuffer类,该类的主要方法如下:
三、通道Channel
3.1 基本介绍
1)NIO的通道类似于流,但是有一些区别:
- 通道是双向的,可以同时进行读写,而流只能读或者只能写
- 通道可以实现异步读写数据
- 通道可以从缓冲读数据,也可以从缓冲写数据

2)BIO中的 Stream 是单向的,例如 FileInputStream 对象只能进行读取数据的操作,而 NIO 中的通道(Channel)是双向的,可以读操作,也可以写操作。
3) Channel 在 NIO 中是一个接口 public interface Channel extends Closeable{}
4) 常用的Channel类有、FileChannel、DatagramChannel、ServerSocketChannel和SocketChannel。
5) FileChannel用于文件的数据读写,DatagramChannel用于UDP的数据读写,ServerSocketChannel和SocketChannel用于Tcp的数据读写。
无论再怎么想象,那些从来没有发生过的事情也总是无法深入,更何况,从来不敢想象你会回来!
3.2 FileChannel类
FileChannel类主要用来对本地文件进行IO操作,创建的方法如下:
- public int read(ByteBuffer dst), 从通道读取数据并放到缓冲区中
- public int write(ByteBuffer src), 把缓冲区中的数据写入到通道中
- public long transferFrom(ReadableByteChannel src, long position, long count),从目标通道中复制数据到当前通道
- public long transferTo(long position, long count, WriteableByteChannel target),把数据从当前通道复制给目标通道。
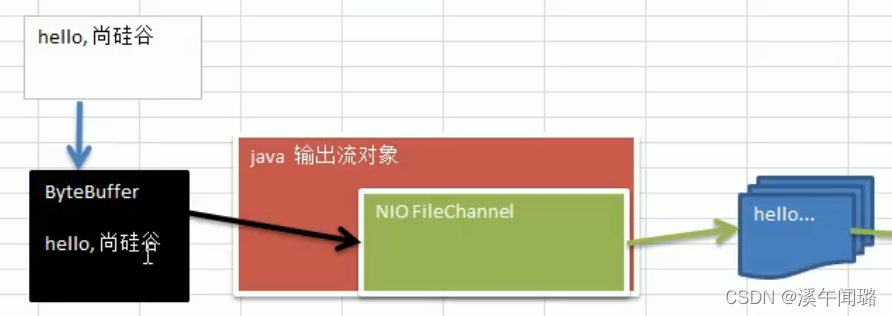
案例1:本地文件写数据
    public static void main(String[] args) throws IOException {
        String str = "wangy";
        //创建一个输出流 ->用于获取到一个channel
        FileOutputStream fileOutputStream = new FileOutputStream("d:\\file01.txt");

        //通过fileOutputStream获取对应的FileChannel
        //这里体现了多态,此处fileChannel真是类型是FileChannelImpl, FileChannel是一个抽象类
        FileChannel fileChannel = fileOutputStream.getChannel();

        //创建ByteBuffer缓冲区
        ByteBuffer byteBuffer = ByteBuffer.allocate(1024);

        //将str数据放入到ByteBuffer中
        byteBuffer.put(str.getBytes(StandardCharsets.UTF_8));

        //将byteBuffer中的数据写入到channel中(该操作对byteBuffer来说是将数据读出来,对fileChannel通道来说,是将缓冲区读出的数据写入到通道)
        byteBuffer.flip(); // 反转缓冲区,由写变为读
        fileChannel.write(byteBuffer);

        //关闭流
        fileOutputStream.close();
    }
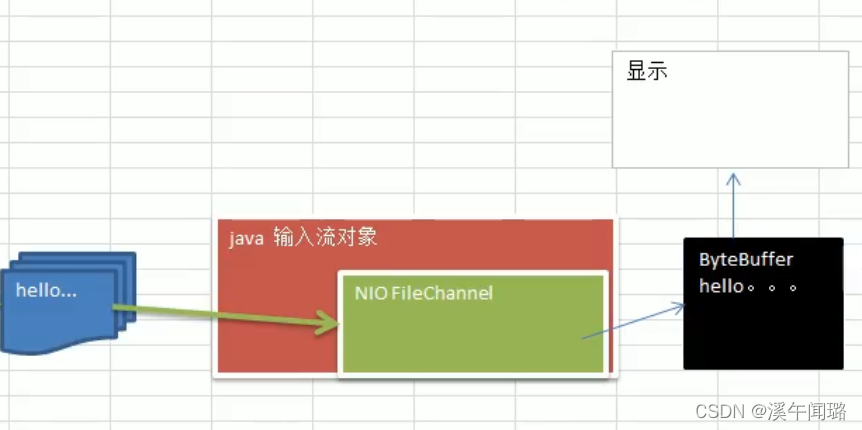
案例2:本地文件读数据
    public static void main(String[] args) throws IOException {
        //创建文件输入流
        File file = new File("d:\\file01.txt");
        FileInputStream fileInputStream = new FileInputStream(file);

        //通过fileInputStream 获取到对应的FileChannel ->实际类型为FileChannelImpl
        FileChannel fileChannel = fileInputStream.getChannel();

        //创建ByteBuffer缓冲区
        ByteBuffer byteBuffer = ByteBuffer.allocate((int)file.length());

        //将通道的数据读入到Buffer
        fileChannel.read(byteBuffer);

        //将byteBuffer的字节数据转为string
        System.out.println(new String(byteBuffer.array()));

        //关闭流
        fileInputStream.close();
    }
案例三:使用一个Buffer完成文件拷贝

/**
 * 拷贝
 */
public class NIOFileChannel03 {
    public static void main(String[] args) throws IOException {
        //文件对象
        File file1= new File("d:\\file01.txt");
        FileInputStream fileInputStream = new FileInputStream(file1);
        FileChannel fileChannel01 = fileInputStream.getChannel(); //由输入流获取Channel通道

        //创建缓冲对象
        ByteBuffer byteBuffer = ByteBuffer.allocate((int)file1.length());

        //创建文件输出流对象
        File file2 = new File("d:\\file02.txt");
        FileOutputStream fileOutputStream = new FileOutputStream(file2);
        FileChannel fileChannel2 = fileOutputStream.getChannel(); //由输出流获取Channel通道
        //循环读取
        while(true){
            /**
             *     public Buffer clear() {
             *         position = 0;
             *         limit = capacity;
             *         mark = -1;
             *         return this;
             *     }
             */
            byteBuffer.clear(); //清空buffer,复位,非常重要
            //从通道读取数据,放入到缓冲区
            int read = fileChannel01.read(byteBuffer);
            if(read == -1){ //读完所有数据
                break;
            }
            //将buffer中的数据写入到fileChannel02,即写入到文件file02.txt
            byteBuffer.flip();
            fileChannel2.write(byteBuffer);
        }

        //关闭流
        fileInputStream.close();
        fileOutputStream.close();
    }
}
案例四:transferFrom方法拷贝文件
使用FileChannel(通道)和方法transferFrom,完成文件的拷贝。
public class NIOFileChannel04 {

    public static void main(String[] args) throws IOException {
        //创建相关的流
        File file1= new File("D:\\星空.jpg");
        FileInputStream fileInputStream = new FileInputStream(file1);
        File file2 = new File("D:\\星空2.jpg");
        FileOutputStream fileOutputStream = new FileOutputStream(file2);

        //获取各个流对应的filechannel
        FileChannel sourceChannel = fileInputStream.getChannel();
        FileChannel destChannel = fileOutputStream.getChannel();

        //使用trans
        destChannel.transferFrom(sourceChannel,0,sourceChannel.size());

        //关闭相关流
        sourceChannel.close();;
        destChannel.close();
        fileInputStream.close();
        fileOutputStream.close();
    }
}
3.3 Buffer和Channel的注意事项和细节
- ByteBuffer支持类型化的put和get, put放入的是什么数据类型,get就应该使用相应的数据类型来取出,负责可能有BufferUnderflowExceptiion异常。
public class NIOByteBufferPutGet {
    public static void main(String[] args) {
        //创建一个Budder
        ByteBuffer buffer = ByteBuffer.allocate(64);

        //以类型化方式放入数据
        buffer.putInt(100);
        buffer.putLong(9L);
        buffer.putChar('w');
        buffer.putShort((short)4);

        //取出数据
        buffer.flip();
        System.out.println(buffer.getInt());
        System.out.println(buffer.getLong());
        System.out.println(buffer.getChar());
        System.out.println(buffer.getShort());
    }
}- 可以将一个普通Buffer转成只读Buffer
public class ReadOnlyBuffer {
    public static void main(String[] args) {
        //创建一个Buffer
        ByteBuffer buffer = ByteBuffer.allocate(64);

        for(int i=0;i<64;i++){
            buffer.put((byte)i);
        }

        //读取
        buffer.flip();
        //得到一个只读的Buffer
        ByteBuffer readOnlyBuffer = buffer.asReadOnlyBuffer(); //由ByteBuffer获取一个只读的Buffer
        while(readOnlyBuffer.hasRemaining()){
            System.out.println(readOnlyBuffer.get());
        }

        readOnlyBuffer.put((byte)100); //抛出异常,ReadOnlyBufferException
    }
}- NIO提供MappedByteBuffer,可以让文件直接在内存(堆外的内存)中进行修改(不用拷贝),而如何同步到文件,由NIO来完成。
/**
 * 说明:
 *      MappedByteBuffer可以让文件直接在内存(堆外内存)中修改,操作系统不需要拷贝文件
 */
public class MappedByteBufferTest {
    public static void main(String[] args) throws IOException {
        //准备文件
        RandomAccessFile randomAccessFile = new RandomAccessFile("D:\\a.txt","rw");
        //获取对应的通道
        FileChannel channel = randomAccessFile.getChannel();
        /**
         * 参数1:FileChannel.MapMode.READ_WRITE 使用读写模式
         * 参数2: 0, 可以直接修改的起始位置
         * 参数3: 5, 映射到内存的大小(不是索引位置),即将a。txt的多少个字节映射到内存,可以直接修改的范围就是0-5(最多修改5个字节,索引到4)
         *
         * MappedByteBuffer是一个抽象类,此处实际类型是DirectByteBuffer
         */
        MappedByteBuffer mappedByteBuffer = channel.map(FileChannel.MapMode.READ_WRITE,0,5);

        mappedByteBuffer.put(0,(byte) 'H');
        mappedByteBuffer.put(3,(byte)'5');

        randomAccessFile.close();
    }
}- 前面的读写操作,都是通过一个Buffer完成的,NIO还支持多个Budder(即Buffer数组)完成读写操作,即Scattering和Gathering。
/**
 * Scattering:将数据写入到buffer时,可以采用Buffer数组,依次写入
 * Gathering: 从Buffer读取数据时,可以采用Buffer数组,依次读
 */
public class ScatteringAndGatheringTest {
    public static void main(String[] args) throws IOException {
        //使用ServerSocketChannel和SocketChannel
        ServerSocketChannel serverSocketChannel = ServerSocketChannel.open();
        InetSocketAddress inetSocketAddress = new InetSocketAddress(7000);

        //绑定端口到Socket,并启动
        serverSocketChannel.socket().bind(inetSocketAddress);

        //创建Buffer数组
        ByteBuffer[] byteBuffers = new ByteBuffer[2];
        byteBuffers[0] = ByteBuffer.allocate(5);
        byteBuffers[1] = ByteBuffer.allocate(3);

        //等待客户端的连接
        SocketChannel socketChannel = serverSocketChannel.accept();

        int messageLength = 8; //假定从客户端接收8个字节
        //循环读取数据
        while(true){
            int byteRead = 0;
            while(byteRead<messageLength){
                long l = socketChannel.read(byteBuffers);
                byteRead+=l; //累计读取到的字节数
                System.out.println("byteRead="+byteRead);
                //使用流打印,看看当前的buffer的position和limit
                Arrays.asList(byteBuffers).stream().map(buffer->"position="+buffer.position()+",Limit="+buffer.limit()).forEach(System.out::println);
            }

            //将所有的Budder进行flip反转
            Arrays.asList(byteBuffers).forEach(buffer-> buffer.flip());

            //将数据读出,显示到客户端
            long byteWrite = 0;
            while(byteWrite<messageLength){
                long l = socketChannel.write(byteBuffers);
                byteWrite+=l;
            }

            //将所有的buffer进行复位
            Arrays.asList(byteBuffers).forEach(buffer->buffer.clear());
            System.out.println("byteRead:="+byteRead+" byteWrite="+byteWrite+", MessageLength"+messageLength);
        }
    }
}
四、Selecter选择器
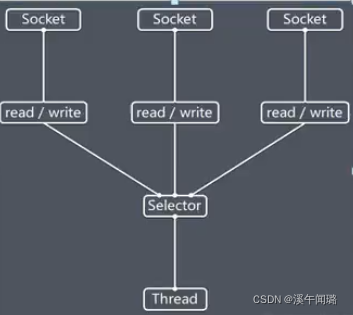
Java NIO,是非阻塞的IO,可以使用一个线程,处理多个客户端连接,其就是通过Selector(选择器实现的)。Selector选择器特性如下:
- Selector能够检测多个注册的通道上是否有事件发生,如果有事件发生,便获取事件,然后针对每个事件进行相应的处理。这样就可以只用一个单线程去管理多个通道,也就是管理多个连接和请求。
- 只有在连接/通道真正有读写事件发生时,才会进行读写,这大大减少了系统开销,并且不必 为每个连接都创建一个线程,不用去维护多个线程。避免了多线程之间的上下文切换导致的开销。
4.1 Selector示意图和特点说明
Nonblocking I/O
特点说明如下:
- Netty 的
IO线程NioEventLoop聚合了Selector(选择器,也叫多路复用器),可以同时并发处理成百上千个客户端连接。 - 当线程从某客户端Socket通道进行读写数据时,若没有数据可用时,该线程可以进行其他任务。
- 线程通常将非阻塞IO的空闲时间用于在其他通道上执行I/O操作,所以单个线程可以管理多个输入和输出通道。
- 由于读写操作都是非阻塞的,这就可以充分提升IO线程的运行效率,避免由于频繁I/O阻塞导致的线程挂起
- 一个I/O线程可以并发处理N个客户端连接和读写操作,这从根本上解决了传统同步阻塞I/O一连接一线程模型,架构的性能、弹性伸缩能力和可靠性都得到了极大的提升。
4.2 Selector 类相关方法
Selector类是一个抽象类,常用方法及说明如下:
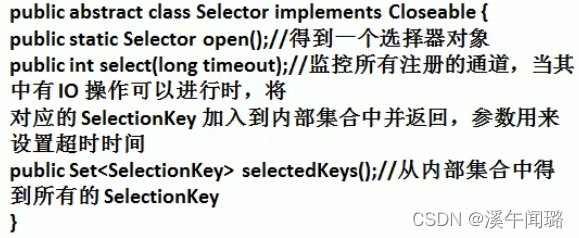
注意事项:
- NIO中的ServerSocketChannel功能类似ServerSocket,ServerChannel功能类似Socket。
- Selector相关方法说明
- selector.selector() //阻塞
- selector.select(1000) //阻塞1000毫秒,在1000毫秒后返回
- selector.wakeup(); //唤醒selevctor
- selector.selectNow() //不阻塞,立马返回
4.3 NIO 非阻塞网络编程原理分析图
NIO非阻塞网络编程相关的 Selector、SelectionKey、ServerSocketChannel、及SocketChannel关系梳理图:
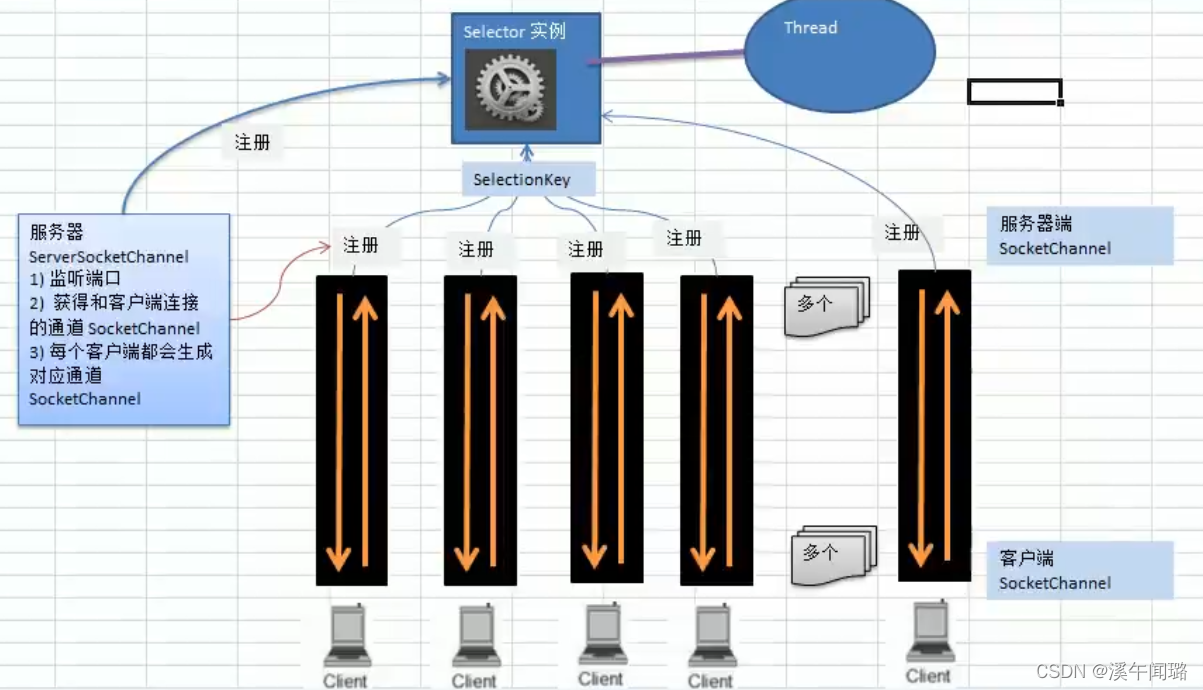
上图说明:
- 当客户端请求连接时,会通过ServerSocketChannel得到SocketChannel;
- 然后,将SocketChannel注册到Selector上;通过函数register(Selector sel, int ops)注册。一个selector上可以注册多个SocketChannel;
- SocketChannel注册到Selector上,会返回一个SelectionKey,会和该Selector关联;
- Selector通过select()方法,返回有事件发生的通道的个数,并进一步得到有事件发生的SelectionKey;
- 在获取到有事件发生的SelectionKey之后,通过channel()可以反向获取到SocketChannel;
- 最终,可以通过获取到的有事件发生的SocketChannel,完成相关的业务处理。


 353
353


 被折叠的 条评论
为什么被折叠?
被折叠的 条评论
为什么被折叠?
 到【灌水乐园】发言


