iOS页面间传值的方式(Delegate/NSNotification/Block/NSUserDefault/单例)

iOS页面间传值的方式(NSUserDefault/Delegate/NSNotification/Block/单例)

实现了以下iOS页面间传值:1.委托delegate方式;2.通知notification方式;3.block方式;4.UserDefault或者文件方式;5.单例模式方式;6.通过设置属性,实现页面间传值

在iOS开发中,我们经常会遇到页面间跳转传值的问题,现归纳总结一下:

情况1:A页面跳转到B页面

方法:

在B页面的控制器中,编写对应的属性,在A页面跳转到B页面的地方,给B的属性赋值即可

[objc]  view plain  copy
  1. //SecondViewController.h  
  2.   
  3. @property(nonatomic) NSInteger flag;//当前系统标示(0:其他传值方式;1:block传值方式  

在A页面的试图控制器中

[objc]  view plain  copy
  1. //RootViewController.m  
  2.   
  3. - (IBAction)showSecondView:(id)sender {  
  4.     SecondViewController *second = [[SecondViewController alloc] initWithNibName:@"SecondViewController" bundle:nil];  
  5.     second.delegate = self;  
  6.     second.flag = 0;  
  7.     [self presentViewController:second animated:YES completion:nil];  
  8. }  

情况2:A页面跳转到B页面,B页面再跳转回A页面

主流方案:

(1)通过委托delegate的方式实现
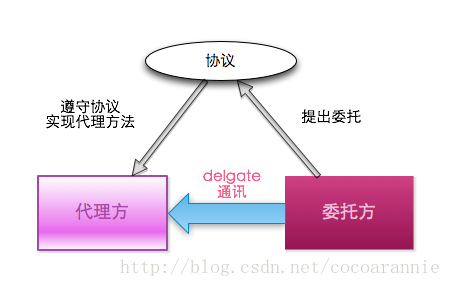

设置协议及方法

[objc]  view plain  copy
  1. //SecondViewController.h  
  2.   
  3. @protocol secondViewDelegate  
  4. -(void)showName:(NSString *)nameString;  
  5. @end  

设置代理(为防止循环引用,此处采用了weak)

[objc]  view plain  copy
  1. //SecondViewController.h  
  2.   
  3. @interface SecondViewController : UIViewController  
  4. @property (nonatomic, weak)id<secondViewDelegate> delegate;  
  5. @property (nonatomiccopy) ablock block;  
  6. @end  

调用

显示

[objc]  view plain  copy
  1. //RootViewController.m  
  2. -(void)showName:(NSString *)nameString{  
  3.     self.nameLabel.text = nameString;  
  4. }  

最重要也是最容易忽略的,就是一定要设置delegate的指向。

(2)通过通知notification的方式实现
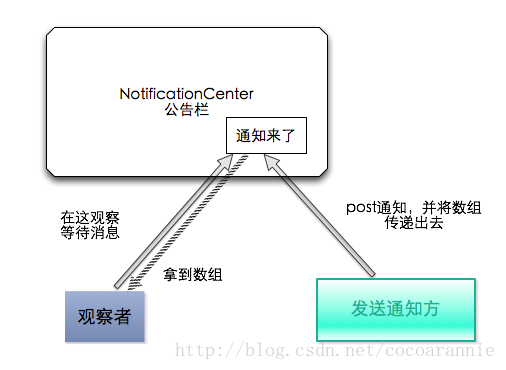

在B页面的控制器中,发送通知:

[objc]  view plain  copy
  1. //SecondViewController.m  
  2. - (IBAction)notificationMethod:(id)sender {  
  3.     if ([self notEmpty]) {  
  4.         [[NSNotificationCenter defaultCenter] postNotificationName:@"ChangeNameNotification" object:self userInfo:@{@"name":self.nameTextField.text}];  
  5.         [self dismissViewControllerAnimated:YES completion:nil];  
  6.     }else{  
  7.         [self showAlert];  
  8.     }  
  9. }  

在A页面的控制器中,注册通知:

[objc]  view plain  copy
  1. //RootViewController.m  
  2. - (void)viewDidLoad  
  3. {  
  4.     [super viewDidLoad];  
  5.     // Do any additional setup after loading the view from its nib.  
  6.     [[NSNotificationCenter defaultCenter] addObserver:self selector:@selector(ChangeNameNotification:) name:@"ChangeNameNotification" object:nil];  
  7. }  

当我们不使用时,要记得删掉通知:

[objc]  view plain  copy
  1. //RootViewController.m  
  2. -(void)dealloc{  
  3.     [[NSNotificationCenter defaultCenter] removeObserver:self];  
  4. }  

 调用,显示

[objc]  view plain  copy
  1. //RootViewController.m  
  2.   
  3. -(void)ChangeNameNotification:(NSNotification*)notification{  
  4.     NSDictionary *nameDictionary = [notification userInfo];  
  5.     self.nameLabel.text = [nameDictionary objectForKey:@"name"];  
  6. }  

(3)block方式实现

block介绍:http://blog.csdn.NET/totogo2010/article/details/7839061

链接一篇描述block回调挺有意思的文章: http://blog.csdn.Net/mobanchengshuang/article/details/11751671

分析:

在B试图控制器中,定义一个block,参数为字符串

[objc]  view plain  copy
  1. //SecondViewController.h  
  2. typedef void (^ablock)(NSString *str);  

[objc]  view plain  copy
  1. //SecondViewController.h  
  2.   
  3. @property (nonatomiccopy) ablock block;  

在B试图控制器中,当输入名字,点击对应的确定按钮后

[objc]  view plain  copy
  1. - (IBAction)blockMethod:(id)sender {  
  2.     if ([self notEmpty]) {  
  3.         if (self.block) {  
  4.             self.block(self.nameTextField.text);  
  5.             [self dismissViewControllerAnimated:YES completion:nil];  
  6.         }  
  7.     }else{  
  8.         [self showAlert];  
  9.     }  
  10. }  

在A试图显示,回调block

[objc]  view plain  copy
  1. - (IBAction)showSecondWithBlock:(id)sender {  
  2.     SecondViewController *second = [[SecondViewController alloc] initWithNibName:@"SecondViewController" bundle:nil];  
  3.     [self presentViewController:second animated:YES completion:nil];  
  4.     second.block = ^(NSString *str){  
  5.         self.nameLabel.text = str;  
  6.     };  
  7. }  

(4)KVO方式实现 

KVO实现原理介绍:http://blog.csdn.net/kesalin/article/details/8194240

在A视图中,编写以下代码 

[objc]  view plain  copy
  1. //A视图  
  2. //一个指向B视图的成员变量  
  3. @property (nonatomicstrongSecondViewController *second;  
  4.   
  5. //在A视图跳转到B视图的地方添加如下代码  
  6.     self.second = [[SecondViewController alloc] initWithNibName:@"SecondViewController" bundle:nil];  
  7.     [self.second addObserver:self forKeyPath:@"userName" options:NSKeyValueObservingOptionNew context:nil];  
  8.     [self presentViewController:self.second animated:YES completion:nil];  
  9.   
  10.   
  11. -(void)observeValueForKeyPath:(NSString *)keyPath ofObject:(id)object change:(NSDictionary *)change context:(voidvoid *)context  
  12. {  
  13. //此处监听key对应值的变化情况  
  14.     if ([keyPath isEqualToString:@"userName"]) {  
  15.         self.myLabel.text = self.second.userName;  
  16.     }  
  17. }  
  18.   
  19. //清理观察  
  20. - (void)dealloc  
  21. {  
  22.     [self.second removeObserver:self forKeyPath:@"userName"];  
  23. }  

在B视图编写以下代码

[objc]  view plain  copy
  1. //在B视图  
  2. //.h文件  
  3.   
  4. @property (nonatomicstrongNSString *userName;//待监听的成员变量  
  5.   
  6. //可以在两处修改userName的值。一个是设置textfield的UITextFieldDelegate。实现一下方法  
  7.   
  8. -(void)textFieldDidEndEditing:(UITextField *)textField{  
  9. self.userName = self.myField.text;  
  10. }  
  11.   
  12. //或者在B视图,点击确定按钮,跳转回A视图的时候,修改userName的值也可以  
  13.   
  14. - (IBAction)buttonPressed:(id)sender {  
  15.     self.userName = self.myField.text;  
  16.     [self dismissViewControllerAnimated:YES completion:nil];  
  17. }  

在查阅资料的过程中,我还看到了以下几种方案:

(1)使用SharedApplication,定义一个变量来传递(感觉和单例的方式一样)

(2)使用文件,或者NSUserdefault来传递

[objc]  view plain  copy
  1. //通过文件或者UserDefault方式存值(感觉不太适合此类传值,如果要用文件或者UserDefault方式存值的话,可以考虑此方式)  
  2. - (IBAction)userDefaultMethod:(id)sender {  
  3.     if ([self notEmpty]) {  
  4.         [[NSUserDefaults standardUserDefaults] setObject:self.nameTextField.text forKey:@"myNameText"];  
  5.         [self dismissViewControllerAnimated:YES completion:nil];  
  6.     }else{  
  7.         [self showAlert];  
  8.     }  
  9. }  

在A试图控制器显示

[objc]  view plain  copy
  1. -(void)viewDidAppear:(BOOL)animated{  
  2.     [super viewDidAppear:animated];  
  3.     //如果想测试通过UserDefault方式传值或者通过单例方式传值,取消以下注释即可  
  4. /* 
  5.     if ([[[NSUserDefaults standardUserDefaults] objectForKey:@"myNameText"] length] != 0) { 
  6.         self.nameLabel.text = [[NSUserDefaults standardUserDefaults] objectForKey:@"myNameText"]; 
  7.         [[NSUserDefaults standardUserDefaults] setObject:@"" forKey:@"myNameText"]; 
  8.     } 
  9.     DataSource *dataSource = [DataSource sharedDataSource]; 
  10.     if ([dataSource.myName length] != 0) { 
  11.         self.nameLabel.text = dataSource.myName; 
  12.         dataSource.myName = @""; 
  13.     } 
  14. */  
  15. }  

(3)通过一个单例的class来传递

B试图控制器

[objc]  view plain  copy
  1. //通过单例方式传值(感觉不太适合此类传值,如果要用单例方式传值的话,可以考虑此方式)  
  2. - (IBAction)singletonMethod:(id)sender {  
  3.     if ([self notEmpty]) {  
  4.         DataSource *dataSource = [DataSource sharedDataSource];  
  5.         dataSource.myName = self.nameTextField.text;  
  6.         [self dismissViewControllerAnimated:YES completion:nil];  
  7.     }else{  
  8.         [self showAlert];  
  9.     }  
  10. }  

A试图控制器显示

[objc]  view plain  copy
  1. -(void)viewDidAppear:(BOOL)animated{  
  2.     [super viewDidAppear:animated];  
  3.     //如果想测试通过UserDefault方式传值或者通过单例方式传值,取消以下注释即可  
  4. /* 
  5.     if ([[[NSUserDefaults standardUserDefaults] objectForKey:@"myNameText"] length] != 0) { 
  6.         self.nameLabel.text = [[NSUserDefaults standardUserDefaults] objectForKey:@"myNameText"]; 
  7.         [[NSUserDefaults standardUserDefaults] setObject:@"" forKey:@"myNameText"]; 
  8.     } 
  9.     DataSource *dataSource = [DataSource sharedDataSource]; 
  10.     if ([dataSource.myName length] != 0) { 
  11.         self.nameLabel.text = dataSource.myName; 
  12.         dataSource.myName = @""; 
  13.     } 
  14. */  
  15. }  
  16. @end  

这里面用到了单例模式,编写了DataSource这个类,存放数据

[objc]  view plain  copy
  1. //  
  2. //  DataSource.h  
  3. //  TestCallBack  
  4. //  
  5. //  Created by csdc-iMac on 14-7-17.  
  6. //  Copyright (c) 2014年 JuneWang. All rights reserved.  
  7. //  
  8.   
  9. #import <Foundation/Foundation.h>  
  10.   
  11. @interface DataSource : NSObject  
  12. @property (nonatomicstrongNSString *myName;  
  13. +(DataSource*)sharedDataSource;  
  14. @end  

[objc]  view plain  copy
  1. //  
  2. //  DataSource.m  
  3. //  TestCallBack  
  4. //  
  5. //  Created by csdc-iMac on 14-7-17.  
  6. //  Copyright (c) 2014年 JuneWang. All rights reserved.  
  7. //  
  8.   
  9. #import "DataSource.h"  
  10.   
  11. @implementation DataSource  
  12. +(DataSource *)sharedDataSource{  
  13.     static DataSource *dataSource = nil;  
  14.     static dispatch_once_t once;  
  15.     dispatch_once(&once, ^{  
  16.         dataSource = [DataSource new];  
  17.     });  
  18.     return dataSource;  
  19. }  
  20. @end  

程序运行截图

A视图:


B视图


当输入姓名,并点击对应的确认按钮后,会回到A视图,并显示在B视图中输入的姓名


PS:用全局变量的方式也可以实现页面传值的效果。

源码地址:https://github.com/wangtao169447/PassValue

  • 0
    点赞
  • 0
    收藏
    觉得还不错? 一键收藏
  • 0
    评论
评论
添加红包

请填写红包祝福语或标题

红包个数最小为10个

红包金额最低5元

当前余额3.43前往充值 >
需支付:10.00
成就一亿技术人!
领取后你会自动成为博主和红包主的粉丝 规则
hope_wisdom
发出的红包
实付
使用余额支付
点击重新获取
扫码支付
钱包余额 0

抵扣说明:

1.余额是钱包充值的虚拟货币,按照1:1的比例进行支付金额的抵扣。
2.余额无法直接购买下载,可以购买VIP、付费专栏及课程。

余额充值