了解一门新技术,一般从2W1H入手:
- 是什么?(What)
- 有什么用?(What)
- 怎么用?(How)
DataBinding翻译过来就是数据绑定,把数据绑定在控件上。本篇讲述的都是单向绑定,即数据绑定到控件上。现在已经支持双向绑定,也就是说,还可以把控件绑定在数据上,后续介绍。
DataBinding可以代替findViewById,让代码更简洁,而且比注解框架(如ButterKnife)效率高。
开始学习吧……
二、DataBinding使用
2.1 准备工作
环境要求:
- Gradle 插件版本不低于 1.5.0-alpha1
- Android Studio 版本要高于 1.3
在module(如:app)的build.gradle中添加dataBinding的使能开关
android {
    compileSdkVersion 24
    buildToolsVersion "23.0.2"

    defaultConfig {
        ...
    }

    // add
    dataBinding{
        enabled true
    }

    ...
然后使用Sync now同步。
2.2 快速使用
2.2.1 创建一个Bean类
创建一个User类:
public class User{
    String name;
    String nickname;
    boolean isMale;
    int age;

    public User(String name, String nickname, boolean isMale, int age) {
        this.name = name;
        this.nickname = nickname;
        this.isMale = isMale;
        this.age = age;
    }

    /**
     * Getter and Setter,省略
     */
     ...
}
- 1
- 2
- 3
- 4
- 5
- 6
- 7
- 8
- 9
- 10
- 11
- 12
- 13
- 14
- 15
- 16
- 17
- 18
2.2.2 修改xml布局文件
步骤:
- 在原布局文件外套一层layout标签,把命名空间移到layout标签内
- layout标签内部包含数据模块和样式模块(原布局)
- 数据模块使用data标签,定义变量名称name——下面android:text属性中调用的名称,及类型type——定义变量所指的类型或类(如果是自定义类,必须给完整包名+类名)
<?xml version="1.0" encoding="utf-8"?>
<layout xmlns:android="http://schemas.android.com/apk/res/android"
xmlns:tools="http://schemas.android.com/tools">
<data>
<variable
name="user"
type="com.zjun.databinding.demo.bean.User" />
</data>
<LinearLayout
android:id="@+id/activity_fast_use"
android:layout_width="match_parent"
android:layout_height="match_parent"
android:orientation="vertical"
android:padding="@dimen/activity_vertical_margin"
tools:context="com.zjun.databinding.demo.FastUseActivity">
<LinearLayout style="@style/StyleItemParent">
<Button
android:id="@+id/btn_load"
style="@style/StyleBeforeText"
android:text="数据1" />
<Button
android:id="@+id/btn_change"
style="@style/StyleBeforeText"
android:text="数据2" />
</LinearLayout>
<LinearLayout style="@style/StyleItemParent">
<TextView
style="@style/StyleBeforeText"
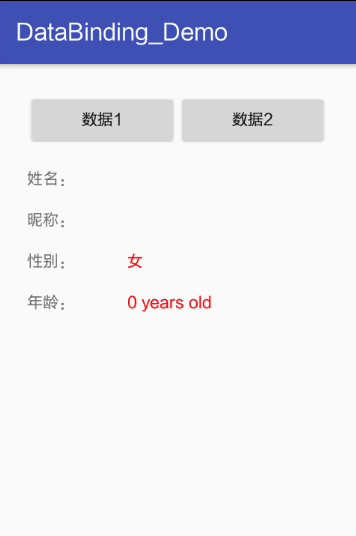
android:text="姓名:" />
<TextView
style="@style/StyleAfterText"
android:text="@{user.name}"
android:onClick="@{user.onNameClick}"/>
</LinearLayout>
<LinearLayout style="@style/StyleItemParent">
<TextView
style="@style/StyleBeforeText"
android:text="昵称:" />
<TextView
style="@style/StyleAfterText"
android:text="@{user.nickname ?? user.name}"
android:onLongClick="@{user.onNicknameLongClick}"/>
</LinearLayout>
<LinearLayout style="@style/StyleItemParent">
<TextView
style="@style/StyleBeforeText"
android:text="性别:" />
<TextView
style="@style/StyleAfterText"
android:textColor="@{user.male ? 0xFF0000FF : 0xFFFF0000}"
android:text='@{user.male ? @string/male : @string/female}' />
</LinearLayout>
<LinearLayout style="@style/StyleItemParent">
<TextView
style="@style/StyleBeforeText"
android:text="年龄:" />
<TextView
style="@style/StyleAfterText"
android:textColor="@{user.age < 14 || user.age > 65 ? 0xFFFF0000 : 0xFF000000}"
android:text='@{String.valueOf(user.age) + " years old"}' />
</LinearLayout>
</LinearLayout>
</layout>
- 1
- 2
- 3
- 4
- 5
- 6
- 7
- 8
- 9
- 10
- 11
- 12
- 13
- 14
- 15
- 16
- 17
- 18
- 19
- 20
- 21
- 22
- 23
- 24
- 25
- 26
- 27
- 28
- 29
- 30
- 31
- 32
- 33
- 34
- 35
- 36
- 37
- 38
- 39
- 40
- 41
- 42
- 43
- 44
- 45
- 46
- 47
- 48
- 49
- 50
- 51
- 52
- 53
- 54
- 55
- 56
- 57
- 58
- 59
- 60
- 61
- 62
- 63
- 64
- 65
- 66
- 67
- 68
- 69
- 70
- 71
- 72
- 73
- 74
- 75
- 76
- 77
- 78
- 79
- 80
2.2.3 xml中的使用语法
上面的数据绑定中,主要是把数据显示android:text属性中(点击事件暂不考虑),必须注意语法:
- 每一个变量variable都是由名称name和类型type组成。name可以在布局文件中使用,也可以通过Setter和Getter在代码中使用。type可以是基本数据类型、集合、适配器、自定义类等,除了基本类型,其他都必须把包名写全
- 双引号中可以套“`”(Tab键上面,非单引号),单引号内可以套双引号;
- 不能直接用boolean和int类型的值。而且int值将被当做资源文件。因此要使用其数值,必须转换成字符串,如(boolean同理):
"@{user.age + ``}",或 "@{String.valueOf(user.age)}" - 颜色必须使用ARGB制,指定其所有的透明度和单色值,以前的#F00和#FF0000无效,且前面不能加“#”
"@{user.nickname ?? user.name}",代表user.nickname为null时显示user.name,否则显示自己。等同于"@{user.nickname == null ? user.name : user.nickname}"- 比较运算符,必须使用转义字符:
大于号“>”——>
小于号“<”——< - 不能直接使用中文(MD),如:
android:text='@{user.male ? "男" : "女"}'
将报错,得用string引用,改成:
android:text='@{user.male ? @string/male : @string/female}'
2.2.4 代码中修改数据
public class FastUseActivity extends AppCompatActivity {
private ActivityFastUseBinding mBinding;
@Override
protected void onCreate(Bundle savedInstanceState) {
super.onCreate(savedInstanceState);
mBinding= DataBindingUtil.setContentView(this, R.layout.activity_fast_use);
}
public void onClick(View view) {
User user = new User("张君宝", "张三丰", true, 30);
mBinding.setUser(user);
}
...
}
- 1
- 2
- 3
- 4
- 5
- 6
- 7
- 8
- 9
- 10
- 11
- 12
- 13
- 14
- 15
- 16
- 17
- 18
其中:
- ActivityFastUseBinding是由布局文件activity_fast_use.xml的文件名生成的。
- DataBindingUtil.setContextView()生成的是抽象类ViewDataBinding,但不能用作定义mBinding,因为设置数据时,需要用到其实现类的方法,如setUser()。
运行结果:
2.3 监听事件
可以设置控件的点击与长按事件。
A. 先定义监听事件处理方法
在Bean类中添加点击事件:
public class User{
    String name;
    String nickname;
    boolean isMale;
    int age;

    ...

    public void onNameClick(View view) {
        Toast.makeText(view.getContext(), name + " is Clicked", Toast.LENGTH_SHORT).show();
    }

    public boolean onNicknameLongClick(View view) {
        Toast.makeText(view.getContext(), nickname + " is long Clicked", Toast.LENGTH_SHORT).show();
        return true;
    }
B. 在xml中使用
...
<TextView
    ...
    android:text="@{user.name}"
    android:onClick="@{user.onNameClick}"/>

...

<TextView
    ...
    android:text="@{user.nickname ?? user.name}"
    android:onLongClick="@{user.onNicknameLongClick}"/>
...
注意:
- 自定义监听事件方法的参数、返回值必须与原监听事件里的方法一样。如点击事件必须与onClick(View view)一样,参数是View,返回值是void;长按事件与onLongCLick(View view)一样,参数是View,返回值是boolean
- android:onLongClick会提示没有此属性,但只要不报错就没关系
2.4 include的参数传递
布局文件中,经常会用到include子布局,那如何把父布局中的数据传递给子布局呢?方法就是通过自定义属性。
【1】子布局layout_include_params.xml——与之前一样,定义数据模块,然后使用就OK:
<?xml version="1.0" encoding="utf-8"?>
<layout ...
    xmlns:tools="http://schemas.android.com/tools">

    <data>

        <variable
            name="user"
            type="com.zjun.databinding.demo.bean.User" />
    </data>

    <LinearLayout
        ...>

        <LinearLayout style="@style/StyleItemParent">

            <TextView
                ...
                android:text="姓名:" />

            <TextView
                ...
                android:text="@{user.name}" />
        </LinearLayout>


        <LinearLayout ...>

            <TextView
                ...
                android:text="年龄:" />

            <TextView
                ...
                android:text="@{String.valueOf(user.age) + ` years old`}" />
        </LinearLayout>
    </LinearLayout>
</layout>
- 1
- 2
- 3
- 4
- 5
- 6
- 7
- 8
- 9
- 10
- 11
- 12
- 13
- 14
- 15
- 16
- 17
- 18
- 19
- 20
- 21
- 22
- 23
- 24
- 25
- 26
- 27
- 28
- 29
- 30
- 31
- 32
- 33
- 34
- 35
- 36
- 37
- 38
【2】父布局activity_include_params_post.xml(添加命名空间app,用于自定义属性,然后在include标签中传递数据app:user="@{user}"):
<?xml version="1.0" encoding="utf-8"?>
<layout ...
xmlns:app="http://schemas.android.com/apk/res-auto" >
<data>
<variable
name="user"
type="com.zjun.databinding.demo.bean.User" />
</data>
<RelativeLayout
...>
<include
layout="@layout/layout_include_params"
app:user="@{user}" />
</RelativeLayout>
</layout>
- 1
- 2
- 3
- 4
- 5
- 6
- 7
- 8
- 9
- 10
- 11
- 12
- 13
- 14
- 15
- 16
- 17
- 18
- 19
- 20
- 21
2.5 List集合显示
这里的List的显示,表示把List集合中的对象单独拎出来显示,非适配器Adapter。如把两个User放入List中,然后在父布局中把对象取出来,再传递给子布局。
【1】父布局activity_list_show.xml:
<?xml version="1.0" encoding="utf-8"?>
<layout ...
xmlns:app="http://schemas.android.com/apk/res-auto" >
<data>
<import type="com.zjun.databinding.demo.bean.User" />
<variable
name="userList"
type="java.util.List<User>" />
</data>
<LinearLayout
... >
<include
layout="@layout/layout_include_list"
...
app:user="@{userList[0]}" />
<include
layout="@layout/layout_include_list"
...
app:user="@{userList[1]}" />
</LinearLayout>
</layout>
- 1
- 2
- 3
- 4
- 5
- 6
- 7
- 8
- 9
- 10
- 11
- 12
- 13
- 14
- 15
- 16
- 17
- 18
- 19
- 20
- 21
- 22
- 23
- 24
- 25
- 26
- 27
- 28
- 29
【2】子布局layout_include_list.xml:
<?xml version="1.0" encoding="utf-8"?>
<layout xmlns:android="http://schemas.android.com/apk/res/android">

    <data>
        <variable
            name="user"
            type="com.zjun.databinding.demo.bean.User" />

    </data>

    <TextView
        ...
        android:text="@{user.name + `[` + user.nickname + `, ` + (user.male ? `男` : `女`) + `, ` + user.age +`]`}" />
</layout>
【3】代码中设置数据:
@Override
protected void onCreate(Bundle savedInstanceState) {
    super.onCreate(savedInstanceState);
    ActivityListShowBinding binding = DataBindingUtil.setContentView(this, R.layout.activity_list_show);
    List<User> userList = new ArrayList<>();
    userList.add(new User("黄药师", "东邪", true, 30));
    userList.add(new User("欧阳锋", "西毒", true, 33));
    binding.setUserList(userList);
}
结果:

注意:
- 在type中的泛型同样不能使用”<”与”>”,必须使用转义字符
"<"和">" - 转义字符在type中会包红色错误,可忽略,编译时能通过
- 不能直接使用
android:text="@{userList[0]}",即使你想打印对象的地址,也不行。这样使用的后果是:每个databing都报“程序包不存在”的错误,连之前正常的也错了。会懵逼的 - 子布局中的
(user.male ? `男` : `女`),必须用小括号括起来 - android:text中的数据组合很长,但也只能写一行,目前还不知如何分行
2.6 自定义属性——ImageView显示图片
2.6.1 使用注解,在代码中实现自定义属性的添加
这里专门使用了一个类DBUtils,来封装Databinding的注解
public class DBUtils {
    /**
     * 使用DataBinding来加载图片
     * 使用@BindingAdapter注解,注解值(这里的imageUrl)可任取,注解值将成为自定义属性
     * 此自定义属性可在xml布局文件中使用,自定义属性的值就是这里定义String类型url
     * 《说明》:
     * 1. 方法名可与注解名一样,也可不一样
     * 2. 第一个参数必须是View,就是自定义属性所在的View
     * 3. 第二个参数就是自定义属性的值,与注解值对应。这是数组,可多个
     * 这里需要INTERNET权限,别忘了
     *
     * @param imageView     ImageView控件
     * @param url           图片网络地址
     */
    @BindingAdapter({"imageUrl"})
    public static void loadImage(ImageView imageView, String url) {
        if (url == null) {
            imageView.setImageResource(R.mipmap.ic_launcher);
        } else {
            Glide.with(imageView.getContext()).load(url).into(imageView);
        }
    }
}
- 1
- 2
- 3
- 4
- 5
- 6
- 7
- 8
- 9
- 10
- 11
- 12
- 13
- 14
- 15
- 16
- 17
- 18
- 19
- 20
- 21
- 22
- 23
2.6.2 在xml布局文件中使用自定义属性
先把命名空间写上:xmlns:app="http://schemas.android.com/apk/res-auto"
再使用自定义属性imageUrl
<?xml version="1.0" encoding="utf-8"?>
<layout ...
    xmlns:app="http://schemas.android.com/apk/res-auto" >

    <data>

        <variable
            name="imgUrl1"
            type="String" />

        <variable
            name="imgUrl2"
            type="String" />

    </data>

    <RelativeLayout
        ...>

        <!--使用自定义属性imageUrl-->
        <ImageView
            ...
            app:imageUrl="@{imgUrl1}" />

        <ImageView
            ...
            app:imageUrl="@{imgUrl2}" />

    </RelativeLayout>
</layout>
- 1
- 2
- 3
- 4
- 5
- 6
- 7
- 8
- 9
- 10
- 11
- 12
- 13
- 14
- 15
- 16
- 17
- 18
- 19
- 20
- 21
- 22
- 23
- 24
- 25
- 26
- 27
- 28
- 29
- 30
2.6.3 代码中设置自定义属性值
binding.setImgUrl1("http://avatar.csdn.net/4/9/8/1_a10615.jpg");
binding.setImgUrl2(null);
运行结果:

2.6 ListView
ListView的展示全靠BaseAdapter,在DataBinding中也不例外。这个相对来复杂点,先把步骤写下:
- 创建BaseAdapter的子类,因为此类可通用,所以称CommonAdapter。内部实现核心代码
- 在主布局文件中定义变量,type类型可为BaseAdapter,也可为CommonAdapter。并把变量设置给自定义属性adapter
- 子布局中通过Bean来设置变量
- 在代码中创建CommonAdapter实例,并设置给DataBinding变量
再一步一步来完成:
2.6.1 创建通用的适配器CommonAdapter
public class CommonAdapter extends BaseAdapter {
private Context mContext;
private List<User> mDataList;
private int layoutId;
private int variableId;
public CommonAdapter(Context context, List<User> dataList, int layoutId, int variableId) {
this.mContext = context;
this.mDataList = dataList;
this.layoutId = layoutId;
this.variableId = variableId;
}
@Override
public int getCount() { return mDataList.size(); }
@Override
public Object getItem(int position) { return mDataList.get(position); }
@Override
public long getItemId(int position) { return position; }
@Override
public View getView(int position, View convertView, ViewGroup parent) {
ViewDataBinding binding;
if (convertView == null) {
binding = DataBindingUtil.inflate(LayoutInflater.from(mContext), layoutId, parent, false);
} else {
binding = DataBindingUtil.getBinding(convertView);
}
binding.setVariable(variableId, mDataList.get(position));
return binding.getRoot();
}
}
- 1
- 2
- 3
- 4
- 5
- 6
- 7
- 8
- 9
- 10
- 11
- 12
- 13
- 14
- 15
- 16
- 17
- 18
- 19
- 20
- 21
- 22
- 23
- 24
- 25
- 26
- 27
- 28
- 29
- 30
- 31
- 32
- 33
- 34
- 35
2.6.2 主布局文件中设置适配器
<?xml version="1.0" encoding="utf-8"?>
<layout ...
xmlns:app="http://schemas.android.com/apk/res-auto"
>
<data >
<variable
name="lvAdapter"
type="com.zjun.databinding.demo.adapter.CommonAdapter" />
</data>
<RelativeLayout
...>
<ListView
...
app:adapter="@{lvAdapter}"
/>
</RelativeLayout>
</layout>
- 1
- 2
- 3
- 4
- 5
- 6
- 7
- 8
- 9
- 10
- 11
- 12
- 13
- 14
- 15
- 16
- 17
- 18
- 19
- 20
- 21
- 22
2.6.3 条目布局中设置数据
这个简单,上面都已经讲过了的
<?xml version="1.0" encoding="utf-8"?>
<layout ...
    xmlns:app="http://schemas.android.com/apk/res-auto">

    <data>
        <variable
            name="user"
            type="com.zjun.databinding.demo.bean.User" />
    </data>

    <LinearLayout
        ...>

        <ImageView
            ...
            app:imageUrl="@{user.icon}" />

        <TextView
            ...
            android:text="@{user.name}" />
    </LinearLayout>
</layout>
- 1
- 2
- 3
- 4
- 5
- 6
- 7
- 8
- 9
- 10
- 11
- 12
- 13
- 14
- 15
- 16
- 17
- 18
- 19
- 20
- 21
- 22
- 23
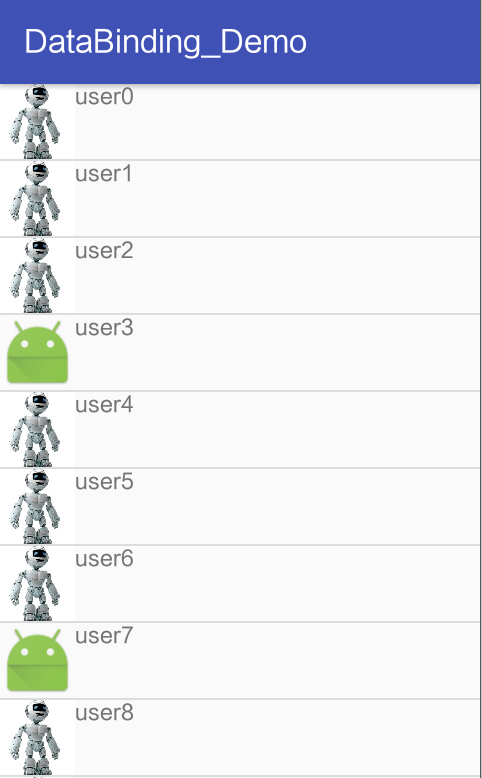
2.6.4 给ListView设置Adapter
protected void onCreate(Bundle savedInstanceState) {
super.onCreate(savedInstanceState);
ActivityListViewBinding binding = DataBindingUtil.setContentView(this, R.layout.activity_list_view);
List<User> list = new ArrayList<>();
for (int i = 0; i < 100; i++) {
User user = new User("user" + i, (i & 0x03) < 3 ? "http://avatar.csdn.net/4/9/8/1_a10615.jpg" : null);
list.add(user);
}
CommonAdapter adapter = new CommonAdapter(this, list, R.layout.item_list_view, BR.user);
binding.setLvAdapter(adapter);
}
结果:
2.7 ListView的条目更新
在普通的ListView中,更新数据后要立马展示到界面上,需要notifyDataSetChanged()。在但这里,Databinding里使用的是观察者模式。
实现步骤:
- 在Bean类中继承观察者BaseObservable
- 在需要被观察的属性getter方法上添加注解@Bindable。因为xml中就是通过getter来获取值的,这里也是为了在BR文件生成此字段标识
- 在更新的方法中,添加属性更新通知方法:
notifyPropertyChanged(int variableId);。一般把它放在Setter方法中,因为属性值都是通过这里改变的。
代码
Bean类:
public class Member extends BaseObservable{
private String name;
private String icon;
public Member(String name, String icon) {
this.name = name;
this.icon = icon;
}
@Bindable
public String getName() {
return name;
}
public void setName(String name) {
this.name = name;
notifyPropertyChanged(com.zjun.databinding.demo.BR.name);
}
public String getIcon() {
return icon;
}
public void setIcon(String icon) {
this.icon = icon;
}
public void onItemClick(View view) {
setName(name + "【已更新】");
}
}
- 1
- 2
- 3
- 4
- 5
- 6
- 7
- 8
- 9
- 10
- 11
- 12
- 13
- 14
- 15
- 16
- 17
- 18
- 19
- 20
- 21
- 22
- 23
- 24
- 25
- 26
- 27
- 28
- 29
- 30
- 31
- 32
- 33
- 34
布局文件(在整个条目上设置点击事件,也可以设置在某个控件上):
<?xml version="1.0" encoding="utf-8"?>
<layout ...
xmlns:app="http://schemas.android.com/apk/res-auto">
<data>
<variable
name="member"
type="com.zjun.databinding.demo.bean.Member" />
</data>
<LinearLayout
...
android:onClick="@{member.onItemClick}">
<ImageView
...
app:imageUrl="@{member.icon}" />
<TextView
...
android:text="@{member.name}" />
</LinearLayout>
</layout>
- 1
- 2
- 3
- 4
- 5
- 6
- 7
- 8
- 9
- 10
- 11
- 12
- 13
- 14
- 15
- 16
- 17
- 18
- 19
- 20
- 21
- 22
- 23
- 24
- 25
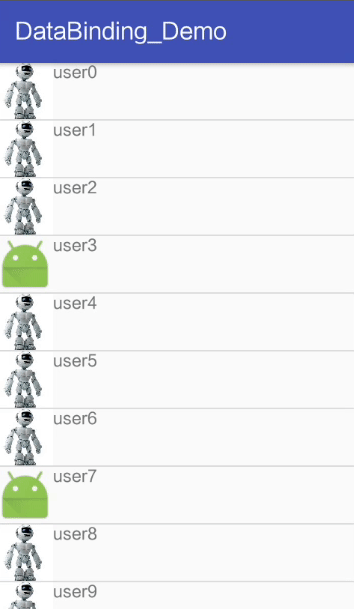
Activity中的代码同上,不过我把CommonAdapter的User改成了泛型,以便通用。
结果:
还有两种方法:ObserableField和ObservableMap,见最后的参考1或2
2.8 添加自定义属性用非static方法
前面我们加载图片的时候,使用了注解@BindingAdapter({"imageUrl"}),和static静态方法来添加自定义属性。但static没有非static功能多,有时就要用到对象等,怎么办?
DataBinding里也可以通过component组件的方式,来实现非static来添加自定义属性:
- 在自定义类中对添加自定义属性的非static方法,添加@BindingAdapter注解
- 创建自定义组件类,实现DataBindingComponent。这时会自动报错,提示需要实现获取1中类的方法(静态的就不需要了)。那就实现此方法
- 把组件对象设置给DataBinding
代码实现:
2.8.1 自定义类中添加非static方法,用于添加自定义属性
public class NotStaticUtils {
    @BindingAdapter({"imgSrc"})
    public  void showImg(ImageView imageView, String src) {
        if (src == null) {
            imageView.setImageResource(R.mipmap.ic_launcher);
        } else {
            Glide.with(imageView.getContext()).load(src).into(imageView);
        }
    }
}
2.8.2 创建自定义组件类,并实现方法
public class MyComponent implements DataBindingComponent{
    private NotStaticUtils utils;

    @Override
    public NotStaticUtils getNotStaticUtils() {
        if (utils == null) {
            utils = new NotStaticUtils();
        }
        return utils;
    }
}
2.8.3 把自定义组件设置给DataBinding
@Override
protected void onCreate(Bundle savedInstanceState) {
super.onCreate(savedInstanceState);
DataBindingUtil.setDefaultComponent(new MyComponent());
ActivityNotStaticBinding dataBinding = DataBindingUtil.setContentView(this, R.layout.activity_not_static);
dataBinding.setSrc1("http://avatar.csdn.net/4/9/8/1_a10615.jpg");
dataBinding.setSrc2(null);
}
2.8.4 xml中使用
这个跟上面一样,就是名称改了一下而已。核心如下:
<variable
name="src1"
type="String" />
...
<ImageView
...
app:imgSrc="@{src1}" />
2.9 在Fragment中使用
Fragment都有独立的布局,好像与Activity没有什么关系,但DataBinding中有一个方法可以绑定View:DataBindingUtil.bind(View root)。
2.9.1 布局文件
<layout ...>
    <data>
        <variable name="province" type="String" />
        <variable name="city" type="String" />
    </data>

    <LinearLayout ...>
        <TextView ...
            android:text="@{province}" />

        <TextView ...
            android:text="@{city}" />
    </LinearLayout>
</layout>
2.9.2 Fragment中绑定
获取DataBinding的方式有三种:
- 在onCreateView通过inflate(),然后通过getRoot()返回View。然后直接设置data变量值
- 通过bind()方法,返回布局Binding(根据布局自动生成的)。然后直接设置data变量值
- 通过bind()方法,返回布局Binding的父类ViewDataBinding。然后通过setVariable()给指定变量设置值
private FragmentShowBinding mBinding;
@Override
public View onCreateView(LayoutInflater inflater, ViewGroup container,
Bundle savedInstanceState) {
return inflater.inflate(R.layout.fragment_show, container, false);
}
@Override
public void onViewCreated(View view, @Nullable Bundle savedInstanceState) {
super.onViewCreated(view, savedInstanceState);
mBinding = DataBindingUtil.bind(view);
mBinding.setProvince("浙江");
mBinding.setCity("宁波");
}
- 1
- 2
- 3
- 4
- 5
- 6
- 7
- 8
- 9
- 10
- 11
- 12
- 13
- 14
- 15
- 16
- 17
- 18
- 19
- 20
- 21
- 22
- 23
- 24
- 25
2.10 RecyclerView
RecyclerView跟ListView一样,有一个适配器Adapter。但要正常显示,RecyclerView还需要一个LayoutManager(第一次就不小心就掉此坑了)。
网上有的方法是只在item条目里使用Databinding,RecyclerView还是通过findViewById来获取。但这里是Databinding,所以我这里就不要findViewById了。
在Databinding的世界里,如果这个View有setter方法,直接使用即可,没有我们可以自定义属性(见2.6)。比如要添加分割线,自己去玩吧。
直接看代码来看步骤逻辑:
2.10.1 activity中的布局
activity_recycler_view.xml
<?xml version="1.0" encoding="utf-8"?>
<layout ...>
<data >
<variable
name="rvLayoutManager"
type="android.support.v7.widget.LinearLayoutManager" />
<variable
name="rvAdapter"
type="com.zjun.databinding.demo.adapter.RVAdapter" />
</data>
<RelativeLayout ...>
<android.support.v7.widget.RecyclerView
...
app:layoutManager="@{rvLayoutManager}"
app:adapter="@{rvAdapter}"
/>
</RelativeLayout>
</layout>
- 1
- 2
- 3
- 4
- 5
- 6
- 7
- 8
- 9
- 10
- 11
- 12
- 13
- 14
- 15
- 16
- 17
- 18
- 19
- 20
- 21
- 22
2.10.2 item条目布局
跟上面ListView的条目布局一样
item_recycler_view.xml
<?xml version="1.0" encoding="utf-8"?>
<layout ...>

    <data>
        <variable name="member" type="com.zjun.databinding.demo.bean.Member" />
    </data>

    <LinearLayout ...>

        <ImageView ...
            app:imageUrl="@{member.icon}" />

        <TextView ...
            android:text="@{member.name}" />
    </LinearLayout>
</layout>
2.10.3 适配器及Activity中的代码
有两种写法,第一种是官方的,第二种通用性好。官方的里面,条目布局都不用(哈哈,是不是可以在新手面前装一下?但查看代码时,不能直接跳到布局文件,要显示也可以,根据上一节Fragment自己去修改吧)
一、官方办法
public class RVAdapter extends RecyclerView.Adapter<RVAdapter.RVHolder> {
private Context mContext;
private List<Member> mDataList;
public RVAdapter(Context context, List<Member> list) {
this.mContext = context;
this.mDataList = list;
}
@Override
public RVHolder onCreateViewHolder(ViewGroup parent, int viewType) {
return RVHolder.create(LayoutInflater.from(mContext), parent);
}
@Override
public void onBindViewHolder(RVHolder holder, int position) {
holder.bindTo(mDataList.get(position));
}
@Override
public int getItemCount() {
return mDataList == null ? 0 :mDataList.size();
}
static class RVHolder extends RecyclerView.ViewHolder {
static RVHolder create(LayoutInflater inflater, ViewGroup parent) {
ItemRecyclerViewBinding binding = ItemRecyclerViewBinding.inflate(inflater, parent, false);
return new RVHolder(binding);
}
ItemRecyclerViewBinding mBinding;
private RVHolder(ItemRecyclerViewBinding binding) {
super(binding.getRoot());
this.mBinding = binding;
}
public void bindTo(Member member) {
mBinding.setMember(member);
mBinding.executePendingBindings();
}
}
}
- 1
- 2
- 3
- 4
- 5
- 6
- 7
- 8
- 9
- 10
- 11
- 12
- 13
- 14
- 15
- 16
- 17
- 18
- 19
- 20
- 21
- 22
- 23
- 24
- 25
- 26
- 27
- 28
- 29
- 30
- 31
- 32
- 33
- 34
- 35
- 36
- 37
- 38
- 39
- 40
- 41
- 42
- 43
- 44
- 45
activity中使用:
@Override
protected void onCreate(Bundle savedInstanceState) {
super.onCreate(savedInstanceState);
ActivityRecyclerViewBinding binding = DataBindingUtil.setContentView(this, R.layout.activity_recycler_view);
List<Member> list = new ArrayList<>();
for (int i = 0; i < 100; i++) {
Member member = new Member("user" + i, (i & 0x01) == 0 ? "http://avatar.csdn.net/4/9/8/1_a10615.jpg" : null);
list.add(member);
}
binding.setRvLayoutManager(new LinearLayoutManager(this, LinearLayoutManager.VERTICAL, false));
binding.setRvAdapter(new RVAdapter(this, list));
}
- 1
- 2
- 3
- 4
- 5
- 6
- 7
- 8
- 9
- 10
- 11
- 12
- 13
- 14
- 15
- 16
- 17
- 18
二、通用办法
public class RVAdapter extends RecyclerView.Adapter<RVAdapter.RVHolder> {
private Context mContext;
private List<Member> mDataList;
private int mLayoutId;
private int mVariableId;
public RVAdapter(Context context, List<Member> list, int layoutId, int variableId) {
this.mContext = context;
this.mDataList = list;
this.mLayoutId = layoutId;
mVariableId = variableId;
}
@Override
public RVHolder onCreateViewHolder(ViewGroup parent, int viewType) {
ViewDataBinding binding = DataBindingUtil.inflate(LayoutInflater.from(mContext), mLayoutId, parent, false);
RVHolder holder = new RVHolder(binding.getRoot());
holder.binding = binding;
return holder;
}
@Override
public void onBindViewHolder(RVHolder holder, int position) {
holder.binding.setVariable(mVariableId, mDataList.get(position));
holder.binding.executePendingBindings();
}
@Override
public int getItemCount() {
return mDataList == null ? 0 :mDataList.size();
}
class RVHolder extends RecyclerView.ViewHolder {
ViewDataBinding binding;
RVHolder(View view) {
super(view);
}
}
}
- 1
- 2
- 3
- 4
- 5
- 6
- 7
- 8
- 9
- 10
- 11
- 12
- 13
- 14
- 15
- 16
- 17
- 18
- 19
- 20
- 21
- 22
- 23
- 24
- 25
- 26
- 27
- 28
- 29
- 30
- 31
- 32
- 33
- 34
- 35
- 36
- 37
- 38
- 39
- 40
- 41
- 42
activity中把setAdapter()代码,改成这句这就好了:
binding.setRvAdapter(new RVAdapter(this, list, R.layout.item_recycler_view, BR.member));
三、常见坑
DataBinding的错误很难找,但基本都是在xml文件中出错的。要仔细
3.1 Error:(8, 45) 错误: 程序包com.zjun.databinding.demo.databinding不存在
很难找到具体原因,一个一个排查吧:
- 查看Bean类中是否有getter方法,且getter方法是否正常
- 检查语法,包括一对大括号,其他见2.2.3 xml中的使用语法
四、开源Demo
传送门
五、参考
- 棉花糖给 Android 带来的 Data Bindings(数据绑定库)
- Android-MVVM架构-Data Binding的使用
- 千锋教育Android开发视频_DataBinding(自行百度)
- Android数据绑定框架DataBinding,堪称解决界面逻辑的黑科技
参考资料: http://blog.csdn.net/a10615/article/details/52781956


 被折叠的 条评论
为什么被折叠?
被折叠的 条评论
为什么被折叠?
 到【灌水乐园】发言


