


平台奖励创作,可能会升级VIP文章,可以移步我的公众号:【编程朝花夕拾】,且可获取首发内容。

01 引言
Spring的父子容器主要出现在Spring MVC时代,随着Spring Boot这位行业颠覆者的问世,以其简单的配置,快速搭建Web项目的能力,迅速取代Spring MVC的江湖地位。
初学者更喜欢的Spring Boot高度集成的框架,最大部分较少了Maven依赖的记忆。原来的Spring MVC框架,有经验的开发搭起一个Web项目并运行,也不是一件容易得事,而Spring Boot脚手架,可以让零基础的用户很快就能搭建一个可以运行的Web项目。
因此,关于父子容器的概念也慢慢被忽视了。我们一起来回顾一下。
02 什么是父子容器
顾名思义就是两个容器:父容器和子容器。
父容器:
Root WebApplicationContext,通过web.xml中的监听类org.springframework.web.context.ContextLoaderListener加载配置文件而形成,包括数据源、事务、MQ等基础设施。配置文件通常的是applicationContext开头的xml配置文件。
 <!-- 配置spring 父容器 -->
  <context-param>
    <param-name>contextConfigLocation</param-name>
    <param-value>classpath:spring/applicationContext*.xml</param-value>
  </context-param>
  <listener>
    <listener-class>org.springframework.web.context.ContextLoaderListener</listener-class>
  </listener>
子容器:
Servlet WebApplicationContext,通过web.xml中org.springframework.web.servlet.DispatcherServlet 类初始化配置文件而形成,主要处理Web层的Controller、ViewResolver等。配置文件经常以servlet名称-servlet.xml命名。
<!-- 配置springmvc容器: 子容器 -->
<servlet>
    <servlet-name>springmvc</servlet-name>
    <servlet-class>org.springframework.web.servlet.DispatcherServlet</servlet-class>
    <init-param>
      <param-name>contextConfigLocation</param-name>
      <param-value>classpath:springmvc-servlet.xml</param-value>
    </init-param>
    <load-on-startup>1</load-on-startup>
</servlet>
<servlet-mapping>
    <servlet-name>springmvc</servlet-name>
    <url-pattern>/</url-pattern>
</servlet-mapping>
父子容器的关系:
父子容器里面的资源并不是相互共享的。父容器不能调用子容器的资源,而子容器可以访问父容器的资源。这也就是常说的子容器对父容器不可见。
最直观的就是Controller中可以注入Service,这也是常用的写法。但是Service中无法注入Controller。我们回想一下,是不是没有见过Service 中注入Controller。
03 重现Spring MVC的父子容器
Spring MVC的搭建不能再使用Spring Boot的脚手架搭建了,因为配置起来相对会麻烦一些。这里使用Maven的模版创建。
3.1 Maven依赖引入
<!-- webmvc依赖 -->
<dependency>
      <groupId>org.springframework</groupId>
      <artifactId>spring-webmvc</artifactId>
      <version>4.1.3.RELEASE</version>
</dependency>
<!-- jsp页面依赖 -->
<dependency>
      <groupId>javax.servlet.jsp.jstl</groupId>
      <artifactId>jstl-api</artifactId>
      <version>1.2</version>
</dependency>

<!-- 添加log4j的依赖:方便日志打印 -->
<dependency>
      <groupId>org.slf4j</groupId>
      <artifactId>slf4j-api</artifactId>
      <version>1.6.4</version>
</dependency>
<dependency>
      <groupId>org.slf4j</groupId>
      <artifactId>slf4j-log4j12</artifactId>
      <version>1.6.4</version>
</dependency>
这里如果使用高版本(6.x)的spring-webmvc搭建也会出现问题,采用低版本的更容易搭建。
3.2 子容器配置
springmvc-servlet.xml配置
<?xml version="1.0" encoding="UTF-8"?>
<beans xmlns="http://www.springframework.org/schema/beans"
       xmlns:xsi="http://www.w3.org/2001/XMLSchema-instance"
       xmlns:p="http://www.springframework.org/schema/p"
       xmlns:context="http://www.springframework.org/schema/context"
       xmlns:mvc="http://www.springframework.org/schema/mvc"
       xsi:schemaLocation="http://www.springframework.org/schema/beans
       http://www.springframework.org/schema/beans/spring-beans-3.0.xsd
       http://www.springframework.org/schema/context
       http://www.springframework.org/schema/context/spring-context-3.0.xsd
       http://www.springframework.org/schema/mvc
       http://www.springframework.org/schema/mvc/spring-mvc-3.2.xsd">
    <!-- 配置注解驱动,代替默认(已过时)的RequestMappingHandlerMapping和RequestMappingHandlerAdapter-->
    <mvc:annotation-driven />
    <!-- 配置注解注解扫描包:扫描需要的Controller -->
    <context:component-scan base-package="com.simonking.mvc.controller"></context:component-scan>

    <!-- 禁止访问静态资源(可以不配置) -->
    <mvc:default-servlet-handler/>

    <!-- 配置视图解析器 -->
    <bean id="viewResolver" class="org.springframework.web.servlet.view.InternalResourceViewResolver">
        <!-- 如果页面需要使用jstl标签库,需要配置该属性:将普通视图转化成jstl视图 -->
        <property name="viewClass" value="org.springframework.web.servlet.view.JstlView"/>
        <property name="prefix" value="/WEB-INF/view/"/>
        <property name="suffix" value=".jsp"/>
    </bean>
</beans>
3.3 父容器的配置
applicationContext.xml配置
<?xml version="1.0" encoding="UTF-8"?>
<beans xmlns="http://www.springframework.org/schema/beans"
       xmlns:xsi="http://www.w3.org/2001/XMLSchema-instance"
       xmlns:context="http://www.springframework.org/schema/context"
       xsi:schemaLocation="http://www.springframework.org/schema/beans
       http://www.springframework.org/schema/beans/spring-beans-3.0.xsd
       http://www.springframework.org/schema/context
       http://www.springframework.org/schema/context/spring-context-3.0.xsd">

        <!-- 启动注解扫描包,获取bean -->
        <context:component-scan base-package="com.simonking.mvc.service" />
</beans>
3.4 web配置
web.xml配置
<?xml version="1.0" encoding="UTF-8"?>
<web-app xmlns:xsi="http://www.w3.org/2001/XMLSchema-instance" xmlns="http://java.sun.com/xml/ns/javaee" xsi:schemaLocation="http://java.sun.com/xml/ns/javaee http://java.sun.com/xml/ns/javaee/web-app_2_5.xsd" version="2.5">
  <!-- 配置spring容器:spring核心监听器 -->
  <context-param>
    <param-name>contextConfigLocation</param-name>
    <param-value>classpath:spring/applicationContext*.xml</param-value>
  </context-param>
  <listener>
    <listener-class>org.springframework.web.context.ContextLoaderListener</listener-class>
  </listener>

  <!-- 配置springmvc容器 -->
  <servlet>
    <servlet-name>springmvc</servlet-name>
    <servlet-class>org.springframework.web.servlet.DispatcherServlet</servlet-class>
    <init-param>
      <param-name>contextConfigLocation</param-name>
      <param-value>classpath:springmvc-servlet.xml</param-value>
    </init-param>
    <load-on-startup>1</load-on-startup>
  </servlet>
  <servlet-mapping>
    <servlet-name>springmvc</servlet-name>
    <url-pattern>/</url-pattern>
  </servlet-mapping>

  <!-- 默认欢迎页 -->
  <welcome-file-list>
    <welcome-file>index.jsp</welcome-file>
  </welcome-file-list>
</web-app>
3.5 日志配置
log4j.properties配置
log4j.rootLogger=info, console
log4j.appender.console=org.apache.log4j.ConsoleAppender
log4j.appender.console.layout=org.apache.log4j.PatternLayout
log4j.appender.console.layout.ConversionPattern=[%-d{yyyy-MM-dd HH:mm:ss}][%p] %l %n %m %n
3.6 父子容器Bean
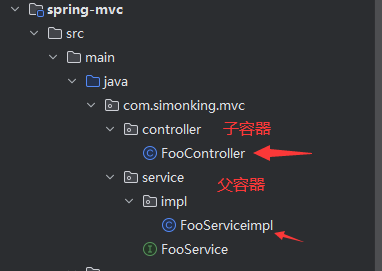
从上面的配置中可以看到:
com.simonking.mvc.controller包下的子容器
com.simonking.mvc.service包下的为父容器
3.7 子容器调用父容器
@Controller
@RequestMapping("/foo")
public class FooController {
@Autowired
FooService fooService;
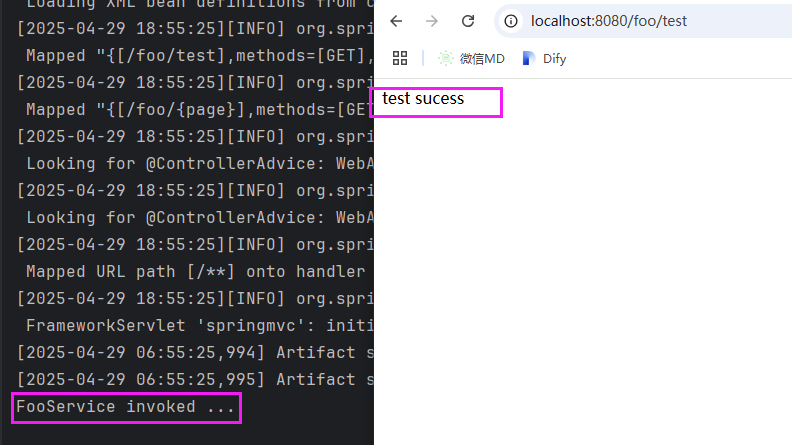
@RequestMapping(value = "/test", method = RequestMethod.GET)
@ResponseBody
public String testService() {
fooService.foo();
return "test sucess";
}
}
正常调用:
3.8 父容器调用子容器
@Service("fooService")
public class FooServiceimpl implements FooService {

    @Autowired
    FooController fooController;

    public void foo() {
        fooController.test();
        System.out.println("FooService invoked ...");
    }
}

启动会发现注解报错了:创建fooService没有成功,因为需要注入fooController, 而fooController 属于子容器的资源。
原因分析
我们可以看一下正常的启动日志:
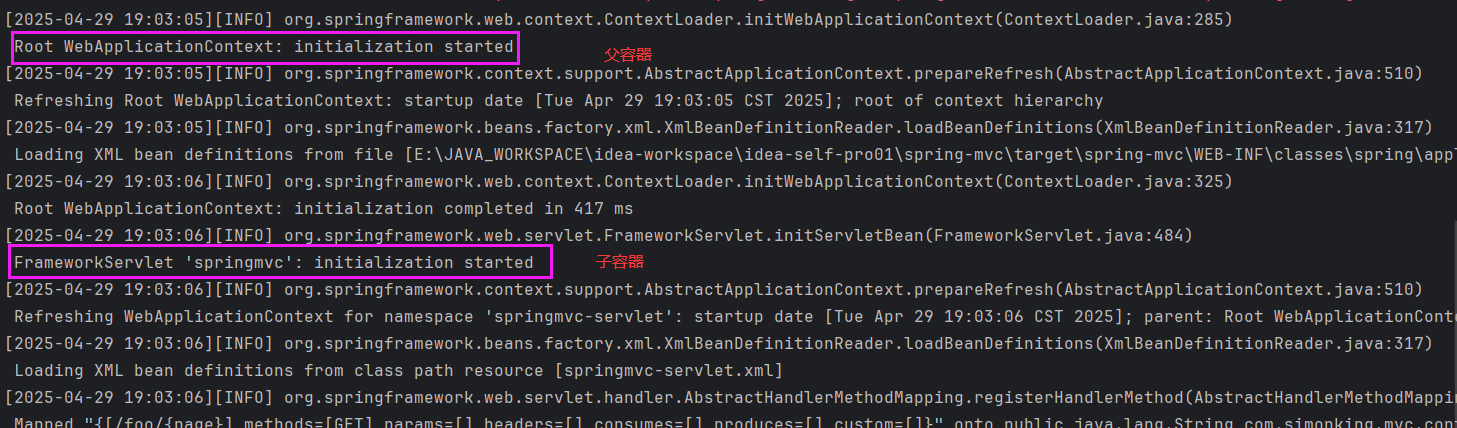
从日志来看,父容器是先启动的,子容器在父容器启动完成之后启动的。所以父容器中注入子容器资源的时候,子容器还没有启动加载,所以就无法获取。反之,子容器注入父容器的资源,父容器已经加载完成了,就可以正常获取了。
04 小结
Spring Boot启动的时候自动创建AnnotationConfigServletWebServerApplicationContext ,将所有的Bean注册到同一个上下文中,所以Spring boot没有父子容器的概念。Spring Boot可以在Service中注入Controller,感兴趣的可以去试试。
Spring 父子容器的内容就介绍到这里了。


 被折叠的 条评论
为什么被折叠?
被折叠的 条评论
为什么被折叠?
 到【灌水乐园】发言


