


开篇词
Spring Boot Actuator 是 Spring Boot 的子项目。它为你的应用增加了几项生产级服务,这不需要你付出多大的努力就能实现。在该指南中,你将构建一个添加这些服务的应用。
你将创建的应用
该指南将指导你使用 Spring Boot Actuator 创建一个 “Hello, world” RESTful Web 服务。我们将构建一个接受以下 HTTP GET 请求的服务:
$ curl http://localhost:9000/hello-world
它响应了以下 JSON 数据:
{"id":1,"content":"Hello, World!"}
应用中还添加了许多功能,用于在生产(或其他)环境中管理服务。我们构建的服务的业务功能与构建 RESTful Web 服务中的功能相同。尽管比较结果可能会很有趣,但我们无需借助那个指南即可完成该指南。
你将需要的工具
- 大概 15 分钟左右;
- 你最喜欢的文本编辑器或集成开发环境(IDE)
- JDK 1.8 或更高版本;
- Gradle 4+ 或 Maven 3.2+
- 你还可以将代码直接导入到 IDE 中:
如何完成这个指南
像大多数的 Spring 入门指南一样,你可以从头开始并完成每个步骤,也可以绕过你已经熟悉的基本设置步骤。如论哪种方式,你最终都有可以工作的代码。
- 要从头开始,移步至从 Spring Initializr 开始;
- 要跳过基础,执行以下操作:
待一切就绪后,可以检查一下 gs-actuator-service/complete 目录中的代码。
从 Spring Initializr 开始
对于所有的 Spring 应用来说,你应该从 Spring Initializr 开始。Initializr 提供了一种快速的方法来提取应用程序所需的依赖,并为你完成许多设置。该示例需要 Spring Web 以及 Spring Boot Actuator 依赖。下图显示了此示例项目的 Initializr 设置:
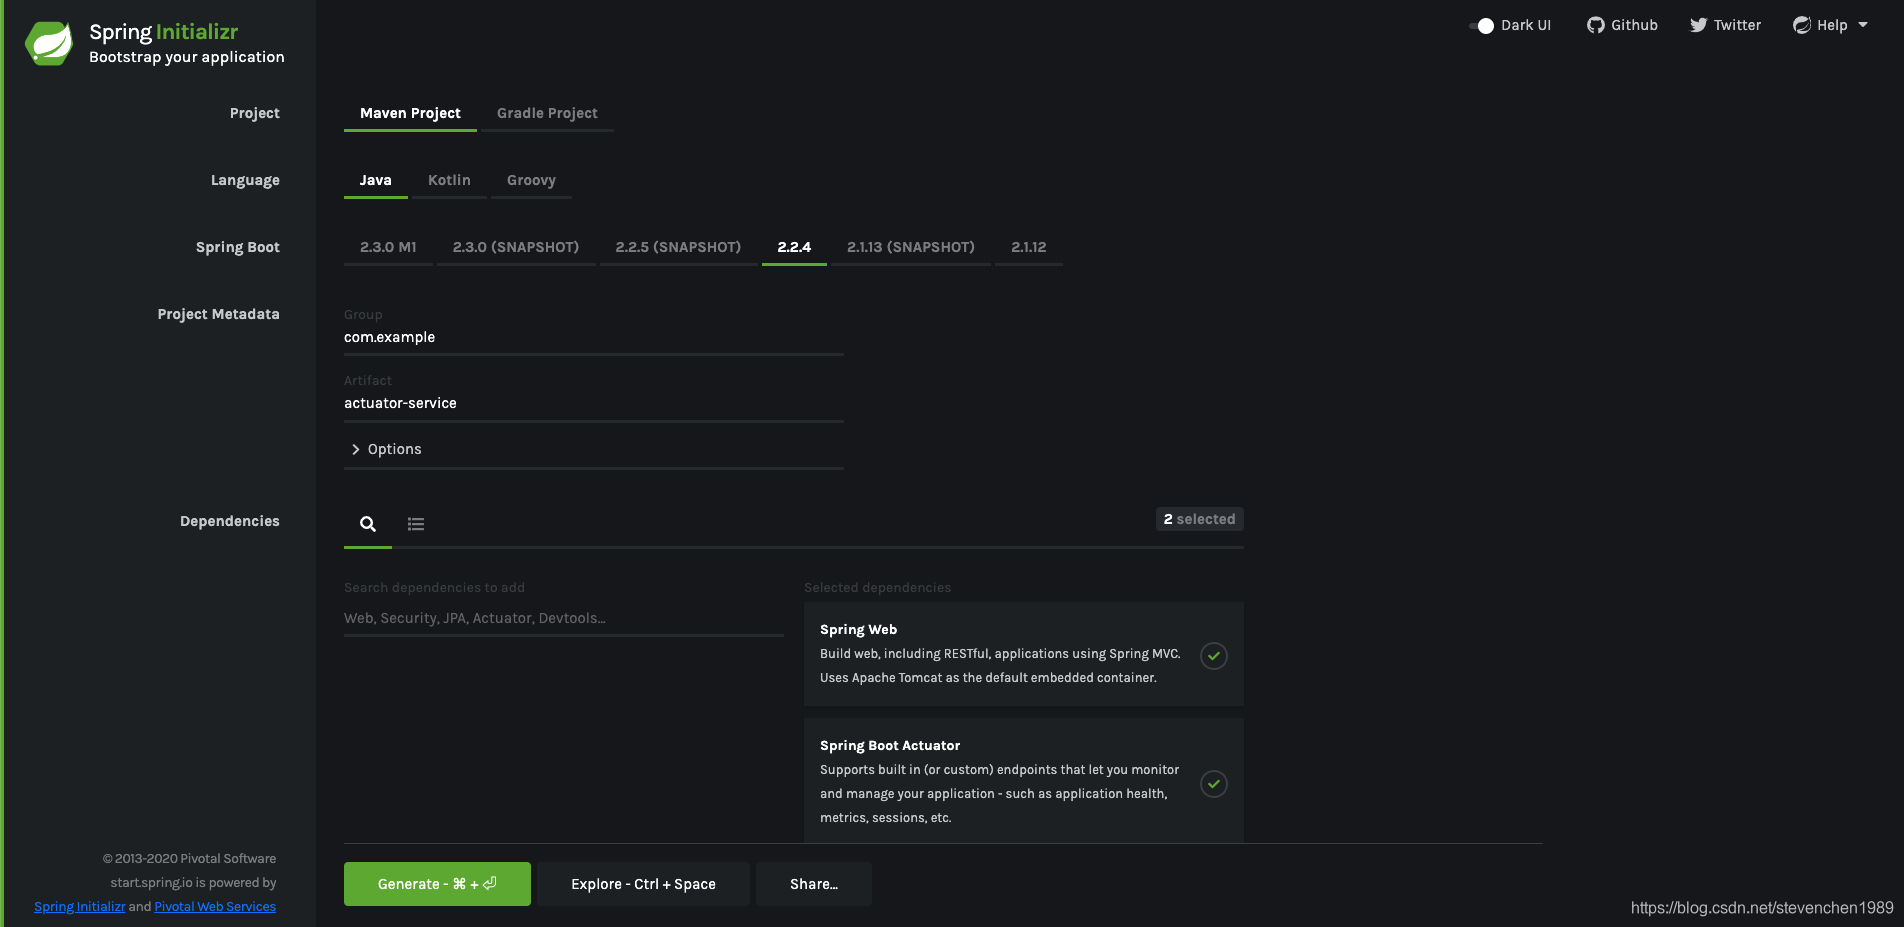
上图显示了选择 Maven 作为构建工具的 Initializr。你也可以使用 Gradle。它还将
com.example和actuator-service的值分别显示为 Group 和 Artifact。在本示例的其余部分,将用到这些值。
以下清单显示了选择 Maven 时创建的 pom.xml 文件:
<?xml version="1.0" encoding="UTF-8"?>
<project xmlns="http://maven.apache.org/POM/4.0.0" xmlns:xsi="http://www.w3.org/2001/XMLSchema-instance"
	xsi:schemaLocation="http://maven.apache.org/POM/4.0.0 https://maven.apache.org/xsd/maven-4.0.0.xsd">
	<modelVersion>4.0.0</modelVersion>
	<parent>
		<groupId>org.springframework.boot</groupId>
		<artifactId>spring-boot-starter-parent</artifactId>
		<version>2.2.2.RELEASE</version>
		<relativePath/> <!-- lookup parent from repository -->
	</parent>
	<groupId>com.example</groupId>
	<artifactId>actuator-service</artifactId>
	<version>0.0.1-SNAPSHOT</version>
	<name>actuator-service</name>
	<description>Demo project for Spring Boot</description>

	<properties>
		<java.version>1.8</java.version>
	</properties>

	<dependencies>
		<dependency>
			<groupId>org.springframework.boot</groupId>
			<artifactId>spring-boot-starter-actuator</artifactId>
		</dependency>
		<dependency>
			<groupId>org.springframework.boot</groupId>
			<artifactId>spring-boot-starter-web</artifactId>
		</dependency>

		<dependency>
			<groupId>org.springframework.boot</groupId>
			<artifactId>spring-boot-starter-test</artifactId>
			<scope>test</scope>
			<exclusions>
				<exclusion>
					<groupId>org.junit.vintage</groupId>
					<artifactId>junit-vintage-engine</artifactId>
				</exclusion>
			</exclusions>
		</dependency>
	</dependencies>

	<build>
		<plugins>
			<plugin>
				<groupId>org.springframework.boot</groupId>
				<artifactId>spring-boot-maven-plugin</artifactId>
			</plugin>
		</plugins>
	</build>

</project>
以下清单显示了在选择 Gradle 时创建的 build.gradle 文件:
plugins {
	id 'org.springframework.boot' version '2.2.2.RELEASE'
	id 'io.spring.dependency-management' version '1.0.8.RELEASE'
	id 'java'
}

group = 'com.example'
version = '0.0.1-SNAPSHOT'
sourceCompatibility = '1.8'

repositories {
	mavenCentral()
}

dependencies {
	implementation 'org.springframework.boot:spring-boot-starter-actuator'
	implementation 'org.springframework.boot:spring-boot-starter-web'
	testImplementation('org.springframework.boot:spring-boot-starter-test') {
		exclude group: 'org.junit.vintage', module: 'junit-vintage-engine'
	}
}

test {
	useJUnitPlatform()
}
运行空服务
Spring Initializr 创建了一个空的应用,我们可以使用它来入门。以下示例(来自 initial 目录中的 src/main/java/com/example/actuatorservice/ActuatorServiceApplication)显示了 Spring Initializr 创建的类:
package com.example.actuatorservice;

import org.springframework.boot.SpringApplication;
import org.springframework.boot.autoconfigure.SpringBootApplication;

@SpringBootApplication
public class ActuatorServiceApplication {

  public static void main(String[] args) {
    SpringApplication.run(ActuatorServiceApplication.class, args);
  }

}
@SpringBootApplication 注解根据类路径的内容和其他内容提供默认值(例如嵌入式 servlet 容器)的装载。它还会启用 Spring MVC 的 @EnableWebMvc 注解,该注解将激活 Web 端点。
在该应用中没有定义端点,但有足够的端点来启动事物并查看 Actuator 的某些功能。SpringApplication.run() 命令知道如何启动 Web 应用。我们需要做的就是运行以下命令:
$ ./gradlew clean build && java -jar build/libs/gs-actuator-service-0.1.0.jar
由官网提供的以上这条命令的执行结果与我本地的不一样,我需要这样才能运行:
./gradlew clean build && java -jar build/libs/actuator-service-0.0.1-SNAPSHOT.jar。
我们尚未编写任何代码,打开另一个终端,然后尝试以下命令(及其输出显示):
$ curl localhost:8080
{"timestamp":1384788106983,"error":"Not Found","status":404,"message":""}
以上命令的输出表明服务器正在运行,但是我们尚未定义任何业务端点。我们会看到来自 Actuator /error 端点的通用 JSON 响应,而不是默认的容器生成的 HTML 错误响应。我们可以在服务器启动的控制台日志中看到开箱即用提供的端点。我们可以尝试其中的一些端点,包括 /health 端点。以下示例显示了如何执行该操作:
$ curl localhost:8080/actuator/health
{"status":"UP"}
状态为 UP,因此 actuator 服务正在运行。
有关更多详细信息,请参见 Spring Boot 的 Actuator 项目。
创建展示类
首先,我们需要考虑一下 API 的外观。
我们想要处理 /hello-world 的 GET 请求,可以选用使用名称查询参数。为了响应这样的请求,我们想发送回表示问候的 JSON,该 JSON 类似于以下内容:
{
    "id": 1,
    "content": "Hello, World!"
}
id 字段是问候语的唯一标识符,content 包含问候语的文本展示。
要建模问候展示,创建一个展示类。以下清单(来自 src/main/java/com/example/actuatorservice/Greeting.java)显示了 Greeting 类:
package com.example.actuatorservice;

public class Greeting {

  private final long id;
  private final String content;

  public Greeting(long id, String content) {
    this.id = id;
    this.content = content;
  }

  public long getId() {
    return id;
  }

  public String getContent() {
    return content;
  }

}
现在,我们需要创建用于展示类的端点控制器。
创建资源控制器
在 Spring 中,REST 端点是 Spring MVC 控制器。以下 Spring MVC 控制器(来自 src/main/java/com/example/actuatorservice/HelloWorldController.java)处理针对 /hello-world 端点的 GET 请求并返回 Greeting 资源:
package com.example.actuatorservice;

import java.util.concurrent.atomic.AtomicLong;

import org.springframework.stereotype.Controller;
import org.springframework.web.bind.annotation.GetMapping;
import org.springframework.web.bind.annotation.RequestParam;
import org.springframework.web.bind.annotation.ResponseBody;

@Controller
public class HelloWorldController {

  private static final String template = "Hello, %s!";
  private final AtomicLong counter = new AtomicLong();

  @GetMapping("/hello-world")
  @ResponseBody
  public Greeting sayHello(@RequestParam(name="name", required=false, defaultValue="Stranger") String name) {
    return new Greeting(counter.incrementAndGet(), String.format(template, name));
  }

}
面向用户的控制器和 REST 端点控制器之间的主要区别在于响应的创建方式。端点控制器不依赖于视图(如 JSP)以 HTML 形式呈现模型数据,而是将要直接写入响应正文的数据返回。
@ResponseBody 注解告诉 Spring MVC 不要将模型呈现到视图中,而是将返回的对象写到响应主体中。它是通过使用 Spring 的某一个消息转换器来实现的。由于 Jackson 2 在类路径中,因此如果请求的 Aceept 标头指定应返回 JSON,则 MappingJackson2HttpMessageConverter 将 Greeting 对象转换成 JSON。
如何获知 Jackson 2 的类路径?运行
mvn dependency:tree或./gradlew dependencies, 然后我们将获得包含 Jackson 2.x 的详细依赖关系树。我们还可以看到它来自 /spring-boot-starter-json,它本身是由 spring-boot-starter-web 导入的。
运行应用
我们可以从自定义主类或直接从其中一个配置类运行应用。对于这个简单的示例,可以使用 SpringApplication 帮助类。请注意,这是 Spring Initializr 为我们创建的应用类,我们甚至无需对其进行修改即可使其适用于该简单应用。以下清单(来自 src/main/java/com/example/actuatorservice/HelloWorldApplication.java)显示了应用类:
package com.example.actuatorservice;

import org.springframework.boot.SpringApplication;
import org.springframework.boot.autoconfigure.SpringBootApplication;

@SpringBootApplication
public class HelloWorldApplication {

  public static void main(String[] args) {
    SpringApplication.run(HelloWorldApplication.class, args);
  }

}
在常规的 Spring MVC 应用中,我们将添加 @EnableWebMvc 来激活关键行为,包括配置 DispatcherServlet。但是当 Spring Boot 在我们的类路径上监测到 spring-webmvc 时,它会自动开启该注解。这使我们可以在接下来的步骤中构建控制器。
@SpringBootApplication 注解还引入了 @ComponentScan 注解,该注解告诉 Spring 扫描 com.example.actuatorservice 应用包中的那些控制器(以及任何其他带有注解的组件类)。
构建可执行 JAR
我们可以结合 Gradle 或 Maven 来从命令行运行该应用。我们还可以构建一个包含所有必须依赖项、类以及资源的可执行 JAR 文件,然后运行该文件。在整个开发生命周期中,跨环境等等情况下,构建可执行 JAR 可以轻松地将服务作为应用进行发布、版本化以及部署。
如果使用 Gradle,则可以借助 ./gradlew bootRun 来运行应用。或通过借助 ./gradlew build 来构建 JAR 文件,然后运行 JAR 文件,如下所示:
java -jar build/libs/gs-actuator-service-0.1.0.jar
由官网提供的以上这条命令的执行结果与我本地的不一样,我需要这样才能运行:
java -jar build/libs/actuator-service-0.0.1-SNAPSHOT.jar。
如果使用 Maven,则可以借助 ./mvnw spring-boot:run 来运行该用。或可以借助 ./mvnw clean package 来构建 JAR 文件,然后运行 JAR 文件,如下所示:
java -jar target/gs-actuator-service-0.1.0.jar
由官网提供的以上这条命令的执行结果与我本地的不一样,我需要这样才能运行:
java -jar target/actuator-service-0.0.1-SNAPSHOT.jar。
我们还可以构建一个经典的 WAR 文件。
服务运行后(因为我们在终端上运行 spring-boot:run),可以通过在单独的终端上运行以下命令来对其进行测试:
$ curl localhost:8080/hello-world
{"id":1,"content":"Hello, Stranger!"}
切换至不一样的服务器端口
Spring Boot Actuator 默认在端口 8080 上运行。通过添加 application.properties 文件,我们可以覆盖该设置。以下清单(来自 src/main/resources/application.properties)显示了必要的更改:
server.port: 9000
management.server.port: 9001
management.server.address: 127.0.0.1
通过在终端中运行以下命令来再次运行服务器:
$ ./gradlew clean build && java -jar build/libs/gs-actuator-service-0.1.0.jar
由官网提供的以上这条命令的执行结果与我本地的不一样,我需要这样才能运行:
./gradlew clean build && java -jar build/libs/actuator-service-0.0.1-SNAPSHOT.jar。
现在,该服务从端口 9000 启动。
我们可以通过在终端中运行以下命令来测试它是否在端口 9000 上运行:
$ curl localhost:8080/hello-world
curl: (52) Empty reply from server
$ curl localhost:9000/hello-world
{"id":1,"content":"Hello, Stranger!"}
$ curl localhost:9001/actuator/health
{"status":"UP"}
测试应用
要检查我们的应用是否正常工作,我们应该为应用编写单元测试和集成测试。src/test/java/com/example/actuatorservice/HelloWorldApplicationTests.java 中的测试类可以确保:
- 我们的控制器反应灵敏;
- 我们的管理端点是响应式的。
请注意,测试会在随机端口上启动应用。以下清单显示了测试类:
/*
 * Copyright 2012-2014 the original author or authors.
 *
 * Licensed under the Apache License, Version 2.0 (the "License");
 * you may not use this file except in compliance with the License.
 * You may obtain a copy of the License at
 *
 *	  https://www.apache.org/licenses/LICENSE-2.0
 *
 * Unless required by applicable law or agreed to in writing, software
 * distributed under the License is distributed on an "AS IS" BASIS,
 * WITHOUT WARRANTIES OR CONDITIONS OF ANY KIND, either express or implied.
 * See the License for the specific language governing permissions and
 * limitations under the License.
 */
package com.example.actuatorservice;

import java.util.Map;

import org.junit.jupiter.api.Test;

import org.springframework.beans.factory.annotation.Autowired;
import org.springframework.beans.factory.annotation.Value;
import org.springframework.boot.test.context.SpringBootTest;
import org.springframework.boot.test.web.client.TestRestTemplate;
import org.springframework.boot.web.server.LocalServerPort;
import org.springframework.http.HttpStatus;
import org.springframework.http.ResponseEntity;
import org.springframework.test.context.TestPropertySource;

import static org.assertj.core.api.BDDAssertions.then;

/**
 * Basic integration tests for service demo application.
 *
 * @author Dave Syer
 */
@SpringBootTest(webEnvironment = SpringBootTest.WebEnvironment.RANDOM_PORT)
@TestPropertySource(properties = {"management.port=0"})
public class HelloWorldApplicationTests {

	@LocalServerPort
	private int port;

	@Value("${local.management.port}")
	private int mgt;

	@Autowired
	private TestRestTemplate testRestTemplate;

	@Test
	public void shouldReturn200WhenSendingRequestToController() throws Exception {
		@SuppressWarnings("rawtypes")
		ResponseEntity<Map> entity = this.testRestTemplate.getForEntity(
				"http://localhost:" + this.port + "/hello-world", Map.class);

		then(entity.getStatusCode()).isEqualTo(HttpStatus.OK);
	}

	@Test
	public void shouldReturn200WhenSendingRequestToManagementEndpoint() throws Exception {
		@SuppressWarnings("rawtypes")
		ResponseEntity<Map> entity = this.testRestTemplate.getForEntity(
				"http://localhost:" + this.mgt + "/actuator/info", Map.class);

		then(entity.getStatusCode()).isEqualTo(HttpStatus.OK);
	}

}
概述
恭喜你!我们刚刚使用 Spring 开发了一个简单的 RESTful 服务,并使用 Spring Boot Actuator 添加了一些有用的内置服务。
参见
以下指南也可能会有所帮助:
- 使用 Spring Boot 构建应用(尽请期待~)
- 使用 Spring MVC 服务 Web 内容(尽请期待~)
想看指南的其他内容?请访问该指南的所属专栏:《Spring 官方指南》


 784
784


 被折叠的 条评论
为什么被折叠?
被折叠的 条评论
为什么被折叠?
 到【灌水乐园】发言


