


1. 深入Struts2的配置文件
本部分主要介绍struts.xml的常用配置。
1.1. 包配置:
Struts2框架中核心组件就是Action、拦截器等,Struts2框架使用包来管理Action和拦截器等。每个包就是多个Action、多个拦截器、多个拦截器引用的集合。
在struts.xml文件中package元素用于定义包配置,每个package元素定义了一个包配置。它的常用属性有:
| 名称 | 作用 |
|---|---|
name | 必填属性,用来指定包的名字。 |
extends | 可选属性,用来指定该包继承其他包。继承其它包,可以继承其它包中的Action定义、拦截器定义等。 |
namespace | 可选属性,用来指定该包的命名空间。 |
<!DOCTYPE struts PUBLIC
        "-//Apache Software Foundation//DTD Struts Configuration 2.0//EN"
        "http://struts.apache.org/dtds/struts-2.0.dtd">
<struts>
    <!-- struts2的action必须放在一个指定的包空间下定义 -->
    <package name="default" extends="struts-default">
    <!-- 定义处理请求URL为login.action的Action -->
        <action name="login" class="org.qiujy.web.struts.action.LoginAction">
        <!-- 定义处理结果字符串和资源之间的映射关系 -->
            <result name="success">/success.jsp</result>
            <result name="error">/error.jsp</result>
        </action>
    </package>
</struts>如上示例的配置,配置了一个名为default的包,该包下定义了一个Action。
1.2. 命名空间配置:
考虑到同一个Web应用中需要同名的Action,Struts2以命名空间的方式来管理Action,同一个命名空间不能有同名的Action。
Struts2通过为包指定namespace属性来为包下面的所有Action指定共同的命名空间。
把上示例的配置改为如下形式:
<!DOCTYPE struts PUBLIC
        "-//Apache Software Foundation//DTD Struts Configuration 2.0//EN"
        "http://struts.apache.org/dtds/struts-2.0.dtd">
<struts>
    <!-- struts2的action必须放在一个指定的包空间下定义 -->
    <package name="qiujy" extends="struts-default">
    <!-- 定义处理请求URL为login.action的Action -->
        <action name="login" class="org.qiujy.web.struts2.action.LoginAction">
        <!-- 定义处理结果字符串和资源之间的映射关系 -->
            <result name="success">/success.jsp</result>
            <result name="error">/error.jsp</result>
        </action>
    </package>

    <package name="my" extends="struts-default" namespace="/manage">
    <!-- 定义处理请求URL为login.action的Action -->
        <action name="backLogin" class="org.qiujy.web.struts2.action.LoginAction">
        <!-- 定义处理结果字符串和资源之间的映射关系 -->
            <result name="success">/success.jsp</result>
            <result name="error">/error.jsp</result>
        </action>
    </package>
</struts>如上配置了两个包:default和my,配置my包时指定了该包的命名空间为/manage。
对于包default:没有指定namespace属性。如果某个包没有指定namespace属性,即该包使用默认的命名空间,默认的命名空间总是”“。
对于包my:指定了命名空间/manage,则该包下所有的Action处理的URL应该是“命名空间/Action名”。如上名为backLogin的Action,它处理的URL为:
http://localhost:8080/userlogin_struts2/manage/backLogin.action
Struts2的命名空间的作用等同于struts1里模块的作用。
1.3. 包含配置:
在Struts2中可以将一个配置文件分解成多个配置文件,那么我们必须在struts.xml中包含其他配置文件。
<struts>
    <include file="struts-default.xml"/>
    <include file="struts-user.xml"/>
    <include file="struts-book.xml"/>
    <include file="struts-shoppingCart.xml"/>
    ......
</struts>
1.4. 拦截器配置:
见后面章节介绍。
1.5. 常量配置:
Struts2框架有两个核心配置文件,其中struts.xml文件主要负责管理应用中的Action映射, 及Action处理结果和物理资源之间的映射关系。除此之外,Struts2框架还包含了一个struts.properties文件,该文件主义了Struts2框架的大量常量属性。但通常推荐也是在struts.xml文件中来配置这些常量属性。
如:后面会讲到Struts2的国际化,它的资源文件位置就用常量属性来指定:
<struts>
    ......
    <constant name="struts.custom.i18n.resources" value="messages"/>
</struts>表示指定了资源文件的放置在classes目录下,基本名是messages,则在classes目录下您就应该放置类似messages_zh_CN.properties,message_en.properties名的文件。
2. Struts2的Action
2.1. 实现Action类:
Struts2中Action是核心内容,它包含了对用户请求的处理逻辑,我们也称Action为业务控制器。
Struts2中的Action采用了低侵入式的设计,Struts2不要求Action类继承任何的Struts2的基类或实现Struts2接口。(但是,我们为了方便实现Action,大多数情况下都会继承com.opensymphony.xwork2.ActionSupport类,并重写此类里的public String execute() throws Exception方法。因为此类中实现了很多的实用接口,提供了很多默认方法,这些默认方法包括获取国际化信息的方法、数据校验的方法、默认的处理用户请求的方法等,这样可以大大的简化Action的开发。)
Struts2中通常直接使用Action来封装HTTP请求参数,因此,Action类里还应该包含与请求参数对应的属性,并且为属性提供对应的getter和setter方法。(当然,Action类中还可以封装处理结果,把处理结果信息当作一属性,提供对应的getter和setter方法)
修改第一部分的用户登录示例:把Action改成如下:
package org.qiujy.web.struts2.action;

import com.opensymphony.xwork2.ActionSupport;

/**
 *@authorqiujy
 *@version1.0
 */
publicclass LoginAction extends ActionSupport{
    private String userName;
    private String password;

    private String msg; //结果信息属性

    /**
     *@returnthemsg
     */
    public String getMsg() {
        returnmsg;
    }
    /**
     *@parammsgthemsgtoset
     */
    publicvoid setMsg(String msg) {
        this.msg = msg;
    }
    /**
     *@returntheuserName
     */
    public String getUserName() {
        returnuserName;
    }
    /**
     *@paramuserNametheuserNametoset
     */
    publicvoid setUserName(String userName) {
        this.userName = userName;
    }
    /**
     *@returnthepassword
     */
    public String getPassword() {
        returnpassword;
    }
    /**
     *@parampasswordthepasswordtoset
     */
    publicvoid setPassword(String password) {
        this.password = password;
    }

    /**
     *处理用户请求的excute()方法
     *@return结果导航字符串
     *@throwsException
     */
    public String execute() throws Exception{
       if("test".equals(this.userName) &&
"test".equals(this.password)){
           msg = "登录成功,欢迎" + this.userName;
           returnthis.SUCCESS;
       }else{
           msg = "登录失败,用户名或密码错";
           returnthis.ERROR;
       }
    }
}往success.jsp和error.jsp页面中添加 ${msg} EL表达式来显示结果信息。则最终效果跟以前一样。
2.2. Action访问Servlet API:
Struts2中的Action并没有和任何Servlet API耦合,这样框架更具灵活性,更易测试。
但是,对于web应用的控制器而言,不访问Servlet API几乎是不可能的,例如跟踪HTTP Session状态等。Struts2框架提供了一种更轻松的方式来访问Servlet API。Struts2中提供了一个ActionContext类(当前Action的上下文对象),通过这个类可以访问Servlet API。下面是该类中提供的几个常用方法:
| 方法 | 作用 |
|---|---|
public static ActionContext getContext() | 获得当前Action的ActionContext实例。 |
public Object get(Object key) | 此方法类似于调用HttpServletRequest的getAttribute(String name)方法。 |
public void put(Object key, Object value) | 此方法类似于调用HttpServletRequest 的setAttribute(String name, Object o)。 |
public Map getParameters() | 获取所有的请求参数。类似于调用HttpServletRequest对象的getParameterMap() 方法。 |
public Map getSession() | 返回一个Map对象,该Map对象模拟了HttpSession实例。 |
public void setSession(Map session) | 直接传入一个Map实例,将该Map实例里的key-value对转换成session的属性名-属性值对。 |
public Map getApplication() | 返回一个Map对象,该对象模拟了该应用的ServletContext实例。 |
public void setApplication(Map application) | 直接传入一个Map实例,将该Map实例里的key-value对转换成application的属性名-属性值对。 |
修改以上用户登录验证示例的Action类中的execute方法:
public String execute() throws Exception{
        if("test".equals(this.userName) && "test".equals(this.password)){
            msg = "登录成功,欢迎" + this.userName;
            //获取ActionContext实例,通过它来访问Servlet API
            ActionContext context = ActionContext.getContext();
            //看session中是否已经存放了用户名,如果存放了:说明已经登录了;
//否则说明是第一次登录成功
            if(null != context.getSession().get("uName")){
                msg = this.userName + ":你已经登录过了!!!";
            }else{
                context.getSession().put("uName", this.userName);
            }

            returnthis.SUCCESS;
        }else{
            msg = "登录失败,用户名或密码错";
            returnthis.ERROR;
        }
    }
Struts2中通过`ActionContext`来访问`Servlet API`,让Action彻底从`Servlet API` 中分离出来,最大的好处就是可以脱离Web容器测试Action。
另外,Struts2中还提供了一个`ServletActionContext`类,Action只要继承自该类,就可以直接访问Servlet API。具体方法参看struts2的API文档。
3. 一个Action内包含多个请求处理方法的处理
Struts1提供了DispatchAction,从而允许一个Action内包含多个请求处理方法。Struts2也提供了类似的功能。处理方式主要有以下三种方式:
3.1. 动态方法调用:
DMI:Dynamic Method Invocation 动态方法调用。
动态方法调用是指:表单元素的action不直接等于某个Action的名字,而是以如下形式来指定对应的动作名:
<form method="post" action="userOpt!login.action">则用户的请求将提交到名为”userOpt”的Action实例,Action实例将调用名为”login”方法来处理请求。同时login方法的签名也是跟execute()一样,即为public String login() throws Exception。
注意:要使用动态方法调用,必须设置Struts2允许动态方法调用,通过设置struts.enable.DynamicMethodInvocation常量来完成,该常量属性的默认值是false。
3.1.1. 示例:
修改用户登录验证示例,多增加一个注册用户功能。
1) 修改Action类:
package org.qiujy.web.struts2.action;
import com.opensymphony.xwork2.ActionContext;
import com.opensymphony.xwork2.ActionSupport;
/**
*@authorqiujy
*@version1.0
*/
publicclass LoginAction extends ActionSupport{
private String userName;
private String password;
private String msg; //结果信息属性
/**
*@returnthemsg
*/
public String getMsg() {
returnmsg;
}
/**
*@parammsgthemsgtoset
*/
publicvoid setMsg(String msg) {
this.msg = msg;
}
/**
*@returntheuserName
*/
public String getUserName() {
returnuserName;
}
/**
*@paramuserNametheuserNametoset
*/
publicvoid setUserName(String userName) {
this.userName = userName;
}
/**
*@returnthepassword
*/
public String getPassword() {
returnpassword;
}
/**
*@parampasswordthepasswordtoset
*/
publicvoid setPassword(String password) {
this.password = password;
}
/**
*处理用户请求的login()方法
*@return结果导航字符串
*@throwsException
*/
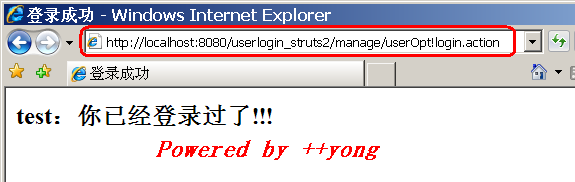
public String login() throws Exception{
if("test".equals(this.userName) && "test".equals(this.password)){
msg = "登录成功,欢迎" + this.userName;
//获取ActionContext实例,通过它来访问Servlet API
ActionContext context = ActionContext.getContext();
//看session中是否已经存放了用户名,如果存放了:说明已经登录了;
//否则说明是第一次登录成功
if(null != context.getSession().get("uName")){
msg = this.userName + ":你已经登录过了!!!";
}else{
context.getSession().put("uName", this.userName);
}
returnthis.SUCCESS;
}else{
msg = "登录失败,用户名或密码错";
returnthis.ERROR;
}
}
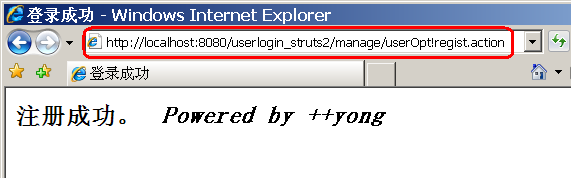
public String regist() throws Exception{
//将用户名,密码添加到数据库中
//...
msg = "注册成功。";
returnthis.SUCCESS;
}
}2) struts.xml文件:没有什么变化,跟以前一样配置
<!DOCTYPE struts PUBLIC
        "-//Apache Software Foundation//DTD Struts Configuration 2.0//EN"
        "http://struts.apache.org/dtds/struts-2.0.dtd">
<struts>
    <package name="my" extends="struts-default" namespace="/manage">
    <!-- 定义处理请求URL为login.action的Action -->
        <action name="userOpt" class="org.qiujy.web.struts2.action.LoginAction">
        <!-- 定义处理结果字符串和资源之间的映射关系 -->
            <result name="success">/success.jsp</result>
            <result name="error">/error.jsp</result>
        </action>
    </package>
</struts>
3) 页面:
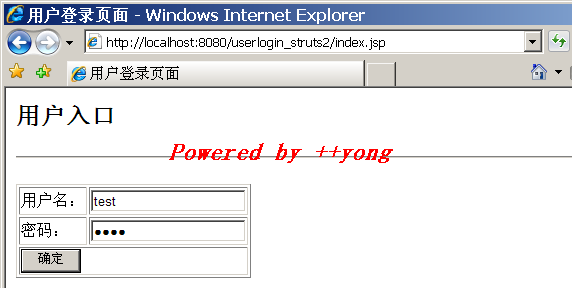
index.jsp
<%@ page language="java" pageEncoding="UTF-8"%>
<html>
<head>
<title>用户登录页面</title>
</head>
<body>
<h2>用户入口</h2>
<hr>
<form action="manage/userOpt!login.action" method="post">
<table border="1">
<tr>
<td>用户名:</td>
<td><input type="text" name="userName"/></td>
</tr>
<tr>
<td>密码:</td>
<td><input type="password" name="password"/></td>
</tr>
<tr>
<td colspan="2">
<input type="submit" value=" 确定 "/>
</td>
</tr>
</table>
</form>
</body>
</html>
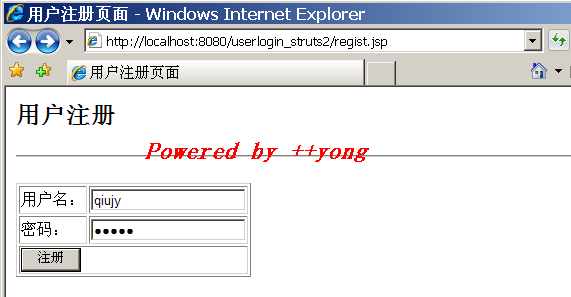
regist.jsp
<%@ page language="java" pageEncoding="UTF-8"%>
<html>
<head>
<title>用户注册页面</title>
</head>
<body>
<h2>用户注册</h2>
<hr>
<form action="manage/userOpt!regist.action" method="post">
<table border="1">
<tr>
<td>用户名:</td>
<td><input type="text" name="userName"/></td>
</tr>
<tr>
<td>密码:</td>
<td><input type="password" name="password"/></td>
</tr>
<tr>
<td colspan="2">
<input type="submit" value=" 注册 "/>
</td>
</tr>
</table>
</form>
</body>
</html>4) 运行结果:
3.2. 为Action配置method属性:
将Action类中的每一个处理方法都定义成一个逻辑Action方法。
<!DOCTYPE struts PUBLIC
        "-//Apache Software Foundation//DTD Struts Configuration 2.0//EN"
        "http://struts.apache.org/dtds/struts-2.0.dtd">
<struts>
    <package name="my" extends="struts-default" namespace="/manage">
        <action name="userLogin" class="org.qiujy.web.struts2.action.LoginAction" method="login">
            <result name="success">/success.jsp</result>
            <result name="error">/error.jsp</result>
        </action>

        <action name="userRegist" class="org.qiujy.web.struts2.action.LoginAction" method="regist">
            <result name="success">/success.jsp</result>
            <result name="error">/error.jsp</result>
        </action>
    </package>
</struts>如上,把LoginAction中的login和regist方法都配置成逻辑Action。要调用login方法,则相应的把index.jsp中表单元素的action设置为”manage/userLogin.action“;要调用regist方法,把regist.jsp中表单元素的action设置为”manage/userRegist.action“。
3.3. 使用通配符映射(wildcard mappings)方式:
在struts.xml文件中配置<action…>元素时,它的name、class、method属性都可支持通配符,这种通配符的方式是另一种形式的动态方法调用。
当我们使用通配符定义Action的name属性时,相当于用一个元素action定义了多个逻辑Action:
<action name="user_*"
class="org.qiujy.web.struts2.action.UserAction" method="{1}">
    <result name="success">/success.jsp</result>
    <result name="error">/error.jsp</result>
</action>如上,<action name=”user_*”>定义一系列请求URL是user_*.action模式的逻辑Action。同时method属性值为一个表达式{1},表示它的值是name属性值中第一个*的值。例如:用户请求URL为user_login.action时,将调用到UserAction类的login方法;用户请求URL为user_regist.action时,将调用到UserAction类的regist方法。
4. 处理结果
Struts2的Action处理完用户请求后,将返回一个普通字符串,整个普通字符串就是一个逻辑视图名。Struts2通过配置逻辑视图名和物理视图资源之间的映射关系,一旦系统收到Action返回的某个逻辑视图名,系统就会把对应的物理视图资源呈现给浏览者。
4.1. 配置处理结果:
Struts2的Action处理用户请求结束后,返回一个普通字符串-逻辑视图名,必须在struts.xml文件中完成逻辑视图和物理视图资源的映射,才可让系统转到实际的视图资源。
Struts2通过在struts.xml文件中使用<result …/>元素来配置结果。Struts2提供了两种结果。
| 结果 | 配置 |
|---|---|
| 局部结果 | 将<result …/>作为<action …>元素的子元素配置。 |
| 全局结果 | 将<result …/>作为<global-results …>元素的子元素配置。 |
在package元素中配置<global-results>子元素:
<global-results>
 <result name="error">/Error.jsp</result>
 <result name="invalid.token">/Error.jsp</result>
 <result name="login" type="redirect-action">Logon!input</result>
</global-results>
4.2. 处理结果类型:
Struts2提供了对不同种类返回结果的支持,常见的有JSP,FreeMarker,Velocity等。
Struts2支持的不同类型的返回结果为:
| 名字 | 说明 |
|---|---|
chain | 用来处理Action链 |
dispatcher | 用来转向页面,通常处理JSP,这是默认的结果类型 |
freeMarker | 处理FreeMarker模板 |
httpHeader | 用来控制特殊的Http行为 |
redirect | 重定向到一个URL |
redirect-action | 重定向到一个Action |
stream | 向浏览器发送InputSream对象,通常用来处理文件下载 |
velocity | 处理Velocity模板 |
xslt | 处理XML/XLST模板 |
plaintext | 显示原始文件内容,例如文件源代码 |
tiles | 结合Tile使用 |
另外第三方的Result类型还包括JasperReports Plugin,专门用来处理JasperReport类型的报表输出;Jfreechart Plugin;JSF Plugin。
常见使用总结:
result:配置跳转的页面
name:action执行方法之后的返回值有对应关系
标签中间:1.直接写跳转地址(JSP)
- 如果直接写地址,受命名空间的保护
- 如果直接地址前加/,/代表了项目根目录
2.可以使用param标签配置(Action)
1.
namespace
2.actionName
3.methodtype:页面跳转的方式
1.请求转发:
1.请求转发到JSP:dispatcher
2.请求转发到Action:chain2.重定向:
1.重定向到JSP:redirect(如何手动传参)
2.重定向到Action:redirectAction3.流stream:
4.3. 动态返回结果
有些时候,只有当Action执行完毕的时候我们才知道要返回哪个结果,这个时候我们可以在Action内部定义一个属性,这个属性用来存储Action执行完毕之后的result值,例如:
private String nextAction;

public String getNextAction() {
    return nextAction;
}在strutx.xml配置文件中,我们可以使用${nextAction}来引用到Action中的属性,通过${nextAction}表示的内容来动态的返回结果,例如:
<action name="fragment" class="FragmentAction">
    <result name="next" type="redirect-action">${nextAction}</result>
</action>上述Action的execute方法返回next的时候,还需要根据nextAction的属性来判断具体定位到哪个Action。
5. 属性驱动和模型驱动
不管属性驱动还是模型驱动,Struts2框架都是通过拦截器负责提取请求参数,并将请求数据封装到相应的Action实例的属性或专门的模型的属性。
5.1. 属性驱动:
属性驱动就是属性(property)作为贯穿MVC流程的信息携带者。简单的说,就是使用Action实例来封装请求参数和处理结果信息。前面我们做的示例都属于属性驱动模式。
5.2. 模型驱动:
模型驱动就是使用单独的javaBean作为贯穿整个MVC流程的信息携带者。也就是说,使用单独的VO(值对象)来封装请求参数和处理结果信息。
示例:继续修改用户登录验证:
1) 新增一用户域模型对象:User.java
package org.qiujy.domain;

publicclass User {
    private String userName;
    private String password;
    /**
     *@returntheuserName
     */
    public String getUserName() {
        returnuserName;
    }
    /**
     *@paramuserNametheuserNametoset
     */
    publicvoid setUserName(String userName) {
        this.userName = userName;
    }
    /**
     *@returnthepassword
     */
    public String getPassword() {
        returnpassword;
    }
    /**
     *@parampasswordthepasswordtoset
     */
    publicvoid setPassword(String password) {
        this.password = password;
    }
}
2) 业务控制器:UserAction.java
package org.qiujy.web.struts2.action;

import org.qiujy.domain.User;
import com.opensymphony.xwork2.ActionContext;
import com.opensymphony.xwork2.ActionSupport;

publicclass UserAction extends ActionSupport{
    //定义用于封装请求参数的模型对象
    private User user = new User();

    private String msg; //结果信息属性

    /**
     *@returntheuser
     */
    public User getUser() {
        returnuser;
    }
    /**
     *@paramusertheusertoset
     */
    publicvoid setUser(User user) {
        this.user = user;
    }
    /**
     *@returnthemsg
     */
    public String getMsg() {
        returnmsg;
    }
    /**
     *@parammsgthemsgtoset
     */
    publicvoid setMsg(String msg) {
        this.msg = msg;
    }

    /**
     *处理用户请求的login()方法
     *@return结果导航字符串
     *@throwsException
     */
    public String login() throws Exception{
        String userName = user.getUserName();
        String password = user.getPassword();

        if("test".equals(userName) && "test".equals(password)){
            msg = "登录成功,欢迎" + userName;
            //获取ActionContext实例,通过它来访问Servlet API
            ActionContext context = ActionContext.getContext();
            //看session中是否已经存放了用户名,如果存放了:说明已经登录了;否则说明是第一次登录成功
            if(null != context.getSession().get("uName")){
                msg = userName + ":你已经登录过了!!!";
            }else{
                context.getSession().put("uName", userName);
            }

            returnthis.SUCCESS;
        }else{
            msg = "登录失败,用户名或密码错";
            returnthis.ERROR;
        }
    }

    public String regist() throws Exception{
        //将用户名,密码添加到数据库中
        //...
        msg = "注册成功。";
        returnthis.SUCCESS;
    }
}
3) 配置文件:struts.xml
<!DOCTYPE struts PUBLIC
        "-//Apache Software Foundation//DTD Struts Configuration 2.0//EN"
        "http://struts.apache.org/dtds/struts-2.0.dtd">
<struts>
    <package name="my" extends="struts-default" namespace="/manage">
        <action name="userOpt" class="org.qiujy.web.struts2.action.UserAction">
            <result name="success">/success.jsp</result>
            <result name="error">/error.jsp</result>
        </action>
    </package>
</struts>
4) 页面:index.jsp
<%@ page language="java" pageEncoding="UTF-8"%>
<html>
 <head>
    <title>用户登录页面</title>
 </head>

 <body>
  <h2>用户入口</h2>
  <hr>
    <form action="manage/userOpt!login.action" method="post">
    <table border="1">
         <tr>
             <td>用户名:</td>
             <td><input type="text" name="user.userName"/></td>
         </tr>
         <tr>
             <td>密码:</td>
         <td><input type="password" name="user.password"/></td>
         </tr>
         <tr>
             <td colspan="2">
                 <input type="submit" value=" 确定 "/>
             </td>
         </tr>
    </table>
    </form>
 </body>
</html>
其它页面略。
5) 运行效果:同以前一样。
6) 源代码:
6. Struts2的异常处理机制:
任何成熟的MVC框架都应该提供成就的异常处理机制。Strut2也不例外。Struts2提供了一种声明式的异常处理方式。Struts2也是通过配置的拦截器来实现异常处理机制的。
Struts2的异常处理机制通过在struts.xml文件中配置<exception-mapping …>元素完成的,配置该元素时,需要指定两个属性:
exception:此属性指定该异常映射所设置的异常类型。
result:此属性指定Action出现该异常时,系统转入result属性所指向的结果。
6.1. 异常映射也分为两种:
| 一场映射 | 配置 |
|---|---|
| 局部异常映射 | <exception-mapping…>元素作为<action…>元素的子元素配置。 |
| 全局异常映射 | <exception-mapping…>元素作为<global-exception-mappings>元素的子元素配置。 |
6.2. 输出异常信息:
使用Struts2的标签来输出异常信息:
l <s:property value="exception.message"/> : 输出异常对象本身。
l <s:property value="exceptionStack"/> : 输出异常堆栈信息。
6.3. 示例:
还是修改用户登录示例:
1) 把UserAciton.java中的regist方法改成:
public String regist() throws Exception{
        //将用户名,密码添加到数据库中
        //...
        //msg = "注册成功。";
        if(true){
           throw new java.sql.SQLException("没有数据库驱动程序");
       }

        return this.SUCCESS;
    }
2) 修改struts.xml文件:
<!DOCTYPE struts PUBLIC
        "-//Apache Software Foundation//DTD Struts Configuration 2.0//EN"
        "http://struts.apache.org/dtds/struts-2.0.dtd">
<struts>
    <package name="my" extends="struts-default" namespace="/manage">
        <!-- 定义全局处理结果 -->
        <global-results>
        <!-- 逻辑名为sql的结果,映射到/exception.jsp页面 -->
        <result name="sql">/exception.jsp</result>
        </global-results>

        <global-exception-mappings>
        <!-- 当Action抛出SQLException异常时,转入名为sql的结果 -->
        <exception-mapping exception="java.sql.SQLException" result="sql"/>
        </global-exception-mappings>

        <action name="userOpt" class="org.qiujy.web.struts2.action.UserAction">
            <result name="success">/success.jsp</result>
            <result name="error">/error.jsp</result>
        </action>
    </package>
</struts>
3) 新增一页面:exception.jsp
<%@ page language="java" pageEncoding="utf-8"%>
<%@ taglib uri="/struts-tags" prefix="s"%>
<html>
<head>
<title>异常信息</title>
</head>

<body>
    <h2>出现异常啦</h2>
    <hr />
    <h3 style="color:red">
        <!-- 获得异常对象 -->
        <s:property value="exception.message" />
    </h3>
    <br />
    <!-- 异常堆栈信息 -->
    <s:property value="exceptionStack" />
</html>
4) 运行regist.jsp进行调试:


 593
593

 被折叠的 条评论
为什么被折叠?
被折叠的 条评论
为什么被折叠?
 到【灌水乐园】发言


