


http://cgs1999.iteye.com/blog/1972831
0、引言
在研究WebRTC服务端画面合成和混音处理,需要实现浏览器端与服务器端的点对点,网上找了好些参考的项目,webrtc2sip项目就是其中之一,该项目基于doubango的框架,需要自行编译搭建环境,根据webrtc2sip中的《技术指南1.0》(注:《technical guide1.0》)文档进行了编译,本文记录编译过程及相关问题的处理。
1、准备
(1)VMware;
(2)CentOS 64位版本(本人使用CentOS 6.4 的64位版本);
(3)安装的虚拟机要可以上网,建议网络使用NAT,相关方法可网上查找;
2、构建Doubango IMS框架
2.1 更新及安装软件
(1)更新CentOS系统软件至最新版本
(2)安装需要的软件
2.2 安装libsrtp
libsrtp为必须组件,相关命令如下:
2.3 安装OpenSSL
OpenSSL为必须组件,相关命令如下:
2.4 安装libspeex和libspeexdsp
libspeex为可选组件,libspeexdsp为必须组件,相关命令如下:
(1)直接安装开发包
(2)或者直接从源代码中构建
注:技术指南中使用的是speex-1.2beta3版本,本人则直接使用了rc1的版本
2.5 安装YASM
该组件启用VPX (VP8视频编解码)或x264 (H.264 编解码)时必须,相关命令如下:
注:技术指南中没有“mkdir m4”,本人在编译时,老是编译出错,后来网上找了一下解决方案,增加了该命令后编译通过
2.6 安装libvpx
该组件用于支持VP8是可选的,若你想支持Chrome或FireFox的视频则强烈推荐安装,相关命令如下:
(1)直接安装开发包
(2)或者直接从源代码中构建
2.7 安装libyuv
该组件为可选,可视情况进行编译,相关命令如下:
注:相关的命令个人在虚拟机上没有编译通过,由于是可选的,后来没有再编译
2.8 安装opencore-amr
该组件可选,用于支持AMR的音频编解码,相关命令如下:
注:技术指南中缺少了“cd opencore-amr”,需要补上
2.9 安装libopus
该组件可选,但强烈推荐安装用于支持WebRTC的MTI编解码,可支持OPUS音频编解码,相关命令如下:
2.10 安装libgsm
该组件可选,用于支持GSM的音频编解码,相关命令如下:
(1)直接安装开发包
(2)或者直接从源代码中构建
2.11 安装g729
该组件可选,用于支持G729的音频编解码,相关命令如下:
2.12 安装iLBC
该组件可选,用于支持iLBC的音频编解码,个人建议安装,相关命令如下:
2.13 安装x264
该组件可选,用于支持H.264的视频编解码(需要FFmpeg),个人建议安装,相关命令如下:
注:命令“cd x264-snapshot-20131105-2245”随版本的不同而不同,本人安装使用的版本为x264-snapshot-20131105-2245
2.14 安装FFmpeg
该组件可选,用于支持H.263、H.264(需要x264)和MP4V-ES的视频编解码,个人建议安装,相关命令如下:
2.15 编译并安装Doubango
(1)下载源代码
(2)三种构建方案
A. 最小化构建
B. 推荐构建
C. 完整构建
注:
1. 命令“chmod 755 ./autogen.sh”为实际编译中发现没有执行权限,本人增加的
2. 可根据实际安装的情况,修改完整构建中相关组件的支持
3. configure命令成功会出现CONGRATULATIONS及相关组件信息,如下所示:
3、编译并安装webrtc2sip
webrtc2sip依赖于Doubango IMS框架和libxml2
3.1 安装libxml2
3.2 下载源代码
3.3 构建webrtc2sip
注:
1. 命令“chmod 755 ./autogen.sh”为实际编译中发现没有执行权限而增加的;
2. configure命令成功会出现CONGRATULATIONS及相关组件信息,如下所示:
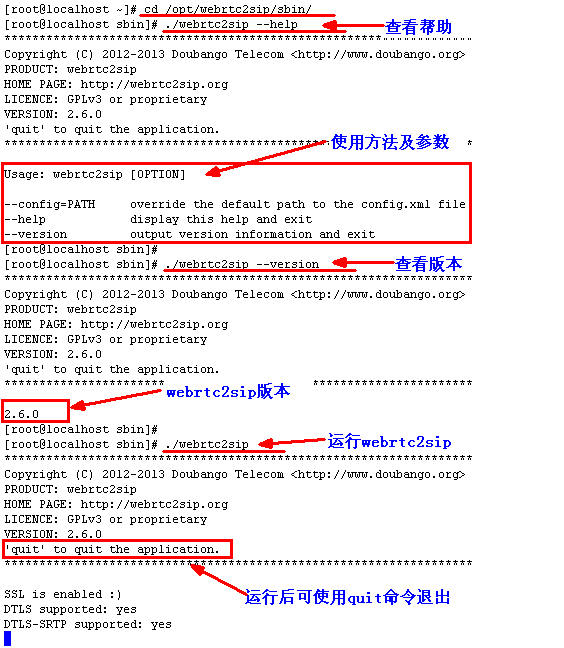
4、运行webrtc2sip
4.1 运行命令
注:PREFIX为编译webrtc2sip时指定的路径,如/opt/webrtc2sip
4.2 命令行参数
相关命令行参数及描述如下表所示:
4.3 运行效果
5、小结
至此,webrtc2sip已经编译并安装成功,但如何测试webrtc2sip的功能以及相关效果,请查阅后续的博文(编写中)。
在研究WebRTC服务端画面合成和混音处理,需要实现浏览器端与服务器端的点对点,网上找了好些参考的项目,webrtc2sip项目就是其中之一,该项目基于doubango的框架,需要自行编译搭建环境,根据webrtc2sip中的《技术指南1.0》(注:《technical guide1.0》)文档进行了编译,本文记录编译过程及相关问题的处理。
1、准备
(1)VMware;
(2)CentOS 64位版本(本人使用CentOS 6.4 的64位版本);
(3)安装的虚拟机要可以上网,建议网络使用NAT,相关方法可网上查找;
2、构建Doubango IMS框架
2.1 更新及安装软件
(1)更新CentOS系统软件至最新版本
Java代码


- sudo yum update
sudo yum update
(2)安装需要的软件
Java代码
- sudo yum install make libtool autoconf subversion git cvs wget libogg-devel gcc gcc-c++ pkgconfig
sudo yum install make libtool autoconf subversion git cvs wget libogg-devel gcc gcc-c++ pkgconfig
2.2 安装libsrtp
libsrtp为必须组件,相关命令如下:
Java代码
- git clone https://github.com/cisco/libsrtp/
- cd libsrtp
- CFLAGS="-fPIC" ./configure --enable-pic && make && make install
git clone https://github.com/cisco/libsrtp/
cd libsrtp
CFLAGS="-fPIC" ./configure --enable-pic && make && make install
2.3 安装OpenSSL
OpenSSL为必须组件,相关命令如下:
Java代码
- wget http://www.openssl.org/source/openssl-1.0.1c.tar.gz
- tar -xvzf openssl-1.0.1c.tar.gz
- cd openssl-1.0.1c
- ./config shared --prefix=/usr/local --openssldir=/usr/local/openssl && make && make install
wget http://www.openssl.org/source/openssl-1.0.1c.tar.gz
tar -xvzf openssl-1.0.1c.tar.gz
cd openssl-1.0.1c
./config shared --prefix=/usr/local --openssldir=/usr/local/openssl && make && make install
2.4 安装libspeex和libspeexdsp
libspeex为可选组件,libspeexdsp为必须组件,相关命令如下:
(1)直接安装开发包
Java代码
- yum install speex-devel
yum install speex-devel
(2)或者直接从源代码中构建
Java代码
- wget http://downloads.xiph.org/releases/speex/speex-1.2rc1.tar.gz
- tar -xvzf speex-1.2rc1.tar.gz
- cd speex-1.2rc1
- ./configure --disable-oggtest --without-libogg && make && make install
wget http://downloads.xiph.org/releases/speex/speex-1.2rc1.tar.gz
tar -xvzf speex-1.2rc1.tar.gz
cd speex-1.2rc1
./configure --disable-oggtest --without-libogg && make && make install
注:技术指南中使用的是speex-1.2beta3版本,本人则直接使用了rc1的版本
2.5 安装YASM
该组件启用VPX (VP8视频编解码)或x264 (H.264 编解码)时必须,相关命令如下:
Java代码
- wget http://www.tortall.net/projects/yasm/releases/yasm-1.2.0.tar.gz
- tar -xvzf yasm-1.2.0.tar.gz
- cd yasm-1.2.0
- mkdir m4
- ./configure && make && make install
wget http://www.tortall.net/projects/yasm/releases/yasm-1.2.0.tar.gz
tar -xvzf yasm-1.2.0.tar.gz
cd yasm-1.2.0
mkdir m4
./configure && make && make install
注:技术指南中没有“mkdir m4”,本人在编译时,老是编译出错,后来网上找了一下解决方案,增加了该命令后编译通过
2.6 安装libvpx
该组件用于支持VP8是可选的,若你想支持Chrome或FireFox的视频则强烈推荐安装,相关命令如下:
(1)直接安装开发包
Java代码
- sudo yum install libvpx-devel
sudo yum install libvpx-devel
(2)或者直接从源代码中构建
Java代码
- git clone http://git.chromium.org/webm/libvpx.git
- cd libvpx
- ./configure --enable-realtime-only --enable-error-concealment --disable-examples --enable-vp8 --enable-pic --enable-shared --as=yasm
- make && make install
git clone http://git.chromium.org/webm/libvpx.git
cd libvpx
./configure --enable-realtime-only --enable-error-concealment --disable-examples --enable-vp8 --enable-pic --enable-shared --as=yasm
make && make install
2.7 安装libyuv
该组件为可选,可视情况进行编译,相关命令如下:
Java代码
- mkdir libyuv && cd libyuv
- svn co http://src.chromium.org/svn/trunk/tools/depot_tools .
- ./gclient config http://libyuv.googlecode.com/svn/trunk
- ./gclient sync && cd trunk
- make -j6 V=1 -r libyuv BUILDTYPE=Release
- make -j6 V=1 -r libjpeg BUILDTYPE=Release
- cp out/Release/obj.target/libyuv.a /usr/local/lib
- cp out/Release/obj.target/third_party/libjpeg_turbo/libjpeg_turbo.a /usr/local/lib
- mkdir --parents /usr/local/include/libyuv/libyuv
- cp -rf include/libyuv.h /usr/local/include/libyuv
- cp -rf include/libyuv/*.h /usr/local/include/libyuv/libyuv
mkdir libyuv && cd libyuv
svn co http://src.chromium.org/svn/trunk/tools/depot_tools .
./gclient config http://libyuv.googlecode.com/svn/trunk
./gclient sync && cd trunk
make -j6 V=1 -r libyuv BUILDTYPE=Release
make -j6 V=1 -r libjpeg BUILDTYPE=Release
cp out/Release/obj.target/libyuv.a /usr/local/lib
cp out/Release/obj.target/third_party/libjpeg_turbo/libjpeg_turbo.a /usr/local/lib
mkdir --parents /usr/local/include/libyuv/libyuv
cp -rf include/libyuv.h /usr/local/include/libyuv
cp -rf include/libyuv/*.h /usr/local/include/libyuv/libyuv
注:相关的命令个人在虚拟机上没有编译通过,由于是可选的,后来没有再编译
2.8 安装opencore-amr
该组件可选,用于支持AMR的音频编解码,相关命令如下:
Java代码
- git clone git://opencore-amr.git.sourceforge.net/gitroot/opencore-amr/opencore-amr
- cd opencore-amr
- autoreconf --install && ./configure && make && make install
git clone git://opencore-amr.git.sourceforge.net/gitroot/opencore-amr/opencore-amr
cd opencore-amr
autoreconf --install && ./configure && make && make install
注:技术指南中缺少了“cd opencore-amr”,需要补上
2.9 安装libopus
该组件可选,但强烈推荐安装用于支持WebRTC的MTI编解码,可支持OPUS音频编解码,相关命令如下:
Java代码
- wget http://downloads.xiph.org/releases/opus/opus-1.0.2.tar.gz
- tar -xvzf opus-1.0.2.tar.gz
- cd opus-1.0.2
- ./configure --with-pic --enable-float-approx && make && make install
wget http://downloads.xiph.org/releases/opus/opus-1.0.2.tar.gz
tar -xvzf opus-1.0.2.tar.gz
cd opus-1.0.2
./configure --with-pic --enable-float-approx && make && make install
2.10 安装libgsm
该组件可选,用于支持GSM的音频编解码,相关命令如下:
(1)直接安装开发包
Java代码
- sudo yum install gsm-devel
sudo yum install gsm-devel
(2)或者直接从源代码中构建
Java代码
- wget http://www.quut.com/gsm/gsm-1.0.13.tar.gz
- tar -xvzf gsm-1.0.13.tar.gz
- cd gsm-1.0-pl13 && make && make install
- #cp -rf ./inc/* /usr/local/include
- #cp -rf ./lib/* /usr/local/lib
wget http://www.quut.com/gsm/gsm-1.0.13.tar.gz
tar -xvzf gsm-1.0.13.tar.gz
cd gsm-1.0-pl13 && make && make install
#cp -rf ./inc/* /usr/local/include
#cp -rf ./lib/* /usr/local/lib
2.11 安装g729
该组件可选,用于支持G729的音频编解码,相关命令如下:
Java代码
- svn co http://g729.googlecode.com/svn/trunk/ g729b
- cd g729b
- ./autogen.sh && ./configure --enable-static --disable-shared && make && make install
svn co http://g729.googlecode.com/svn/trunk/ g729b
cd g729b
./autogen.sh && ./configure --enable-static --disable-shared && make && make install
2.12 安装iLBC
该组件可选,用于支持iLBC的音频编解码,个人建议安装,相关命令如下:
Java代码
- svn co http://doubango.googlecode.com/svn/branches/2.0/doubango/thirdparties/scripts/ilbc
- cd ilbc
- wget http://www.ietf.org/rfc/rfc3951.txt
- awk -f extract.awk rfc3951.txt
- ./autogen.sh && ./configure && make && make install
svn co http://doubango.googlecode.com/svn/branches/2.0/doubango/thirdparties/scripts/ilbc
cd ilbc
wget http://www.ietf.org/rfc/rfc3951.txt
awk -f extract.awk rfc3951.txt
./autogen.sh && ./configure && make && make install
2.13 安装x264
该组件可选,用于支持H.264的视频编解码(需要FFmpeg),个人建议安装,相关命令如下:
Java代码
- wget ftp://ftp.videolan.org/pub/x264/snapshots/last_x264.tar.bz2
- tar -xvjf last_x264.tar.bz2
- # the output directory may be difference depending on the version and date
- cd x264-snapshot-20131105-2245
- ./configure --enable-shared --enable-pic && make && make install
wget ftp://ftp.videolan.org/pub/x264/snapshots/last_x264.tar.bz2
tar -xvjf last_x264.tar.bz2
# the output directory may be difference depending on the version and date
cd x264-snapshot-20131105-2245
./configure --enable-shared --enable-pic && make && make install
注:命令“cd x264-snapshot-20131105-2245”随版本的不同而不同,本人安装使用的版本为x264-snapshot-20131105-2245
2.14 安装FFmpeg
该组件可选,用于支持H.263、H.264(需要x264)和MP4V-ES的视频编解码,个人建议安装,相关命令如下:
Java代码
- git clone git://source.ffmpeg.org/ffmpeg.git ffmpeg
- cd ffmpeg
- # grap a release branch
- git checkout n1.2
- # configure source code
- ./configure \
- --extra-cflags="-fPIC" \
- --extra-ldflags="-lpthread" \
- \
- --enable-pic --enable-memalign-hack --enable-pthreads \
- --enable-shared --disable-static \
- --disable-network --enable-pthreads \
- --disable-ffmpeg --disable-ffplay --disable-ffserver --disable-ffprobe \
- \
- --enable-gpl \
- \
- --disable-debug
- make && make install
git clone git://source.ffmpeg.org/ffmpeg.git ffmpeg
cd ffmpeg
# grap a release branch
git checkout n1.2
# configure source code
./configure \
--extra-cflags="-fPIC" \
--extra-ldflags="-lpthread" \
\
--enable-pic --enable-memalign-hack --enable-pthreads \
--enable-shared --disable-static \
--disable-network --enable-pthreads \
--disable-ffmpeg --disable-ffplay --disable-ffserver --disable-ffprobe \
\
--enable-gpl \
\
--disable-debug
make && make install
2.15 编译并安装Doubango
(1)下载源代码
Java代码
- svn checkout http://doubango.googlecode.com/svn/branches/2.0/doubango doubango
svn checkout http://doubango.googlecode.com/svn/branches/2.0/doubango doubango
(2)三种构建方案
A. 最小化构建
Java代码
- cd doubango && ./autogen.sh && ./configure --with-ssl --with-srtp --with-speexdsp
- make && make install
cd doubango && ./autogen.sh && ./configure --with-ssl --with-srtp --with-speexdsp
make && make install
B. 推荐构建
Java代码
- cd doubango && ./autogen.sh && ./configure --with-ssl --with-srtp --with-speexdsp --with-ffmpeg
- make && make install
cd doubango && ./autogen.sh && ./configure --with-ssl --with-srtp --with-speexdsp --with-ffmpeg
make && make install
C. 完整构建
Java代码
- cd doubango
- chmod 755 ./autogen.sh
- ./autogen.sh && ./configure --with-ssl --with-srtp --with-vpx --with-yuv --with-amr --with-speex --with-speexdsp --with-gsm --with-ilbc --with-g729 --with-ffmpeg
- make && make install
cd doubango
chmod 755 ./autogen.sh
./autogen.sh && ./configure --with-ssl --with-srtp --with-vpx --with-yuv --with-amr --with-speex --with-speexdsp --with-gsm --with-ilbc --with-g729 --with-ffmpeg
make && make install
注:
1. 命令“chmod 755 ./autogen.sh”为实际编译中发现没有执行权限,本人增加的
2. 可根据实际安装的情况,修改完整构建中相关组件的支持
3. configure命令成功会出现CONGRATULATIONS及相关组件信息,如下所示:
Java代码
- **************************************************************************
- * CONGRATULATIONS
- **************************************************************************
- Host setup: x86_64-unknown-linux-gnu
- Install prefix: /usr/local
- Compiler: gcc
- FFmpeg: yes
- VP8 video codec: yes
- OPUS audio codec: yes
- ILBC audio codec: yes
- G.729 audio codec: no
- GSM audio codec: check
- AMR audio codec: yes
- SPEEX audio codec: yes
- G.722 audio codec: yes
- G.711 audio codec: yes
- YUV: check
- SPEEX DSP: yes
- SSL: yes
- DTLS-SRTP: yes
- DTLS: yes
- SRTP: yes
- Monotonic timers: yes
- RESOLV: no
- DEBUG: no
- Report any issues at https://groups.google.com/group/doubango
- -------------------------------------------------------------------------
- Next steps
- 1) run 'make' to build the source
- 2) run 'make install' to install
- -------------------------------------------------------------------------
**************************************************************************
*                               CONGRATULATIONS
**************************************************************************
Host setup:          x86_64-unknown-linux-gnu
Install prefix:      /usr/local
Compiler:            gcc

FFmpeg:              yes
VP8 video codec:     yes
OPUS audio codec:    yes
ILBC audio codec:    yes
G.729 audio codec:   no
GSM audio codec:     check
AMR audio codec:     yes
SPEEX audio codec:   yes
G.722 audio codec:   yes
G.711 audio codec:   yes

YUV:                 check
SPEEX DSP:           yes

SSL:                 yes
DTLS-SRTP:           yes
DTLS:                yes

SRTP:                yes

Monotonic timers:    yes
RESOLV:              no

DEBUG:               no

Report any issues at https://groups.google.com/group/doubango

-------------------------------------------------------------------------
Next steps
  1) run 'make' to build the source
  2) run 'make install' to install
-------------------------------------------------------------------------
3、编译并安装webrtc2sip
webrtc2sip依赖于Doubango IMS框架和libxml2
3.1 安装libxml2
Java代码
- yum install libxml2-devel
yum install libxml2-devel
3.2 下载源代码
Java代码
- svn co http://webrtc2sip.googlecode.com/svn/trunk/ webrtc2sip
svn co http://webrtc2sip.googlecode.com/svn/trunk/ webrtc2sip
3.3 构建webrtc2sip
Java代码
- export PREFIX=/opt/webrtc2sip
- cd webrtc2sip
- chmod 755 ./autogen.sh
- ./autogen.sh && ./configure --prefix=$PREFIX
- make clean && make && make install
- cp -f ./config.xml $PREFIX/sbin/config.xml
export PREFIX=/opt/webrtc2sip
cd webrtc2sip
chmod 755 ./autogen.sh
./autogen.sh && ./configure --prefix=$PREFIX
make clean && make && make install
cp -f ./config.xml $PREFIX/sbin/config.xml
注:
1. 命令“chmod 755 ./autogen.sh”为实际编译中发现没有执行权限而增加的;
2. configure命令成功会出现CONGRATULATIONS及相关组件信息,如下所示:
Java代码
- **************************************************************************
- CONGRATULATIONS
- **************************************************************************
- Host setup:
- Install prefix: /opt/webrtc2sip
- Compiler: gcc
- DOUBANGO
- MIN_VER: 2.0.1002
- TINYSAK: yes
- TINYNET: yes
- TINYHTTP: yes
- TINYSIP: yes
- TINYDAV: yes
- TINYSDP: yes
- TINYSIGCOMP: yes
- TINYMEDIA: yes
- TINYMEDIA: yes
- TINYSMS: yes
- TINYMSRP: yes
- TINYRTP: yes
- TINYIPSEC: yes
- LIBXML2_INCLUDE: /usr/include/libxml2
- LIBXML2_LIB: /usr/lib
- LIBPTHREAD_INCLUDE: /usr/include
- LIBPTHREAD_LIB: /usr/lib
- Report issues at https://groups.google.com/group/doubango
- -------------------------------------------------------------------------
- Next steps
- 1) run 'make' to build the source
- 2) run 'make install' to install
- -------------------------------------------------------------------------
**************************************************************************
                                CONGRATULATIONS
**************************************************************************
Host setup:
Install prefix:              /opt/webrtc2sip
Compiler:                    gcc

DOUBANGO
     MIN_VER:                2.0.1002
     TINYSAK:                yes
     TINYNET:                yes
     TINYHTTP:               yes
     TINYSIP:                yes
     TINYDAV:                yes
     TINYSDP:                yes
     TINYSIGCOMP:            yes
     TINYMEDIA:              yes
     TINYMEDIA:              yes
     TINYSMS:                yes
     TINYMSRP:               yes
     TINYRTP:                yes
     TINYIPSEC:              yes

LIBXML2_INCLUDE:             /usr/include/libxml2
LIBXML2_LIB:                 /usr/lib

LIBPTHREAD_INCLUDE:          /usr/include
LIBPTHREAD_LIB:              /usr/lib

Report issues at https://groups.google.com/group/doubango

-------------------------------------------------------------------------
Next steps
  1) run 'make' to build the source
  2) run 'make install' to install
-------------------------------------------------------------------------
4、运行webrtc2sip
4.1 运行命令
Java代码
- $PREFIX/sbin/webrtc2sip
$PREFIX/sbin/webrtc2sip
注:PREFIX为编译webrtc2sip时指定的路径,如/opt/webrtc2sip
4.2 命令行参数
相关命令行参数及描述如下表所示:
| 参数 | 描述 | 示例 |
| --config=PATH | 使用指定路径的配置文件启动 | ./webrtc2sip --config=/temp/config.xml |
| --help | 显示帮助信息 | ./webrtc2sip --help |
| --version | 显示版本信息 | ./webrtc2sip --version |
4.3 运行效果
5、小结
至此,webrtc2sip已经编译并安装成功,但如何测试webrtc2sip的功能以及相关效果,请查阅后续的博文(编写中)。


 4018
4018

 被折叠的 条评论
为什么被折叠?
被折叠的 条评论
为什么被折叠?
 到【灌水乐园】发言


