


标签(空格分隔): android
原文:
https://blog.stylingandroid.com/vectordrawables-part-1/
https://blog.stylingandroid.com/vectordrawables-part-2/
https://blog.stylingandroid.com/vectordrawables-part-3/
第一部分
Android Lolipop版本提供了一些令人兴奋的新特性,例如VectorDrawable类.
该类支持将复杂的矢量图形(可以自由缩放,适应部分分辨率的屏幕)作为path对象添加到界面上,还可以为这些矢量图形添加动画.接下来让我们看下VectorDrawable类带来的好处,看看具体能实现什么样的效果(只需少量代码).
(矢量图形的详细介绍就不翻译了)
目前在Android中使用矢量图形的方法包括Lolipop引入的VectorDrawable类和一些第三方库,例如MrVector(MrVector库目前还不支持AnimatedVectorDrawable).有了VectorDrawable类,我们就可以用矢量图的xml文本替换掉mdpi, hdpi, xhdpi, xxhdpi, and xxxhdpi这么多不同大小的png资源,同时只需占用大约十几Kb最多几百Kb的空间.
接下来使用的SVG文件的例子是(从android svg资源库上找到的):

该svg文件大小仅为2265字节.但如果转化成500×500的图像,保存成png格式后占用空间为13272字节.更不必说为了支持不同分辨率的屏幕,还需要多个不同大小的png.
不过SVG文件与VectorDrawable稍有不同,并不能直接使用.VectorDrawable的文件规范是SVG规范的一个子集.SVG中的path与 android.graphics.Path类似.
android.svg文件内容如下:
<?xml version="1.0" encoding="utf-8"?>
<!-- Generator: Adobe Illustrator 13.0.0, SVG Export Plug-In . SVG Version: 6.00 Build 14948)  -->
<!DOCTYPE svg PUBLIC "-//W3C//DTD SVG 1.1//EN" "http://www.w3.org/Graphics/SVG/1.1/DTD/svg11.dtd">
<svg version="1.1" id="Layer_1" xmlns="http://www.w3.org/2000/svg" xmlns:xlink="http://www.w3.org/1999/xlink" x="0px" y="0px"
 width="500px" height="500px" viewBox="0 0 500 500" enable-background="new 0 0 500 500" xml:space="preserve">
<g id="max_width__x2F__height" display="none">
 <path display="inline" d="M499.001,1v498H1V1H499.001 M500.001,0H0v500h500.001V0L500.001,0z"/>
</g>
<g id="androd">
 <path fill="#9FBF3B" d="M301.314,83.298l20.159-29.272c1.197-1.74,0.899-4.024-0.666-5.104c-1.563-1.074-3.805-0.543-4.993,1.199
 L294.863,80.53c-13.807-5.439-29.139-8.47-45.299-8.47c-16.16,0-31.496,3.028-45.302,8.47l-20.948-30.41
 c-1.201-1.74-3.439-2.273-5.003-1.199c-1.564,1.077-1.861,3.362-0.664,5.104l20.166,29.272
 c-32.063,14.916-54.548,43.26-57.413,76.34h218.316C355.861,126.557,333.375,98.214,301.314,83.298"/>
 <path fill="#FFFFFF" d="M203.956,129.438c-6.673,0-12.08-5.407-12.08-12.079c0-6.671,5.404-12.08,12.08-12.08
 c6.668,0,12.073,5.407,12.073,12.08C216.03,124.03,210.624,129.438,203.956,129.438"/>
 <path fill="#FFFFFF" d="M295.161,129.438c-6.668,0-12.074-5.407-12.074-12.079c0-6.673,5.406-12.08,12.074-12.08
 c6.675,0,12.079,5.409,12.079,12.08C307.24,124.03,301.834,129.438,295.161,129.438"/>
 <path fill="#9FBF3B" d="M126.383,297.598c0,13.45-10.904,24.354-24.355,24.354l0,0c-13.45,0-24.354-10.904-24.354-24.354V199.09
 c0-13.45,10.904-24.354,24.354-24.354l0,0c13.451,0,24.355,10.904,24.355,24.354V297.598z"/>
 <path fill="#9FBF3B" d="M140.396,175.489v177.915c0,10.566,8.566,19.133,19.135,19.133h22.633v54.744
 c0,13.451,10.903,24.354,24.354,24.354c13.451,0,24.355-10.903,24.355-24.354v-54.744h37.371v54.744
 c0,13.451,10.902,24.354,24.354,24.354s24.354-10.903,24.354-24.354v-54.744h22.633c10.569,0,19.137-8.562,19.137-19.133V175.489
 H140.396z"/>
 <path fill="#9FBF3B" d="M372.734,297.598c0,13.45,10.903,24.354,24.354,24.354l0,0c13.45,0,24.354-10.904,24.354-24.354V199.09
 c0-13.45-10.904-24.354-24.354-24.354l0,0c-13.451,0-24.354,10.904-24.354,24.354V297.598z"/>
</g>
</svg>其中有6个,分别定义了头部,左眼,右眼,左臂,身体和双腿,以及右臂.一些标签和属性的含义可参见svg <path>规范.
依此创建出我们的VectorDrawable, res/drawable/android.xml内容如下:
<?xml version="1.0" encoding="utf-8"?>
<vector xmlns:android="http://schemas.android.com/apk/res/android"
    android:viewportWidth="500"
    android:viewportHeight="500"
    android:width="500px"
    android:height="500px">
    <group android:name="android">
        <path
            android:name="head"
            android:fillColor="#9FBF3B"
            android:pathData="M301.314,83.298l20.159-29.272c1.197-1.74,0.899-4.024-0.666-5.104c-1.563-1.074-3.805-0.543-4.993,1.199L294.863,80.53c-13.807-5.439-29.139-8.47-45.299-8.47c-16.16,0-31.496,3.028-45.302,8.47l-20.948-30.41c-1.201-1.74-3.439-2.273-5.003-1.199c-1.564,1.077-1.861,3.362-0.664,5.104l20.166,29.272c-32.063,14.916-54.548,43.26-57.413,76.34h218.316C355.861,126.557,333.375,98.214,301.314,83.298" />
        <path
            android:name="left_eye"
            android:fillColor="#FFFFFF"
            android:pathData="M203.956,129.438c-6.673,0-12.08-5.407-12.08-12.079c0-6.671,5.404-12.08,12.08-12.08c6.668,0,12.073,5.407,12.073,12.08C216.03,124.03,210.624,129.438,203.956,129.438" />
        <path
            android:name="right_eye"
            android:fillColor="#FFFFFF"
            android:pathData="M295.161,129.438c-6.668,0-12.074-5.407-12.074-12.079c0-6.673,5.406-12.08,12.074-12.08c6.675,0,12.079,5.409,12.079,12.08C307.24,124.03,301.834,129.438,295.161,129.438" />
        <path
            android:name="left_arm"
            android:fillColor="#9FBF3B"
            android:pathData="M126.383,297.598c0,13.45-10.904,24.354-24.355,24.354l0,0c-13.45,0-24.354-10.904-24.354-24.354V199.09c0-13.45,10.904-24.354,24.354-24.354l0,0c13.451,0,24.355,10.904,24.355,24.354V297.598z" />
        <path
            android:name="body"
            android:fillColor="#9FBF3B"
            android:pathData="M140.396,175.489v177.915c0,10.566,8.566,19.133,19.135,19.133h22.633v54.744c0,13.451,10.903,24.354,24.354,24.354c13.451,0,24.355-10.903,24.355-24.354v-54.744h37.371v54.744c0,13.451,10.902,24.354,24.354,24.354s24.354-10.903,24.354-24.354v-54.744h22.633c10.569,0,19.137-8.562,19.137-19.133V175.489H140.396z" />
        <path
            android:name="right_arm"
            android:fillColor="#9FBF3B"
            android:pathData="M372.734,297.598c0,13.45,10.903,24.354,24.354,24.354l0,0c13.45,0,24.354-10.904,24.354-24.354V199.09c0-13.45-10.904-24.354-24.354-24.354l0,0c-13.451,0-24.354,10.904-24.354,24.354V297.598z" />
    </group>
</vector>
然后就可以在android的layout xml里使用了:
<RelativeLayout xmlns:android="http://schemas.android.com/apk/res/android"
    xmlns:tools="http://schemas.android.com/tools"
    android:layout_width="match_parent"
    android:layout_height="match_parent"
    android:paddingLeft="@dimen/activity_horizontal_margin"
    android:paddingRight="@dimen/activity_horizontal_margin"
    android:paddingTop="@dimen/activity_vertical_margin"
    android:paddingBottom="@dimen/activity_vertical_margin"
    tools:context=".VectorDrawablesActivity">

    <ImageView
        android:id="@+id/android"
        android:layout_width="wrap_content"
        android:layout_height="wrap_content"
        android:src="@drawable/android"
        android:contentDescription="@null" />

</RelativeLayout>
效果图如下:
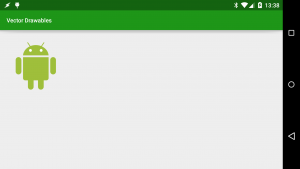
(Android Studio的某些版本会在渲染VectorDrawable时出错.最好在真机上调试)
第二部分
接下我们要实现的效果是:让android的logo做出耸肩的动作
为此,我们计划给头部,左眼,右眼,左臂,右臂设置一些动画.
不过,由于”<path>”元素没有translateX和translateY属性,而”<group>”元素却有.所以需要对android.xml进行一些改造: 把头部,左眼,右眼放到一个名为”head_eyes”的group中去,把左臂和右臂放到一个名为”arms”的group中去.
修改后的/res/drawable/android.xml如下:
<?xml version="1.0" encoding="utf-8"?>
<vector xmlns:android="http://schemas.android.com/apk/res/android"
    android:viewportWidth="500"
    android:viewportHeight="500"
    android:width="500px"
    android:height="500px">
    <group android:name="android">
        <group android:name="head_eyes">
            <path
                android:name="head"
                android:fillColor="#9FBF3B"
                android:pathData="M301.314,83.298l20.159-29.272c1.197-1.74,0.899-4.024-0.666-5.104c-1.563-1.074-3.805-0.543-4.993,1.199L294.863,80.53c-13.807-5.439-29.139-8.47-45.299-8.47c-16.16,0-31.496,3.028-45.302,8.47l-20.948-30.41c-1.201-1.74-3.439-2.273-5.003-1.199c-1.564,1.077-1.861,3.362-0.664,5.104l20.166,29.272c-32.063,14.916-54.548,43.26-57.413,76.34h218.316C355.861,126.557,333.375,98.214,301.314,83.298" />
            <path
                android:name="left_eye"
                android:fillColor="#FFFFFF"
                android:pathData="M203.956,129.438c-6.673,0-12.08-5.407-12.08-12.079c0-6.671,5.404-12.08,12.08-12.08c6.668,0,12.073,5.407,12.073,12.08C216.03,124.03,210.624,129.438,203.956,129.438" />
            <path
                android:name="right_eye"
                android:fillColor="#FFFFFF"
                android:pathData="M295.161,129.438c-6.668,0-12.074-5.407-12.074-12.079c0-6.673,5.406-12.08,12.074-12.08c6.675,0,12.079,5.409,12.079,12.08C307.24,124.03,301.834,129.438,295.161,129.438" />
        </group>
        <group android:name="arms">
            <path
                android:name="left_arm"
                android:fillColor="#9FBF3B"
                android:pathData="M126.383,297.598c0,13.45-10.904,24.354-24.355,24.354l0,0c-13.45,0-24.354-10.904-24.354-24.354V199.09c0-13.45,10.904-24.354,24.354-24.354l0,0c13.451,0,24.355,10.904,24.355,24.354V297.598z" />
            <path
                android:name="right_arm"
                android:fillColor="#9FBF3B"
                android:pathData="M372.734,297.598c0,13.45,10.903,24.354,24.354,24.354l0,0c13.45,0,24.354-10.904,24.354-24.354V199.09c0-13.45-10.904-24.354-24.354-24.354l0,0c-13.451,0-24.354,10.904-24.354,24.354V297.598z" />
        </group>
        <path
            android:name="body"
            android:fillColor="#9FBF3B"
            android:pathData="M140.396,175.489v177.915c0,10.566,8.566,19.133,19.135,19.133h22.633v54.744c0,13.451,10.903,24.354,24.354,24.354c13.451,0,24.355-10.903,24.355-24.354v-54.744h37.371v54.744c0,13.451,10.902,24.354,24.354,24.354s24.354-10.903,24.354-24.354v-54.744h22.633c10.569,0,19.137-8.562,19.137-19.133V175.489H140.396z" />
    </group>
</vector>
然后我们需要创建一个根节点为<animated-vector>的元素,然后给两个group元素设置动画:
/res/drawable/animated_android.xml:
<?xml version="1.0" encoding="utf-8"?>
<animated-vector xmlns:android="http://schemas.android.com/apk/res/android"
    android:drawable="@drawable/android">

    <target
        android:animation="@animator/shrug"
        android:name="head_eyes" />

    <target
        android:animation="@animator/shrug"
        android:name="arms" />
</animated-vector>
当然你也可以只创建一个group而不是head_eyes和arms两个group.这里只是顺便演示一下animated-vector对多个group的支持.
<vector>, <group>, <clip-path>, 和 <path>都支持动画 (详见VectorDrawable文档)
shrug动画是一个简单的Y轴重复平移的动画.
/res/animator/shrug.xml:
<?xml version="1.0" encoding="utf-8"?>
<set xmlns:android="http://schemas.android.com/apk/res/android">
    <objectAnimator
        android:propertyName="translateY"
        android:valueType="floatType"
        android:valueFrom="0"
        android:valueTo="-10"
        android:repeatMode="reverse"
        android:repeatCount="infinite"
        android:duration="250" />
</set>
为了让这个动画跑起来,需要做一些改动:
/res/layout/activity_vetors_drawables.xml:
<RelativeLayout xmlns:android="http://schemas.android.com/apk/res/android"
    xmlns:tools="http://schemas.android.com/tools"
    android:layout_width="match_parent"
    android:layout_height="match_parent"
    android:paddingLeft="@dimen/activity_horizontal_margin"
    android:paddingRight="@dimen/activity_horizontal_margin"
    android:paddingTop="@dimen/activity_vertical_margin"
    android:paddingBottom="@dimen/activity_vertical_margin"
    tools:context=".VectorDrawablesActivity">

    <ImageView
        android:id="@+id/android"
        android:layout_width="wrap_content"
        android:layout_height="wrap_content"
        android:src="@drawable/animated_android"
        android:contentDescription="@null" />

</RelativeLayout>
这时候动画还不会起效.
VectorDrawablesActivity.java:
public class VectorDrawablesActivity extends Activity {

    @Override
    protected void onCreate(Bundle savedInstanceState) {
        super.onCreate(savedInstanceState);
        setContentView(R.layout.activity_vector_drawables);
        ImageView androidImageView = (ImageView) findViewById(R.id.android);
        Drawable drawable = androidImageView.getDrawable();
        if (drawable instanceof Animatable) {
            ((Animatable) drawable).start();
        }
    }
}
然后就能看到动画了.
演示效果(youtube):https://www.youtube.com/embed/ZxRayIdYt6E?version=3&rel=1&fs=1&showsearch=0&showinfo=1&iv_load_policy=1&wmode=transparent
第三部分
接下来我们研究下能否给path元素添加动画.
Romain Guy写过一篇关于追踪path的博客,他使用的是SVG 的path,利用不断修改dash参数的方法来形成path正在被绘制的错觉.我们应该能借鉴这种思路,利用VectorDrawable中的一些属性实现同样的效果.
由于android logo包含了填充的图像,不适合作为这部分的例子.这里我们打算换个例子:
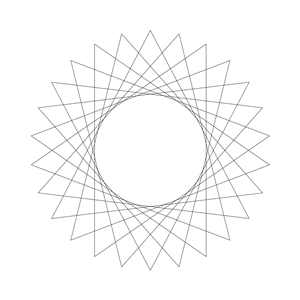
改svg文件的下载地址: http://cliparts101.com/free_clipart/30472/star_26pt09step
/res/drawable/star.xml:
<vector xmlns:android="http://schemas.android.com/apk/res/android"
    android:viewportHeight="500"
    android:viewportWidth="500"
    android:width="500px"
    android:height="500px">
    <group android:scaleX="5.0" android:scaleY="5.0">
        <path
            android:name="star"
            android:strokeColor="@color/sa_green"
            android:strokeWidth="2"
            android:pathData="M 50.0,90.0 L 82.9193546357,27.2774101308 L 12.5993502926,35.8158045183 L 59.5726265715,88.837672697 L 76.5249063296,20.0595700732 L 10.2916450361,45.1785327898 L 68.5889268818,85.4182410261 L 68.5889268818,14.5817589739 L 10.2916450361,54.8214672102 L 76.5249063296,79.9404299268 L 59.5726265715,11.162327303 L 12.5993502926,64.1841954817 L 82.9193546357,72.7225898692 L 50.0,10.0 L 17.0806453643,72.7225898692 L 87.4006497074,64.1841954817 L 40.4273734285,11.162327303 L 23.4750936704,79.9404299268 L 89.7083549639,54.8214672102 L 31.4110731182,14.5817589739 L 31.4110731182,85.4182410261 L 89.7083549639,45.1785327898 L 23.4750936704,20.0595700732 L 40.4273734285,88.837672697 L 87.4006497074,35.8158045183 L 17.0806453643,27.2774101308 L 50.0,90.0Z" />
    </group>
</vector>
/res/drawable/animated_star.xml:
<?xml version="1.0" encoding="utf-8"?>
<animated-vector xmlns:android="http://schemas.android.com/apk/res/android"
    android:drawable="@drawable/star">
    <target
        android:animation="@animator/path"
        android:name="star" />

</animated-vector>
VectorDrawable有个属性叫trimPathEnd,取值范围是0~1,0代表完全不画出来,1代表path完全被画出来.
/res/animator/path.xml
<?xml version="1.0" encoding="utf-8"?>
<objectAnimator xmlns:android="http://schemas.android.com/apk/res/android"
    android:propertyName="trimPathEnd"
    android:valueFrom="0"
    android:valueTo="1"
    android:duration="5000"
    android:valueType="floatType"
    android:interpolator="@android:interpolator/linear">

</objectAnimator>
这里给objectAnimator设置的时间是5秒,这样就能很清楚地看到整个过程.
演示效果(youtube):https://www.youtube.com/embed/jEK4quCiQaQ?version=3&rel=1&fs=1&showsearch=0&showinfo=1&iv_load_policy=1&wmode=transparent


 1547
1547


 被折叠的 条评论
为什么被折叠?
被折叠的 条评论
为什么被折叠?
 到【灌水乐园】发言


