


1.ogr
使用ogr库创建点状要素的shapefile文件以及将经纬度坐标转为投影坐标。实例如下:
#include "ogrsf_frmts.h"
#include "gdal.h"
#include "gdal_priv.h"
#include "cpl_string.h"
#include <string>
#include <iostream>
#include <strstream>
using namespace std;
void convertToShp(double longitude, double latitude, char *outshp)
{
    //使属性表字段支持中文
    CPLSetConfigOption("SHAPE_ENCODING","");
    OGRRegisterAll();//注册所有的驱动
    //创建ESRI shp文件
    char *pszDriverName = "ESRI Shapefile";
    //调用对Shape文件读写的Driver
    OGRSFDriver *poDriver = OGRSFDriverRegistrar::GetRegistrar()->GetDriverByName(pszDriverName);
    if (poDriver == NULL)
    {
        cout<<pszDriverName<<"驱动不可用!"<<endl;
        return;
    }
    //创建数据源
    OGRDataSource *poDs = poDriver->CreateDataSource(outshp, NULL);
    if (poDs == NULL)
    {
        cout<<"DataSource Creation Error"<<endl;
        return;
    }
    //创建图层Layer
    string outShapName = outshp;
    string layerName = outShapName.substr(0, outShapName.length()-4);
    //layerName.c_str()表示将string转为char *类型
    //参数说明:新图层名称,坐标系,图层的几何类型,创建选项,与驱动有关
    OGRLayer *poLayer = poDs->CreateLayer(layerName.c_str(), NULL, wkbPoint, NULL);
    if (poLayer == NULL)
    {
        cout<<"Layer Creation Failed"<<endl;
        OGRDataSource::DestroyDataSource(poDs);
        return;
    }
    //下面创建属性表,我们在属性表中创建两列数据即可
    //先创建一个“ID”整型属性
    OGRFieldDefn oFieldId("ID", OFTInteger);
    oFieldId.SetWidth(5);
    poLayer->CreateField(&oFieldId);
    //再创建一个"X"double属性
    OGRFieldDefn oFieldX("X", OFTString);
    oFieldX.SetWidth(30);
    poLayer->CreateField(&oFieldX);
    //再创建一个"Y"double属性
    OGRFieldDefn oFieldY("Y", OFTString);
    oFieldY.SetWidth(30);
    poLayer->CreateField(&oFieldY);
    //创建一个feature
    OGRFeature *poFeature;
    poFeature = OGRFeature::CreateFeature(poLayer->GetLayerDefn());//GetLayerDefn()获取当前图层的属性表结构
    //给属性表中我们刚创建的列赋值
    int i = 0;
    poFeature->SetField("ID", i);
    poFeature->SetField("X", longitude);
    poFeature->SetField("Y", latitude);
    i++;
    //创建一个OGRPoint对象
    OGRPoint point;
    point.setX(longitude);
    point.setY(latitude);
    //point.setZ(0);

    poFeature->SetGeometry(&point);

    if(poLayer->CreateFeature(poFeature) != OGRERR_NONE )
    {
        printf( "Failed to create feature in shapefile.\n" );
        exit( 1 );
    }
    OGRFeature::DestroyFeature(poFeature);
    OGRDataSource::DestroyDataSource(poDs);
}
//======= 经纬度转化为投影坐标=============
double* transfer(double longitude, double latitude)
{
    OGRSpatialReference oSourceSRS;
    //EPSG code 代表特定的椭球体、单位、地理坐标系或投影坐标系等信息
    //This method will initialize the spatial reference based on the passed in EPSG GCS or PCS code
    oSourceSRS.importFromEPSG(4326);//EPSG:4326代表地理坐标系WGS1984
    OGRSpatialReference oTargetSRS;
    oTargetSRS.importFromEPSG(2029);// utm zone 17N
    OGRCoordinateTransformation *poTransform;
    poTransform = OGRCreateCoordinateTransformation(&oSourceSRS, &oTargetSRS);
    if (poTransform == NULL)
    {
        cout<<"poTransform is null"<<endl;
        exit(1);
    }
    if (!poTransform->Transform(1, &longitude, &latitude, NULL))
    {
        cout<<"transform failed"<<endl;
        exit(1);
    }
    //poTransform->Transform(1, &longitude, &latitude, NULL);
    double *inout = new double[2];
    inout[0] = longitude;
    inout[1] = latitude;
    return inout;
}
int main(int argc, char *argv[])
{
    char *xCoordinate = argv[1];
    char *yCoordinate = argv[2];
    char *outShp = argv[3];
    double x = atof(xCoordinate);
    double y = atof(yCoordinate);
    convertToShp(x, y, outShp);
    cout<<"success! file is saved to "<<outShp<<endl;
    double *transferedLongLat = transfer(116.246742, 40.022211);
    cout<<"转换后的投影坐标为:"<<transferedLongLat[0]<<","<<transferedLongLat[1]<<endl;

    getchar();
}
- 1
- 2
- 3
- 4
- 5
- 6
- 7
- 8
- 9
- 10
- 11
- 12
- 13
- 14
- 15
- 16
- 17
- 18
- 19
- 20
- 21
- 22
- 23
- 24
- 25
- 26
- 27
- 28
- 29
- 30
- 31
- 32
- 33
- 34
- 35
- 36
- 37
- 38
- 39
- 40
- 41
- 42
- 43
- 44
- 45
- 46
- 47
- 48
- 49
- 50
- 51
- 52
- 53
- 54
- 55
- 56
- 57
- 58
- 59
- 60
- 61
- 62
- 63
- 64
- 65
- 66
- 67
- 68
- 69
- 70
- 71
- 72
- 73
- 74
- 75
- 76
- 77
- 78
- 79
- 80
- 81
- 82
- 83
- 84
- 85
- 86
- 87
- 88
- 89
- 90
- 91
- 92
- 93
- 94
- 95
- 96
- 97
- 98
- 99
- 100
- 101
- 102
- 103
- 104
- 105
- 106
- 107
- 108
- 109
- 110
- 111
- 112
- 113
- 114
- 115
- 116
- 117
- 118
- 119
- 120

程序运行结束后即在我们指定的目录下生成点状要素的shp文件。
关于坐标转换,可以参考:http://blog.csdn.net/jingss_3/article/details/8240328
本文介绍如何使用GDAL/OGR 库对shapefile文件进行简单的操作,包括读取、创建、修改等.在GDAL官网上有读写shp文件的介绍,主要是针对点要素的操作例子:点击打开链接
2.读取shp文件
- void ExtracInfo::ReadShapeFile()
- {
- OGRRegisterAll();
- OGRDataSource *poDS;
- poDS = OGRSFDriverRegistrar::Open("F:/test.shp", FALSE);
- if (poDS == NULL)
- {
- // printf("Open failed \n");
- }
- OGRLayer *poLayer;
- poLayer = poDS->GetLayerByName("test");
- int layercount = poDS->GetLayerCount();
- // printf("layer count is : %d\n", layercount);
- OGRFeature *poFeature;
- poLayer->ResetReading();
- while((poFeature = poLayer->GetNextFeature()) != NULL)
- {
- //printf("hello!\n");
- //get field
- OGRFeatureDefn *poFDefn = poLayer->GetLayerDefn();
- int iField;
- int fieldcount = poFDefn->GetFieldCount();
- // printf("Field count is : %d\n", poFDefn->GetFieldCount());
- int fieldv1;
- double fieldv2;
- string feildv3;
- for (iField = 0; iField < poFDefn->GetFieldCount(); iField ++)
- {
- OGRFieldDefn * poFieldDefn = poFDefn->GetFieldDefn(iField);
- if (poFieldDefn->GetType() == OFTInteger)
- {
- fieldv1 = poFeature->GetFieldAsInteger(iField);
- // printf("%d ", poFeature->GetFieldAsInteger(iField));
- }
- else if (poFieldDefn->GetType() == OFTReal)
- {
- fieldv2 = poFeature->GetFieldAsDouble(iField);
- // printf("%3f ", poFeature->GetFieldAsDouble(iField));
- }
- else if (poFieldDefn->GetType() == OFTString)
- {
- feildv3 = poFeature->GetFieldAsString(iField);
- // printf("%s ", poFeature->GetFieldAsString(iField));
- }
- // else
- // printf("%s", poFeature->GetFieldAsString(iField));
- }
- //以上操作与gdal官网一样
- //get Geometry获取polygon的信息
- OGRGeometry *poGeometry;
- poGeometry = poFeature->GetGeometryRef();
- double x, y;double area;
- if (poGeometry != NULL && wkbFlatten(poGeometry->getGeometryType()) == wkbPolygon)
- {
- OGRPolygon *poPolygon = (OGRPolygon * )poGeometry;
- area = poPolygon->get_Area();
- OGRPoint point;
- OGRLinearRing *pOGRLinearRing = poPolygon->getExteriorRing();
- pOGRLinearRing->getPoint(0,&point);//得到第一个点的坐标
- x = point.getX();
- y = point.getY();
- // printf("%.6f, %.6f\n", poPoint->getX(), poPoint->getY());
- }
- else
- // printf("no point geometry\n");
- OGRFeature::DestroyFeature(poFeature);
- }
- OGRDataSource::DestroyDataSource(poDS);
- }
3.shp文件添加字段
有时需要对已经存在的shp文件进行添加字段操作。代码如下:
- OGRDataSource *poDS;
- poDS = OGRSFDriverRegistrar::Open("F:/test.shp", TRUE);//第二个参数表示只读还是可读写
- if (poDS == NULL)
- {
- // printf("Open failed \n");
- }
- OGRLayer *poLayer;
- poLayer = poDS->GetLayerByName("test");
- int layercount = poDS->GetLayerCount();
- OGRFieldDefn poField("NewField", OFTReal);
- // poField.SetWidth(1); //设置的是格式化输出时的位数
- poField.SetPrecision(8);//设置精度,除了real类型,其他的一般为0
- if (poLayer->CreateField(&poField) != OGRERR_NONE)
- {
- // printf("Creating Name Field Failed\n");
- // exit(1);
- }
- OGRFeature *poFeature;
- poLayer->ResetReading();//设置从第0个要素开始读
- int featureNum = 0;
- while((poFeature = poLayer->GetNextFeature()) != NULL)
- {
- OGRFeatureDefn *poFDefn = poLayer->GetLayerDefn();
- int fieldcount = poFDefn->GetFieldCount();
- poFeature->SetField(fieldcount - 1, featureNum);
- poLayer->SetFeature(poFeature);
- OGRFeature::DestroyFeature(poFeature);
- featureNum ++;
- }
- OGRDataSource::DestroyDataSource(poDS);
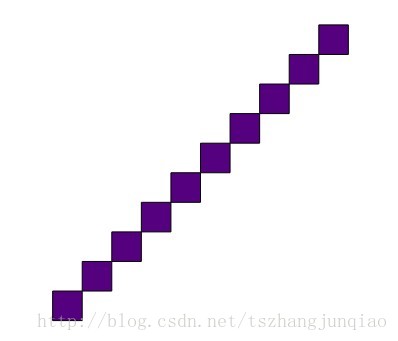
4.创建shp文件
下面主要说说创建多边形shp文件。创建的方法:使用的WKT格式的字符串来进行创建。也可以使用其他的方式进行创建(参考大神博客:点击打开链接)。但是它是wkt方法的C#、Python代码,c++代码对应的函数没查到。所以用另一种方法创建如下:
- const char *pszDriverName = "ESRI Shapefile";
- OGRSFDriver *poDriver;
- OGRRegisterAll();
- poDriver = OGRSFDriverRegistrar::GetRegistrar()->GetDriverByName(pszDriverName);
- if (poDriver == NULL)
- {
- // printf("%s driver not available \n", pszDriverName);
- }
- OGRDataSource *poDS;
- poDS = poDriver->CreateDataSource("F:/zjq/testProject/ogrtest/polygon.shp", NULL);
- if (poDS == NULL)
- {
- // printf("Create shapefile failed\n");
- // exit(1);
- }
- OGRLayer *poLayer;
- poLayer = poDS->CreateLayer("polygon1", NULL, wkbPolygon, NULL);
- if (poLayer == NULL)
- {
- // printf("Layer create failed\n");
- // exit(1);
- }
- //下面创建属性表
- OGRFieldDefn poFieldID("ID", OFTInteger);//创建ID字段
- poLayer->CreateField(&poFieldID);
- OGRFieldDefn poFieldname("Name", OFTString);//创建Name字段
- poFieldname.SetWidth(32);
- poLayer->CreateField(&poFieldname);
- double x = 0.0, y = 0.0;
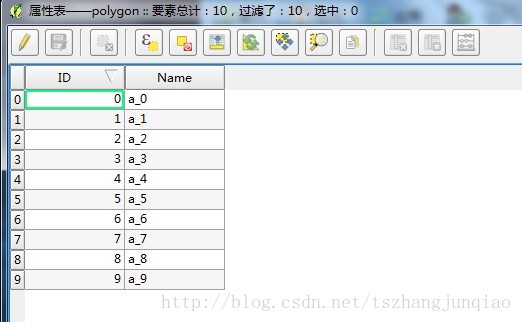
- for (int i = 0; i < 10; i++)
- {
- string szname = "a_" + QString::number(i).toStdString();
- OGRFeature *poFeature;
- poFeature = OGRFeature::CreateFeature( poLayer->GetLayerDefn() );
- poFeature->SetField(0, i);
- poFeature->SetField(1, szname.c_str());
- OGRLinearRing ring;
- ring.addPoint(0 + 10 * i, 0 + 10 *i);
- ring.addPoint(0 +10 * i, 10 + 10 *i);
- ring.addPoint(10 + 10 *i, 10 + 10 *i);
- ring.addPoint(10 + 10 *i, 0 + 10*i);
- ring.closeRings();//首尾点重合形成闭合环
- OGRPolygon polygon;
- polygon.addRing(&ring);
- poFeature->SetGeometry(&polygon);
- if ( poLayer->CreateFeature( poFeature) != OGRERR_NONE)
- {
- // printf("Failed to create feature in shapefile \n");
- // exit(1);
- }
- OGRFeature::DestroyFeature(poFeature);
- }
- OGRDataSource::DestroyDataSource(poDS);


 3498
3498

 被折叠的 条评论
为什么被折叠?
被折叠的 条评论
为什么被折叠?
 到【灌水乐园】发言


