


1.环境准备
| 序号 | 节点 | IP | 组件 | 角色 |
|---|---|---|---|---|
| 1 | node3 | 192.168.56.123 | mysql5.7 | master |
| 2 | node4 | 192.168.56.124 | mysql5.7 | slave |
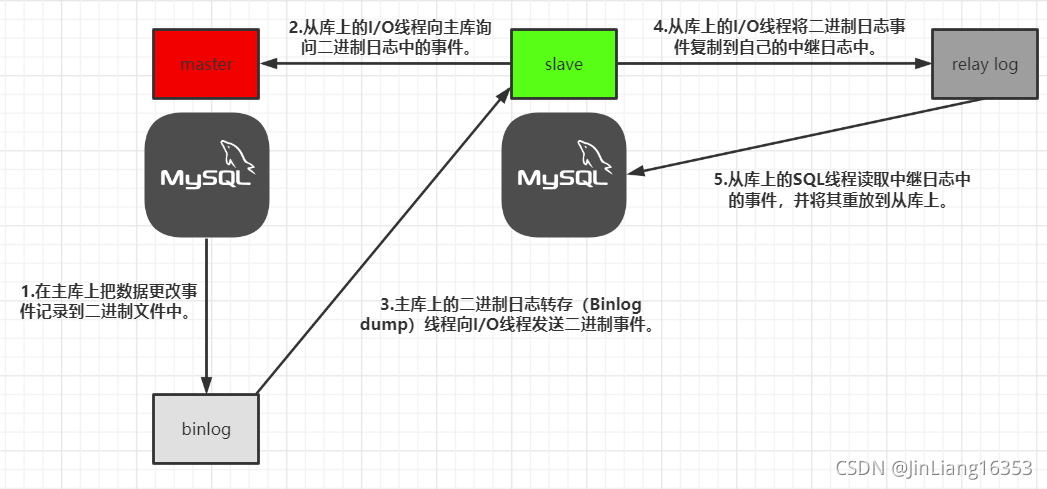
2.mysql主从复制架构图
2.安装mysql
3.实现步骤
3.1 配置master节点
vim /etc/my.cnf
# For advice on how to change settings please see
# http://dev.mysql.com/doc/refman/5.7/en/server-configuration-defaults.html

[mysqld]
#
# Remove leading # and set to the amount of RAM for the most important data
# cache in MySQL. Start at 70% of total RAM for dedicated server, else 10%.
# innodb_buffer_pool_size = 128M
#
# Remove leading # to turn on a very important data integrity option: logging
# changes to the binary log between backups.
# log_bin
#
# Remove leading # to set options mainly useful for reporting servers.
# The server defaults are faster for transactions and fast SELECTs.
# Adjust sizes as needed, experiment to find the optimal values.
# join_buffer_size = 128M
# sort_buffer_size = 2M
# read_rnd_buffer_size = 2M
lower_case_table_names=1
query_cache_type=2
log-bin=mysql-bin
# 服务器唯一ID,默认为1
server-id=1
# 每次执行写入就与磁盘同步
sync-binlog=1
# 需要同步的数据库名称
binlog-do-db=shop_ds_master
binlog-do-db=shop_ds_master1
# 不需要同步的数据库
binlog-ignore-db=information_schema
binlog-ignore-db=performation_schema
binlog-ignore-db=sys
# 设置日志保留时间 7天 防止磁盘打满
expire-logs-days=7

datadir=/var/lib/mysql
socket=/var/lib/mysql/mysql.sock
3.2 创建同步账号
在master节点创建数据同步账号
# 创建账号
CREATE USER 'hound'@'192.168.%.%' IDENTIFIED BY 'Root@1234!';
# 分配 REPLICATION SLAVE 权限
grant replication slave,replication client on *.* to hound@'192.168.%.%' identified by 'Root@1234!';
# 刷新权限
 FLUSH PRIVILEGES;
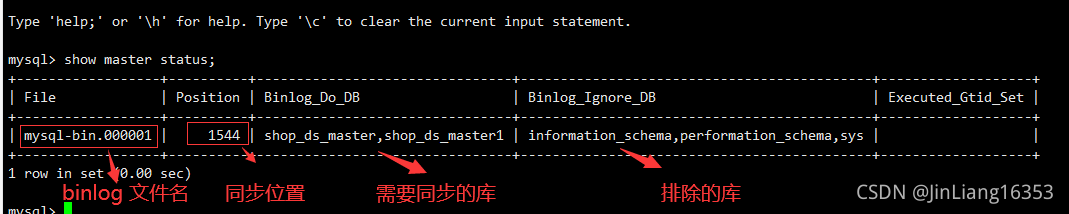
3.3 查看master节点状态
3.4 配置slave节点
vim /etc/my.cnf
# For advice on how to change settings please see
# http://dev.mysql.com/doc/refman/5.7/en/server-configuration-defaults.html

[mysqld]
server-id=2
relay_log=mysql-relay-bin
read_only=1
log_bin=mysql-bin
log_slave_updates=1
# 需要同步的数据库名称
replicate-do-db=shop_ds_master
#
# Remove leading # and set to the amount of RAM for the most important data
# cache in MySQL. Start at 70% of total RAM for dedicated server, else 10%.
# innodb_buffer_pool_size = 128M
#
# Remove leading # to turn on a very important data integrity option: logging
# changes to the binary log between backups.
# log_bin
#
# Remove leading # to set options mainly useful for reporting servers.
# The server defaults are faster for transactions and fast SELECTs.
# Adjust sizes as needed, experiment to find the optimal values.
# join_buffer_size = 128M
# sort_buffer_size = 2M
# read_rnd_buffer_size = 2M
datadir=/var/lib/mysql
socket=/var/lib/mysql/mysql.sock

# Disabling symbolic-links is recommended to prevent assorted security risks
symbolic-links=0

log-error=/var/log/mysqld.log
pid-file=/var/run/mysqld/mysqld.pid
3.5 启动slave复制线程
连接到slave节点
change master to
   master_host='192.168.56.123',
   master_user='hound',
   master_password='Root@1234!',
   master_log_file='mysql-bin.000001',
   master_log_pos=1544;
3.6 查看slave状态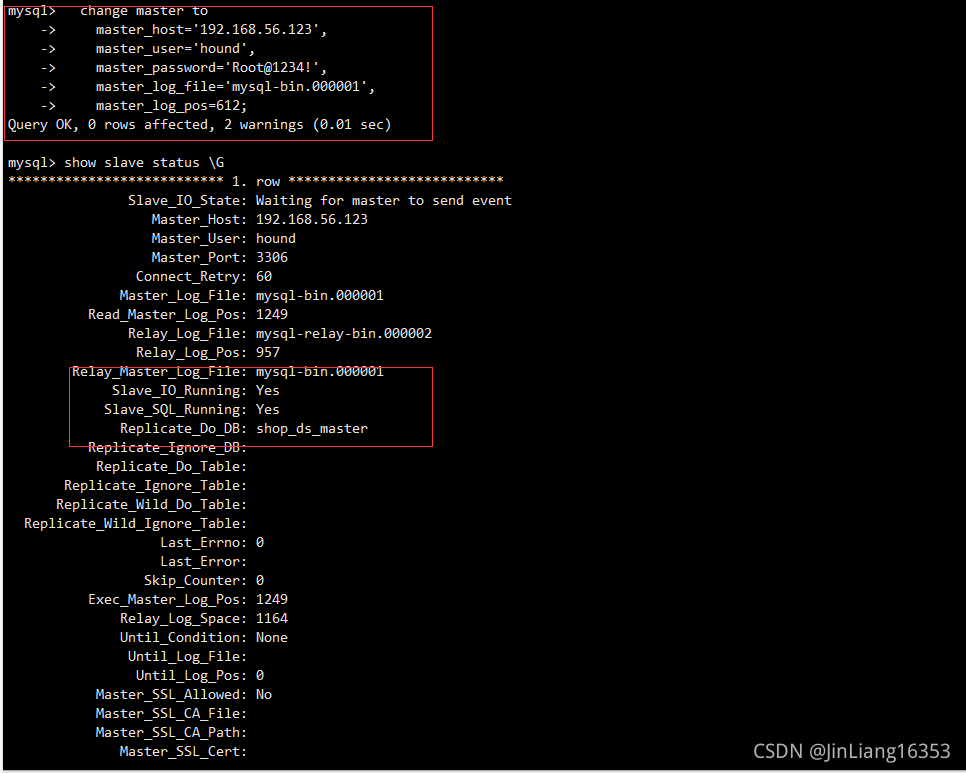
4.测试
mster节点创建 shop_ds_master数据库和temp表,并插入数据观察slave节点是否会同步
SET NAMES utf8mb4;
SET FOREIGN_KEY_CHECKS = 0;

-- ----------------------------
-- Table structure for temp
-- ----------------------------
DROP TABLE IF EXISTS `temp`;
CREATE TABLE `temp`  (
  `ID` int(11) NOT NULL AUTO_INCREMENT,
  `CODE` varchar(255) CHARACTER SET utf8mb4 COLLATE utf8mb4_general_ci NOT NULL,
  `NAME` varchar(255) CHARACTER SET utf8mb4 COLLATE utf8mb4_general_ci NOT NULL,
  PRIMARY KEY (`ID`) USING BTREE,
  UNIQUE INDEX `U1`(`CODE`) USING BTREE
) ENGINE = InnoDB AUTO_INCREMENT = 2 CHARACTER SET = utf8mb4 COLLATE = utf8mb4_general_ci ROW_FORMAT = Dynamic;

-- ----------------------------
-- Records of temp
-- ----------------------------
INSERT INTO `temp` VALUES (1, 'TEST', '测试');

SET FOREIGN_KEY_CHECKS = 1;


 被折叠的 条评论
为什么被折叠?
被折叠的 条评论
为什么被折叠?
 到【灌水乐园】发言


