


本文承接《一份写给极客的智能家居指南》,从基础知识到实战,看如何搭建起一个完整的智能家居系统。
实战设备篇
ESP8266 仿真设备
- Wemo:可以被 Amazon Echo 识别
- Philips Hue:可以被 HomeKit 识别 ?
ESP8266 仿真 Wemo
要求:下载 Ardunio IDE,地址: http://www.arduino.cc/en/main/software
一、安装 Arduino ESP8266
Arduino ESP8266 GitHub 地址: https://github.com/esp8266/Arduino
安装方法:
- 启动 Arduino IDE,并进入
Preferences窗口 - 在 Additional Board Manager URLs 中输入:
http://arduino.esp8266.com/stable/package_esp8266com_index.json - 从 Tools > Board 菜单中打开 Boards Manager,并输入安装 esp8266 平台
二、测试仿真
下载安装包:https://github.com/kakopappa/arduino-esp8266-alexa-multiple-wemo-switch
Setup 步骤:
- 下载代码
- 在编辑器中打开 wemos.ino
- 修改 WiFi 设置
- 定义开关及其回调,在
officeLightsOn、officeLightsOff、kitchenLightsOn、kitchenLightsOff中 - 烧录
相似项目:Arduino Esp8266 Alexa Wemo switch emulator
ESP8266 仿真 Philips Hue
ESP8266 Hue Emulator 项目地址:ESP8266HueEmulator
这个 Demo 需要这么几个库NeoPixelBus、aJson、Time、NtpClient,同时还需要修改一些相关的配置。
因此直接使用这个脚本安装,比较简单:
注意:如果是 Mac OS,需要将下面脚本中的 $HOME/Arduino/libraries/ 改为 $HOME/Documents/Arduino/libraries/
mkdir -p $HOME/Arduino/libraries/
cd $HOME/Arduino/libraries/
git clone --branch 2.1.4 https://github.com/Makuna/NeoPixelBus.git
git clone https://github.com/interactive-matter/aJson.git
git clone https://github.com/PaulStoffregen/Time.git
git clone https://github.com/gmag11/NtpClient.git
sed -i -e 's|#define PRINT_BUFFER_LEN 256|#define PRINT_BUFFER_LEN 4096|g'  aJson/aJSON.h
cd -
git clone https://github.com/probonopd/ESP8266HueEmulator.git
sed -i -e 's|#include "/secrets.h"|//#include "/secrets.h"|g' ESP8266HueEmulator/ESP8266HueEmulator/ESP8266HueEmulator.ino
sed -i -e 's|//const char|const char|g' ESP8266HueEmulator/ESP8266HueEmulator/ESP8266HueEmulator.ino
再将代码烧录到 ESP8266 上,就可以在 Homekit 看到相应的配置。
小米智能插座
寻找设备
npm install -g miio
miio --discover
npm install --save miio集成网关篇
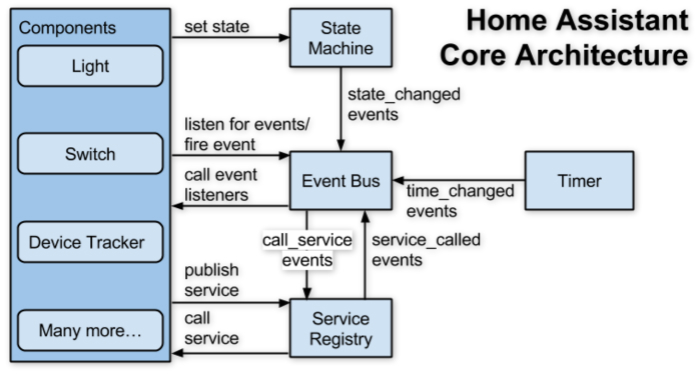
Raspberry Pi Home Assistant
Images: https://home-assistant.io/docs/hassbian/installation/
Images Downloader: https://etcher.io/
发现文档好像有点问题,便手动地尝试安装:
pip3 install --upgrade homeassistant运行
sudo -u homeassistant -H /srv/homeassistant/bin/hass并不没工作,于是执行官方的安装脚本:
curl -O https://raw.githubusercontent.com/home-assistant/fabric-home-assistant/master/hass_rpi_installer.sh && sudo chown pi:pi hass_rpi_installer.sh && bash hass_rpi_installer.sh又在我的 MBP 上安装尝试
pip3 install homeassistant
hass --open-ui
然后发现安装完就可以了。
Home Assistant Broadlink PM PRO
在 configuration.yaml 文件中添加下面的配置:
# Example configuration.yaml entry
switch:
  - platform: broadlink
    host: IP_ADDRESS
    mac: 'MAC_ADDRESS'
    switches:
      reciever:
        command_on: 'switch_packet on'
        command_off: 'switch_packet off'
获取 Broadlink 配置
- 从 https://github.com/NightRang3r/Broadlink-e-control-db-dump 获取数据导出脚本
- 打开 易控(英语:E-Control) 应用,点击
菜单->共享->云分享就会生成相应的配置文件 - 浏览手机上的
/broadlink/newremote/SharedData/目录,复制出jsonSubIr、jsonButton、jsonIrCode三个文件 - 安装好 python 环境, 并安装
pip install simplejson - 执行第一步代码中的脚本,
python getBroadlinkSharedData.py - 安装
python-broadlink,地址https://github.com/mjg59/python-broadlink.git
不知道是不是我的空调问题,获取到的配置是空的。
Homebridge
相关的插件:
- Yeelight:homebridge-yeelight
- 小米设备:homebridge-aqara
- Broadlink RM 红外:homebridge-broadlink-rm
- Broadlink SP 开关: homebridge-broadlink-sp
- Home Assistant: homebridge-homeassistant
安装 Homebridge
编辑软件源:
sudo vim /etc/apt/sources.list修改为阿里云,速度会更快一些:
deb http://mirrors.aliyun.com/raspbian/raspbian/ jessie main non-free contrib
deb-src http://mirrors.aliyun.com/raspbian/raspbian/ jessie main non-free contrib
安装 Node.js ARM 版 :
curl -sL https://deb.nodesource.com/setup_7.x | sudo -E bash -
sudo apt-get install -y nodejs
安装 avahi:
sudo apt-get install libavahi-compat-libdnssd-dev安装 homebridge:
npm install -g homebridge安装相应的插件:
sudo npm install -g homebridge-yeelight
sudo npm install -g homebridge-homeassistant
sudo npm install -g homebridge-broadlink-sp
sudo npm install -g homebridge-broadlink-rm
sudo npm install -g homebridge-platform-wemo
sudo npm install -g homebridge-miio
对应的配置在 home-assistant 目录下的 configuration.yaml 文件。
开机启动
在 /etc/default 目录下创建 homebridge 文件,内容如下:
#Defaults / Configuration options for homebridge
#The following settings tells homebridge where to find the config.json file and where to persist the data (i.e. pairing and others)
HOMEBRIDGE_OPTS=-U /var/lib/homebridge

# If you uncomment the following line, homebridge will log more
# You can display this via systemd's journalctl: journalctl -f -u homebridge
# DEBUG=*
在 /etc/systemd/system 目录下创建 homebridge.service 文件,内容如下:
[Unit]
Description=Node.js HomeKit Server
After=syslog.target network-online.target

[Service]
Type=simple
User=homebridge
EnvironmentFile=/etc/default/homebridge
# Adapt this to your specific setup (could be /usr/bin/homebridge)
# See comments below for more information
ExecStart=/usr/local/bin/homebridge $HOMEBRIDGE_OPTS
Restart=on-failure
RestartSec=10
KillMode=process

[Install]
WantedBy=multi-user.target
启动服务:
systemctl daemon-reload
systemctl enable homebridge
systemctl start homebridge
HomeBridge 集成 Home Assistant
安装插件:
npm install -g homebridge-homeassistant添加配置:
"platforms": [
  {
    "platform": "HomeAssistant",
    "name": "HomeAssistant",
    "host": "http://127.0.0.1:8123",
    "password": "yourapipassword",
    "supported_types": ["binary_sensor", "climate", "cover", "device_tracker", "fan", "group", "input_boolean", "light", "lock", "media_player", "scene", "sensor", "switch"],
    "logging": true
  }
]
Amazon Echo 设置
我用的是 Amazon Echo Dot 2 就是那个 Mini 版的
- 安装 Yeelight Skill
- 安装 Mijia
两者需要登录小米的账号,才能授权获得控制。
结合 HomeAssistant 和 Amazon Echo
文档:https://home-assistant.io/components/alexa/
如果只是为了打开、关闭设备,可以直接使用 emulated_hue 组件,它可以提供一个虚拟的 Philips Hue 桥。
只开关设备
使用 Home Assistant 的 Emulated Hue 组件就可以了,添加如下的配置:
emulated_hue:
  host_ip: 192.168.199.242
其中的 192.168.199.242 即是 Home Assistant 的服务器地址
更详细的配置,如:https://github.com/Teagan42/HomeAssistantConfig
定制命令
为了使用更多的功能,则需要使用将 Home Assistant 暴露到公网上——使用诸如花生壳等。(PS:由于当前家里使用的是光纤,需要光纤猫,实施上比较困难;因此,外部访问需要使用一级跌幅,暂时没有进行这方面的尝试)。
创建相应的 Alexa Skill,并添加 Endpoing:https://YOUR_HOST/api/alexa?api_password=YOUR_API_PASSWORD
必须使用 HTTPS
定制 Home Assistant
Home Assistant RESTful API 地址:Home Assistant API
Raspberry Pi Cornata
官方文档:Use Cortana Function on IoT Core
下载 Windows 10 IoT Core Dashboard
下载地址:https://developer.microsoft.com/en-us/windows/iot/docs/iotdashboard
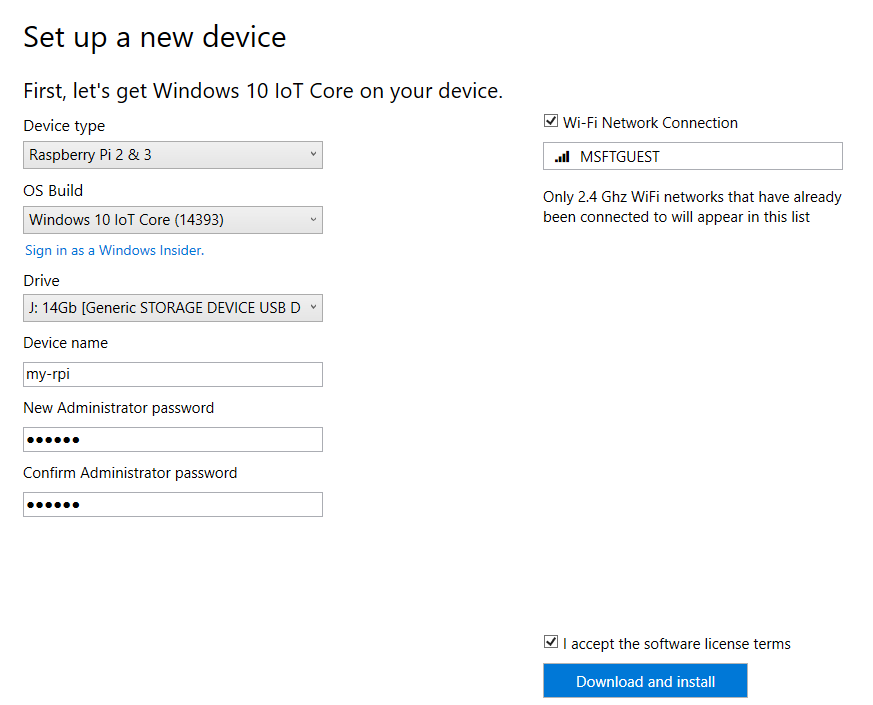
安装最新镜像
打开 Windows 10 IoT Core Dashboard,为 RPi 烧录镜像,如下图所示:
官方建议要更新到最新。使用 Web 界面打开设备的 Windows Update,http://:8080/#Windows%20Update,如http://192.168.199.223:8080/#Windows%20Update。
然后到 Devices 中看是否出现相应的 Microphone 设置。
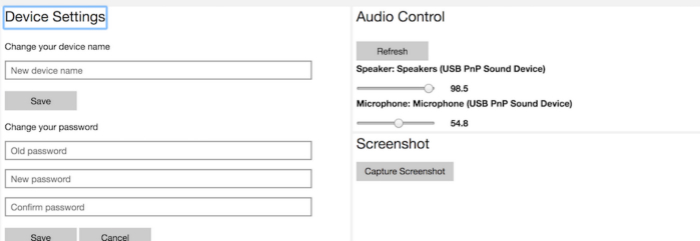
开机启动 Cortana
在首页的 Device Settigns 最下面有一个 Start Cortana on Boot 的选项。
使用 Windows IoT Remote Server 访问:在 http://192.168.199.223:8080/#Remote 在勾上 Enable Windows IoT Remote Server
设置 speechlanguage 成中文:
打开 Processes -> Run command,执行:
IoTSettings -set region CN
IoTSettings -set speechlanguage zh-Hans-CN
工具集
Tools:
欢迎 star:https://github.com/phodal/smart-home
作者:黄峰达(@Phodal),ThoughtWorks软件开发工程师,CSDN博客专家。长期活跃于GitHub,专注于物联网和前端领域。出版著作《自己动手设计物联网》,以及《Growth:全栈增长工程师指南》等六本电子书,并译有《物联网实战指南》。
2017 年 7 月 1 日(星期六),「一天掌握物联网全栈开发之道」物联网主题线上峰会将在 CSDN 学院召开,Phodal 将与其他六位专家将一起从整体架构、技术栈、应用开发平台到实战经验与安全方案,希望通过一天的时间,帮助开发者快速掌握物联网全栈开发之道,目前峰会正在 7 折优惠中,点击「峰会官网」立即报名。


 5510
5510

 被折叠的 条评论
为什么被折叠?
被折叠的 条评论
为什么被折叠?
 到【灌水乐园】发言


