


转
React JS 组件间沟通的一些方法
刚入门React可能会因为React的单向数据流的特性而遇到组件间沟通的麻烦,这篇文章主要就说一说如何解决组件间沟通的问题。
1.组件间的关系
1.1 父子组件
ReactJS中数据的流动是单向的,父组件的数据可以通过设置子组件的props传递数据给子组件。如果想让子组件改变父组件的数据,可以在父组件中传一个callback(回调函数)给子组件,子组件内调用这个callback即可改变父组件的数据。
var MyContainer = React.createClass({
	getInitialState: function(){
		return {
			list: ['item1', 'item2'],
			curItem: 'item1'
		}
	},
	// 改变curItem的回调函数
	changeItem: function(item){
		this.setState({
			curItem: item
		});
	},
	render: function(){
		return (
			<div>
				The curItem is: {this.state.curItem}
				<List list={this.state.list} changeItem={this.changeItem}/>
			</div>
		)
	}
});

var List = React.createClass({
	onClickItem: function(item){
		this.props.changeItem(item);
	},
	render: function(){
		return (
			<ul>
				{
					(function(){
						var self = this;
						return this.props.list.map(function(item){
							return (
								<li onClick={self.onClickItem.bind(self, item)}>I am {item}, click me!</li>
							)
						});
					}.bind(this))()

				}

			</ul>
		)
	}
})


ReactDOM.render(
  <MyContainer />,
  document.getElementById('example')
);
<MyContainer />是<List />的父组件,<MyContainer />通过props传递list数据给<List />组件,如果<MyContainer />中的list改变,<List />会重新渲染列表数据。而<List />可以通过<MyContainer />传来的changeItem函数,改变<MyContainer />的curItem数据。
1.2 兄弟组件
当两个组件不是父子关系,但有相同的父组件时,将这两个组件称为兄弟组件。兄弟组件不能直接相互传送数据,此时可以将数据挂载在父组件中,由两个组件共享:如果组件需要数据渲染,则由父组件通过props传递给该组件;如果组件需要改变数据,则父组件传递一个改变数据的回调函数给该组件,并在对应事件中调用。
var MyContainer = React.createClass({
	getInitialState: function(){
		return {
			list: ['item1', 'item2'],
			curItem: 'item1'
		}
	},
	// 改变curItem的回调函数
	changeItem: function(item){
		this.setState({
			curItem: item
		});
	},
	render: function(){
		return (
			<div>
				The curItem is: {this.state.curItem}
				<List list={this.state.list} curItem={this.state.curItem} />
				<SelectionButtons changeItem={this.changeItem}/>
			</div>
		)
	}
});

var List = React.createClass({

	render: function(){
		var selectedStyle = {
			color: 'white',
			background: 'red'
		};

		return (
			<ul>

				{
					(function(){
						var self = this;
						return this.props.list.map(function(item){
							var itemStyle = (item == self.props.curItem) ? selectedStyle : {};
							return (
								<li style={itemStyle}>I am {item}!</li>
							)
						});
					}.bind(this))()

				}

			</ul>
		)
	}
});

var SelectionButtons = React.createClass({
	onClickItem: function(item){
		this.props.changeItem(item);
	},
	render: function(){
		return (
			<div>
				<button onClick={this.onClickItem.bind(this, 'item1')}>item1</button>
				<button onClick={this.onClickItem.bind(this, 'item2')}>item2</button>
			</div>
		)
	}
});


ReactDOM.render(
  <MyContainer />,
  document.getElementById('example')
);
如上述代码所示,共享数据curItem作为state放在父组件<MyContainer />中,将回调函数changeItem传给<SelectionButtons />用于改变curItem,将curItem传给<List />用于高亮当前被选择的item。
2. 组件层次太深的噩梦
兄弟组件的沟通的解决方案就是找到两个组件共同的父组件,一层一层的调用上一层的回调,再一层一层地传递props。如果组件树嵌套太深,就会出现如下惨不忍睹的组件亲戚调用图。
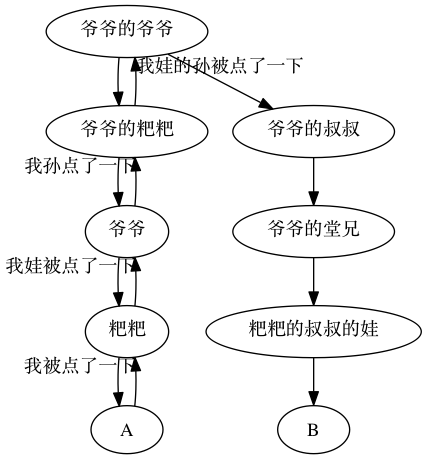
下面就来说说如何避免这个组件亲戚图的两个方法:全局事件和Context。
3. 全局事件
可以使用事件来实现组件间的沟通:改变数据的组件发起一个事件,使用数据的组件监听这个事件,在事件处理函数中触发setState来改变视图或者做其他的操作。使用事件实现组件间沟通脱离了单向数据流机制,不用将数据或者回调函数一层一层地传给子组件,可以避免出现上述的亲戚图。
事件模块可以使用如EventEmitter或PostalJS这些第三方库,也可以自己简单实现一个:
var EventEmitter = {
    _events: {},
    dispatch: function (event, data) {
        if (!this._events[event]) return; // no one is listening to this event
        for (var i = 0; i < this._events[event].length; i++)
            this._events[event][i](data);
    },
    subscribe: function (event, callback) {
      if (!this._events[event]) this._events[event] = []; // new event
      this._events[event].push(callback);
    },
    unSubscribe: function(event){
    	if(this._events && this._events[event]) {
    		delete this._events[event];
    	}
    }
}
组件代码如下:
var MyContainer = React.createClass({

	render: function(){
		return (
			<div>
				<CurItemPanel />
				<SelectionButtons/>
			</div>
		)
	}
});

var CurItemPanel = React.createClass({
	getInitialState: function(){
		return {
			curItem: 'item1'
		}
	},
	componentDidMount: function(){
		var self = this;
		EventEmitter.subscribe('changeItem', function(newItem){
			self.setState({
				curItem: newItem
			});
		})
	},
	componentWillUnmount: function(){
		EventEmitter.unSubscribe('changeItem');
	},
	render: function(){
		return (
			<p>
				The curItem is:  {this.state.curItem}
			</p>
		)
	}

});

var SelectionButtons = React.createClass({
	onClickItem: function(item){
		EventEmitter.dispatch('changeItem', item);
	},
	render: function(){
		return (
			<div>
				<button onClick={this.onClickItem.bind(this, 'item1')}>item1</button>
				<button onClick={this.onClickItem.bind(this, 'item2')}>item2</button>
			</div>
		)
	}
});


ReactDOM.render(
  <MyContainer />,
  document.getElementById('example')
);
事件绑定和解绑可以分别放在componentDidMount和componentWillUnMount中。由于事件是全局的,最好保证在componentWillUnMount中解绑事件,否则,下一次初始化组件时事件可能会绑定多次。 使用事件模型,组件之间无论是父子关系还是非父子关系都可以直接沟通,从而解决了组件间层层回调传递的问题,但是频繁地使用事件实现组件间沟通会使整个程序的数据流向越来越乱,因此,组件间的沟通还是要尽量遵循单向数据流机制。
4. context(上下文)
使用上下文可以让子组件直接访问祖先的数据或函数,无需从祖先组件一层层地传递数据到子组件中。
MyContainer组件:
var MyContainer = React.createClass({
	getInitialState: function(){
		return {
			curItem: 'item1'
		}
	},
	childContextTypes: {
		curItem: React.PropTypes.any,
		changeItem: React.PropTypes.any
	},
	getChildContext: function(){
		return {
			curItem: this.state.curItem,
			changeItem: this.changeItem
		}
	},
	changeItem: function(item){
		this.setState({
			curItem: item
		});
	},
	render: function(){
		return (
			<div>
				<CurItemWrapper />
				<ListWrapper changeItem={this.changeItem}/>
			</div>
		)
	}
});
childContextTypes用于验证上下文的数据类型,这个属性是必须要有的,否则会报错。getChildContext用于指定子组件可直接访问的上下文数据。
CurItemWrapper组件和CurItemPanel组件:
var CurItemWrapper = React.createClass({
	render: function(){
		return (
			<div>
				<CurItemPanel />
			</div>
		)
	}
});

var CurItemPanel = React.createClass({
	contextTypes: {
		curItem: React.PropTypes.any
	},
	render: function(){
		return (
			<p>
				The curItem is: {this.context.curItem}
			</p>
		)
	}

});
在<CurItemPanel />通过this.context.curItem属性访问curItem,无需让<CurItemWrapper />将curItem传递过来。必须在contextTypes中设置curItem的验证类型,否则this.context是访问不了curItem的。
ListWrapper组件和List组件:
var ListWrapper = React.createClass({
	render: function(){
		return (
			<div>
				<List />
			</div>
		)
	}
});

var List = React.createClass({
	contextTypes: {
		changeItem: React.PropTypes.any
	},
	onClickItem: function(item){
		this.context.changeItem(item);
	},
	render: function(){
		return (
			<ul>
				<li onClick={this.onClickItem.bind(this, 'item1')}>I am item1, click me!</li>
				<li onClick={this.onClickItem.bind(this, 'item2')}>I am item2, click me!</li>
			</ul>
		)
	}
});
同上,<List />可以通过this.context.changeItem获取<MyContainer />的改变curItem的changeItem函数。
5. Redux
为了在React中更加清晰地管理数据,Facebook提出了Flux架构,而redux则是Flux的一种优化实现。
关于redux,另外一个比我帅气的同事已经写了一篇详细的redux介绍博文,传送门在下面,有兴趣的可以去看看。
http://www.alloyteam.com/2015/09/react-redux/
当Redux与React搭配使用时,一般都是在最顶层组件中使用Redux。其余内部组件仅仅是展示性的,发起dispatch的函数和其他数据都通过props传入。然后,我们又会看到那熟悉的组件亲戚调用图:
如果使用全局事件解决方案,那么redux中漂亮的,优雅的单向数据管理方式就会遭到破坏。于是,使用context就成了解决这种层层回调传递问题的首选方案,下面给出一个简单例子:
index.js:
import { createStore, applyMiddleware } from 'redux';
import reducers from "./reducers"
import { Provider } from 'react-redux'

import React, {Component} from 'react';
import { render } from 'react-dom';
import App from './App';

let store = createStore(reducers);

render(
  <Provider store={store}>
    <App />
  </Provider>,
  document.getElementById('root')
);
reducers.js:
export default function changeItem(state = {'curItem': 'item1'}, action){
  switch(action.type) {
    case 'CHANGE_ITEM':
      return Object.assign({}, {
        curItem: action.curItem
      });
    default:
      return state;
  }
}
actions.js:
export function changeItem(item) {
  return {
    type: 'CHANGE_ITEM',
    curItem: item
  }
}
App.js(组件代码):
import React, {Component} from 'react';
import { connect, Provider } from 'react-redux';
import { changeItem } from './actions';

class App extends Component{
  constructor(props, context) {
    super(props, context);
  }
  getChildContext() {
    return {
      curItem: this.props.curItem,
      changeItem: this.props.changeItem
    }
  }
  render() {
    return (
      <div>
        <CurItemPanel />
        <List />
      </div>

    )
  }
}

App.childContextTypes = {
  curItem: React.PropTypes.any,
  changeItem: React.PropTypes.any
};

class CurItemPanel extends Component {
  constructor(props, context) {
    super(props, context);
  }
  render() {
    return (
      <div>The curItem is: {this.context.curItem}</div>
    )
  }
}
CurItemPanel.contextTypes = {
  curItem: React.PropTypes.any
};

class List extends Component {
  constructor(props, context) {
    super(props, context);
  }
  onClickItem (item){
    this.context.changeItem(item);
  }
  render() {
    return (
      <ul>
        <li onClick={this.onClickItem.bind(this, 'item1')}>I am item1, click me!</li>
        <li onClick={this.onClickItem.bind(this, 'item2')}>I am item2, click me!</li>
      </ul>
    )
  }
}

List.contextTypes = {
  changeItem: React.PropTypes.any
};

let select = state => { return state};

function mapDispatchToProps(dispatch) {
  return {
    changeItem: function(item) {
      dispatch(changeItem(item));
    }
  };
}

export default(connect(select, mapDispatchToProps))(App);
上述代码中,Store是直接与智能组件<App />交互的,所以Store将state数据curItem和dispatch函数changeItem作为props传给了<App />。在<App />中将curItem数据和changeItem函数作为上下文,作为子组件的笨拙组件就可以之间通过上下文访问这些数据,无需通过props获取。
注:
1.redux的官方文档中是使用ES6语法的,所以这里的React代码也使用ES6做例子
2.运行上述代码需要构建代码,大家可以在redux的github中下载redux带构建代码的examples,然后将代码替换了再构建运行。
6. transdux
偶尔之间发现一个叫transdux的东西。这是一个类redux的数据沟通框架,作者的初衷是为了让用户写出比redux更简洁的代码,同时还能获得[fl|re]dux的好处。用户端使用该框架的话,可以解决下面一些redux中不好看的代码写法:
1)redux中需要创一个全局的store给Provider。Transdux中省略这个store。
2)redux与react搭配使用时,redux需要通过connect方法将数据和dispatch方法传给redux。Transdux没有connect。
3)redux需要把action当props传下去,跟传callback一样。Trandux不会出现这种传递。
使用transdux需要以下步骤
(1)安装trandux
npm install transdux –save
(2)把component包到Transdux里
import React, {Component} from 'react';
import Transdux from 'transdux';
import App from './TransduxApp.js';
import { render } from 'react-dom';

render(
  <Transdux>
    <App />
  </Transdux>,
  document.getElementById('root')
);
(3)定义component能干什么,component的状态如何改变
import React, {Component} from 'react';
import {mixin} from 'transdux'
import ChangeButton from './ChangeButton';

// 定义action是怎么变的
let actions = {
  addHello(obj, state, props) {
    // 返回state
    return {
      msg: obj.msg
    }
  }
};


class App extends Component{
  constructor(props){
    super(props);
    this.state = {msg: 'init'};
  }
  render() {
    // 应该传入调用了store.dispatch回调函数给笨拙组件
    return (
      <div>
        {this.state.msg}
        <ChangeButton />
      </div>

    )
  }
}

export default mixin(App, actions);
(4)使用dispatch
import React, {Component} from 'react';
import {mixin} from 'transdux'
import minApp from './TransduxApp';
class ChangeButton extends Component{
  click() {
    this.dispatch(minApp, 'addHello', {'msg': 'hello world'});
  }
  render() {
    return (
      <div>
        <button onClick={this.click.bind(this)}>change content</button>
      </div>

    )
  }
}
export default mixin(ChangeButton, {});
mixin方法扩为<ChangeButton />扩展了一个dispatch方法。dispatch方法需要三个参数:接手消息的组件、改变组件的actions、传递的对象。<ChangeButton />的按钮事件处理函数调用了该dispatch后,会改变<App />中的状态。
使用了Clojure的Channel通信机制,实现了组件与组件之间的直接通信。这种通信的效果类似与events,每个组件可以维护着自己的state,然后用mixin包装自己传给其他组件改变状态。
Transdux的传送门在下面,有兴趣的同学可以去看看:
https://blog.oyanglul.us/javascript/react-transdux-the-clojure-approach-of-flux.html
小结
简单的的组件沟通可以用传props和callback的方法实现,然而,随着项目规模的扩大,组件就会嵌套得越来越深,这时候使用这个方法就有点不太适合。全局事件可以让组件直接沟通,但频繁使用事件会让数据流动变得很乱。如果兄弟组件共同的父组件嵌套得太深,在这个父组件设置context从而直接传递数据和callback到这两个兄弟组件中。使用redux可以让你整个项目的数据流向十分清晰,但是很容易会出现组件嵌套太深的情况,events和context都可以解决这个问题。Transdux是一个类redux框架,使用这个框架可以写出比redux简洁的代码,又可以得到redux的好处。
原博客地址:http://www.alloyteam.com/2016/01/some-methods-of-reactjs-communication-between-components/


 726
726


 被折叠的 条评论
为什么被折叠?
被折叠的 条评论
为什么被折叠?
 到【灌水乐园】发言


