转载请标明出处:
http://blog.csdn.net/lmj623565791/article/details/46695347;
本文出自:【张鸿洋的博客】
一、概述
周末游戏打得过猛,于是周天熬夜码代码,周一早上浑浑噩噩的发现android-percent-support-lib-sample这个项目,Google终于开始支持百分比的方式布局了,瞬间脉动回来,啊咧咧。对于这种历史性的时刻,不出篇博客难以表达我内心的激动。
还记得不久前,发了篇博客:Android 屏幕适配方案,这篇博客以Web页面设计引出一种适配方案,最终的目的就是可以通过百分比控制控件的大小。当然了,存在一些问题,比如:
- 对于没有考虑到屏幕尺寸,可能会出现意外的情况;
- apk的大小会增加;
当然了android-percent-support这个库,基本可以解决上述问题,是不是有点小激动,稍等,我们先描述下这个support-lib。
这个库提供了:
layout_widthPercent、layout_heightPercent、
layout_marginPercent、layout_marginLeftPercent、
layout_marginTopPercent、layout_marginRightPercent、
layout_marginBottomPercent、layout_marginStartPercent、layout_marginEndPercent。
可以看到支持宽高,以及margin。
也就是说,大家只要在开发过程中使用PercentRelativeLayout、PercentFrameLayout替换FrameLayout、RelativeLayout即可。
是不是很简单,不过貌似没有LinearLayout,有人会说LinearLayout有weight属性呀。但是,weight属性只能支持一个方向呀~~哈,没事,刚好给我们一个机会去自定义一个PercentLinearLayout。
好了,本文分为3个部分:
PercentRelativeLayout、PercentFrameLayout的使用- 对上述控件源码分析
- 自定义
PercentLinearLayout
二、使用
关于使用,其实及其简单,并且github上也有例子,android-percent-support-lib-sample。我们就简单过一下:
首先记得在build.gradle添加:
compile 'com.android.support:percent:22.2.0'
(一)PercentFrameLayout
<?xml version="1.0" encoding="utf-8"?>
<android.support.percent.PercentFrameLayout
    xmlns:android="http://schemas.android.com/apk/res/android"
    xmlns:app="http://schemas.android.com/apk/res-auto"
    android:layout_width="match_parent"
    android:layout_height="match_parent">

    <TextView
        android:layout_width="0dp"
        android:layout_height="0dp"
        android:layout_gravity="left|top"
        android:background="#44ff0000"
        android:text="width:30%,height:20%"
        app:layout_heightPercent="20%"
        android:gravity="center"
        app:layout_widthPercent="30%"/>

    <TextView
        android:layout_width="0dp"
        android:layout_height="0dp"
        android:layout_gravity="right|top"
        android:gravity="center"
        android:background="#4400ff00"
        android:text="width:70%,height:20%"
        app:layout_heightPercent="20%"
        app:layout_widthPercent="70%"/>


    <TextView
        android:layout_width="0dp"
        android:layout_height="0dp"
        android:layout_gravity="bottom"
        android:background="#770000ff"
        android:text="width:100%,height:10%"
        android:gravity="center"
        app:layout_heightPercent="10%"
        app:layout_widthPercent="100%"/>


</android.support.percent.PercentFrameLayout>
- 1
- 2
- 3
- 4
- 5
- 6
- 7
- 8
- 9
- 10
- 11
- 12
- 13
- 14
- 15
- 16
- 17
- 18
- 19
- 20
- 21
- 22
- 23
- 24
- 25
- 26
- 27
- 28
- 29
- 30
- 31
- 32
- 33
- 34
- 35
- 36
- 37
- 38
- 39
- 40
- 41
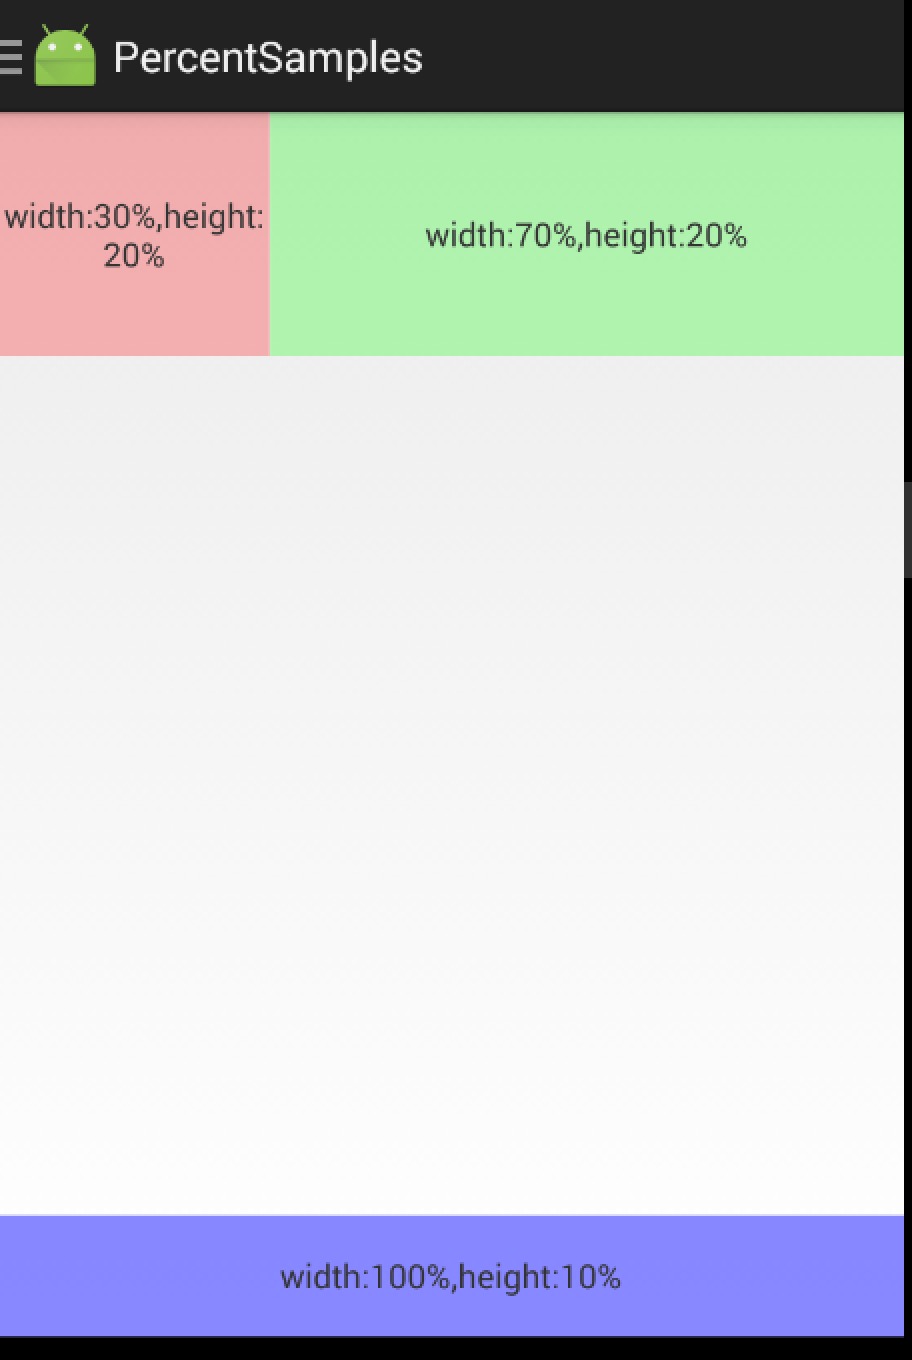
3个TextView,很简单,直接看效果图:

(二) PercentRelativeLayout
<?xml version="1.0" encoding="utf-8"?>
<android.support.percent.PercentRelativeLayout
    xmlns:android="http://schemas.android.com/apk/res/android"
    xmlns:app="http://schemas.android.com/apk/res-auto"
    android:layout_width="match_parent"
    android:layout_height="match_parent"
    android:clickable="true">

    <TextView
        android:id="@+id/row_one_item_one"
        android:layout_width="0dp"
        android:layout_height="0dp"
        android:layout_alignParentTop="true"
        android:background="#7700ff00"
        android:text="w:70%,h:20%"
        android:gravity="center"
        app:layout_heightPercent="20%"
        app:layout_widthPercent="70%"/>

    <TextView
        android:id="@+id/row_one_item_two"
        android:layout_width="0dp"
        android:layout_height="0dp"
        android:layout_toRightOf="@+id/row_one_item_one"
        android:background="#396190"
        android:text="w:30%,h:20%"
        app:layout_heightPercent="20%"
        android:gravity="center"
        app:layout_widthPercent="30%"/>


    <ImageView
        android:id="@+id/row_two_item_one"
        android:layout_width="match_parent"
        android:layout_height="0dp"
        android:src="@drawable/tangyan"
        android:scaleType="centerCrop"
        android:layout_below="@+id/row_one_item_one"
        android:background="#d89695"
        app:layout_heightPercent="70%"/>

    <TextView
        android:layout_width="0dp"
        android:layout_height="0dp"
        android:layout_below="@id/row_two_item_one"
        android:background="#770000ff"
        android:gravity="center"
        android:text="width:100%,height:10%"
        app:layout_heightPercent="10%"
        app:layout_widthPercent="100%"/>


</android.support.percent.PercentRelativeLayout>
- 1
- 2
- 3
- 4
- 5
- 6
- 7
- 8
- 9
- 10
- 11
- 12
- 13
- 14
- 15
- 16
- 17
- 18
- 19
- 20
- 21
- 22
- 23
- 24
- 25
- 26
- 27
- 28
- 29
- 30
- 31
- 32
- 33
- 34
- 35
- 36
- 37
- 38
- 39
- 40
- 41
- 42
- 43
- 44
- 45
- 46
- 47
- 48
- 49
- 50
- 51
- 52
- 53
- 54
- 55
ok,依然是直接看效果图:

使用没什么好说的,就是直观的看一下。
三、源码分析
其实细想一下,Google只是对我们原本熟悉的RelativeLayout和FrameLayout进行的功能的扩展,使其支持了percent相关的属性。
那么,我们考虑下,如果是我们添加这种扩展,我们会怎么做:
- 通过LayoutParams获取child设置的percent相关属性的值
- onMeasure的时候,将child的width,height的值,通过获取的自定义属性的值进行计算(eg:容器的宽 * fraction ),计算后传入给child.measure(w,h);
ok,有了上面的猜想,我们直接看PercentFrameLayout的源码。
public class PercentFrameLayout extends FrameLayout {
private final PercentLayoutHelper mHelper = new PercentLayoutHelper(this);
public PercentFrameLayout(Context context, AttributeSet attrs) {
super(context, attrs);
}
@Override
public LayoutParams generateLayoutParams(AttributeSet attrs) {
return new LayoutParams(getContext(), attrs);
}
@Override
protected void onMeasure(int widthMeasureSpec, int heightMeasureSpec) {
mHelper.adjustChildren(widthMeasureSpec, heightMeasureSpec);
super.onMeasure(widthMeasureSpec, heightMeasureSpec);
if (mHelper.handleMeasuredStateTooSmall()) {
super.onMeasure(widthMeasureSpec, heightMeasureSpec);
}
}
@Override
protected void onLayout(boolean changed, int left, int top, int right, int bottom) {
super.onLayout(changed, left, top, right, bottom);
mHelper.restoreOriginalParams();
}
public static class LayoutParams extends FrameLayout.LayoutParams
implements PercentLayoutHelper.PercentLayoutParams {
private PercentLayoutHelper.PercentLayoutInfo mPercentLayoutInfo;
public LayoutParams(Context c, AttributeSet attrs) {
super(c, attrs);
mPercentLayoutInfo = PercentLayoutHelper.getPercentLayoutInfo(c, attrs);
}
@Override
public PercentLayoutHelper.PercentLayoutInfo getPercentLayoutInfo() {
return mPercentLayoutInfo;
}
@Override
protected void setBaseAttributes(TypedArray a, int widthAttr, int heightAttr) {
PercentLayoutHelper.fetchWidthAndHeight(this, a, widthAttr, heightAttr);
}
}
}
- 1
- 2
- 3
- 4
- 5
- 6
- 7
- 8
- 9
- 10
- 11
- 12
- 13
- 14
- 15
- 16
- 17
- 18
- 19
- 20
- 21
- 22
- 23
- 24
- 25
- 26
- 27
- 28
- 29
- 30
- 31
- 32
- 33
- 34
- 35
- 36
- 37
- 38
- 39
- 40
- 41
- 42
- 43
- 44
- 45
- 46
- 47
- 48
- 49
- 50
- 51
- 52
代码是相当的短,可以看到PercentFrameLayout里面首先重写了generateLayoutParams方法,当然了,由于支持了一些新的layout_属性,那么肯定需要定义对应的LayoutParams。
(一)percent相关属性的获取
可以看到PercentFrameLayout.LayoutParams在原有的FrameLayout.LayoutParams基础上,实现了PercentLayoutHelper.PercentLayoutParams接口。
这个接口很简单,只有一个方法:
public interface PercentLayoutParams {
        PercentLayoutInfo getPercentLayoutInfo();
    }
而,这个方法的实现呢,也只有一行:return mPercentLayoutInfo;,那么这个mPercentLayoutInfo在哪完成赋值呢?
看PercentFrameLayout.LayoutParams的构造方法:
public LayoutParams(Context c, AttributeSet attrs) {
            super(c, attrs);
            mPercentLayoutInfo = PercentLayoutHelper.getPercentLayoutInfo(c, attrs);
        }
可以看到,将attrs传入给getPercentLayoutInfo方法,那么不用说,这个方法的内部,肯定是获取自定义属性的值,然后将其封装到PercentLayoutInfo对象中,最后返回。
代码如下:
public static PercentLayoutInfo getPercentLayoutInfo(Context context,
            AttributeSet attrs) {
        PercentLayoutInfo info = null;
        TypedArray array = context.obtainStyledAttributes(attrs, R.styleable.PercentLayout_Layout);
        float value = array.getFraction(R.styleable.PercentLayout_Layout_layout_widthPercent, 1, 1,
                -1f);
        if (value != -1f) {
            if (Log.isLoggable(TAG, Log.VERBOSE)) {
                Log.v(TAG, "percent width: " + value);
            }
            info = info != null ? info : new PercentLayoutInfo();
            info.widthPercent = value;
        }
        value = array.getFraction(R.styleable.PercentLayout_Layout_layout_heightPercent, 1, 1, -1f);
        if (value != -1f) {
            if (Log.isLoggable(TAG, Log.VERBOSE)) {
                Log.v(TAG, "percent height: " + value);
            }
            info = info != null ? info : new PercentLayoutInfo();
            info.heightPercent = value;
        }
        value = array.getFraction(R.styleable.PercentLayout_Layout_layout_marginPercent, 1, 1, -1f);
        if (value != -1f) {
            if (Log.isLoggable(TAG, Log.VERBOSE)) {
                Log.v(TAG, "percent margin: " + value);
            }
            info = info != null ? info : new PercentLayoutInfo();
            info.leftMarginPercent = value;
            info.topMarginPercent = value;
            info.rightMarginPercent = value;
            info.bottomMarginPercent = value;
        }
        value = array.getFraction(R.styleable.PercentLayout_Layout_layout_marginLeftPercent, 1, 1,
                -1f);
        if (value != -1f) {
            if (Log.isLoggable(TAG, Log.VERBOSE)) {
                Log.v(TAG, "percent left margin: " + value);
            }
            info = info != null ? info : new PercentLayoutInfo();
            info.leftMarginPercent = value;
        }
        value = array.getFraction(R.styleable.PercentLayout_Layout_layout_marginTopPercent, 1, 1,
                -1f);
        if (value != -1f) {
            if (Log.isLoggable(TAG, Log.VERBOSE)) {
                Log.v(TAG, "percent top margin: " + value);
            }
            info = info != null ? info : new PercentLayoutInfo();
            info.topMarginPercent = value;
        }
        value = array.getFraction(R.styleable.PercentLayout_Layout_layout_marginRightPercent, 1, 1,
                -1f);
        if (value != -1f) {
            if (Log.isLoggable(TAG, Log.VERBOSE)) {
                Log.v(TAG, "percent right margin: " + value);
            }
            info = info != null ? info : new PercentLayoutInfo();
            info.rightMarginPercent = value;
        }
        value = array.getFraction(R.styleable.PercentLayout_Layout_layout_marginBottomPercent, 1, 1,
                -1f);
        if (value != -1f) {
            if (Log.isLoggable(TAG, Log.VERBOSE)) {
                Log.v(TAG, "percent bottom margin: " + value);
            }
            info = info != null ? info : new PercentLayoutInfo();
            info.bottomMarginPercent = value;
        }
        value = array.getFraction(R.styleable.PercentLayout_Layout_layout_marginStartPercent, 1, 1,
                -1f);
        if (value != -1f) {
            if (Log.isLoggable(TAG, Log.VERBOSE)) {
                Log.v(TAG, "percent start margin: " + value);
            }
            info = info != null ? info : new PercentLayoutInfo();
            info.startMarginPercent = value;
        }
        value = array.getFraction(R.styleable.PercentLayout_Layout_layout_marginEndPercent, 1, 1,
                -1f);
        if (value != -1f) {
            if (Log.isLoggable(TAG, Log.VERBOSE)) {
                Log.v(TAG, "percent end margin: " + value);
            }
            info = info != null ? info : new PercentLayoutInfo();
            info.endMarginPercent = value;
        }
        array.recycle();
        if (Log.isLoggable(TAG, Log.DEBUG)) {
            Log.d(TAG, "constructed: " + info);
        }
        return info;
    }
- 1
- 2
- 3
- 4
- 5
- 6
- 7
- 8
- 9
- 10
- 11
- 12
- 13
- 14
- 15
- 16
- 17
- 18
- 19
- 20
- 21
- 22
- 23
- 24
- 25
- 26
- 27
- 28
- 29
- 30
- 31
- 32
- 33
- 34
- 35
- 36
- 37
- 38
- 39
- 40
- 41
- 42
- 43
- 44
- 45
- 46
- 47
- 48
- 49
- 50
- 51
- 52
- 53
- 54
- 55
- 56
- 57
- 58
- 59
- 60
- 61
- 62
- 63
- 64
- 65
- 66
- 67
- 68
- 69
- 70
- 71
- 72
- 73
- 74
- 75
- 76
- 77
- 78
- 79
- 80
- 81
- 82
- 83
- 84
- 85
- 86
- 87
- 88
- 89
- 90
- 91
- 92
是不是和我们平时的取值很类似,所有的值最终封装到PercentLayoutInfo对象中。
ok,到此我们的属性获取就介绍完成,有了这些属性,是不是onMeasure里面要进行使用呢?
(二) onMeasue中重新计算child的尺寸
@Override
    protected void onMeasure(int widthMeasureSpec, int heightMeasureSpec) {
        mHelper.adjustChildren(widthMeasureSpec, heightMeasureSpec);
        super.onMeasure(widthMeasureSpec, heightMeasureSpec);
        if (mHelper.handleMeasuredStateTooSmall()) {
            super.onMeasure(widthMeasureSpec, heightMeasureSpec);
        }
    }
可以看到onMeasure中的代码页很少,看来核心的代码都被封装在mHelper的方法中,我们直接看mHelper.adjustChildren方法。
/**
* Iterates over children and changes their width and height to one calculated from percentage
* values.
* @param widthMeasureSpec Width MeasureSpec of the parent ViewGroup.
* @param heightMeasureSpec Height MeasureSpec of the parent ViewGroup.
*/
public void adjustChildren(int widthMeasureSpec, int heightMeasureSpec) {
int widthHint = View.MeasureSpec.getSize(widthMeasureSpec);
int heightHint = View.MeasureSpec.getSize(heightMeasureSpec);
for (int i = 0, N = mHost.getChildCount(); i < N; i++) {
View view = mHost.getChildAt(i);
ViewGroup.LayoutParams params = view.getLayoutParams();
if (params instanceof PercentLayoutParams) {
PercentLayoutInfo info =
((PercentLayoutParams) params).getPercentLayoutInfo();
if (Log.isLoggable(TAG, Log.DEBUG)) {
Log.d(TAG, "using " + info);
}
if (info != null) {
if (params instanceof ViewGroup.MarginLayoutParams) {
info.fillMarginLayoutParams((ViewGroup.MarginLayoutParams) params,
widthHint, heightHint);
} else {
info.fillLayoutParams(params, widthHint, heightHint);
}
}
}
}
}
- 1
- 2
- 3
- 4
- 5
- 6
- 7
- 8
- 9
- 10
- 11
- 12
- 13
- 14
- 15
- 16
- 17
- 18
- 19
- 20
- 21
- 22
- 23
- 24
- 25
- 26
- 27
- 28
- 29
- 30
- 31
- 32
通过注释也能看出,此方法中遍历所有的孩子,通过百分比的属性重新设置其宽度和高度。
首先在widthHint、heightHint保存容器的宽、高,然后遍历所有的孩子,判断其LayoutParams是否是PercentLayoutParams类型,如果是,通过params.getPercentLayoutInfo拿出info对象。
是否还记得,上面的分析中,PercentLayoutInfo保存了percent相关属性的值。
如果info不为null,则判断是否需要处理margin;我们直接看fillLayoutParams方法(处理margin也是类似的)。
/**
* Fills {@code ViewGroup.LayoutParams} dimensions based on percentage values.
*/
public void fillLayoutParams(ViewGroup.LayoutParams params, int widthHint,
int heightHint) {
mPreservedParams.width = params.width;
mPreservedParams.height = params.height;
if (widthPercent >= 0) {
params.width = (int) (widthHint * widthPercent);
}
if (heightPercent >= 0) {
params.height = (int) (heightHint * heightPercent);
}
if (Log.isLoggable(TAG, Log.DEBUG)) {
Log.d(TAG, "after fillLayoutParams: (" + params.width + ", " + params.height + ")");
}
}
- 1
- 2
- 3
- 4
- 5
- 6
- 7
- 8
- 9
- 10
- 11
- 12
- 13
- 14
- 15
- 16
- 17
- 18
- 19
首先保存原本的width和height,然后重置params的width和height为(int) (widthHint * widthPercent)和(int) (heightHint * heightPercent);。
到此,其实我们的百分比转换就结束了,理论上就已经实现了对于百分比的支持,不过Google还考虑了一些细节。
我们回到onMeasure方法:
@Override
    protected void onMeasure(int widthMeasureSpec, int heightMeasureSpec) {
        mHelper.adjustChildren(widthMeasureSpec, heightMeasureSpec);
        super.onMeasure(widthMeasureSpec, heightMeasureSpec);
        if (mHelper.handleMeasuredStateTooSmall()) {
            super.onMeasure(widthMeasureSpec, heightMeasureSpec);
        }
    }
下面还有个mHelper.handleMeasuredStateTooSmall的判断,也就是说,如果你设置的百分比,最终计算出来的MeasuredSize过小的话,会进行一些操作。
代码如下:
public boolean handleMeasuredStateTooSmall() {
        boolean needsSecondMeasure = false;
        for (int i = 0, N = mHost.getChildCount(); i < N; i++) {
            View view = mHost.getChildAt(i);
            ViewGroup.LayoutParams params = view.getLayoutParams();
            if (Log.isLoggable(TAG, Log.DEBUG)) {
                Log.d(TAG, "should handle measured state too small " + view + " " + params);
            }
            if (params instanceof PercentLayoutParams) {
                PercentLayoutInfo info =
                        ((PercentLayoutParams) params).getPercentLayoutInfo();
                if (info != null) {
                    if (shouldHandleMeasuredWidthTooSmall(view, info)) {
                        needsSecondMeasure = true;
                        params.width = ViewGroup.LayoutParams.WRAP_CONTENT;
                    }
                    if (shouldHandleMeasuredHeightTooSmall(view, info)) {
                        needsSecondMeasure = true;
                        params.height = ViewGroup.LayoutParams.WRAP_CONTENT;
                    }
                }
            }
        }
        if (Log.isLoggable(TAG, Log.DEBUG)) {
            Log.d(TAG, "should trigger second measure pass: " + needsSecondMeasure);
        }
        return needsSecondMeasure;
    }
- 1
- 2
- 3
- 4
- 5
- 6
- 7
- 8
- 9
- 10
- 11
- 12
- 13
- 14
- 15
- 16
- 17
- 18
- 19
- 20
- 21
- 22
- 23
- 24
- 25
- 26
- 27
- 28
首先遍历所有的孩子,拿出孩子的layoutparams,如果是PercentLayoutParams实例,则取出info。如果info不为null,调用shouldHandleMeasuredWidthTooSmall判断:
private static boolean shouldHandleMeasuredWidthTooSmall(View view, PercentLayoutInfo info) {
        int state = ViewCompat.getMeasuredWidthAndState(view) & ViewCompat.MEASURED_STATE_MASK;
        return state == ViewCompat.MEASURED_STATE_TOO_SMALL && info.widthPercent >= 0 &&
                info.mPreservedParams.width == ViewGroup.LayoutParams.WRAP_CONTENT;
    }
这里就是判断,如果你设置的measuredWidth或者measureHeight过小的话,并且你在布局文件中layout_w/h 设置的是WRAP_CONTENT的话,将params.width / height= ViewGroup.LayoutParams.WRAP_CONTENT,然后重新测量。
哈,onMeasure终于结束了~~~现在我觉得应该代码结束了吧,尺寸都设置好了,还需要干嘛么,but,你会发现onLayout也重写了,我们又不改变layout规则,在onLayout里面干什么毛线:
@Override
    protected void onLayout(boolean changed, int left, int top, int right, int bottom) {
        super.onLayout(changed, left, top, right, bottom);
        mHelper.restoreOriginalParams();
    }
继续看mHelper.restoreOriginalParams
 /**
     * Iterates over children and restores their original dimensions that were changed for
     * percentage values. Calling this method only makes sense if you previously called
     * {@link PercentLayoutHelper#adjustChildren(int, int)}.
     */
    public void restoreOriginalParams() {
        for (int i = 0, N = mHost.getChildCount(); i < N; i++) {
            View view = mHost.getChildAt(i);
            ViewGroup.LayoutParams params = view.getLayoutParams();
            if (Log.isLoggable(TAG, Log.DEBUG)) {
                Log.d(TAG, "should restore " + view + " " + params);
            }
            if (params instanceof PercentLayoutParams) {
                PercentLayoutInfo info =
                        ((PercentLayoutParams) params).getPercentLayoutInfo();
                if (Log.isLoggable(TAG, Log.DEBUG)) {
                    Log.d(TAG, "using " + info);
                }
                if (info != null) {
                    if (params instanceof ViewGroup.MarginLayoutParams) {
                        info.restoreMarginLayoutParams((ViewGroup.MarginLayoutParams) params);
                    } else {
                        info.restoreLayoutParams(params);
                    }
                }
            }
        }
    }
- 1
- 2
- 3
- 4
- 5
- 6
- 7
- 8
- 9
- 10
- 11
- 12
- 13
- 14
- 15
- 16
- 17
- 18
- 19
- 20
- 21
- 22
- 23
- 24
- 25
- 26
- 27
- 28
- 29
噗,原来是重新恢复原本的尺寸值,也就是说onMeasure里面的对值进行了改变,测量完成后。在这个地方,将值又恢复成如果布局文件中的值,上面写的都是0。恢复很简单:
public void restoreLayoutParams(ViewGroup.LayoutParams params) {
            params.width = mPreservedParams.width;
            params.height = mPreservedParams.height;
        }
你应该没有忘在哪存的把~忘了的话,麻烦Ctrl+F ‘mPreservedParams.width’ 。
也就是说,你去打印上面写法,布局文件中view的v.getLayoutParams().width,这个值应该是0。
这里感觉略微不爽~这个0没撒用处呀,还不如不重置~~
好了,到此就分析完了,其实主要就几个步骤:
- LayoutParams中属性的获取
- onMeasure中,改变params.width为百分比计算结果,测量
- 如果测量值过小且设置的w/h是wrap_content,重新测量
- onLayout中,重置params.w/h为布局文件中编写的值
可以看到,有了RelativeLayout、FrameLayout的扩展,竟然没有LinearLayout几个意思。好在,我们的核心代码都由PercentLayoutHelper封装了,自己扩展下LinearLayout也不复杂。
三、实现PercentLinearlayout
可能有人会说,有了weight呀,但是weight能做到宽、高同时百分比赋值嘛?
好了,代码很简单,如下:
(一)PercentLinearLayout
package com.juliengenoud.percentsamples;

import android.content.Context;
import android.content.res.TypedArray;
import android.support.percent.PercentLayoutHelper;
import android.util.AttributeSet;
import android.view.ViewGroup;
import android.widget.LinearLayout;

/**
 * Created by zhy on 15/6/30.
 */
public class PercentLinearLayout extends LinearLayout
{

    private PercentLayoutHelper mPercentLayoutHelper;

    public PercentLinearLayout(Context context, AttributeSet attrs)
    {
        super(context, attrs);

        mPercentLayoutHelper = new PercentLayoutHelper(this);
    }


    @Override
    protected void onMeasure(int widthMeasureSpec, int heightMeasureSpec)
    {
        mPercentLayoutHelper.adjustChildren(widthMeasureSpec, heightMeasureSpec);
        super.onMeasure(widthMeasureSpec, heightMeasureSpec);
        if (mPercentLayoutHelper.handleMeasuredStateTooSmall())
        {
            super.onMeasure(widthMeasureSpec, heightMeasureSpec);
        }
    }

    @Override
    protected void onLayout(boolean changed, int l, int t, int r, int b)
    {
        super.onLayout(changed, l, t, r, b);
        mPercentLayoutHelper.restoreOriginalParams();
    }

    @Override
    public LayoutParams generateLayoutParams(AttributeSet attrs)
    {
        return new LayoutParams(getContext(), attrs);
    }


    public static class LayoutParams extends LinearLayout.LayoutParams
            implements PercentLayoutHelper.PercentLayoutParams
    {
        private PercentLayoutHelper.PercentLayoutInfo mPercentLayoutInfo;

        public LayoutParams(Context c, AttributeSet attrs)
        {
            super(c, attrs);
            mPercentLayoutInfo = PercentLayoutHelper.getPercentLayoutInfo(c, attrs);
        }

        @Override
        public PercentLayoutHelper.PercentLayoutInfo getPercentLayoutInfo()
        {
            return mPercentLayoutInfo;
        }

        @Override
        protected void setBaseAttributes(TypedArray a, int widthAttr, int heightAttr)
        {
            PercentLayoutHelper.fetchWidthAndHeight(this, a, widthAttr, heightAttr);
        }

        public LayoutParams(int width, int height) {
            super(width, height);
        }


        public LayoutParams(ViewGroup.LayoutParams source) {
            super(source);
        }

        public LayoutParams(MarginLayoutParams source) {
            super(source);
        }

    }

}
- 1
- 2
- 3
- 4
- 5
- 6
- 7
- 8
- 9
- 10
- 11
- 12
- 13
- 14
- 15
- 16
- 17
- 18
- 19
- 20
- 21
- 22
- 23
- 24
- 25
- 26
- 27
- 28
- 29
- 30
- 31
- 32
- 33
- 34
- 35
- 36
- 37
- 38
- 39
- 40
- 41
- 42
- 43
- 44
- 45
- 46
- 47
- 48
- 49
- 50
- 51
- 52
- 53
- 54
- 55
- 56
- 57
- 58
- 59
- 60
- 61
- 62
- 63
- 64
- 65
- 66
- 67
- 68
- 69
- 70
- 71
- 72
- 73
- 74
- 75
- 76
- 77
- 78
- 79
- 80
- 81
- 82
- 83
- 84
- 85
- 86
- 87
- 88
- 89
- 90
- 91
如果你详细看了上面的源码分析,这个代码是不是没撒解释的了~
(二)测试布局
<?xml version="1.0" encoding="utf-8"?>


<com.juliengenoud.percentsamples.PercentLinearLayout
    xmlns:android="http://schemas.android.com/apk/res/android"
    xmlns:app="http://schemas.android.com/apk/res-auto"
    android:layout_width="match_parent"
    android:layout_height="match_parent"
    android:orientation="vertical">

    <TextView
        android:layout_width="0dp"
        android:layout_height="0dp"
        android:background="#ff44aacc"
        android:text="width:60%,height:5%"
        android:textColor="#ffffff"
        app:layout_heightPercent="5%"
        app:layout_marginBottomPercent="5%"
        app:layout_widthPercent="60%"/>

    <TextView
        android:layout_width="0dp"
        android:layout_height="0dp"
        android:background="#ff4400cc"
        android:gravity="center"
        android:textColor="#ffffff"
        android:text="width:70%,height:10%"
        app:layout_heightPercent="10%"
        app:layout_marginBottomPercent="5%"
        app:layout_widthPercent="70%"/>
    <TextView
        android:layout_width="0dp"
        android:layout_height="0dp"
        android:background="#ff44aacc"
        android:gravity="center"
        android:text="width:80%,height:15%"
        android:textColor="#ffffff"
        app:layout_heightPercent="15%"
        app:layout_marginBottomPercent="5%"
        app:layout_widthPercent="80%"/>
    <TextView
        android:layout_width="0dp"
        android:layout_height="0dp"
        android:background="#ff4400cc"
        android:gravity="center"
        android:text="width:90%,height:5%"
        android:textColor="#ffffff"
        app:layout_heightPercent="20%"
        app:layout_marginBottomPercent="10%"
        app:layout_widthPercent="90%"/>

    <TextView
        android:layout_width="match_parent"
        android:layout_height="0dp"
        android:background="#ff44aacc"
        android:gravity="center"
        android:text="width:100%,height:25%"
        android:textColor="#ffffff"
        app:layout_heightPercent="25%"
        app:layout_marginBottomPercent="5%"
        />


</com.juliengenoud.percentsamples.PercentLinearLayout>
- 1
- 2
- 3
- 4
- 5
- 6
- 7
- 8
- 9
- 10
- 11
- 12
- 13
- 14
- 15
- 16
- 17
- 18
- 19
- 20
- 21
- 22
- 23
- 24
- 25
- 26
- 27
- 28
- 29
- 30
- 31
- 32
- 33
- 34
- 35
- 36
- 37
- 38
- 39
- 40
- 41
- 42
- 43
- 44
- 45
- 46
- 47
- 48
- 49
- 50
- 51
- 52
- 53
- 54
- 55
- 56
- 57
- 58
- 59
- 60
- 61
- 62
- 63
- 64
- 65
- 66
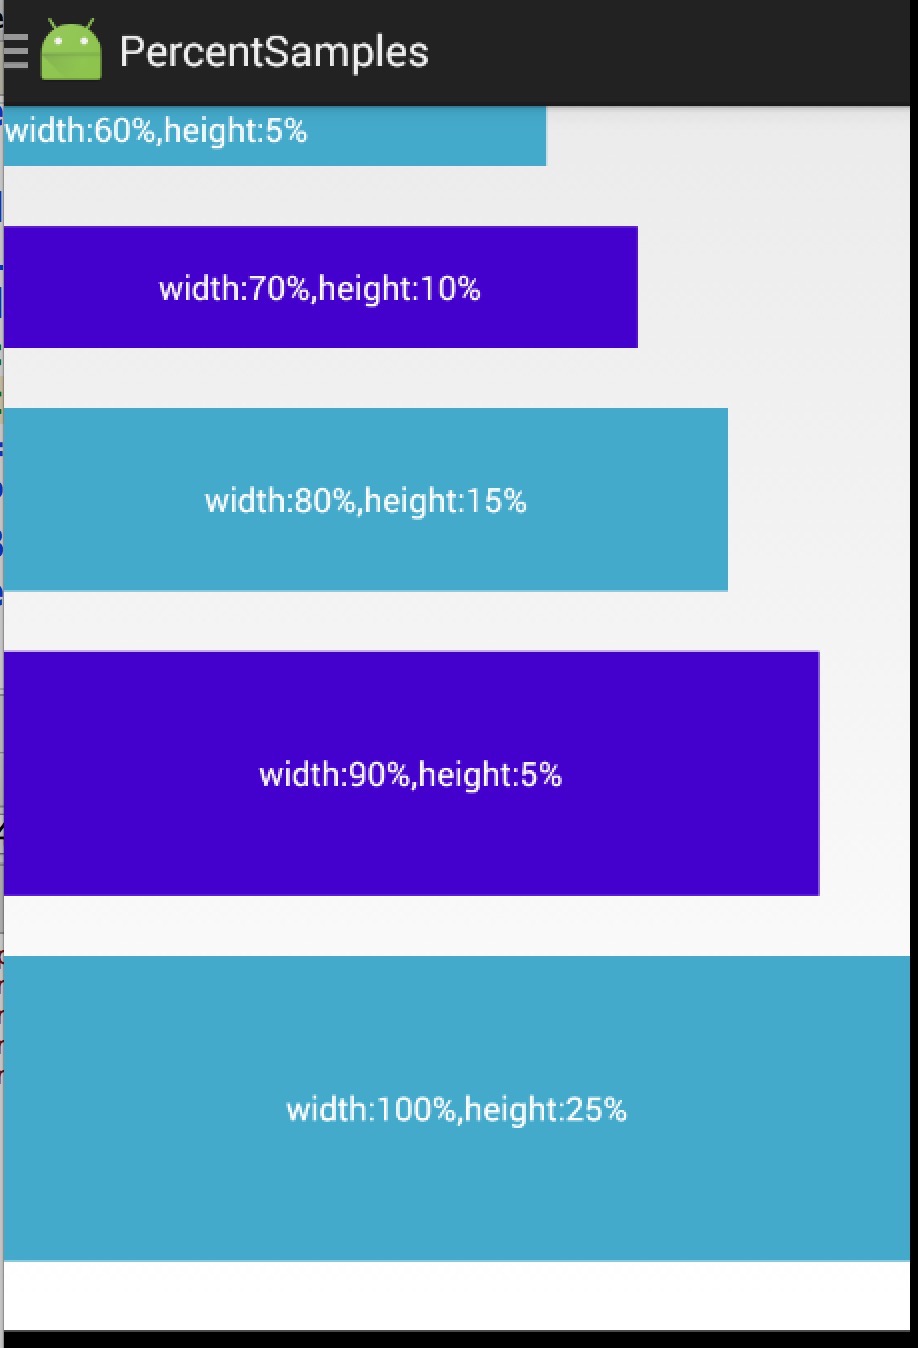
我们纵向排列的几个TextView,分别设置宽/高都为百分比,且之间的间隔为5%p。
(三)效果图

ok,到此,我们使用、源码分析、扩展PercentLinearLayout就结束了。
添加PercentLinearLayout后的地址:点击查看
扩展下载:android-percent-support-extend 包含android studio, eclipse项目,以及上述源码。


 本文介绍了Android的百分比布局库PercentSupportLib的使用,包括PercentFrameLayout和PercentRelativeLayout的使用,源码分析,以及如何实现PercentLinearLayout。通过这个库,开发者可以更方便地进行屏幕适配,避免了传统布局的一些问题。


 414
414

 被折叠的 条评论
为什么被折叠?


