


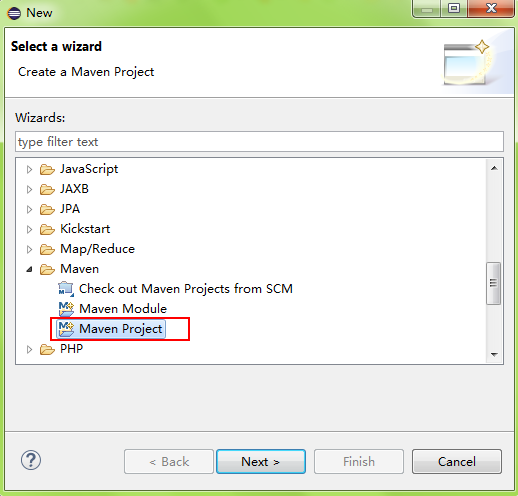
1、新建一个Maven Project
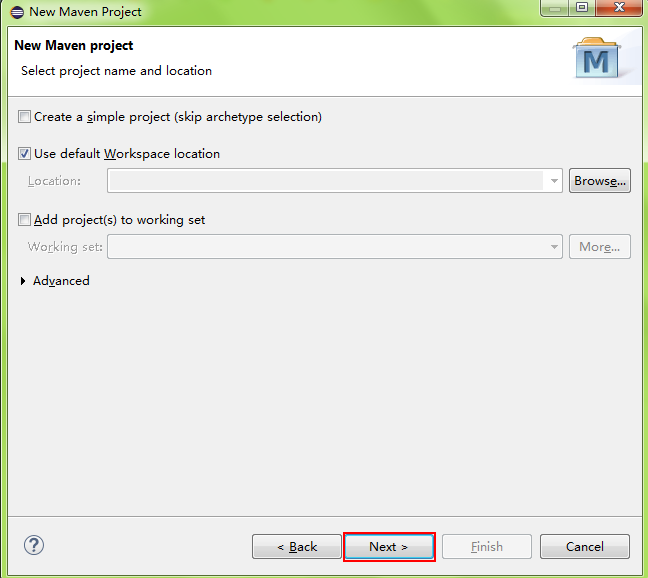
2、选择工作空间
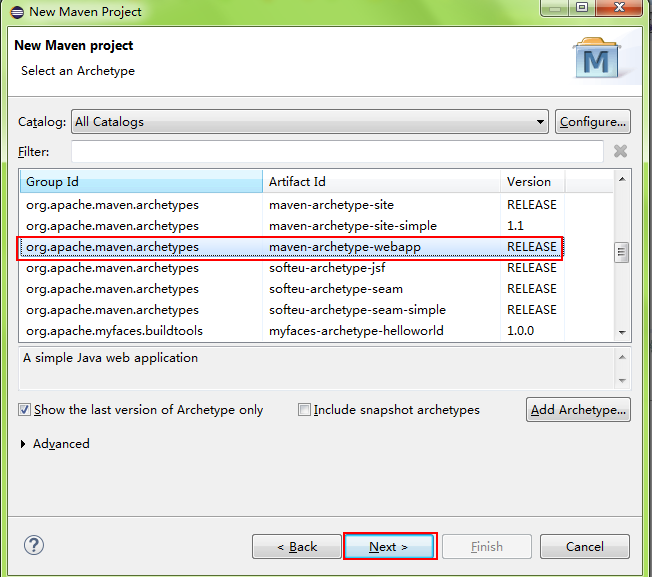
3、搭建Web工程,我们选择maven-archetype-webapp类型
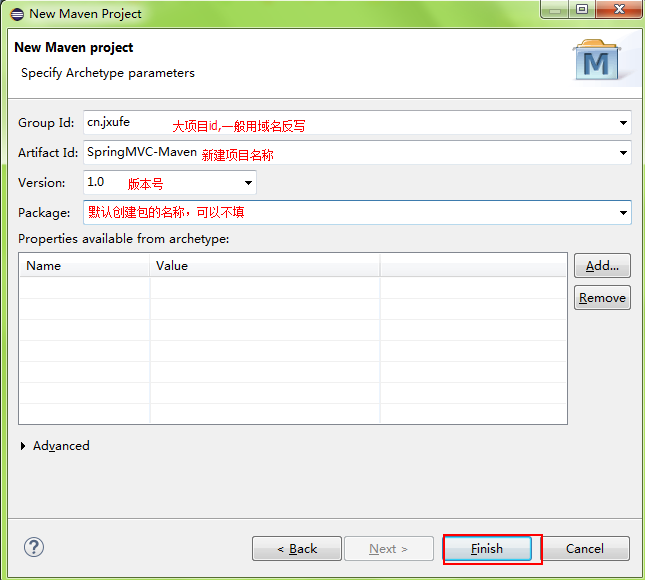
4、填写项目参数,如图
5、以上步骤完成时的工程结构目录

添加source folder

6、 转换成web工程

7、将WebContent下的META-INF移动到webapp目录下,然后删除WebContent

8、修改pom.xml,引入依赖包
<project xmlns="http://maven.apache.org/POM/4.0.0" xmlns:xsi="http://www.w3.org/2001/XMLSchema-instance"
  xsi:schemaLocation="http://maven.apache.org/POM/4.0.0 http://maven.apache.org/maven-v4_0_0.xsd">
  <modelVersion>4.0.0</modelVersion>
  <groupId>com.test.springmvc</groupId>
  <artifactId>SpringMVC</artifactId>
  <packaging>war</packaging>
  <version>0.0.1-SNAPSHOT</version>
  <name>SpringMVC Maven Webapp</name>
  <url>http://maven.apache.org</url>
    <properties>
      <spring.version>4.1.1.RELEASE</spring.version>
  </properties>

  <dependencies>
    <dependency>
      <groupId>junit</groupId>
      <artifactId>junit</artifactId>
      <version>3.8.1</version>
      <scope>test</scope>
    </dependency>

    <dependency>
        <groupId>org.springframework</groupId>
        <artifactId>spring-core</artifactId>
        <version>${spring.version}</version>
    </dependency>
    <dependency>
        <groupId>org.springframework</groupId>
        <artifactId>spring-web</artifactId>
        <version>${spring.version}</version>
    </dependency>
    <dependency>
        <groupId>org.springframework</groupId>
        <artifactId>spring-webmvc</artifactId>
        <version>${spring.version}</version>
    </dependency>

    <dependency>
        <groupId>javax.servlet</groupId>
        <artifactId>javax.servlet-api</artifactId>
        <version>3.1.0</version>
    </dependency>
  </dependencies>

  <build>
        <plugins>
            <plugin>
                <artifactId>maven-compiler-plugin</artifactId>
                <version>2.3.2</version>
                <configuration>
                    <source>1.7</source>
                    <target>1.7</target>
                </configuration>
            </plugin>
            <plugin>
                <artifactId>maven-war-plugin</artifactId>
                <version>2.2</version>
                <configuration>
                    <version>3.0</version>
                    <failOnMissingWebXml>false</failOnMissingWebXml>
                </configuration>
            </plugin>
        </plugins>
        <finalName>${project.artifactId}_${project.version}_${maven.build.timestamp}</finalName>
    </build>
</project>
9、修改web.xml
<?xml version="1.0" encoding="UTF-8"?>
<web-app version="2.5" xmlns="http://java.sun.com/xml/ns/javaee"
    xmlns:xsi="http://www.w3.org/2001/XMLSchema-instance"
    xsi:schemaLocation="http://java.sun.com/xml/ns/javaee
    http://java.sun.com/xml/ns/javaee/web-app_2_5.xsd">

    <!-- 配置web.xml,使其具有springmvc特性,主要配置两处,一个是ContextLoaderListener,一个是DispatcherServlet -->

    <context-param>
        <param-name>contextConfigLocation</param-name>
        <param-value>classpath*:applicationContext.xml</param-value>
    </context-param>
    <!-- 配置ContextLoaderListener表示,该工程要以spring的方式启动。启动时会默认在/WEB-INF目录下查找applicationContext.xml
作为spring容器的配置文件,该文件里可以初始化一些bean -->
    <listener>
        <listener-class>org.springframework.web.context.ContextLoaderListener</listener-class>
    </listener>

    <!-- spring mvc 配置 -->
    <!-- 配置DispatcherServlet表示,该工程将采用springmvc的方式。启动时也会默认在/WEB-INF目录下查找XXX-servlet.xml作为配置文件,
        XXX就是DispatcherServlet的名字,该文件中将配置两项重要的mvc特性:HandlerMapping,负责为DispatcherServlet这个前端控制器的请求查找Controller;
        ViewResolver,负责为DispatcherServlet查找ModelAndView的视图解析器。
        此处使用指定的配置文件spring-mvc.xml -->
    <servlet>
        <servlet-name>springmvc</servlet-name>
        <servlet-class>org.springframework.web.servlet.DispatcherServlet</servlet-class>
        <init-param>
            <param-name>contextConfigLocation</param-name>
            <!--<param-value>/WEB-INF/classes/spring-mvc-servlet.xml</param-value>-->
            <param-value>classpath*:spring-mvc.xml</param-value>
        </init-param>
        <load-on-startup>1</load-on-startup>
    </servlet>
    <servlet-mapping>
        <servlet-name>springmvc</servlet-name>
        <url-pattern>/</url-pattern>
    </servlet-mapping>


    <!-- 字符集过滤器 -->
    <filter>
        <filter-name>encodingFilter</filter-name>
        <filter-class>org.springframework.web.filter.CharacterEncodingFilter</filter-class>
        <init-param>
            <param-name>encoding</param-name>
            <param-value>UTF-8</param-value>
        </init-param>
    </filter>
    <filter-mapping>
        <filter-name>encodingFilter</filter-name>
        <url-pattern>/*</url-pattern>
    </filter-mapping>


    <welcome-file-list>
        <welcome-file>index.jsp</welcome-file>
    </welcome-file-list>
</web-app>
10、新建applicationContext.xml和spring-mvc.xml
applicationContext.xml:
<?xml version="1.0" encoding="UTF-8" ?>
<beans xmlns="http://www.springframework.org/schema/beans" xmlns:xsi="http://www.w3.org/2001/XMLSchema-instance"
	xmlns:context="http://www.springframework.org/schema/context" xmlns:jdbc="http://www.springframework.org/schema/jdbc"
	xmlns:jee="http://www.springframework.org/schema/jee" xmlns:tx="http://www.springframework.org/schema/tx"
    xmlns:util="http://www.springframework.org/schema/util" xmlns:task="http://www.springframework.org/schema/task" xsi:schemaLocation="
		http://www.springframework.org/schema/beans http://www.springframework.org/schema/beans/spring-beans-4.0.xsd
		http://www.springframework.org/schema/context http://www.springframework.org/schema/context/spring-context-4.0.xsd
		http://www.springframework.org/schema/jdbc http://www.springframework.org/schema/jdbc/spring-jdbc-4.0.xsd
		http://www.springframework.org/schema/jee http://www.springframework.org/schema/jee/spring-jee-4.0.xsd
		http://www.springframework.org/schema/tx http://www.springframework.org/schema/tx/spring-tx-4.0.xsd
		http://www.springframework.org/schema/util http://www.springframework.org/schema/util/spring-util-4.0.xsd
		http://www.springframework.org/schema/task http://www.springframework.org/schema/task/spring-task-4.0.xsd"
	default-lazy-init="true">

    <!-- bean definitions here -->
    <context:component-scan base-package="com.test" />

    <!-- 此行语句使得resource autowired 等四个注解可以使用 -->
    <context:annotation-config />


</beans>
spring-mvc.xml:
<?xml version="1.0" encoding="UTF-8" ?>
<beans xmlns="http://www.springframework.org/schema/beans"
	xmlns:xsi="http://www.w3.org/2001/XMLSchema-instance"
	xmlns:p="http://www.springframework.org/schema/p"
	xmlns:context="http://www.springframework.org/schema/context"
	xmlns:mvc="http://www.springframework.org/schema/mvc"
	xsi:schemaLocation="http://www.springframework.org/schema/beans    http://www.springframework.org/schema/beans/spring-beans-4.0.xsd
	http://www.springframework.org/schema/context    http://www.springframework.org/schema/context/spring-context-4.0.xsd
	http://www.springframework.org/schema/mvc http://www.springframework.org/schema/mvc/spring-mvc-4.0.xsd"
	default-lazy-init="true">

    <!-- 默认的注解映射的支持 -->
    <mvc:annotation-driven />

    <!-- 使用Annotation自动注册Bean,只扫描@Controller -->
    <context:component-scan base-package="com.test.controller">
    	<context:include-filter type="annotation" expression="org.springframework.stereotype.Controller"/>
	</context:component-scan>

     <!-- 定义视图文件解析 -->
    <bean
        class="org.springframework.web.servlet.view.InternalResourceViewResolver">
        <property name="prefix" value="/WEB-INF/view/" />
        <property name="suffix" value=".jsp" />
    </bean>


</beans>
框架搭建结束
验证:
创建HelloController.java:
package com.test.controller;

import org.springframework.beans.factory.annotation.Autowired;
import org.springframework.stereotype.Controller;
import org.springframework.web.bind.annotation.RequestMapping;

import com.test.service.HelloService;

@Controller
@RequestMapping(value="/")
public class HelloController {

	@Autowired
	private HelloService helloService;

	@RequestMapping(value="hello")
	public String hello() {
		System.out.println("contorller say hello");
		helloService.hello();
		return "hello";
	}
}
创建HelloService.java:
package com.test.service;

import org.springframework.stereotype.Service;

@Service
public class HelloService {

	public void hello() {
		System.out.println("service say hello");
	}
}
新建hello.jsp
<%@ page language="java" contentType="text/html; charset=ISO-8859-1"
    pageEncoding="ISO-8859-1"%>
<!DOCTYPE html PUBLIC "-//W3C//DTD HTML 4.01 Transitional//EN" "http://www.w3.org/TR/html4/loose.dtd">
<html>
<head>
<meta http-equiv="Content-Type" content="text/html; charset=ISO-8859-1">
<title>Insert title here</title>
</head>
<body>
<h1>hello</h1>
</body>
</html>
发布到tomcat启动,然后访问链接 http://localhost:9091/SpringMVC/hello
浏览器显示hello,后台输出:


 1350
1350


 被折叠的 条评论
为什么被折叠?
被折叠的 条评论
为什么被折叠?
 到【灌水乐园】发言


