


在学习本文前,你需要一点点的VBS基础,WMI了解常识,COM接口皮毛就行。
今天的问题是,如何获得系统中安装的杀毒软件?有人会说遍历注册表之类的。其实用不着这么麻烦。每个正式的AV(Anti-Virus)软件,都要向系统注册自己。通过查看WMI中的/root/SecurityCenter这个名称空间,我们就能知道其中装了那些反病毒产品。
我们来看一段Vbs代码:
如果以上代码你觉得很难懂的话,那么不推荐你继续看下去,请稍微补习下Vbs和Wmi相关的知识。
Select * from AntiVirusProduct是一条WQL语句,用来查询所有的反病毒软件,并返回一个集合。我们用WMITools里面的WMI CIM Studio进行查看下/root/SecurityCenter这个名称空间里面有哪些Win32 Class
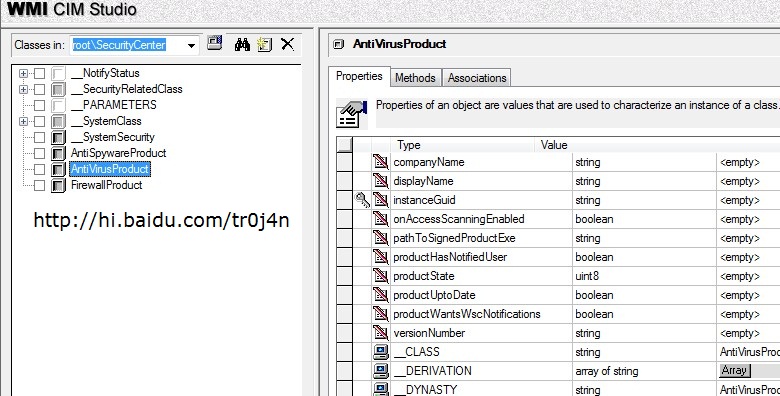
在左边,看到了么,AntiVirusProduct。还有FireWallProduct,防火墙产品,本机没有防火墙,就用查看反病毒软件来做说明吧。
右边的呢,都是AntiVirusProduct这个类的属性(Properties)。里面有产品名,产品公司名,版本号等等。那么我现在需要的,就是通过C++获取到和Vbs一样的信息。上面的Vbs脚本不知道你执行过了么?
我们接下来看C++代码
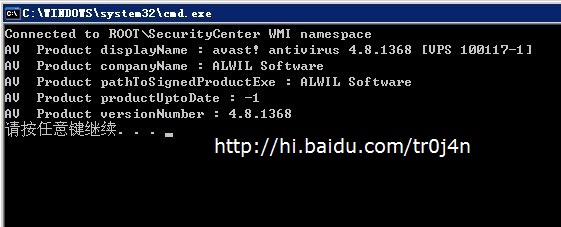
运行效果:
注释大部分都是微软加的,所以非常详细。它本来是用来查询ROOT//CIMV2这个名称空间中的Win32_OperatingSystem类,然后获得操作系统的名称。说实话,用C++调用WMI就为了得到操作系统名称,这简直是一种浪费,简单的Win32 API调用就能实现了。所以我把它改成了查看本机的反病毒产品的代码。
C++操作WMI执行WQL返回,其实就是一个模板,所以我认为大家有掌握的必要。而且可以举一反三。
Step1:Initialize COM parameters with a call to CoInitializeEx.
For more information, see Initializing COM for a WMI Application.
Step2:Initialize COM process security by calling CoInitializeSecurity.
Windows 2000: Specify the default authentication credentials for a user by using a SOLE_AUTHENTICATION_LIST structure in the pAuthList parameter of CoInitializeSecurity.
For more information, see Setting the Default Process Security Level Using C++.
Step3:Obtain the initial locator to WMI by calling CoCreateInstance.
For more information, see Creating a Connection to a WMI Namespace.
Step4:Obtain a pointer to IWbemServices for the root/cimv2 namespace on the local computer by calling IWbemLocator::ConnectServer. To connect to a remote computer, see Example: Getting WMI Data from a Remote Computer.
For more information, see Creating a Connection to a WMI Namespace.
Step5:Set IWbemServices proxy security so the WMI service can impersonate the client by calling CoSetProxyBlanket.
For more information, see Setting the Security Levels on a WMI Connection.
Step6:Use the IWbemServices pointer to make requests of WMI. This example executes a query for the name of the operating system by calling IWbemServices::ExecQuery.
The following WQL query is one of the method arguments.
SELECT * FROM Win32_OperatingSystem 这就是WQL语句
The result of this query is stored in an IEnumWbemClassObject pointer. This allows the data objects from the query to be retrieved semisynchronously with the IEnumWbemClassObject interface. For more information, see Enumerating WMI. For getting the data asynchronously, see Example: Getting WMI Data from the Local Computer Asynchronously.
For more information about making requests to WMI, see Manipulating Class and Instance Information, Querying WMI, and Calling a Method.
Step7:Get and display the data from the WQL query. The IEnumWbemClassObject pointer is linked to the data objects that the query returned, and the data objects can be retrieved with the IEnumWbemClassObject::Next method. This method links the data objects to an IWbemClassObject pointer that is passed into the method. Use the IWbemClassObject::Get method to get the desired information from the data objects.
以上解释出自MSDN。MSDN用得好,对编程能力是一个很大的帮助。如果觉得英语不行,只能去恶补咯。
其实,关键在4,6,7步。第四步弄的是名称空间,第六步写的是WQL语句,第七步获得返回值。至于第七步。你对比那个While循环中的C++语句,和文章开头的Vbs语句中的For each对比,你看出了什么名堂了吗?
Vbs通过For each枚举类实例,而C++中通过IEnumWbemClassObject接口指针。
如何获得IEnumWbemClassObject接口指针呢?微软告诉我们有4种方法。我用的是第一种,执行一个WQL语句,获得一个AntiVirusProduct类实例的枚举接口指针。
IWbemServices::ExecQuery
IWbemServices::CreateInstanceEnum
IWbemServices::CreateClassEnum
IWbemServices::ExecNotificationQuery
我是怎么实现变量的呢?我用的是枚举接口指针的Next方法,其实它还有别的方法,比如Skip跳过,NextAsync异步下一个。
今后有什么WMI的代码想在VC中实现,只要按这个模板一套用,属于你自己的C++ WMI代码就出炉的。对C++ WMI编程感兴趣的同学,可以参考 这里
-
顶
- 0
-
踩


 2063
2063

 被折叠的 条评论
为什么被折叠?
被折叠的 条评论
为什么被折叠?
 到【灌水乐园】发言


