


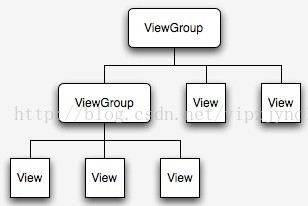
涉及到滑动,就涉及到VIEW,大家都知道,android的UI界面都是由一个一个的View以及View的派生类组成,View作为基类,而常用的布局里面的各种布局就是它派生出来的ViewGroup的子类,ViewGroup作为各个组件的容器搭建了整体的UI。以下是android UI的结构示示意图:
查看源码
    /**

     * Implement this to do your drawing.

     *

     * @param canvas the canvas on which the background will be drawn

     */

    protected void onDraw(Canvas canvas) {

    }
public void addView(View child) {

        addView(child, -1);

}而ViewGroup作为一个组件容器,它可以包含任何组件,可是你必须重写他的onLayout() 方法和 onMeasure()来设置容器布局的位置和绘制它的大小才能正常显示。
首先 ,我们必须明白在Android View视图是没有边界的,Canvas是没有边界的,只不过我们通过绘制特定的View时对 Canvas对象进行了一定的操作,例如 : translate(平移)、clipRect(剪切)等,以便达到我们的对该Canvas对象绘制的要求 ,我们可以将这种无边界的视图称为“视图坐标”—–它不受物理屏幕限制。通常我们所理解的一个Layout布局文件只是该视图的显示区域,超过了这个显示区域将不能显示到父视图的区域中 ,对应的,我们可以将这种有边界的视图称为“布局坐标”—— 父视图给子视图分配的布局(layout)大小。而且, 一个视图的在屏幕的起始坐标位于视图坐标起始处,如下图所示。
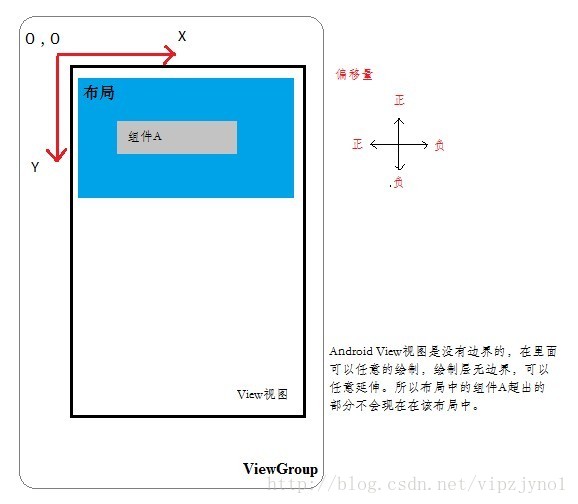
其实是相对于父类视图的左上角坐标为原点(0,0),而不是整体ViewGroup的左上角为原点。
由于布局坐标只能显示特定的一块内容,所以我们只有移动布局坐标的坐标原点就可以将视图坐标的任何位置显示出来。
(注:例如cocos2D的布局就和android的布局坐标原点坐标不一样,是左下角会原点,所以会有所差异。)
这里就大致提下View和ViewGroup,(网上很多大神都对这块进行了分析,这里只是做了少量摘抄记录)目的是为了引出今天的主角scrollTo 和 scrollBy。
/**
* The offset, in pixels, by which the content of this view is scrolled
* horizontally.
* {@hide}
*/
@ViewDebug.ExportedProperty(category = “scrolling”)
protected int mScrollX;
/**
* The offset, in pixels, by which the content of this view is scrolled
* vertically.
* {@hide}
*/
@ViewDebug.ExportedProperty(category = “scrolling”)
protected int mScrollY;
/**
* Return the scrolled left position of this view. This is the left edge of
* the displayed part of your view. You do not need to draw any pixels
* farther left, since those are outside of the frame of your view on
* screen.
*
* @return The left edge of the displayed part of your view, in pixels.
*/
public final int getScrollX() {
return mScrollX;
}/** * Return the scrolled top position of this view. This is the top edge of * the displayed part of your view. You do not need to draw any pixels above * it, since those are outside of the frame of your view on screen. * * @return The top edge of the displayed part of your view, in pixels. */ public final int getScrollY() { return mScrollY; }</SPAN></PRE><BR><SPAN style="FONT-SIZE: 14px; FONT-FAMILY: FangSong_GB2312"><STRONG>mScrollX:表示离视图起始位置的x水平方向的偏移量</STRONG></SPAN>
mScrollY:表示离视图起始位置的y垂直方向的偏移量
分别通过getScrollX() 和getScrollY()方法获得。
注意:mScrollX和mScrollY指的并不是坐标,而是偏移量。
/**
* Set the scrolled position of your view. This will cause a call to
* {@link #onScrollChanged(int, int, int, int)} and the view will be
* invalidated.
* @param x the x position to scroll to
* @param y the y position to scroll to
*/
public void scrollTo(int x, int y) {
if (mScrollX != x || mScrollY != y) {
int oldX = mScrollX;
int oldY = mScrollY;
mScrollX = x;
mScrollY = y;
invalidateParentCaches();
onScrollChanged(mScrollX, mScrollY, oldX, oldY);
if (!awakenScrollBars()) {
postInvalidateOnAnimation();
}
}
}/** * Move the scrolled position of your view. This will cause a call to * {@link #onScrollChanged(int, int, int, int)} and the view will be * invalidated. * @param x the amount of pixels to scroll by horizontally * @param y the amount of pixels to scroll by vertically */ public void scrollBy(int x, int y) { scrollTo(mScrollX + x, mScrollY + y); }</SPAN></PRE><BR>从以上的代码可以看出,<SPAN style="FONT-SIZE: 14px; FONT-FAMILY: FangSong_GB2312; COLOR: rgb(51,51,51); LINE-HEIGHT: 26px"><STRONG>scrollTo 和 scrollBy区别,其实2者的效果是一样的。</STRONG></SPAN>
scrollTo(int x,int y):
如果偏移位置发生了改变,就会给mScrollX和mScrollY赋新值,改变当前位置。
注意:x,y代表的不是坐标点,而是偏移量。
例如:
我要移动view到坐标点(100,100),那么我的偏移量就是(0,,0) - (100,100) = (-100 ,-100) ,我就要执行view.scrollTo(-100,-100),达到这个效果。
scrollBy(int x,int y):
从源码中看出,它实际上是调用了scrollTo(mScrollX + x, mScrollY + y);
mScrollX + x和mScrollY + y,即表示在原先偏移的基础上在发生偏移,通俗的说就是相对我们当前位置偏移。
根据父类VIEW里面移动,如果移动到了超出的地方,就不会显示。
查看上文中的示意图你就会知道大概。
下面通过一个小例子了解下这2个方法之间的的使用,
效果图如下:
核心代码就是本文讲的2个方法,这里就列出代码了。
提供一个简单的DEMO:下载地址
这里大致搞清楚了这2个方法后,对后面的Scroller拖动类以及实现几个拖动效果就更加有帮助了。


 978
978

 被折叠的 条评论
为什么被折叠?
被折叠的 条评论
为什么被折叠?
 到【灌水乐园】发言


